

Isn’t it amazing that you can take just flour and water and turn it into living, active yeast? That’s the real magic of baking, and trust me, it’s way easier than it looks! I know looking at a jar that just sits there for days can make you nervous. That’s why I applied my usual project management thinking here: we’re breaking this down into a simple, guaranteed, day-by-day process so you can create your first perfect sourdough starter for beginners without any stress. We strip away all the intimidating hype. If you follow these seven simple steps, you will have a thriving culture ready for your first loaf. No guesswork needed! If you want a head start on using that natural yeast later, check out some tips for easy yeast bread baking, but first, let’s nail this culture creation—we even looked at what other folks are doing to keep things simple, like checking out guides similar to this one.
- Why This Day-by-Day Guide to Your Sourdough Starter Works for Beginners
- Creating Your Sourdough Starter From Scratch: The 7-Day Process
- Essential Sourdough Starter Maintenance and Care
- Troubleshooting Common Sourdough Starter Issues
- What to Do With Sourdough Discard Recipes
- Tips for Success When Making Your Sourdough Starter
- Frequently Asked Questions About Your New Sourdough Starter
- Estimating the Nutritional Value of Your Sourdough Starter
- Begin Your Sourdough Bread Journey Today
Why This Day-by-Day Guide to Your Sourdough Starter Works for Beginners
I get it—the internet is full of complex advice when you’re looking for a sourdough starter for beginners. But honestly, Leo’s method simplifies this whole natural yeast creation process beautifully. We focus only on what works efficiently, which is why this is the best easy sourdough recipe start you’ll find. Trust me, we’ve optimized the guesswork out of it!
- We stick to simple, accessible ingredients—no fancy extras needed yet.
- A strict day-by-day schedule ensures you know exactly when to feed and when to wait.
- Clear visual cues tell you when your starter is active and ready for baking.
For the first few days, we use whole grain flour because those wild yeasts love the extra nutrients! You can check out a great whole wheat bread recipe for later, but for now, let’s keep our supplies minimal. If you want another strong guide, this one is excellent too: Little Walnut Cottage’s tutorial.
What You Need for Your Flour and Water Starter
Keep it basic! That’s the goal here. We aren’t bringing out the scales and timers for ten different types of flour. For the initial phase, you just need to gather three things. We start heavy on the whole grain because it wakes up those microbes fast.
You’ll need:
- About 100 grams of Whole Wheat or Rye Flour initially (this is the nutrient boost).
- Unbleached All-Purpose Flour for later feedings.
- Unchlorinated Water at room temperature. This is important! Chlorine can mess with the natural yeast development, so if your tap water is heavily treated, just let it sit out overnight first or use filtered water.
Creating Your Sourdough Starter From Scratch: The 7-Day Process
Alright, Deep Breath! This is where the magic happens. Making your sourdough starter from scratch is less about complicated chemistry and more about being consistent for one full week. Think of it as nurturing a tiny pet. The most crucial thing you need to control is the temperature. We want things warm but not hot—aim for a steady 68 to 75 degrees Fahrenheit. A spot on the counter in a warm kitchen is usually perfect, but if your house is chilly, tuck the jar inside your oven with *only* the light on (never turn the oven on!).
We use those initial nutrient-dense whole grains to kickstart the natural yeast creation, and then we settle into a steady feeding rhythm. Don’t sweat it if Days 2 and 3 look weird—that’s normal! Just stick to the schedule. Remember, every time you feed, you have to discard half first. It feels wasteful, but it keeps the environment healthy for the good bacteria we’re trying to grow. We’ve got a great guide on easy fluffy rice if you need a non-baking project nearby for an evening, but for now, focus right here. You can see great pictures of what to expect by checking out this starter tutorial.
Days 1 to 3: Initial Mixing and First Signs of Life in Your Sourdough Starter
Okay, Day 1 is mixing time. Grab your clean jar! Mix 50 grams of that whole wheat or rye flour with 50 grams of room-temperature water. Stir it until it looks like thick pancake batter—no dry bits hiding at the bottom! Cover it loosely—you need airflow, so a paper towel secured with a rubber band or just resting the lid on top works wonders. Let it sit for a full 24 hours.
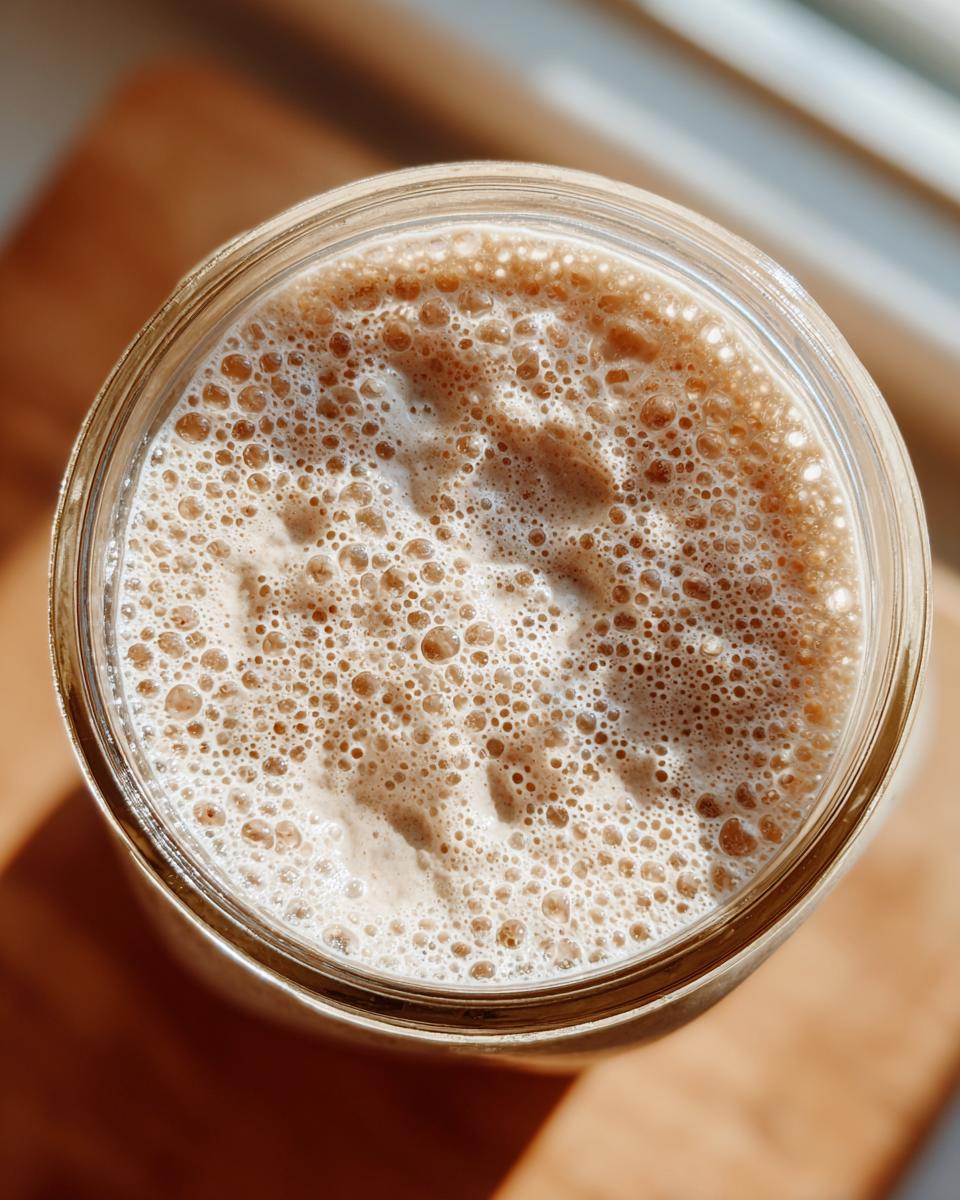
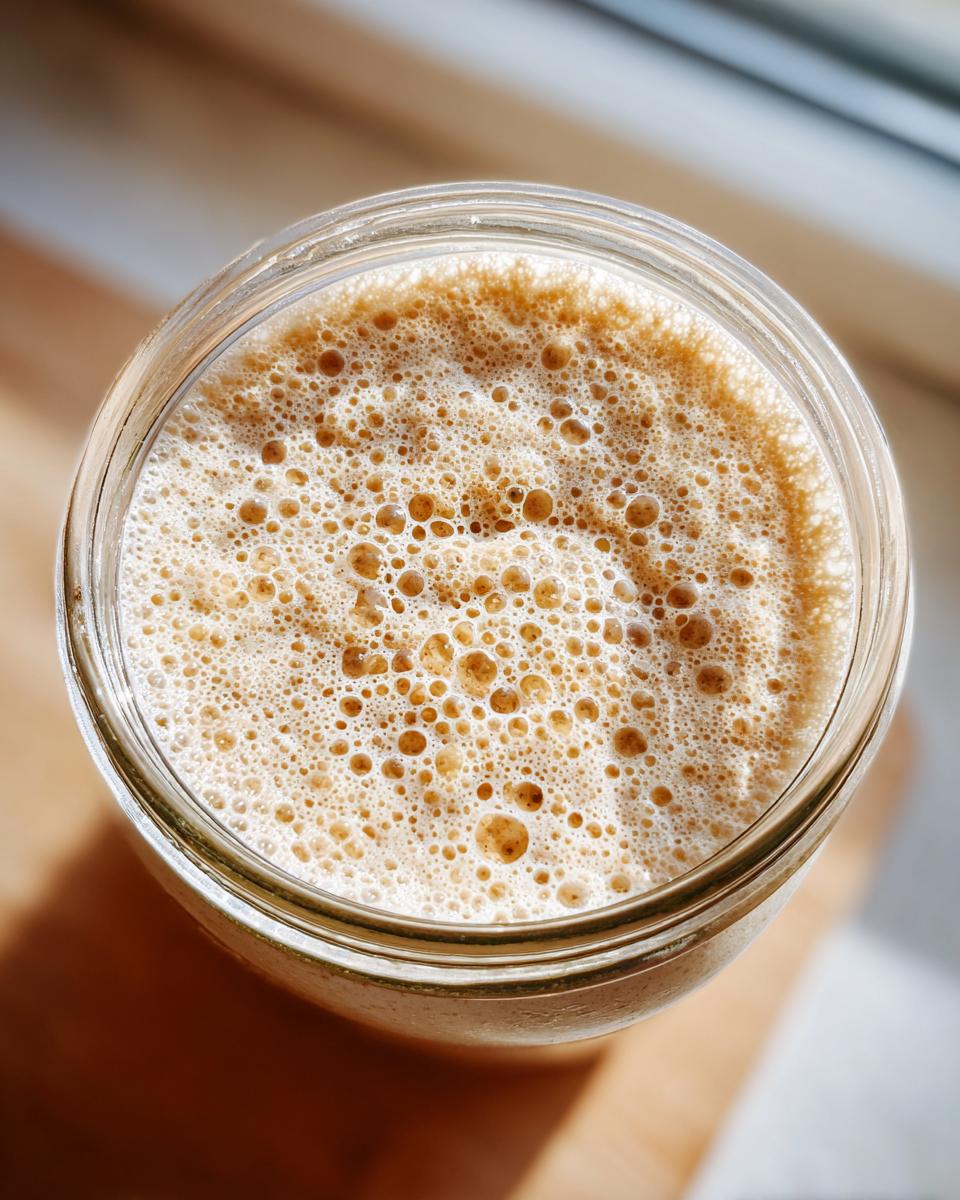
Day 2: You might see tiny bubbles, or you might see absolutely nothing. Don’t panic! That’s totally common. Toss half of it out (yes, really!), and then feed the rest with 50g flour and 50g water. Do the same thing on Day 3. By Day 3, you should start noticing a faint, almost vinegary or slightly sour smell. That’s a good sign that the bacteria are getting established. Keep discarding half before every feeding!
Days 4 to 7: Transitioning and Achieving an Active Bubbly Starter
This is the big switch! Starting on Day 4, we are ditching the whole grain flour and switching everything over to unbleached all-purpose flour. Discard half, then feed it with 50g of your AP flour and 50g of water. You should start seeing more energy now.
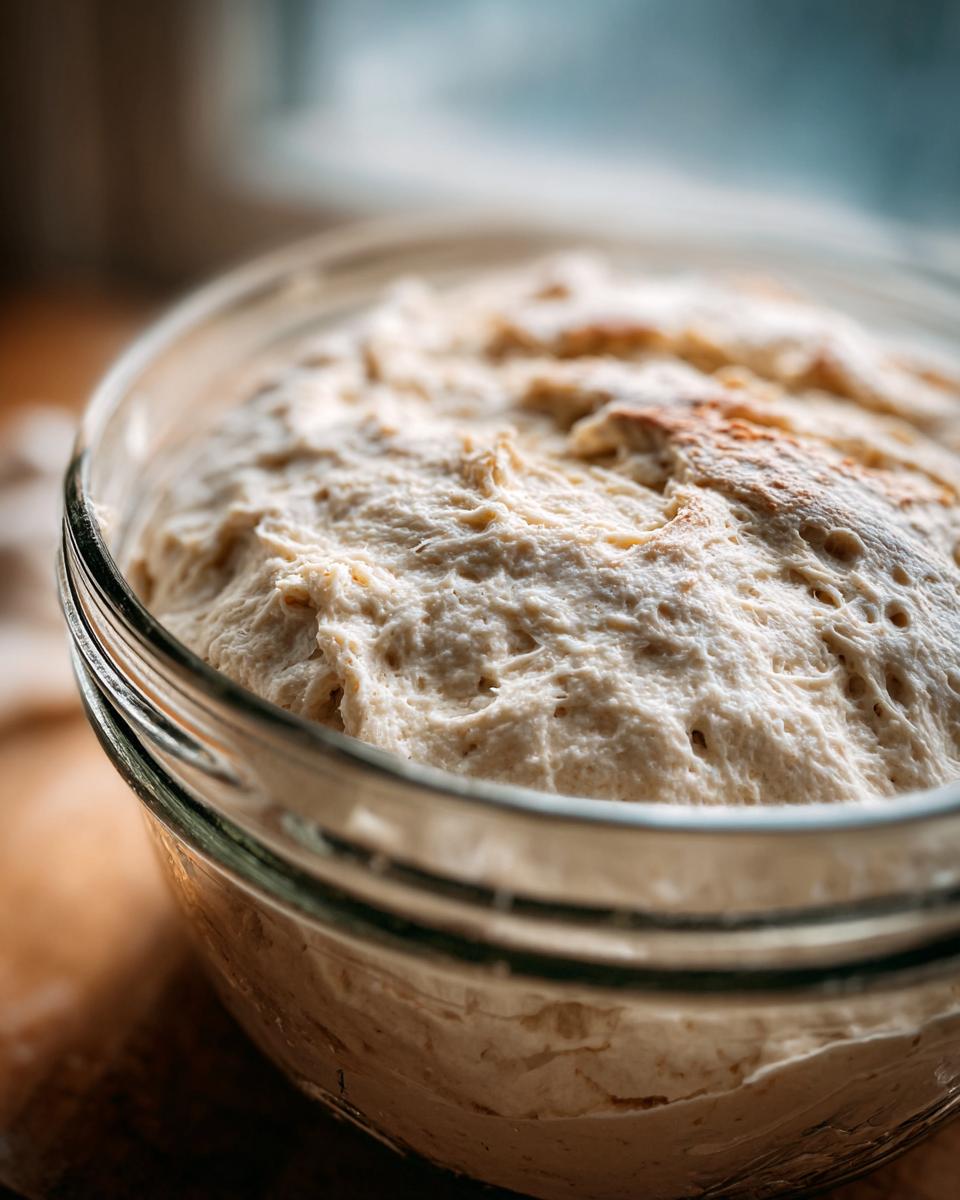
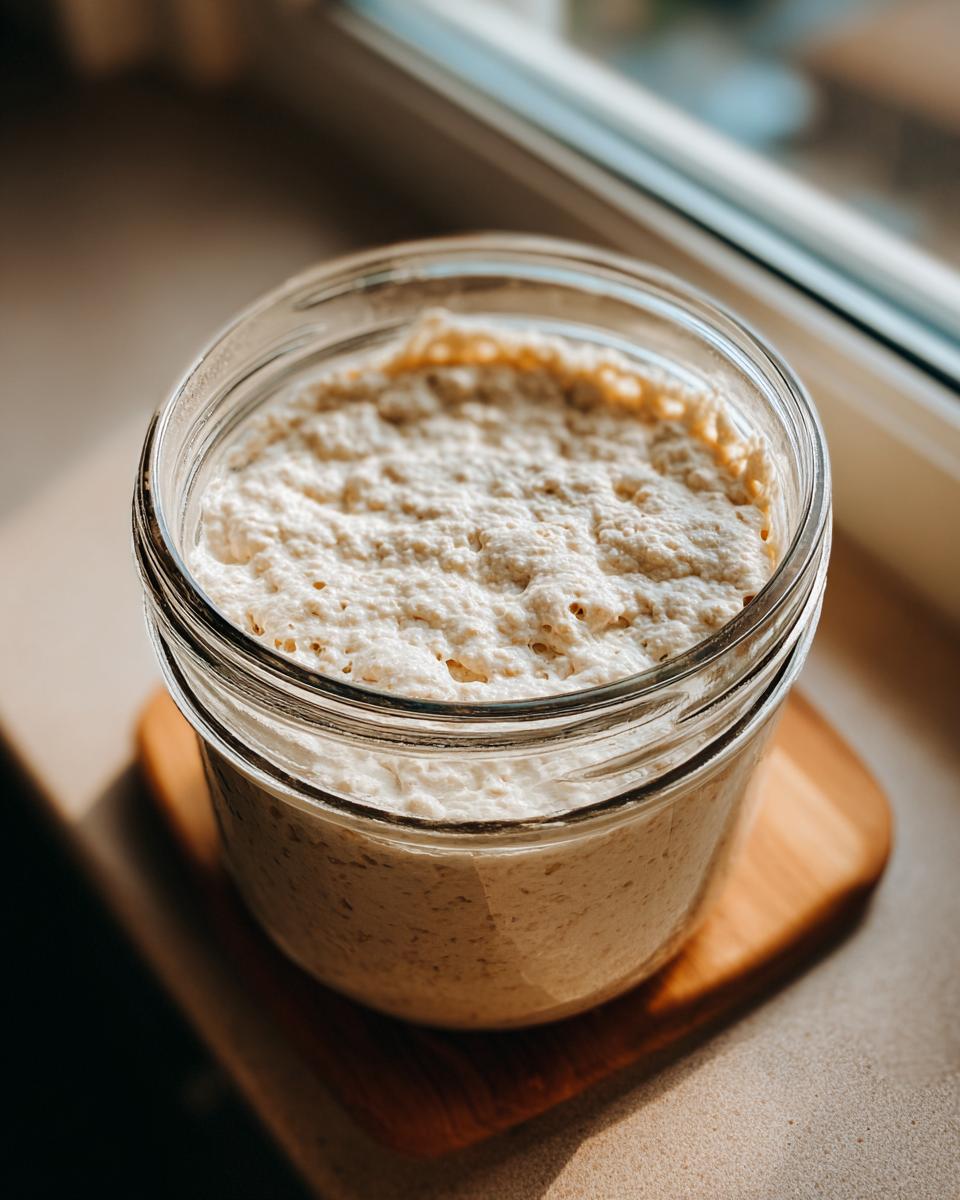
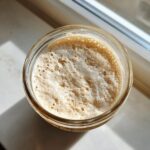
For Days 5 through 7, you keep repeating that discard-and-feed cycle daily. By Day 7, we are looking for the ultimate goal: an active bubbly starter that reliably doubles in size within 6 to 8 hours after you feed it. When it doubles, it will look almost like a fluffy cloud or whipped meringue on top! If it’s doubling consistently, guess what? You’ve successfully figured out how to make sourdough starter!
Essential Sourdough Starter Maintenance and Care
Wow, success! You’ve got a thriving culture now. But just like any great project, you need a maintenance plan for your sourdough starter so you don’t have to start over next week! Luckily, sourdough starter maintenance is super easy once your starter passes that Day 7 test. The key is deciding how often you plan to bake.
If you bake every day or every other day, you’ll want to keep it right on the counter and feed it daily. But if you’re like me and only bake on weekends, the fridge is your best friend. Putting it to sleep saves a ton of flour and time!
When you put it in the fridge, you change the feeding instructions slightly so it survives happily in the cold. You can read more about how to keep things going strong over at Blog Dolce Vita, but the core concept is scaling back the food while it rests. We need a smaller amount of food to sustain it since it’s dormant. I also whip up a batch of creamy celery soup when my discard bowl gets too full!
Understanding Sourdough Starter Ratios Explained
When your starter is chilling in the refrigerator, we switch to what bakers call a 1:1:1 ratio. This is where my project manager brain loves the simplicity of weighted measurements! It just means that for every 1 part of starter you keep, you feed it 1 part flour and 1 part water. For example, if you keep 50 grams of your active starter, you then add 50 grams of flour and 50 grams of water before putting it back in the cold environment. Easy, right? It’s efficient because you aren’t overfeeding a dormant culture. When you want to bake again, just pull it out, give it two or three feeds at room temperature, and it will be ready to go again!
Troubleshooting Common Sourdough Starter Issues
Okay, let’s talk about the bumps in the road. Because even when you follow the instructions perfectly, sometimes your brand-new natural yeast starter seems to throw a little temper tantrum. Don’t throw that jar out! Seriously. Most of the time, these issues are just signals that the wild yeast needs a little adjustment, not a total restart. I’ve seen every problem imaginable in my kitchen over the years, and almost always, time and environment are the culprits.
The biggest reason I see beginners get discouraged is temperature. Remember that goal of 68 to 75 degrees? If your kitchen is colder—say, below 65 degrees—things slow down dramatically. You might think your starter is dead, but really, it’s just taking a long nap. If things are cold, try finding a warmer spot, like on top of the fridge or using that oven-light trick we talked about earlier. Give it a few extra days before you worry.
What about that watery layer on top? That’s called ‘hooch,’ and don’t let the fancy name scare you! It’s just alcohol the yeast produces when it’s hungry. It happens when you’ve gone a little too long between feedings. If you see hooch, just pour it off (or stir it in for a tangier flavor!) and give your starter a robust feeding right away. It means your starter is ready for a more frequent feeding schedule or it’s time to move it into the cool safety of the fridge.
Now, the one thing we absolutely cannot mess with is mold. If you see fuzzy, dark spots—black, pink, or green—that means bad bacteria have won the fight. My advice? Toss the entire batch. It’s a bummer, but it’s not worth the risk. Just sanitize your jar really well, and start fresh. You’ve got all the instructions for a successful sourdough starter from scratch right above, so starting over is easy! When you decide to toss the discard, you should totally try making my easy lentil salad so you don’t feel like you wasted anything!
What to Do With Sourdough Discard Recipes
Okay, we’ve talked about making the starter active, but let’s be real—once it’s really roaring, the discard pile gets huge! You aren’t making bread every day, so what do you do with all that leftover culture? You absolutely cannot just throw it away. That’s wasted potential! If you are researching sourdough discard recipes, you’re already thinking like a smart, efficient baker.
My favorite thing to do when I’m not baking loaves is whipping up a quick batch of sourdough discard crackers. They come together fast and are fantastic for snacking alongside cheese, and you can find a super simple method for them if you check out my recipe for sourdough discard pie crust which shares similar base ingredients!
Another absolute win for a morning when you’re busy is making pancakes or waffles. You just mix the discard straight into your usual recipe—think of it as replacing some of the flour and liquid—and it adds this subtle tang that makes them taste gourmet. Nothing goes to waste, and it keeps your starter happy! If you need more inspiration for what to do with that excess, check out what the folks over at Grandma Bites suggest for using up their excess!
Tips for Success When Making Your Sourdough Starter
So, we’ve got the day-by-day schedule locked down, but I want to give you just a few extra nudges—the little details that move you from “maybe active” to “definitely bubbling” every single time. Remember how Leo approaches recipes like a project? Precision around the small stuff really pays off here, even though we are keeping the ingredient list super simple.
My biggest tip, and this is where you gain instant authority in the kitchen? Use a kitchen scale if you can! I know, I know, I just said keep it simple. But weighing your flour and water, even just for these initial feedings, removes all the guesswork on day-to-day variation. A cup of flour can weigh wildly different depending on how you scoop it, which throws off your water ratio. If you feed 50 grams of flour, you MUST feed 50 grams of water. That consistency is what builds a reliably strong sourdough starter culture.
Next up: Jar Cleanliness. Since we are relying on wild yeast creation, we don’t want any soap residue or lingering food particles fighting for dominance in your jar. Wash that glass jar really well with hot, soapy water, and then give it a quick rinse with filtered water. Glass is always better than plastic for this because you can see clearly what’s happening inside, which helps you monitor that rise and fall! If you want some inspiration for feeding your family after this starter is ready, I’ve got a fantastic chicken pot casserole recipe that comes together fast.
Finally, let’s talk about the environment again because it dictates everything. If you are struggling on Day 5 and nothing is happening, put yourself in your starter’s little shoes—is it too cold in here? Remember, those active microorganisms thrive in that sweet spot between 68 and 75 degrees F. If you can’t keep your kitchen warm, those external guides, like the one from Revealed Recipe, often suggest finding a specific warm spot. Think about the top of your refrigerator, near a pilot light, or even just tucked into a microwave unit when it’s off. Temperature control here makes the difference between waiting excitedly and waiting patiently for weeks! Stick to the temperature cues, and your **flour and water starter** will thrive.
Frequently Asked Questions About Your New Sourdough Starter
I know you’re probably staring at that growing sourdough starter culture and have a ton of questions buzzing around. That’s totally fine! When I first started, I wrote down every little thing I wondered about, mostly so I wouldn’t forget to try out my restaurant-style Mexican rice later that week! Here are a few of the most common things folks ask once they get past that initial mixing stage.
How long until my sourdough starter is ready to bake bread?
That’s the million-dollar question! In our 7-day guide, you are aiming for Day 7 to be the finish line. But really, its true readiness test is performance, not the calendar. You’ll know it’s ready when it reliably doubles in volume (looks beautifully puffy!) within 6 to 8 hours after you feed it. If it’s doubling like that, you’ve successfully created your homemade yeast creation and you can officially proceed to your first loaf. If it’s just sluggish, give it a few more days of consistent feeding. For even more depth on timing and feeding, I always recommend checking out the tips at Pantry Mama.
Can I use bread flour instead of all-purpose flour for my sourdough starter?
Oh, absolutely! Bread flour has a higher protein content. If you are past the initial whole grain phase (Days 1-3) and want to get ahead on your sourdough bread journey by building more strength, switching to bread flour is a great upgrade. It just means more food (protein) for those yeasts to munch on. Just keep the water amount the same by weight—consistency is key! Some people even prefer using 50/50 bread flour and AP flour for their maintenance feedings.
What is the ‘hooch’ I see on top of my starter supposed to mean?
Don’t panic if you see that layer of dark, greyish liquid sitting on top—that is called ‘hooch.’ It’s basically the starter telling you, “Hey, I’m hungry!” It means the yeast has eaten all the sugar from the flour you gave it and has started producing alcohol as a byproduct. I usually just stir it in for flavor or pour it off. Either way, you should discard and feed it right away when you see hooch. It’s a sign of a hungry, active natural yeast starter, not a dead one!
Estimating the Nutritional Value of Your Sourdough Starter
Okay, this part is a little weird, honestly. We’re talking about the nutritional content of something that isn’t even baked yet—it’s just flour, water, and wild yeast doing its wild yeast thing! Since we are dealing with a living, unbaked culture, the numbers aren’t super critical, but since I keep everything documented here like a good project manager would, I’ve included the estimated stats for you. Just remember these are just rough estimates for the original culture mix and don’t reflect the final bread.
You won’t be eating this straight from the jar, obviously, but it’s good to know the baseline for that initial flour and water mixture before you start using it in a recipe like my easy baked garlic butter salmon. These figures relate to the culture itself, not the finished bread product, which changes everything once it’s baked!
- Serving Size: Around 0g (Since it’s an unbaked culture foundation)
- Calories: Usually around 0 (because we’re focusing on the culture, not the volume eaten)
- Sugar: 0g
- Sodium: 0mg
- Fat, Protein, and Carb Content: All noted as 0g or 0mg because this is a live, unrefined mixture before the baking process concentrates those elements.
See? Very simple. The real nutrition blast happens when you turn this lively culture into a delicious loaf of bread—that’s when the complex starches break down and you get all those incredible digestive benefits associated with true sourdough!
Begin Your Sourdough Bread Journey Today
You did it! You navigated the seven days, you wrestled with discard, and you nurtured some flour and water until it started bubbling happily. That’s huge! Now that you know exactly **how to make sourdough starter**, it’s time to lean into this new skill. Don’t just bookmark this page and forget about it; save it right now so you can easily reference those day-by-day instructions the next time you want to refresh your culture or start one for a friend!
I truly want to hear about your success! Did you find a great warm spot for your jar? Did you name your starter? Drop a comment below and let me know if you’re planning your first bake or if you just finished up a batch of easy chicken alfredo while you waited for your new yeast to mature. Sharing successes and challenges is how we all get better at this natural baking thing. For even more inspiration on your next steps, or just to see another great starter guide, check out The Fed Up Foodie’s page. Go get baking, you sourdough superstar!
PrintHow to Make an Active Sourdough Starter from Scratch for Beginners (Day 1 to Day 7 Guide)
Follow this simple, day-by-day guide to create your own active, bubbly sourdough starter using only flour and water. This process is straightforward for beginners starting their homemade yeast journey.
- Prep Time: 5 min
- Cook Time: 0 min
- Total Time: 7 days (active creation period)
- Yield: 1 active starter culture 1x
- Category: Baking Foundation
- Method: Natural Fermentation
- Cuisine: American
- Diet: Vegan
Ingredients
- 100g Whole Wheat or Rye Flour (for initial days)
- 100g Unbleached All-Purpose Flour (for later days)
- 100g Unchlorinated Water (room temperature)
Instructions
- Day 1: Mix 50g of whole wheat or rye flour with 50g of room temperature water in a clean glass jar. Stir until no dry flour remains. Cover loosely and leave at room temperature (68-75°F) for 24 hours.
- Day 2: You may see small bubbles or nothing at all. Discard half of the mixture. Add 50g of whole wheat or rye flour and 50g of water to the remaining starter. Mix well, cover loosely, and wait 24 hours.
- Day 3: You should see some activity, perhaps small bubbles or a slight sour smell. Discard half. Feed with 50g of whole wheat or rye flour and 50g of water.
- Day 4: Switch to using unbleached all-purpose flour for feedings. Discard half. Feed with 50g of all-purpose flour and 50g of water. Look for more consistent bubbling.
- Day 5: Discard half. Feed with 50g of all-purpose flour and 50g of water. The starter should show noticeable growth after feeding.
- Day 6: Discard half. Feed with 50g of all-purpose flour and 50g of water. You are aiming for the starter to double in size within 6-8 hours after feeding.
- Day 7: Your sourdough starter should now be reliably active and bubbly. It should consistently double in size after feeding. You can now begin using it for baking or switch to maintenance feeding.
Notes
- Use a clear jar so you can observe the rise and bubble formation easily.
- If your kitchen is cold, find a warmer spot, like inside an oven with just the light on (do not turn the oven on).
- If you see mold, discard the entire batch and start over.
- Once active, you can switch to a 1:1:1 feeding ratio (starter:flour:water) when storing it in the refrigerator.
Nutrition
- Serving Size: 0g (unbaked culture)
- Calories: 0
- Sugar: 0g
- Sodium: 0mg
- Fat: 0g
- Saturated Fat: 0g
- Unsaturated Fat: 0g
- Trans Fat: 0g
- Carbohydrates: 0g
- Fiber: 0g
- Protein: 0g
- Cholesterol: 0mg