
When the big game is on or you have friends dropping by unexpectedly, the absolute last thing you want is a culinary crisis. Back when I was trying to balance project timelines in Chicago with actually eating a decent meal, I realized recipes needed structure—they needed optimization! That’s why I engineered these grinder sliders. They take everything you love about a messy, flavor-packed Italian deli sandwich—the salty meats, the gooey cheese—and shrink it down onto sweet Hawaiian rolls, then bake it all together. We’re talking minimal effort, maximum impact for your game day sandwiches. This method is simple, reliable, and delivers that perfect party appetizer every single time. Trust me, this one is now in my permanent rotation.
- Why These Grinder Sliders are Your New Go-To Party Appetizers
- Assembling the Ultimate Grinder Sliders: Ingredient Breakdown
- Step-by-Step: How to Prepare Your Grinder Sliders
- Tips for Success Making Grinder Sliders
- Ingredient Notes and Substitutions for Italian Grinder Sliders
- Serving Suggestions for These Crowd Pleasing Appetizers
- Storage and Reheating Instructions for Leftover Grinder Sliders
- Frequently Asked Questions About Grinder Sliders
- Nutritional Estimate for One Slider
- Nutritional Estimate for One Slider
Why These Grinder Sliders are Your New Go-To Party Appetizers
I engineered this method to solve a problem: how to feed a crowd without spending the whole party hiding in the kitchen. These grinder sliders are your cheat code for easy hosting. They check every box, honestly.
- Speed is King: Prep takes under 15 minutes. They bake fast, too.
- Crowd Pleaser Guaranteed: Kids love the sweet rolls; adults love the savory fillings.
- Ultimate Convenience: They’re perfect Tailgate Food Ideas because you bake them right in the pan they sit in.
- Flavor Bomb: You get that amazing deli flavor in a perfectly cheesy slider bite.
If you need reliable recipes that always impress, check out my full roundup of appetizers and snacks. You won’t regret making these.
Assembling the Ultimate Grinder Sliders: Ingredient Breakdown
The key to any great optimized recipe is knowing your components. For these grinder sliders, we aren’t looking for obscure ingredients; we want high-impact flavor from things you can grab quickly at the regular deli counter. Precision here means perfect layering, which equals perfect melt later. Don’t try to cut corners on the quality of the roll, though—that sweet base is crucial!
The Foundation: Rolls and Cheeses
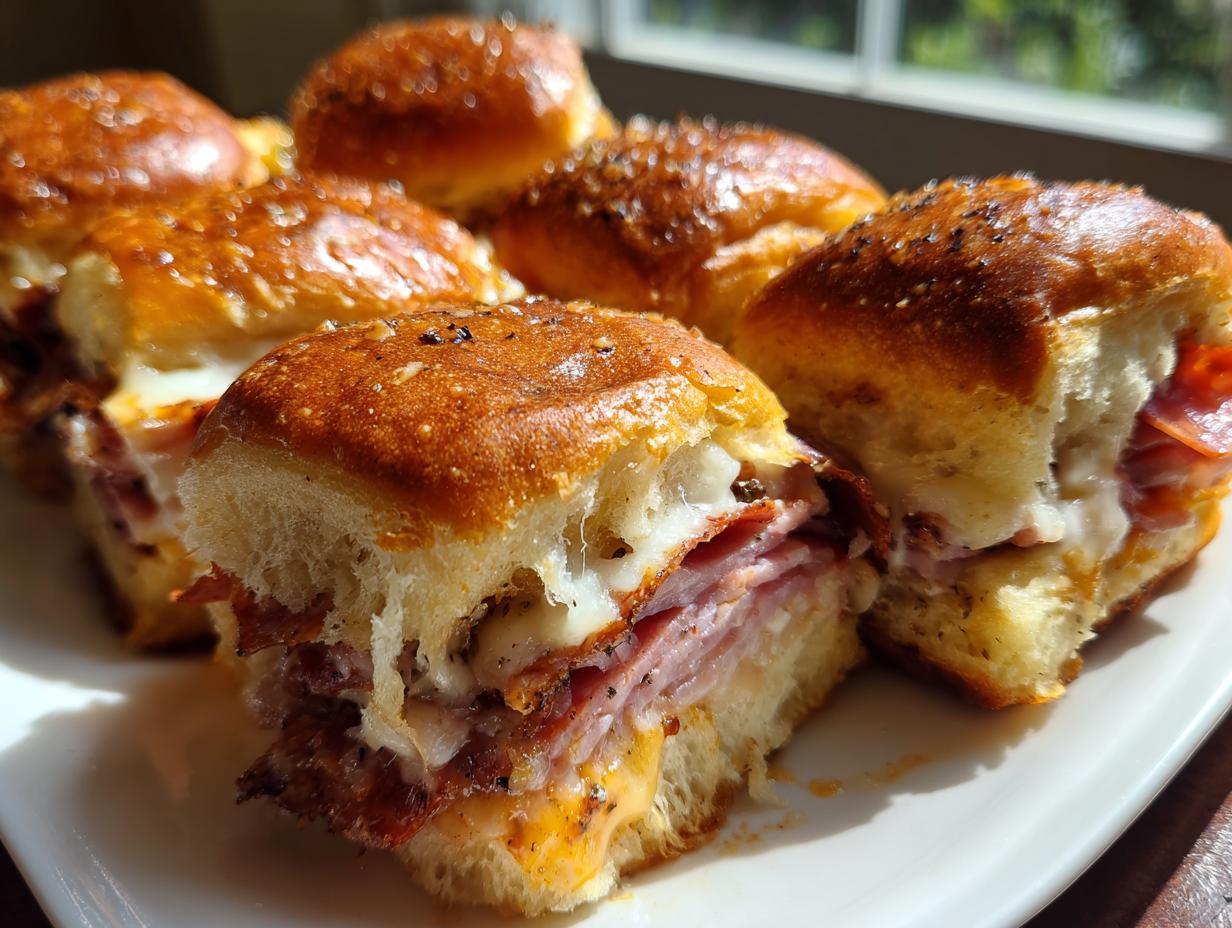
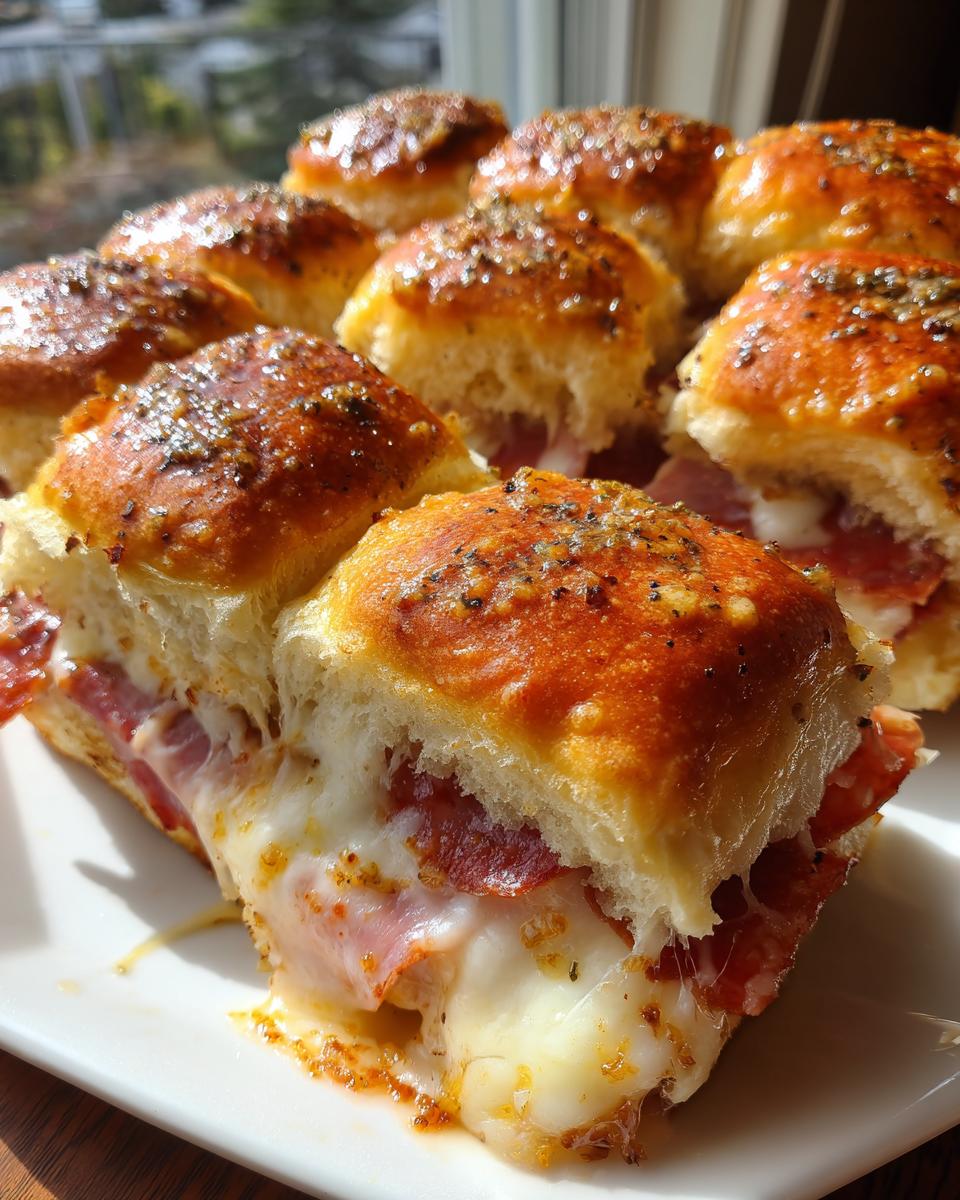
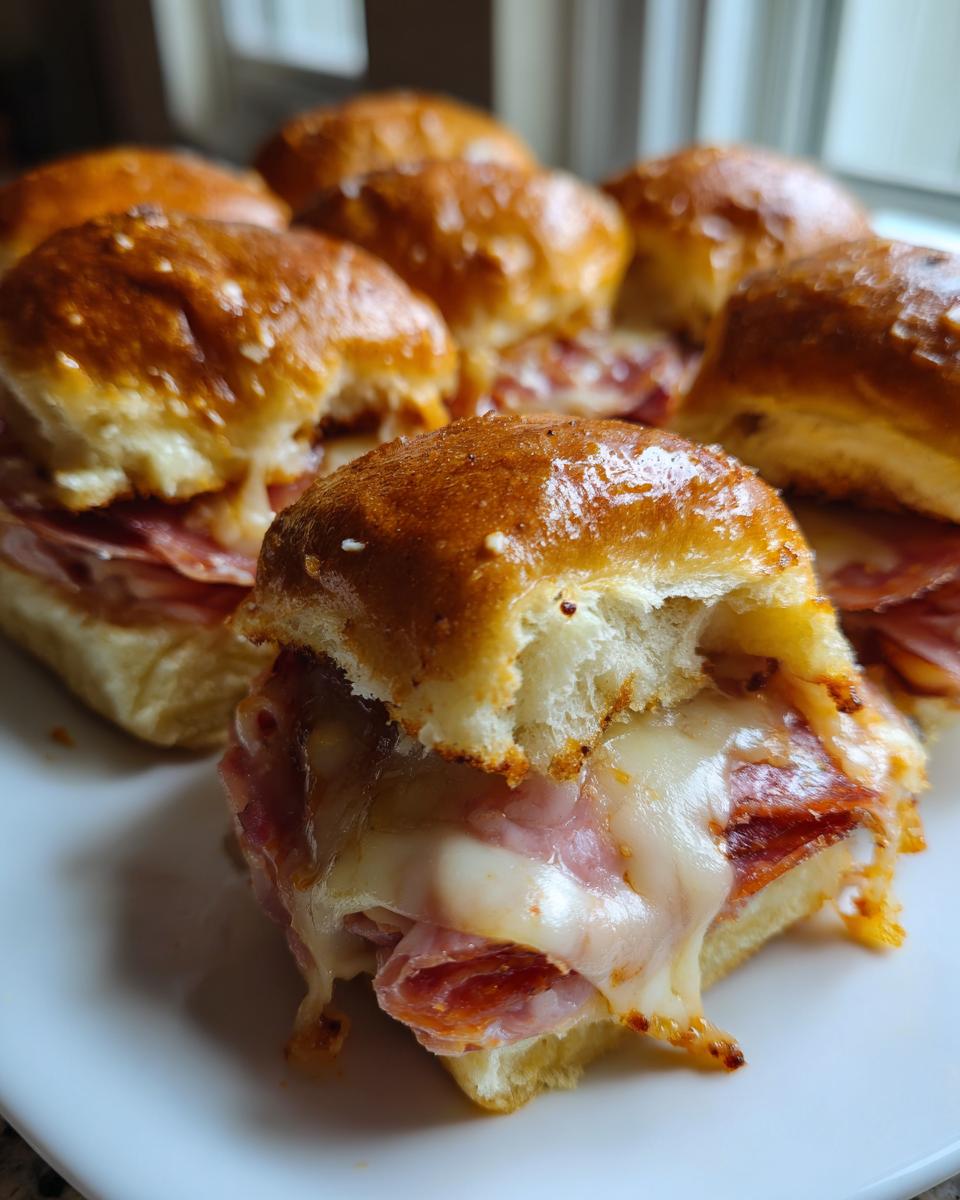
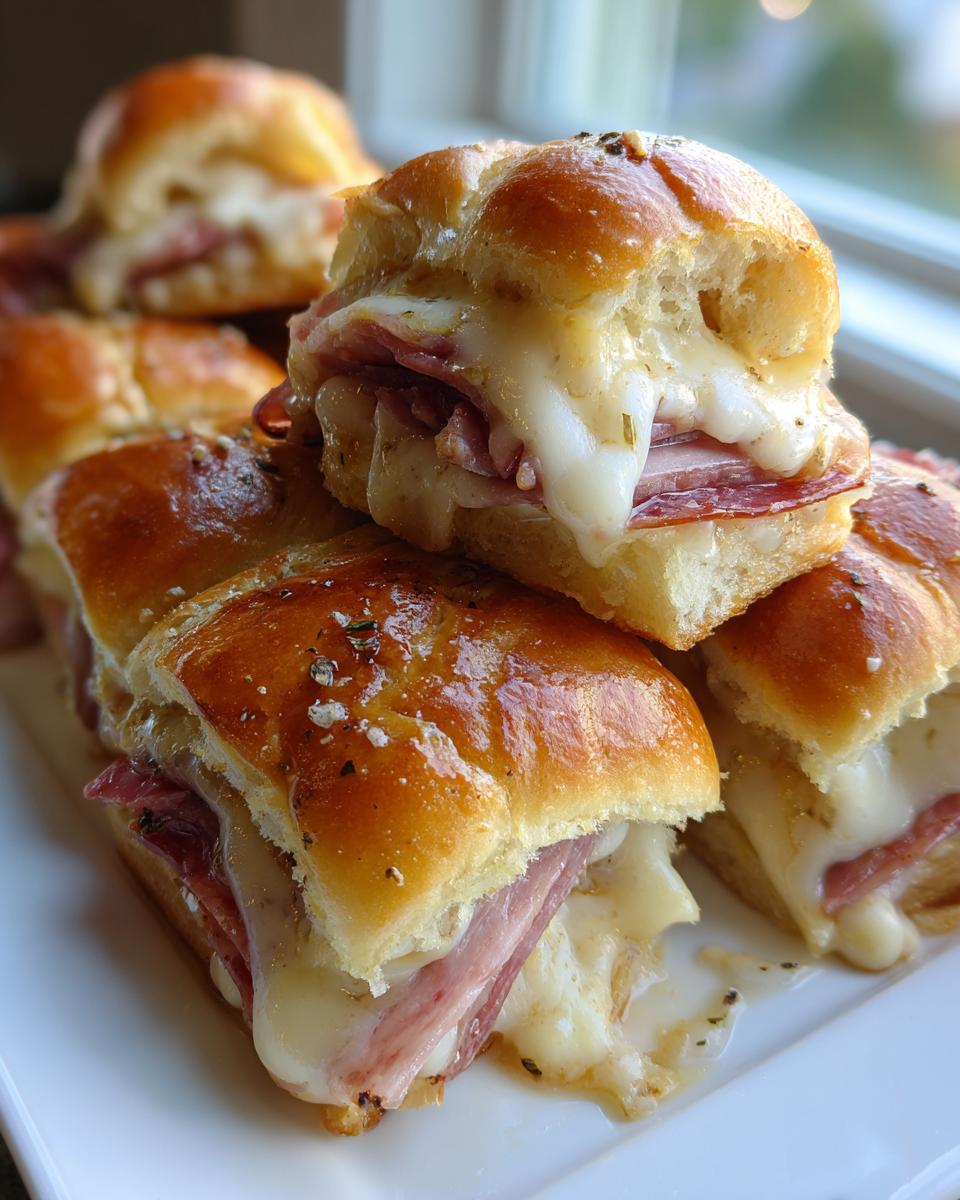
You absolutely need soft, sweet rolls to balance out the savory, salty meats. I insist on using the classic 12-count package of sweet Hawaiian rolls. They bake up beautifully and provide that slight sweetness that transforms these from standard sandwiches to something special. For cheese, we are building layers for maximum melt factor, so you need two kinds. Grab half a pound of thinly sliced provolone and half a pound of thinly sliced mozzarella. Thin slicing is what allows everything to get gooey at the same time.
The Savory Layers: Deli Meats for Your Grinder Sliders
This is where the ‘Grinder’ part of the name comes in. We are stacking three distinct Italian flavor profiles. Make sure you get about half a pound of each, all sliced thin. Thin slicing is non-negotiable for these grinder sliders because thick slices won’t layer evenly and they trap steam, leading to soggy bread.
- Thinly sliced ham
- Thinly sliced salami
- Thinly sliced pepperoni
Crafting the Perfect Garlic Butter Glaze Sliders Topping
This glaze is what sets these apart from just stacking meat on bread. It penetrates that top bun and keeps everything moist while baking. We need one stick of unsalted butter melted down, but the magic comes from the aromatics we infuse into it. Seriously, don’t use garlic powder here if you can avoid it; use fresh.
Mince up two cloves of fresh garlic—we want that sharp, bright flavor kicking through the richness. Whisk that into the melted butter along with one teaspoon of dried Italian seasoning, half a teaspoon of onion powder, and a quarter teaspoon of salt. This simple mixture transforms simple baked sliders into something irresistible!

Step-by-Step: How to Prepare Your Grinder Sliders
Okay, time to execute the plan. Since I approach cooking like a project manager—clear steps, efficient flow—I want you to follow these precisely. This process ensures that every one of the 12 grinder sliders comes out perfectly layered and baked evenly. First things first: preheat that oven to 350 degrees F. Then, grab a 9×13 inch baking dish and give it a quick grease job. We need to set the stage for easy cleanup later!
If you’re looking to streamline your weeknight routine even more, these fit right into my zone of quick and easy dinners because they are mostly hands-off once they hit the oven.
Assembly and Glazing for Maximum Flavor
This is one large sandwich assembly, so handle it gently! Take your entire package of Hawaiian rolls and, very carefully, slice horizontally right through the middle, keeping all 12 tops attached to the bottoms. Don’t separate them yet!
Place the bottom half of the rolls into your greased baking dish. Now, we layer the fillings precisely. Distribute the ham, salami, and pepperoni evenly across the bottom layer. Next, top that meat blanket with the mozzarella and provolone cheeses. Make sure the coverage is consistent from edge to edge.
Now for the moment the flavor locks in: the glaze. Take that garlic butter mixture we whipped up earlier. Slow and steady is the approach here. Drizzle that lovely mixture evenly over the entire top half of the rolls. You want the butter to seep into all those little crevices. Once coated, gently place the top half of the rolls back on to complete your giant slab of grinder sliders.
Baking Strategy for Cheesy Sliders
We use a two-stage bake to manage the cheese melt versus the bread crispness. First, cover the entire dish tightly with aluminum foil. This traps the steam, forcing the cheese to melt completely without burning the top of the sweet rolls. Pop it into the 350-degree oven and bake it covered for exactly 15 minutes. This is crucial for those gooey cheesy sliders!
After 15 minutes, pull the dish out and carefully remove the foil. We need exposure now for color and texture. Bake it uncovered for another 5 to 10 minutes. Look for that perfect visual cue: the tops should be golden brown, glossy from the butter, and the cheese should be visibly melted and bubbling slightly around the edges. Pull them out, let them rest for about 5 minutes, and then slice between the rolls. They are ready to serve hot!
Tips for Success Making Grinder Sliders
As much as I love optimizing, I also know that life doesn’t always cooperate with the schedule. Luckily, these grinder sliders are incredibly forgiving, which makes them my top choice for Tailgate Food Ideas. If you’re prepping them for a big football day, assemble the entire thing—meat, cheese, glaze, everything—the night before. Just cover that pan tightly with plastic wrap instead of foil and keep it refrigerated. Pull it out about 45 minutes before you need to bake it so it loses that deep chill.
When it comes to baking time, remember the two-stage approach we discussed. Covering them first is non-negotiable for melting the cheese properly. If you are worried about the meat quality (maybe you swapped out some of the salami), you can always pull them out after Step 1 (the covered bake) and peek underneath to make sure everything is heated through before you uncover them for browning. This is just extra assurance!
If you’re aiming for maximum flavor complexity in your grinder sliders, don’t be afraid to try one of my little additions from the notes section. While the base recipe is perfect, sometimes adding a thin layer of a zingy spread enhances that classic Italian profile. Next time, try spreading a whisper of mayonnaise or maybe a bit of spicy brown mustard on the bottom rolls before the ham goes on. It adds a slight tang that cuts through the richness of the meat and cheese beautifully. If you enjoy dishes where everything cooks together seamlessly, you should definitely check out my easy one-pot enchilada pasta for another dinner shortcut!
Ingredient Notes and Substitutions for Italian Grinder Sliders
When you’re trying to keep things efficient, knowing where you can safely adjust ingredients without crashing the whole project is key. For these grinder sliders, we’re using a very specific combination because that’s what makes them taste like a deli classic shrunk down. However, I understand brands vary, and sometimes you just can’t find Hawaiian rolls on a Tuesday afternoon.
If you absolutely must swap the rolls—and this is the only place I allow major deviation—you can use any soft slider bun, like King’s Hawaiian Sweet Rolls substitutes or even small potato rolls. Just know this: the baking time might shift slightly because different breads absorb butter differently. If you see the tops getting too dark too fast when uncovered, you’ll need to pull them sooner.
Regarding the meat layers, the specific meats—ham, salami, pepperoni—are what define these as Italian Grinder Sliders. If you have allergies or dietary restrictions, you should lean into swapping for like-for-like meats. For example, swap the ham for smoked turkey, or use turkey salami. The goal is to maintain three distinct layers of flavor and texture.
Now, for the glaze. While the fresh garlic is my preferred method for these Hot Italian Sliders, you can use up to a teaspoon of garlic powder if you’re completely pressed for time, though it won’t have that pungent, fresh pop. If you want a little extra kick that these Deli Meat Sliders often have in a true grinder, a tiny splash of red wine vinegar mixed into the warm butter glaze works wonders. It adds a little brightness!
For more inspiration on how to nail that signature Italian flavor profile, check out this great breakdown on Italian Grinder Slider recipes online. Sometimes seeing an alternate visual helps lock in the technique!
Serving Suggestions for These Crowd Pleasing Appetizers
These grinder sliders are so rich and satisfying on their own, but when you’re putting together a spread—especially for Game Day Sandwiches—you need some things on the side to balance out all that deli meat and cheese.
Since we’ve packed so much savory, salty flavor into these baked sliders, I usually like to pair them with something light, bright, or tangy. Anything heavy just weighs the whole snack table down. We want snacks that keep people moving toward the TV, not falling asleep on the couch!
The Perfect Dip Pairing
Even though the slider is relatively self-contained, a dipping sauce just makes everything better, right? Forget ketchup; we need something with a little zing. My personal favorite to serve alongside these cheesy sliders is a creamy, tangy dip. Anything with pickles or vinegar really cuts through the richness of the provolone and ham.
If you’re looking for an easy, no-cook winner, check out my recipe for easy creamy dill pickle dip. It sounds weird, but the tangy pickle flavor is the perfect counterpoint to the savory pepperoni flavor exploding out of these mini Italian sandwiches.
Light Sides to Balance the Meal
If you need to round this out into an actual meal rather than just a robust appetizer plate, focus on simple sides that require zero cooking time on your part while the sliders are heating up. Think simple assembly, not complex cooking projects.
- A simple bag of crunchy kettle-cooked potato chips. Stick to sea salt or maybe a kettle chip with a light vinegar flavor.
- Pre-cut vegetable sticks (carrots, celery, bell peppers). They offer a great crunchy texture contrast.
- A simple chopped salad. Use romaine, cucumbers, and cherry tomatoes dressed very lightly with a lemon vinaigrette. Just enough acid to refresh the palate between sliders.
Remember, these are meant to be crowd pleasing appetizers, so keep the side dishes accessible and easy to eat while standing up!
Storage and Reheating Instructions for Leftover Grinder Sliders
Even though these grinder sliders are designed to disappear the moment they come out of the oven, sometimes you actually get leftovers! That’s fine; we just need an efficient plan for managing them so they don’t turn into sad, soggy sponges.
The main enemy here is condensation. When that incredible melted cheese cools, it traps moisture against that beautiful sweet roll. If you’re storing any remaining grinder sliders, the absolute best thing you can do is let them cool slightly—just until they’re not steaming hot anymore—and then transfer them to an airtight container. You can place a paper towel on the very bottom of the container to wick up any residual moisture, but cover the container tightly before sliding it into the fridge. They usually hold up really well for about three days.
Now, the reheating: I know your first instinct is to zap them for 20 seconds in the microwave because it’s fast. Don’t give in to that urge! Microwaving heats the moisture inside, turning the bread instantly gummy. We are optimizing for texture here, remember?
The Best Way to Reheat Grinder Sliders
The oven is your friend for bringing these back to life. It allows the exterior to crisp up slightly while gently melting that cheese again without creating steam pockets.
- Preheat your oven to 325 degrees F—lower and slower is better for reheating.
- Arrange the leftover sliders in a single layer on a baking sheet lined with parchment paper. This prevents the bottoms from sticking to the pan if they got a little oily in storage.
- Cover the baking sheet loosely with foil. This protects the tops from drying out while the center comes back up to temperature.
- Bake for about 10 to 12 minutes.
If you want that lovely golden top back that you saw right out of the initial bake, pull the foil off for the last 3 minutes. They will taste almost as good as fresh, which is a win in my book for leftovers!
Frequently Asked Questions About Grinder Sliders
I get a lot of messages asking the same efficient, practical questions about these grinder sliders, so I compiled the top ones right here. Getting the execution right means knowing these small details upfront, which saves time later!
Can I use a bread other than Hawaiian rolls for my Italian Grinder Sliders?
You absolutely can, but you’re shifting the core profile of the recipe slightly! If you can’t find the sweet Hawaiian rolls, opt for soft potato rolls or brioche slider buns. The key characteristic you’re trying to replicate is softness, because our garlic butter glaze needs something absorbent to soak into. Just be aware that if you use a standard, less-sweet roll, your final product will lean more heavily into the savory/salty profile, making them less balanced than the classic sweet-and-salty grinder sliders we made here.
What vegetables can I add to these Deli Meat Sliders without making them soggy?
This is a great way to build flavor, but we have to manage moisture content carefully. Remember, we are baking these, so watery vegetables turn into steam buckets. If you want to add veggies to your Hot Italian Sliders, you must pre-treat them. My advice is to skip the raw lettuce and tomato (those belong on cold sandwiches!). If you want peppers or onions, thinly slice them and sauté them briefly first to cook off most of the water. Then, pat them absolutely dry with a paper towel before layering them over your cheeses. A layer of thinly sliced banana peppers or pepperoncini works perfectly because they are already preserved and won’t release much moisture.
How far in advance can I assemble the Grinder Sliders?
This is an optimization question I love! You can definitely assemble these ahead of time; they make fantastic make-ahead tailgate food ideas. I recommend assembling the entire thing—meat, cheese, and glaze applied—layering it all in the baking pan. Cover it *tightly* with plastic wrap (foil lets too much air in refrigeration), and store it in the fridge for up to 24 hours. When you are ready to bake, let it sit on the counter for about 30–45 minutes to lose the deep chill, then proceed with the covered baking step as written. This cuts your active prep time down to almost zero right before the guests arrive!
Why are these considered ‘grinder sliders’ instead of just ‘Italian sliders’?
That’s a great distinction! A classic Italian Grinder Sandwich, especially in New England, is defined by its slightly crusty, long roll and specific layering of cured meats, cheeses, and often a sharp, oil-and-vinegar-based dressing (or sometimes mayonnaise). We call these grinder sliders because we are using that exact flavor profile—salami, pepperoni, provolone, and garlic in a butter glaze—but we are serving it in the convenient, bite-sized slider format, typically on soft rolls. It’s a fusion of the flavor profile of a grinder with the format of a party slider. If you enjoy these, you might want to browse my collection of fun easy slider recipes for other formats.
Nutritional Estimate for One Slider
It’s smart to know what you’re serving, so here is a general estimate for one Hawaiana Roll-based grinder slider made using the recipe above. Keep in mind that because deli meat brands vary wildly in sodium and fat content, these numbers are an approximation based on averages for these ingredients. Use this as a guideline only!
- Serving Size: 1 slider
- Calories: 380
- Fat: 22g
- Saturated Fat: 10g
- Carbohydrates: 25g
- Protein: 18g
- Sugar: 9g
- Sodium: 950mg (Yes, high because of the deli meats, which is typical for these party appetizers!)
As you can see, these are rich in protein and satisfying, but they are definitely an indulgence! Everything in moderation, right? If you are serving these alongside dips or chips, factor those added calories and sodium into your overall planning.
PrintUltimate Grinder Sliders: Easy Baked Party Appetizers

Make these easy grinder sliders for your next gathering. This recipe uses Hawaiian rolls, deli meats, and cheese, baked with a savory garlic butter glaze, making them perfect game day sandwiches or quick dinner fare.
- Prep Time: 15 min
- Cook Time: 25 min
- Total Time: 40 min
- Yield: 12 servings 1x
- Category: Lunch
- Method: Baking
- Cuisine: American
- Diet: Vegetarian
Ingredients
- 1 (12 count) package sweet Hawaiian rolls
- 1/2 pound thinly sliced ham
- 1/2 pound thinly sliced salami
- 1/2 pound thinly sliced pepperoni
- 1/2 pound thinly sliced provolone cheese
- 1/2 pound thinly sliced mozzarella cheese
- 1/2 cup (1 stick) unsalted butter, melted
- 2 cloves garlic, minced
- 1 teaspoon dried Italian seasoning
- 1/2 teaspoon onion powder
- 1/4 teaspoon salt
Instructions
- Preheat your oven to 350 degrees F. Lightly grease a 9×13 inch baking dish.
- Slice the entire package of Hawaiian rolls in half horizontally, keeping the rolls connected. Place the bottom half of the rolls in the prepared baking dish.
- Layer the meats evenly over the bottom half of the rolls: ham, salami, and pepperoni.
- Layer the cheeses evenly over the meats: provolone and mozzarella.
- Place the top half of the rolls over the cheese layer.
- In a small bowl, whisk together the melted butter, minced garlic, Italian seasoning, onion powder, and salt to create the garlic butter glaze.
- Slowly and evenly drizzle the garlic butter glaze over the top of the assembled sliders.
- Cover the baking dish tightly with aluminum foil.
- Bake for 15 minutes.
- Remove the foil and bake for another 5 to 10 minutes, or until the cheese is fully melted and the tops of the rolls are golden brown.
- Let the sliders rest for 5 minutes before slicing between the rolls. Serve immediately as crowd pleasing appetizers.
Notes
- For extra flavor, you can add a thin layer of mayonnaise or mustard to the bottom rolls before adding the meat.
- If you do not have Hawaiian rolls, use any soft slider bun and adjust baking time as needed.
- These sliders are excellent for tailgating food; assemble them ahead of time and bake them on site.
Nutrition
- Serving Size: 1 slider
- Calories: 380
- Sugar: 9g
- Sodium: 950mg
- Fat: 22g
- Saturated Fat: 10g
- Unsaturated Fat: 12g
- Trans Fat: 0.5g
- Carbohydrates: 25g
- Fiber: 1g
- Protein: 18g
- Cholesterol: 55mg