
That incredible aroma—the rich, fiery steam rising off a bowl of dipping consommé right before you dip that perfectly crisp, cheesy taco? That’s the magic of true street food. I’m Leo, and when I decided I needed authentic beef birria tacos in my life, I knew the traditional method required way too much downtime for my schedule here in Chicago. I’m all about optimizing, right? I looked at that massive recipe and asked, ‘How do we maintain that deep, authentic flavor while cutting the hands-on time down to almost zero?’
The answer, for me, was finding the perfect intersection between slow-cooked tenderness and modern appliance efficiency. This recipe is my streamlined project plan for turning a tough chuck roast into melt-in-your-mouth shreds, all bathing in complex chili bath, ready to deliver that iconic, juicy experience. Forget hours hovering over a pot; we’re letting the slow cooker handle the heavy lifting.
We nail the rich, flavorful beef and that essential, lip-smacking dipping liquid—the consommé—proving you don’t need a weekend project to nail these incredible quesabirria tacos.
- Why This Slow Cooker Method Makes Perfect Beef Birria Tacos
- Essential Ingredients for Flavorful Beef Birria Tacos
- Step-by-Step Instructions for Slow Cooker Beef Birria Tacos
- Mastering the Consommé Recipe for Dipping Beef Birria Tacos
- Tips for Success When Making Beef Birria Tacos
- Serving Suggestions for Your Authentic Street Tacos
- Storage and Reheating Instructions for Leftover Beef Birria Tacos
- Frequently Asked Questions About Beef Birria Tacos
- Nutritional Estimate for Your Meal
Why This Slow Cooker Method Makes Perfect Beef Birria Tacos
When I approach a recipe like this, I see it as a project, and the goal is maximum flavor yield for minimum active time. Using the slow cooker here isn’t just about convenience; it’s about the quality of the breakdown. That long, low heat transforms the tough chuck roast into meat that shreds just by looking at it.
It locks in all the gorgeous chili aromatics and broth, creating a flavor profile that tastes like it simmered all day. Trust me, this efficiency is key, especially when you’re planning something big like Cinco de Mayo!
- Set It and Forget It: Total hands-off cooking for 8 to 10 hours means you can prep days ahead or focus on everything else.
- Unbeatable Tenderness: The slow, steady heat breaks down the collagen perfectly, ensuring the beef is impossibly moist.
- Deep Flavor Infusion: The chilies and spices are sealed in, creating a richer stew base than just simmering on the stovetop.
- Social Gathering Ready: Prep the meat the day before; reheat, shred, and build those amazing tacos right before everyone arrives.
Essential Ingredients for Flavorful Beef Birria Tacos
When we talk about authentic flavor here, we have to start with the chilies. They are the backbone of this entire dish, whether you call it a stew or, ultimately, amazing tacos. Don’t compromise here—the dried peppers are non-negotiable if you want that real, earthy complexity.
Here is exactly what you need to get this project started. I’ve listed everything out so you can check your pantry:
- 3 lbs beef chuck roast, cut into large chunks
- 1 cup dried guajillo chilies, stems and seeds removed
- 1/2 cup dried ancho chilies, stems and seeds removed
- 4 cups beef broth
- 1/2 white onion, quartered
- 6 cloves garlic
- 2 tablespoons apple cider vinegar
- 1 tablespoon dried oregano
- 1 teaspoon cumin seeds
- 1 teaspoon black peppercorns
- 4 whole cloves
- 1 bay leaf
- 1 tablespoon salt
- 1 teaspoon black pepper
- 1 cup water (for soaking chilies)
- 1 cup white onion, diced (for serving)
- 1 cup fresh cilantro, chopped (for serving)
- 12 corn tortillas
- 1 cup Oaxaca or Monterey Jack cheese, shredded
- Oil or lard for frying
Ingredient Notes and Substitutions for Your Beef Birria Tacos
Okay, let’s talk about swapping things out—because sometimes you just don’t have everything ready to go. For the beef, chuck roast is my champion. It has just the right amount of marbling that breaks down beautifully over those long hours in the slow cooker, giving you tender shreds that hold up to dipping. If you can’t find a good chunk, short rib would be an excellent, slightly richer substitute.
For the cheese, Oaxaca is the dream because it melts exactly right, but please don’t stress if you can’t find it. Monterey Jack melts nicely and has a very mild flavor that won’t fight with the smoky chiles. Just shred it yourself; pre-shredded bags have anti-caking agents that can make cheese clump up when you’re trying to get that perfect quesabirria texture.
Also, I noted beef broth specifically for a reason. Since the broth becomes your incredible consommé, using a high-quality, rich beef broth here is essential. It’s the liquid gold foundation of this whole operation!
Step-by-Step Instructions for Slow Cooker Beef Birria Tacos
Now we get down to the build phase. Remember, this is where we streamline the project. We need a dynamite chili sauce and then we let the machine do the rest of the work. Trust me, taking the time on the chili soak and the blending pays off tenfold when you get to the eating part.
Preparing the Chili Base for Authentic Beef Birria Tacos
First, get those dried guajillo and ancho chilies soaking. You need them plump and soft, which takes about 30 minutes after boiling water is pulled off the heat. Drain those puppies, but hold onto about half a cup of that dark, gorgeous water—we might need it for thinning the sauce. Toss the softened chilies into your blender with the beef broth, the quartered onion, garlic, vinegar, and all those beautiful spices—oregano, cumin, cloves, peppercorns. Blast this mixture until it is completely, totally smooth. I mean pureed with no grainy chunks left; that’s essential for our Mexican beef stew base.
Next, the slow cooker part. Put the beef chunks straight in, pour all that smooth, red sauce right over the top, and set it to low for 8 to 10 hours. Honestly, I usually aim for the 9-hour mark. If you’re in a rush, you can go high heat for 4 to 5 hours, but low is always my preference for this cut.
Assembling and Frying Your Quesabirria Tacos
Once the beef is shredding like butter—and it will—pull it out and shred it up. Now, here is my critical Leo tip for the consommé: Skim off the top layer of fat from the liquid left in the slow cooker before you serve it. If you chill it overnight, this is super easy, but if you’re serving immediately, just use a wide spoon to scoop the excess grease off the top. That leaves you with clean, rich dipping liquid for your quesabirria tacos.
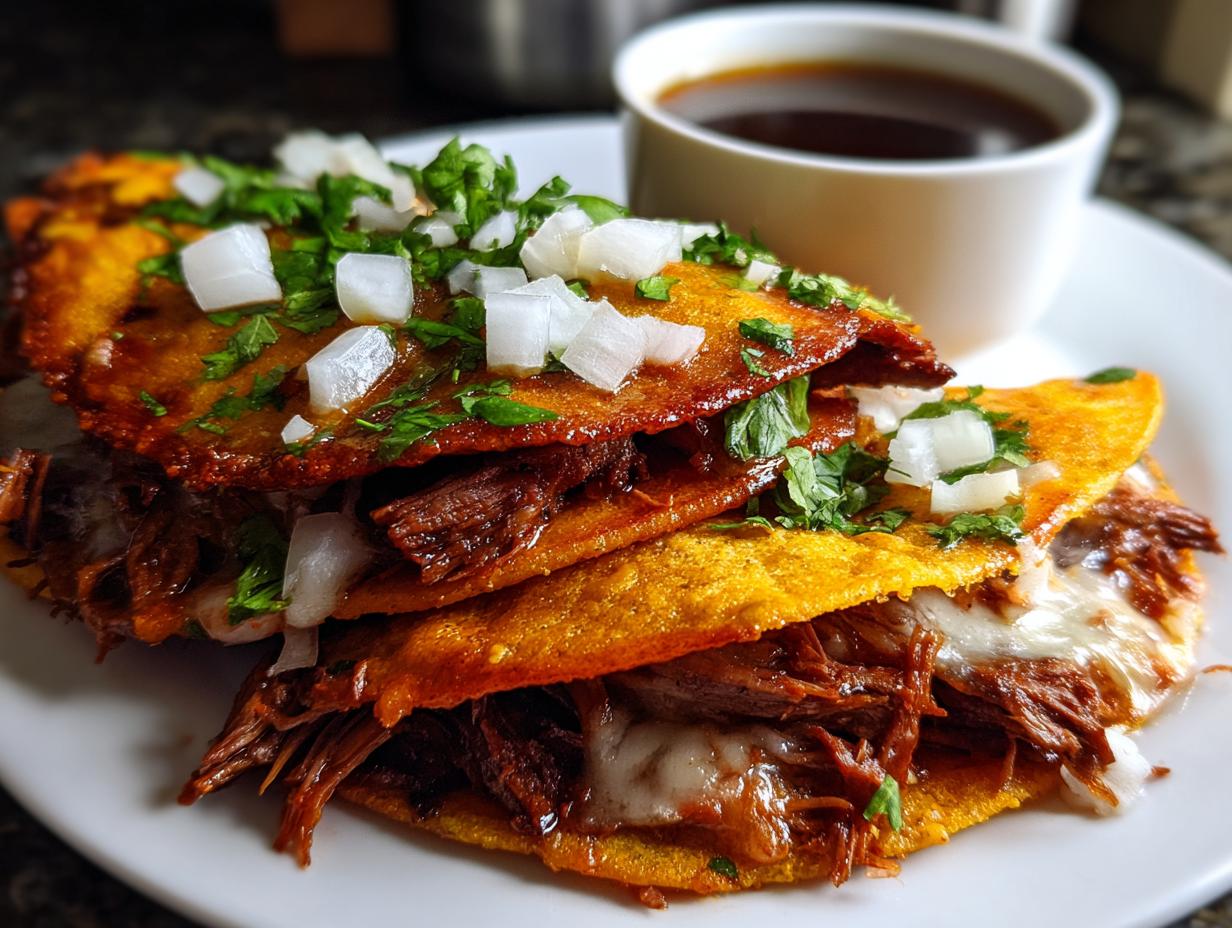
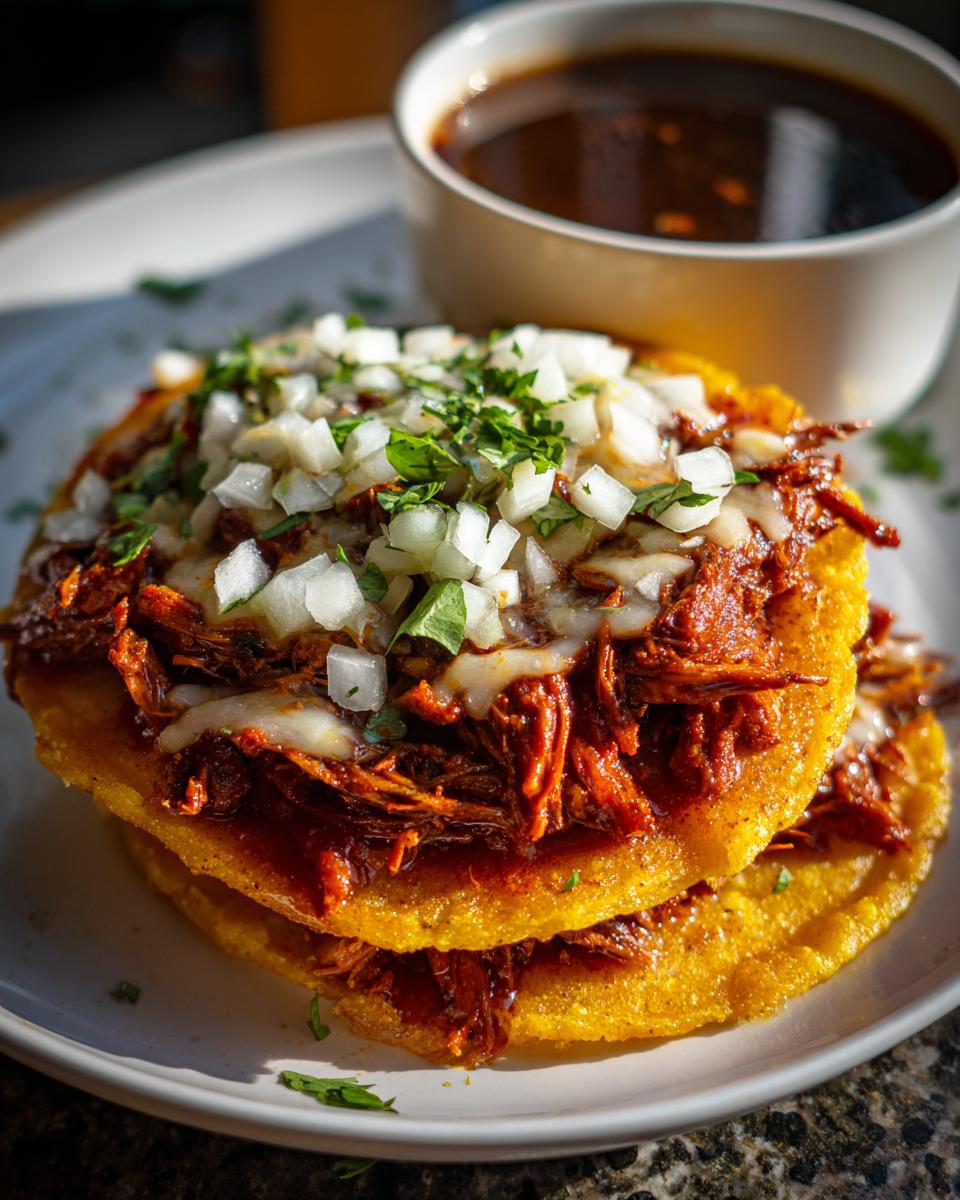
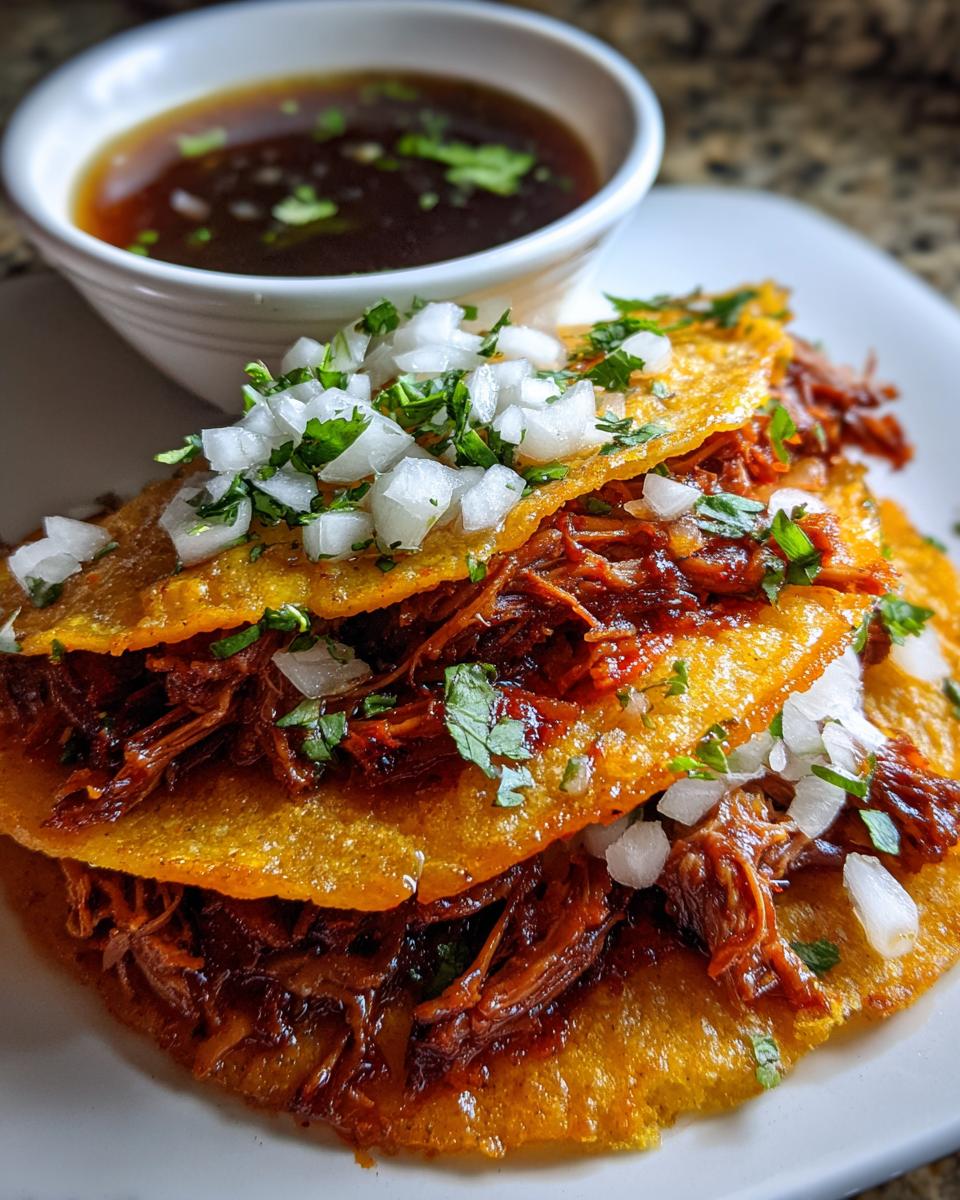
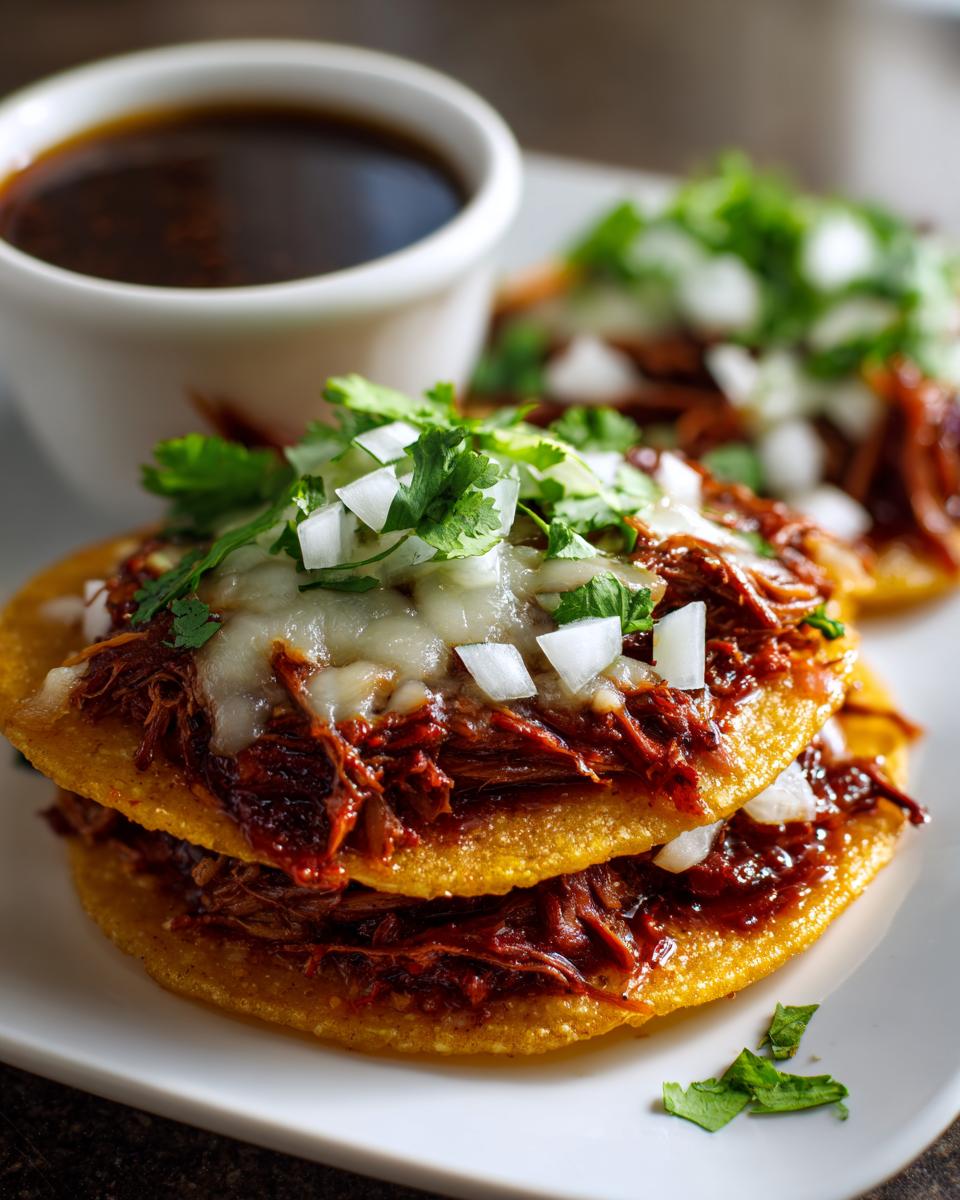
Time to build! Dip those corn tortillas right into that warm, seasoned consommé—don’t just brush it, give it a quick dunk! Place the wet tortilla on a hot, oiled skillet. Top half with shredded beef and a generous sprinkle of Oaxaca cheese. Fold it over and cook it until it’s golden brown and that cheese is gooey. Serve those immediately alongside small bowls of the warm consommé for dipping.
Mastering the Consommé Recipe for Dipping Beef Birria Tacos
Okay, can we just take a minute to appreciate the liquid? I often tell people that the beef is amazing, but the reason you keep coming back to these tacos is the broth. That rich liquid left in your slow cooker? That is your prize—it’s your official, authentic consome recipe.
It’s crucial you understand this: you don’t make a separate broth; you harvest the cooking liquid. The chilies, the spices, the beef juices—they all married together beautifully in that slow cooker. That’s pure gold. However, because we’re using chuck roast, there will be rendered fat floating on top, and we need to deal with that.
Here is my trick, the one I swear by when I plan ahead—and planning is just managing your project schedule, right? If you have the time, let the whole thing sit in the fridge overnight after you shred the meat and skim the top layer. When the liquid cools, the fat solidifies into a nice, firm cap. You just lift that entire cap off, and what’s left is clean, powerfully flavored consommé. It makes such a difference in the final taste of your taco dip! If you’re looking for other ways to utilize rich cooking liquids, check out my steps for homemade brown gravy, which uses similar principles.
When it’s time to eat, just scoop that gorgeous, degreased liquid into small bowls and reheat it gently on the stove. Keep it piping hot right up until you serve them. You can even give it a little stir with a whisk right before serving to make sure everything is integrated again. If you skipped the overnight chill, just use a wide ladle to diligently skim off as much as you can before reheating. Don’t look at it as extra work; look at it as polishing your final product before you present it!

Tips for Success When Making Beef Birria Tacos
Getting this recipe right comes down to a few key optimization points. As a project manager, I look for bottlenecks, and in birria, the bottlenecks are usually texture and fat management. Nail these two areas, and your results will be restaurant quality, every single time.
Let’s talk about shredding. You want that gorgeous, stringy texture—the kind that absorbs the sauce perfectly. If you pull the beef out and it feels like it’s fighting you, it’s not done yet. Give it another hour on low. When it’s ready, it should practically collapse when you touch it with a fork. Use two forks, shred it right in the slow cooker bowl, and let those meat shreds soak back up some of that chili liquid for five minutes before you start assembling tacos. This step is critical for making sure your meat isn’t dry!
Managing timing is another big one. I laid out 8 to 10 hours on low, but your slow cooker might run hotter or cooler than mine. The meat tenderness is your real metric, not the clock. If you have a busy day, aim for 10 hours; if you are home sooner, check it at 8. If you have to run out and come back later, that’s fine, too! The wonderful thing about this style of cooking is that it’s very forgiving once everything is submerged in liquid. Just make sure you cover it properly.
Finally, the fry! If you want that truly authentic, deep-red, slightly crunchy exterior on your quesabirria tacos, you absolutely need to use fat, not just oil. Lard is traditional, and honestly, it provides the best flavor and crispness. If you aren’t comfortable with lard, use a neutral oil like vegetable or canola, but if you can swing the lard, do it. It deepens the flavor connection between the tortilla and the spicy consommé. This step is what separates just good meat from great street tacos.
Serving Suggestions for Your Authentic Street Tacos
We’ve got the tender beef, we’ve got the rich consommé, and the tortillas are crisp and cheesy. Now, we need to finalize the presentation so it screams ‘authentic street tacos!’ This isn’t just dinner; it’s an event, especially if you’re building this up for a big gathering or for Cinco de Mayo.
The garnishes we listed—freshly diced white onion and chopped cilantro—are non-negotiable for me. Why? Because that slight sharpness from the onion and the brightness of the cilantro cut right through the richness of the beef and the fat in the consommé. It’s that balance I’m always looking for in a successful project. When you serve these, place the dips right next to the plate so everyone can get that perfect double-dip.
If you want to really take these authentic street tacos over the top, you only need a couple of easy, complementary sides. This dish is very rich, so we want sides that offer brightness or acidity. My go-to addition that pairs perfectly with the smoky chiles is a good side of Mexican street corn salad—you can find my streamlined recipe for that right here.
For a little extra heat and lime punch on the side, make sure you have a small bowl of sliced radishes and plenty of lime wedges ready to squeeze over everything. A simple squeeze of fresh lime juice right before you dip adds amazing zing. Honestly, that’s all you need—you don’t want sides that compete with the killer consommé!
Storage and Reheating Instructions for Leftover Beef Birria Tacos
One of the best parts about tackling a big project like this is having leftovers—it’s like getting a free meal tomorrow! But you have to store it correctly to maintain that perfection we worked so hard to achieve. You definitely shouldn’t store the tacos assembled, especially not the cheesy ones. The tortilla will get soggy fast.
Treat the meat and the consommé as two separate entities for storage. Scoop the shredded beef into an airtight container. Keep in mind that the beef will have absorbed a lot of liquid during cooking, so it might seem overly wet straight out of the fridge. That’s fine; we fix that easily.
The consommé goes into its own sealed container. This is where that overnight chill becomes a huge benefit for storage too. If you chilled it before, you already have a solid layer of fat to scrape off before you store the liquid portion. If you didn’t chill it, just scrape off as much visible white fat as you can before sealing it up.
When you’re ready for Round Two—maybe for a quick weeknight dinner instead of a big party—reheating is simple. Reheat the shredded beef gently on the stovetop, adding a splash or two of fresh broth or water if it seems too dry. You want it moist, not soupy. For the consommé, reheat it slowly on the stove until it’s steaming again. If you want to try another recipe using low and slow cooking, my slow cooker BBQ chicken recipe is fantastic for next-day leftovers too!
When you reconstruct those beef birria tacos, reheat your dipping consommé, dip your tortillas, and build just what you plan to eat right then. Those leftovers will keep well in the fridge for about three days, giving you the gift of incredibly easy, authentic meals all week long.
Frequently Asked Questions About Beef Birria Tacos
I get a ton of questions after people try this recipe for the first time, which is great! It means you’re applying that project management focus to cooking, and I love to see it. Most questions revolve around adapting the cook time or the spice level. Remember, we need to keep things efficient but delicious!
For instance, how spicy should they be? That depends entirely on your dried chilies. Guajillo is mild and fruity, ancho is deeper and smoky, but if you want a real kick, toss in a couple of dried *chile de árbol* with your soaking peppers. Just a couple! They pack some serious heat. Adjusting the peppers is the easiest way to control the final flavor profile of your beef birria tacos.
Can I use the Instant Pot instead of a slow cooker for this Mexican beef stew?
Absolutely, you can convert this easily. If you’re trading the slow cooker for a pressure cooker, you’re speeding up the process significantly, which is great if you started your project too late in the day! After you blend your chili sauce and pour it over the beef chuck roast in the pot, seal it up and cook on high pressure for about 60 to 75 minutes. Make sure you let the pressure release naturally for at least 15 minutes before manually releasing the rest. That slow, natural depressurization helps keep the meat fibers tender rather than tough. It makes for a fantastic Mexican beef stew much faster!
Can I make everything ahead of time? Yes, and I highly recommend it!
What if I struggle to get the beef tender enough?
If you’ve gone the full 10 hours on low and your beef is still resisting a fork shred, don’t panic—that’s just a variable in your roast size or your cooker’s temperature. Instead of forcing it, just put the lid back on, maintain the low setting, and give it another hour. It will get there. The goal isn’t just shreddable meat; you want beef that falls apart with no effort. A quick note on flavor: if you feel like the sauce isn’t rich enough, this is when you might want to utilize the overnight chilling trick for that super-pure consome recipe. The depth of flavor really concentrates overnight.
What is the purpose of dipping the tortilla in the consommé before frying?
This is arguably the most important step for achieving true quesabirria tacos perfection! Dipping the tortilla into the fat and liquid from the stew base does three things: One, it colors the tortilla that gorgeous deep red-orange. Two, it seasons the tortilla itself so it’s not just a bland wrapper. And three, it softens the corn right before it hits the heat, which creates the best textural contrast—crispy on the outside, tender and cheesy on the inside. Just a quick dip, don’t soak it until it falls apart!
Do I have to use lard for frying the tortillas?
Lard is the traditional choice, and honestly, it imparts a richer, more authentic flavor that complements the beef stew really well, adding to that street food vibe you are going for. However, if you are making this for a crowd and want a slightly cleaner profile, use a neutral oil like canola or avocado oil for frying. If you’re heading toward other rich, savory dishes soon, like my albondigas soup, you’ll learn that fat choice matters! Just make sure whatever you use is hot enough so the tortilla crisps quickly without absorbing too much grease.
Nutritional Estimate for Your Meal
Look, I’m not a nutritionist—I’m a project manager who learned how to optimize flavor while keeping weeknight schedules intact! So, take these numbers with a grain of salt, because different brands of broth or types of cheese can definitely swing these values. But I always run a quick check on my efficient recipes just to see where things land. This section gives you a rough baseline for planning purposes, especially if you’re tracking macros or just trying to keep things balanced.
Based on a yield of 6 servings (which equals two tacos and about a quarter cup of consommé for dipping per person), here is the average projection:
- Serving Size: 2 tacos with 1/4 cup consommé
- Calories: 550
- Fat: 30g
- Carbohydrates: 35g
- Protein: 40g
- Sugar: 6g
- Sodium: 750mg
It’s a hearty meal, no doubt, thanks to that rich beef and the cheese! But notice the protein content—that 40 grams of protein is fantastic fuel. If you were looking to lighten this up a bit, you could easily reduce the cheese or skip the extra oil/lard when frying the tortillas. When I was testing for lighter meals recently, I even experimented with using similar liquid-based cooking concepts for my cottage cheese ice cream recipe, just to see how far I could push the protein without sacrificing taste. It just proves that knowing the raw numbers helps you make smart adjustments to your food projects!
Again, these estimates are calculated based on the ingredients listed in the core recipe. Your sourcing and portioning will ultimately decide the final tally, but it gives you a solid starting point for enjoying these incredible beef birria tacos!
PrintSlow Cooker Beef Birria Tacos with Consommé

Make authentic, tender beef birria and rich dipping consommé using your slow cooker for an easy, flavorful street taco experience.
- Prep Time: 25 min
- Cook Time: 9 hours
- Total Time: 9 hours 25 min
- Yield: 6 servings 1x
- Category: Dinner
- Method: Slow Cooking
- Cuisine: Mexican
- Diet: Low Fat
Ingredients
- 3 lbs beef chuck roast, cut into large chunks
- 1 cup dried guajillo chilies, stems and seeds removed
- 1/2 cup dried ancho chilies, stems and seeds removed
- 4 cups beef broth
- 1/2 white onion, quartered
- 6 cloves garlic
- 2 tablespoons apple cider vinegar
- 1 tablespoon dried oregano
- 1 teaspoon cumin seeds
- 1 teaspoon black peppercorns
- 4 whole cloves
- 1 bay leaf
- 1 tablespoon salt
- 1 teaspoon black pepper
- 1 cup water (for soaking chilies)
- 1 cup white onion, diced (for serving)
- 1 cup fresh cilantro, chopped (for serving)
- 12 corn tortillas
- 1 cup Oaxaca or Monterey Jack cheese, shredded
- Oil or lard for frying
Instructions
- Place dried chilies in a saucepan and cover with water. Bring to a boil, then remove from heat, cover, and let soak for 30 minutes until soft.
- Drain the chilies, reserving about 1/2 cup of the soaking liquid. Place the softened chilies in a blender with the beef broth, quartered onion, garlic, vinegar, oregano, cumin, peppercorns, cloves, bay leaf, salt, and pepper. Add a splash of the reserved chili water if needed to blend. Blend until completely smooth.
- Place the beef chunks in the basin of your slow cooker. Pour the blended chili sauce over the beef.
- Cook on low for 8 to 10 hours, or on high for 4 to 5 hours, until the beef is fork-tender.
- Remove the beef from the slow cooker and shred it using two forks. Skim any excess fat from the surface of the liquid remaining in the slow cooker; this liquid is your consommé. Keep the consommé warm.
- To assemble quesabirria tacos, dip each corn tortilla briefly into the warm consommé to soften it.
- Place the dipped tortilla on a hot, lightly oiled skillet or griddle. Top half the tortilla with shredded beef and a sprinkle of cheese. Fold the tortilla in half.
- Cook for 2 to 3 minutes per side until the tortilla is crisp and the cheese is melted.
- Serve the tacos immediately with small bowls of the warm consommé for dipping. Garnish tacos with diced onion and cilantro.
Notes
- For the richest consommé, chill the cooking liquid overnight after shredding the meat; the fat will solidify on top and you can easily remove it before reheating.
- Use lard instead of oil when frying the tortillas for a more traditional street taco flavor.
- If you do not have a slow cooker, you can cook this dish in a Dutch oven at 325°F (160°C) for 3 to 4 hours.
Nutrition
- Serving Size: 2 tacos with 1/4 cup consommé
- Calories: 550
- Sugar: 6
- Sodium: 750
- Fat: 30
- Saturated Fat: 12
- Unsaturated Fat: 15
- Trans Fat: 1
- Carbohydrates: 35
- Fiber: 5
- Protein: 40
- Cholesterol: 120