

When you think of classic Italian desserts, there’s just something about the crisp crunch followed by that cool, sweet cream that calls to you, right? For years, I thought making truly authentic cannoli was too much of a project—too messy, too complicated—until I applied a little project management thinking to it. Believe me, you don’t need to be a professional pastry chef to nail this. This is the definitive cannoli recipe from scratch. We are tackling both the perfectly blistered, crispy fried shells and that incredibly smooth, traditional ricotta filling. We engineered this process to be streamlined so you can bring a piece of Sicily right into your Chicago apartment kitchen without the stress. You’ll find this method makes what I honestly think is the best cannoli recipe out there.
- Why This Authentic cannoli recipe is Your New Go-To
- Gathering Ingredients for Your cannoli recipe
- Step-by-Step Instructions for the Perfect cannoli recipe
- Cannoli Making Tips for Success
- Variations on the Traditional Sicilian Pastry
- Serving Suggestions for Your cannoli recipe
- Storage and Reheating Instructions for cannoli
- Frequently Asked Questions about this cannoli recipe
- Estimated Nutritional Data for Your Homemade Cannoli
Why This Authentic cannoli recipe is Your New Go-To
When I look at desserts like this, I think about efficiency. Most people skip making Homemade Cannoli because they see the frying and the draining as hurdles. But when you break it down, it’s just a few clear, sequential phases. That’s the project manager in me talking! This approach ensures you get the texture right every time, making this the Best Cannoli Recipe you’ll ever use.
Achieving Bakery-Quality Crispy Cannoli Shells
The trick to that amazing shatter is in the liquids we use for the dough. Seriously, don’t skip the wine and vinegar! Those acidic components react during the high heat of frying, which creates those beautiful little bubbles and that signature crunch in the shell. Plus, maintaining a consistent 375°F oil temperature is non-negotiable. That high heat crisps the outside before the dough has time to soak up too much oil. That’s my main temperature control tip for success.
The Secret to a Smooth Ricotta Filling Recipe
If you mess up the filling, the whole thing falls flat. The absolute biggest pain point for achieving a Sweet Ricotta Cream is moisture. My biggest piece of advice for this Ricotta Filling Recipe is to drain that ricotta for a full 8 to 12 hours. I mean it—overnight in the fridge, sitting over a bowl. If you skip this, your filling will be soup, and those gorgeous crispy shells will turn soggy in minutes. It’s worth the wait, trust me on this one step.
Gathering Ingredients for Your cannoli recipe
Okay, now that we know why this works, let’s talk about the materials. Just like any good project, you need the right supplies for the job. Since we are going completely from scratch for these Homemade Cannoli tubes, we need clear prep for the dough, the filling, and what you’ll use for the final touch. Everything needs to be ready before we start mixing, or timing gets thrown off track!
For the Crispy Cannoli Shells Dough
This is where the magic starts for those crunchy shells. You’ll need:
- 2 cups all-purpose flour
- 1 tablespoon granulated sugar
- 1/2 teaspoon ground cinnamon (for warmth!)
- 1/4 teaspoon salt
- 1 large egg
- 1/4 cup dry white wine
- A splash of Marsala wine (1/4 cup)—this gives it that real, traditional Sicilian flavor profile, don’t skip it if you can find it!
- 2 tablespoons unsalted butter, melted
- 1 teaspoon white vinegar
- Vegetable oil, for frying (you’ll need a good couple of inches deep)
For the Creamy Sweet Ricotta Filling
This filling must be ready to go, meaning your ricotta needs to have been drained overnight. No excuses here! You need:
- 1 pound whole milk ricotta cheese, drained overnight until it’s barely damp.
- 1 cup powdered sugar, sifted really well to avoid lumps.
- 1/2 teaspoon vanilla extract
We’ll also need mini chocolate chips and extra powdered sugar for dusting/dipping those ends. If you’re looking for more great dessert recipes to pair this with, check out our main collection!
Step-by-Step Instructions for the Perfect cannoli recipe
Alright, let’s build this masterpiece. Remember how I said we treat recipes like projects? This is where we execute the plan. We aren’t rushing anything; we are following the sequence exactly. Get your station set up before you start; having everything ready is how we manage complexity.
Project Phase 1: Making and Resting the Dough
First up, the dough for your Crispy Cannoli Shells. In a big bowl, whisk together the flour, sugar, cinnamon, and salt until everything is evenly distributed. In a separate, smaller bowl, take your egg, both wines (white and Marsala—that’s key!), the melted butter, and the vinegar, and give them a good whisking.
Now, pour the wet stuff into the dry stuff. Mix it with a fork until it gets shaggy, and then dump it onto your counter. Knead this dough hard for about five minutes. It should feel smooth and manageable when you’re done—not sticky, but not dry either. Wrap that ball up tight in plastic wrap. This rest period is crucial; you must let it sit for at least one full hour at room temperature. This lets the gluten relax, which is what lets you roll it out super thin later without it snapping back at you.
Project Phase 2: Rolling and Frying the Crispy Cannoli Shells
Once rested, cut the dough into four even balls. Take one ball—keep the others covered!—and roll it out thinner than you think you need to. If you have a pasta roller, go to setting 6 or 7. If you’re rolling by hand, keep going until you can almost see your hand through it. Cut this thin sheet into 4-inch circles or squares.
You need to wrap these pieces around your metal cannoli tubes, making sure the edges overlap a bit. Brush that overlap seam with a little water or egg white to seal it tight—if it pops open in the fryer, you’ll have a mess! Next, heat up at least two inches of vegetable oil in a heavy pot to exactly 375°F. Seriously, use a thermometer! Carefully drop in two or three pieces at a time. Fry for about one to two minutes per side until they bubble up and turn a nice golden brown. Use tongs to hold the tubes submerged so they cook evenly. Pull them out, slide them right off the tubes onto paper towels, and let them cool completely. You just made Fried Pastry Tubes!
Project Phase 3: Preparing the Sweet Ricotta Cream
While those shells cool, we tackle that luscious filling. Remember that drained ricotta we prepped? It’s time for the “project manager trust step.” Place that ricotta into a fine-mesh sieve set over a clean bowl. Grab a spatula and push every bit of that cheese through the sieve. This breaks up any grainy texture and gets you that perfectly smooth Sweet Ricotta Cream. Discard whatever is left behind—it’s not going in!
In a separate, clean bowl, combine the strained ricotta, the sifted powdered sugar, and the vanilla. Mix this gently until it’s just combined. Stop mixing as soon as it looks uniform. Overmixing whips too much air in or breaks down the fat structure, leading to a runny mess later on, especially if you’re looking for a true Creamy Italian Dessert.
Final Assembly: Filling Your Homemade Cannoli
This is the moment of truth, the grand finale for your Italian Dessert Recipes! You must, and I mean *must*, fill the cooled shells immediately before serving. If you fill them 30 minutes ahead, they will start weeping and softening, and all our hard work on those crispy shells goes out the window.
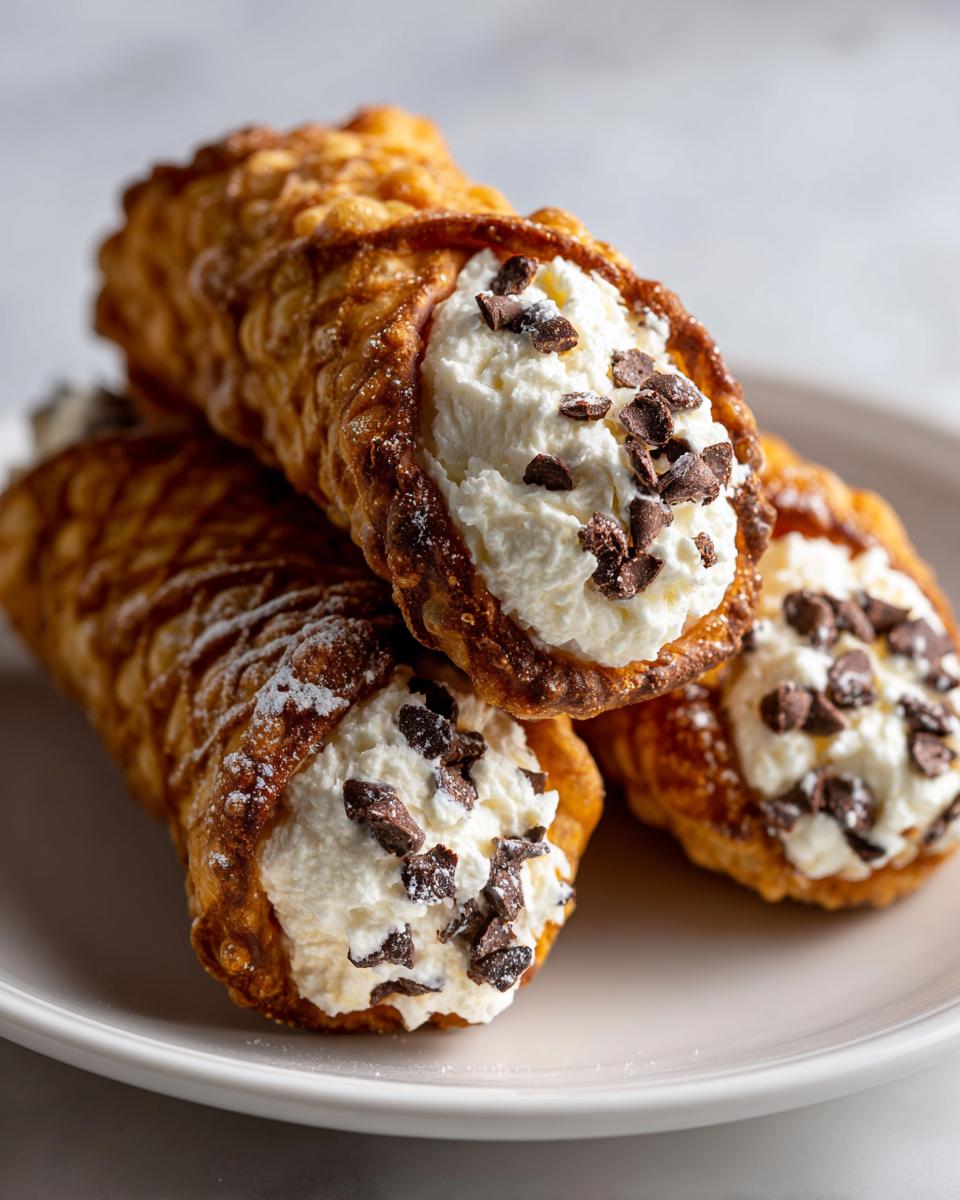
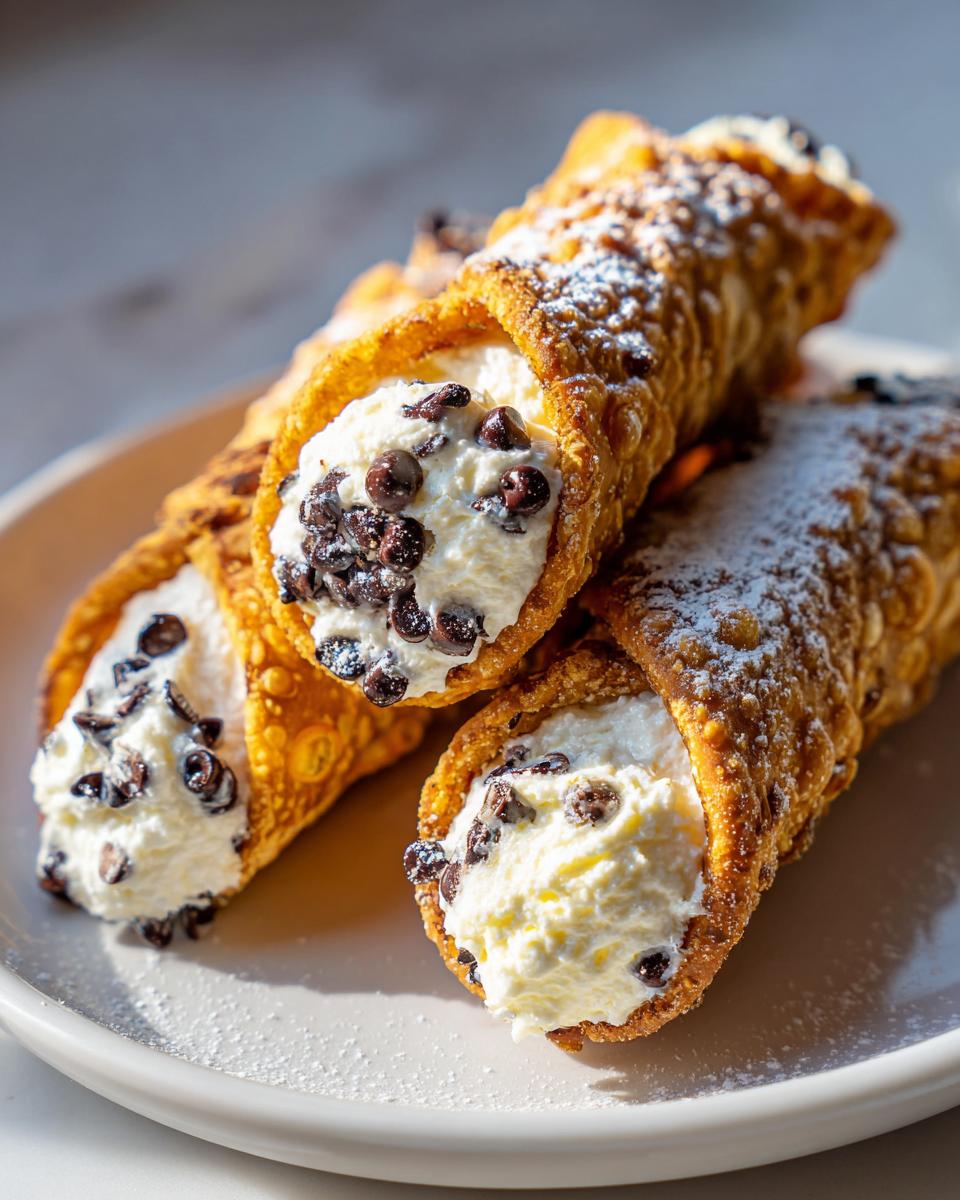
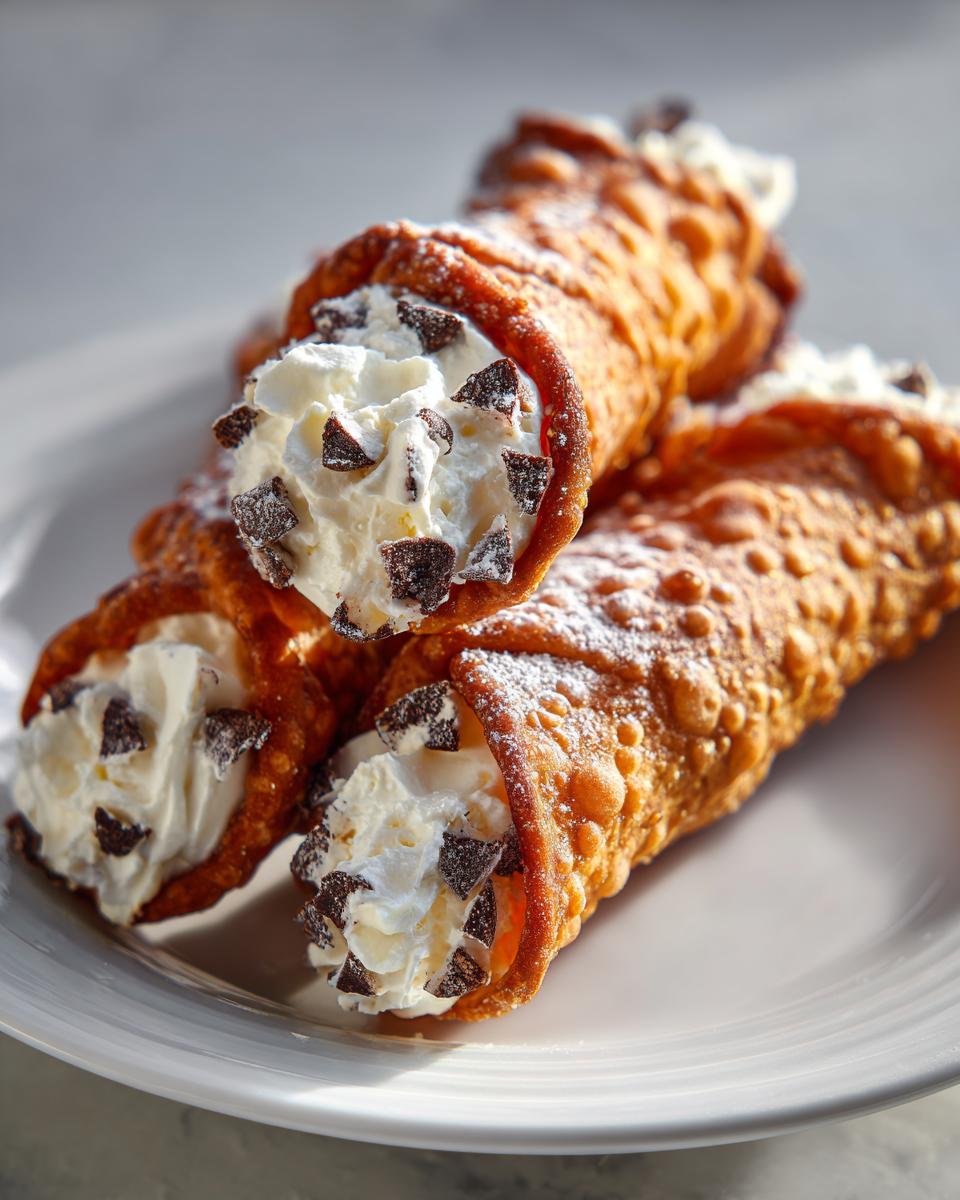
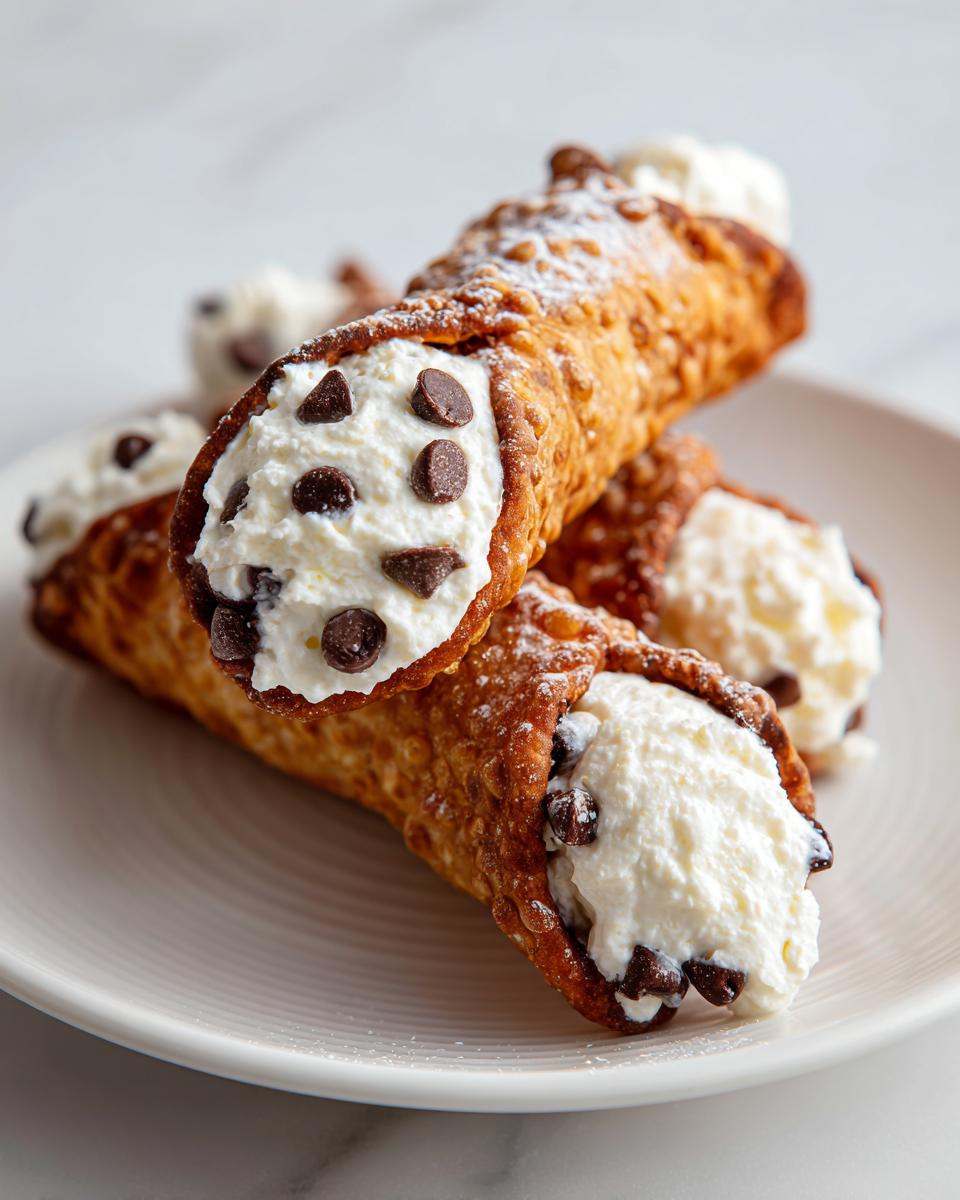
Grab a piping bag fitted with a star tip—it makes the filling look so much nicer. Pipe that glorious ricotta cream into both ends of the cooled, empty shells until they are plump. For a professional look, dip the ends right into a small bowl of mini chocolate chips. A final light dusting of powdered sugar right before serving? Perfection. That’s how you conquer this complex bake!
Cannoli Making Tips for Success
Making these from scratch means we have to stay sharp on the details if we want the absolute best result. Mastering this cannoli recipe really comes down to controlling two things: moisture and timing. It’s not about complicated steps; it’s about respecting the ingredients and when you combine them. These Cannoli Making Tips are what separate a good attempt from a spectacular, authentic batch.
Managing Moisture in the Ricotta Filling
Look, I know I keep hammering this point, but it saves the entire dessert: you must drain the ricotta overnight. If you try to rush this, you’re aiming for a thick, Creamy Italian Dessert, but what you’ll end up with is runny ricotta soup that eats through your shells instantly. Sieve it, cover it vaguely, and let gravity pull out that excess water while it chills in the fridge. This is non-negotiable magic.
Keeping the cannoli recipe Shells Crisp
The second key is assembly timing, which is directly tied to the frying step. Make sure those shells are completely cool—I mean stone cold—before you even think about piping in the filling. More importantly, only fill them right before you serve them. If you bake these on a Saturday for a Sunday party, you can make the shells and the filling, but they must stay separate. Fill them ten minutes before guests arrive to guarantee that incredible, fresh crunch.
For more streamlined baking solutions, check out the rest of my dessert recipes!
Variations on the Traditional Sicilian Pastry
While I preach sticking to the proven classics—after all, this is the Best Cannoli Recipe for a reason—I know that sometimes you want to put your own spin on things. Making these from scratch means you control every variable, so adding a little flourish to the Ricotta Filling Recipe is totally fair game. We aren’t reinventing the wheel, just polishing it up a bit for a modern kitchen.
Think of these additions as small tweaks to your project specifications. You stick to the perfect crisp shell, but we can play with the interior flavor profile.
Adding Zest and Spice to the Filling
If you want to elevate that creamy texture, citrus zest is your best friend. A nice amount of fresh orange zest works miracles with the ricotta; it cuts through the sweetness just enough to make it bright. Lemon zest is fantastic too, giving it a cleaner, tarter edge. Think about what you are serving these with.
For the spice lovers? While the dough has a nice hint of cinnamon, you can absolutely dust the filling with a tiny bit more nutmeg or even a pinch of ground cloves right before you pipe them. Just remember, when you’re adding strong flavors, start small. Taste testing the filling (after chilling!) is the best way to project the right flavor balance.
Elevating the Ends with Candied Fruit and Nuts
We already talked about chocolate chips, which are classic, but if you want to go deeper toward that authentic Sicilian Pastry flavor, you need candied citrus peel. Get a good quality orange peel or maybe even a mixture of mixed candied fruit, finely chop it up, and press that onto the filling ends instead of chocolate chips. It gives a chewy texture contrast that is just amazing.
Nuts are another great project enhancement. Finely chopped pistachios, especially if you can find vibrant Sicilian ones, look gorgeous against the white filling base. Toast them lightly for about five minutes before chopping; that really brings out their earthy flavor and ensures they don’t go stale sitting around in the filling.
A Quick Note on Chocolate Variations
If you’re set on chocolate, you have options beyond the mini chips! Instead of pressing the chips onto the ends, you can fold a quarter cup of chopped dark chocolate (around 60-70% cacao) directly into the filling before you chill it. This distributes that rich chocolate flavor throughout the entire Sweet Ricotta Cream, rather than confining it to the ends. Just be careful not to overmix when folding in the chocolate, or you risk deflating that beautiful smooth texture we worked so hard to achieve!
Serving Suggestions for Your cannoli recipe
So, you’ve nailed the crisp shells and the perfect, smooth filling. Congratulations! You’ve created a truly impressive Homemade Cannoli. Now, how do you serve them up so everyone knows they just ate dessert perfection? Because this is such a rich, decadent Italian treat—full of fatty ricotta and fried pastry—the key is offering something that cleanses the palate between bites. This makes them an absolute showstopper for any Dessert for Parties.
Don’t just put them on a plate! Presentation matters, even when you’re trying to keep things straightforward, which is my whole philosophy here. A little effort goes a long way toward proving you made these babies from scratch.
The Perfect Drink Pairing
You need something to cut through that richness. Forget heavy sodas or milk, which just add more weight. If you are serving these after a big Italian dinner, you should look toward traditional pairings. A small glass of chilled espresso is phenomenal—the bitterness is the perfect counterpoint to the sweet cream.
If you prefer something alcoholic, skip the sweet dessert wines. I find a crisp, slightly acidic Prosecco or a dry sparkling wine does the trick. The bubbles scrub your palate clean. In the summer, though, nothing beats a little icy glass of limoncello. It’s a classic Sicilian finish that complements the vanilla and sugar perfectly.
Making a Beautiful Platter
When setting these out, don’t just stack them. I always arrange mine on a simple white or slate platter. The contrast between the golden-brown shell and the white cream filling looks amazing.
- Dust them right before they hit the table. That light dusting of powdered sugar we talked about makes them look professional, but if you dust them too early, the sugar absorbs surface moisture and just looks wet later on. Timing is everything!
- Use the garnish as a border. If you dipped the ends in chocolate chips or pistachios, use some loose chips or nuts to decorate the platter itself between the cannoli. It ties the presentation together.
- Offer a side of fresh fruit if you are serving a crowd. Think raspberries or blackberries. Their slight tartness is the perfect light element when someone needs a break from the sweetness of the cannoli recipe.
Storage and Reheating Instructions for cannoli
This is the part that trips up everyone following a Homemade Cannoli recipe—the storage plan. If you want those amazing, crunchy, Fried Pastry Tubes to stay crisp, you have to think like a project manager again: separate components, then final assembly just before deployment. You can’t make these the day before a party and leave them sitting on the counter filled!
Keeping Shells and Filling Separate is Key
This is my number one rule regarding longevity for any cannoli recipe. The shells and the cream need entirely different environments. The shells—once completely cooled after frying—should be stored airtight at room temperature. No fridge for the shells! Cold air actually encourages moisture transfer and can make them limp faster. A sealed, dry container keeps them perfect for maybe three or four days.
The ricotta filling, however, needs to stay cold because of the fresh dairy. Store the well-edrained, mixed filling in an airtight container in the refrigerator. It holds up beautifully for about five days, thanks to all that sugar—which acts as a preservative, as you well know.
The Truth About Storing Assembled Cannoli
If you absolutely must assemble them ahead of time—maybe you are setting up for a big event and just don’t have time the day of—you can fill them up to about an hour before serving. I’ve done this in a pinch. But you need to manage expectations. That one hour is the absolute maximum before the moisture from the Sweet Ricotta Cream starts softening the pastry, especially near the ends.
If you want the best experience, fill them right as guests are sitting down. Don’t try to reheat filled cannoli; that’s not really a thing! If you try to warm them, you’ll just end up with warm, soggy dough and melted filling. Stick to separating the components. It’s the most reliable way to deliver that perfect textural contrast that makes this genuine slice of Sicilian Pastry so special.
Frequently Asked Questions about this cannoli recipe
I get a ton of questions when people try tackling an authentic cannoli recipe for the first time. It’s understandable; we are dealing with frying and dairy management here! Think of these as quick troubleshooting sessions to ensure your project result is flawless.
Can I make the cannoli shells ahead of time?
Yes, you absolutely should make the shells ahead of time! Remember what I said about the structural integrity of these Fried Pastry Tubes? Once they are completely cooled after frying—and I mean cool to the touch—you can store them in an airtight container at room temperature for up to four days. Keep them away from humidity, and they’ll stay wonderfully crispy. Just don’t put them in the fridge; they get duller faster there. Assembly is the last step before the party starts.
What is the best substitute for Marsala wine in the dough?
That’s a great question for anyone trying to source ingredients efficiently. Marsala wine provides a specific warmth that really elevates the dough, but if you can’t find it, don’t panic. You can substitute it with a dry sherry—that’s probably the closest flavor profile. If sherry isn’t handy, a dark rum or even a good quality brandy, used in the exact same measure, can work wonders. These spirits help tenderize the dough and contribute to that classic taste profile you find in the best Sicilian Pastry.
Is there a no-bake option for the cannoli filling?
That’s where people sometimes get confused about the “No Bake Cannoli Filling” idea. The great news is that our incredible Ricotta Filling Recipe is technically *no-bake*! We aren’t using an oven for the cream at all. The only cooking involved in the entire dessert is the frying of the shells. Once you strain the ricotta overnight, you are just mixing, chilling, and piping that Sweet Ricotta Cream. So, yes, the filling component is entirely no-bake; you just have to handle the shells first!
If you have other baking projects you want to streamline, explore all our dessert recipes!
Estimated Nutritional Data for Your Homemade Cannoli
While my focus here at Dishicious is always on flavor and efficiency, not clinical health metrics, I always keep the data transparent for folks who need to track things. Since ingredients like the amount of oil absorbed during frying and the exact volume of chocolate chips used can vary wildly, I want to stress that these numbers are strong estimates based on the core recipe for one standard-sized cannoli.
Keep in mind that the texture of your Homemade Cannoli—especially how much oil the dough soaks up—will shift these numbers slightly. But for a general idea of what you’re enjoying after tackling this rewarding cannoli recipe, here’s the breakdown:
- Serving Size: 1 cannoli
- Calories: Approximately 350 (This reflects the fried shell and the rich ricotta filling)
- Total Fat: Around 18g (This includes saturated fats from the butter and cheese)
- Carbohydrates: About 40g (Mostly from the sugar and flour dough)
- Protein: Roughly 10g (Thanks to that whole milk ricotta!)
This is definitely a special occasion Italian Dessert Recipe, not an everyday snack, but when you make them from scratch like this, you know exactly what’s in them, which is better than any store-bought version!
PrintAuthentic Homemade Cannoli Recipe: Crispy Fried Shells and Sweet Ricotta Filling

Make traditional Italian cannoli from scratch. This recipe provides clear steps for achieving crispy fried shells and a smooth, sweet ricotta filling, perfect for a classic dessert.
- Prep Time: 45 min
- Cook Time: 20 min
- Total Time: 1 hour 45 min
- Yield: 12 cannoli 1x
- Category: Dessert
- Method: Frying
- Cuisine: Italian
- Diet: Vegetarian
Ingredients
- 2 cups all-purpose flour
- 1 tablespoon granulated sugar
- 1/2 teaspoon ground cinnamon
- 1/4 teaspoon salt
- 1 large egg
- 1/4 cup dry white wine
- 1/4 cup Marsala wine
- 2 tablespoons unsalted butter, melted
- 1 teaspoon white vinegar
- Vegetable oil, for frying
- 1 pound whole milk ricotta cheese, drained overnight
- 1 cup powdered sugar, sifted
- 1/2 teaspoon vanilla extract
- 1/4 cup mini chocolate chips (optional, for garnish)
- Powdered sugar, for dusting (optional)
Instructions
- Prepare the Dough: In a large bowl, whisk together the flour, granulated sugar, cinnamon, and salt.
- In a separate bowl, whisk the egg, white wine, Marsala wine, melted butter, and vinegar.
- Pour the wet ingredients into the dry ingredients. Mix until a shaggy dough forms. Knead the dough on a lightly floured surface for about 5 minutes until smooth. Wrap the dough tightly in plastic wrap and let it rest at room temperature for at least 1 hour.
- Roll the Shells: Divide the dough into four equal pieces. Work with one piece at a time, keeping the others covered. Roll the dough out very thin, either by hand or using a pasta machine, until it is almost translucent (setting 6 or 7 on most machines).
- Cut the dough into 4-inch circles or squares.
- Shape the Shells: Wrap each dough piece around metal cannoli tubes, overlapping the edges slightly. Brush the overlapping seam with a little water or egg white to seal it securely.
- Fry the Shells: Heat 2 inches of vegetable oil in a deep, heavy-bottomed pot to 375°F (190°C). Carefully place 2-3 shells at a time into the hot oil, using tongs to hold the tubes submerged until the dough bubbles and turns golden brown, about 1-2 minutes per side.
- Remove the shells from the oil and immediately slide them off the tubes onto a paper towel-lined plate to drain excess oil. Let them cool completely.
- Prepare the Filling: Place the well-drained ricotta cheese in a fine-mesh sieve set over a bowl. Press the ricotta through the sieve using a spatula to remove lumps and achieve a smooth texture. Discard any solids left in the sieve.
- In a clean bowl, combine the strained ricotta, sifted powdered sugar, and vanilla extract. Mix until just combined and creamy. Do not overmix. Chill the filling for at least 30 minutes.
- Assemble: Just before serving, use a piping bag fitted with a large star tip to fill the cooled cannoli shells with the ricotta cream.
- Dip the ends of the filled cannoli into mini chocolate chips, if using. Dust the tops with powdered sugar before serving.
Notes
- Drain the ricotta cheese for at least 8 hours, or preferably overnight, in the refrigerator to remove excess moisture. This prevents a runny filling.
- If you do not have cannoli tubes, you can carefully wrap the dough around dowels or even tightly rolled aluminum foil tubes, but ensure the foil is sturdy and well-oiled.
- Fill the shells immediately before serving to keep the pastry crisp. Filling them too early causes the shells to absorb moisture and soften.
Nutrition
- Serving Size: 1 cannoli
- Calories: 350
- Sugar: 25
- Sodium: 110
- Fat: 18
- Saturated Fat: 10
- Unsaturated Fat: 8
- Trans Fat: 0
- Carbohydrates: 40
- Fiber: 1
- Protein: 10
- Cholesterol: 55