
You know those nights when you crave something sweet, something special, but the thought of a whole cake feels like way too much work? Or how about those potlucks where you want to bring something that’s totally impressive but also super easy to serve? Well, I’ve got your back with my absolute favorite cherry cheesecake hand pies! Seriously, they’re pure magic in a little pastry pocket. Imagine creamy, tangy cheesecake filling nestled right up against sweet, slightly tart cherry pie filling, all wrapped up in a flaky, golden crust. They’re basically a dream come true for anyone who loves dessert but also loves the idea of just grabbing something and going. I first made these for a neighborhood get-together when I was swamped, and let me tell you, they disappeared faster than you can say “delicious!”
- Why You'll Love These Cherry Cheesecake Hand Pies
- Gather Your Ingredients for Cherry Cheesecake Hand Pies
- Essential Equipment for Making Hand Pies
- Step-by-Step Guide to Perfect Cherry Cheesecake Hand Pies
- Tips for Success with Your Cream Cheese Hand Pies
- Make-Ahead and Storage for Cherry Cheesecake Hand Pies
- Frequently Asked Questions about Baked Hand Pies
- Estimated Nutritional Information
- Share Your Cherry Cheesecake Hand Pies!
Why You’ll Love These Cherry Cheesecake Hand Pies
Trust me, these little pockets of joy are a game-changer:
- Super Easy to Make: Seriously, we’re using store-bought pie crusts, so no fancy dough skills needed!
- Perfectly Portable: These are the ultimate handheld desserts – easy to grab and enjoy anywhere, whether it’s a picnic or just your couch.
- Crowd-Pleaser Guaranteed: The combo of creamy cheesecake and sweet cherries is a total winner that always disappears fast at parties and bake sales.
- Flavor Explosion: You get that delicious tang from the cream cheese filling, the sweetness of cherries, and a buttery, flaky crust all in one perfect bite.
- Versatile Treat: They’re fantastic for after-school snacks, potlucks, or just when you need a little sweet something for yourself.
- Quick to Whip Up: Ready in under an hour, making them ideal for those last-minute dessert emergencies or busy weeknights.
Gather Your Ingredients for Cherry Cheesecake Hand Pies
Alright, let’s get our supplies ready for these amazing cherry cheesecake hand pies! You won’t believe how simple it is. You’ll need:
- Two packages of refrigerated pie crusts – yep, the kind from the grocery store makes this super fast!
- An 8-ounce package of cream cheese, and make sure it’s softened up nice and smooth.
- A half cup of granulated sugar for that sweet cheesecake base.
- One egg, just lightly beaten, to help bind our cream cheese filling together.
- A teaspoon of vanilla extract – it just makes everything smell and taste better, right?
- One 21-ounce can of cherry pie filling. This is the star of the show!
- A tablespoon of fresh lemon juice to give our cherries a little zing, and
- A tablespoon of cornstarch to thicken everything up perfectly.
- For the topping, we’ll use an egg white, beaten, and two tablespoons of sugar for that gorgeous golden crunch.
You can find some other awesome dessert ideas on our site when you’re ready for more!
Essential Equipment for Making Hand Pies
Before we dive into making these yummy cherry cheesecake hand pies, let’s make sure you’ve got the right tools on hand! You’ll want a couple of standard baking sheets, some parchment paper to keep things from sticking (because nobody wants that!), and a round cookie cutter, probably around 4 or 5 inches wide. Grab a few mixing bowls – one for the cream cheese filling, one for the cherry stuff, and maybe one for your egg wash. Oh, and a fork is a must for crimping those edges nice and tight! We’ve got some other great kitchen tips and recipes, like these chicken wings, that you might find handy too!
Step-by-Step Guide to Perfect Cherry Cheesecake Hand Pies
Alright, let’s get these beautiful cherry cheesecake hand pies into the oven! It’s easier than you think, and the payoff a million times worth it.
First things first, crank up your oven to 375°F (190°C). While that’s heating up, get a couple of baking sheets lined with parchment paper. This little trick makes cleanup a breeze and stops anything from sticking, which is always a win.
Now, let’s make that heavenly cream cheese filling. In a medium bowl, grab your softened cream cheese and that half cup of granulated sugar. Beat ‘em together until they’re super smooth and happy. Then, beat in that egg and the vanilla extract until it’s all perfectly combined. Smell that? Already amazing!
Next up, the cherry filling! In a separate, smaller bowl, give the cherry pie filling, lemon juice, and cornstarch a good stir. You want that cornstarch to really mix in so it can do its thickening magic later.
Time to get our dough ready! Unroll those convenient pie crusts you bought. Use a round cutter – about 4 or 5 inches across is perfect – and cut out circles. You should get a good amount from each crust, usually around 6 to 8. Don’t toss those scraps; we might be able to make little pie bites!
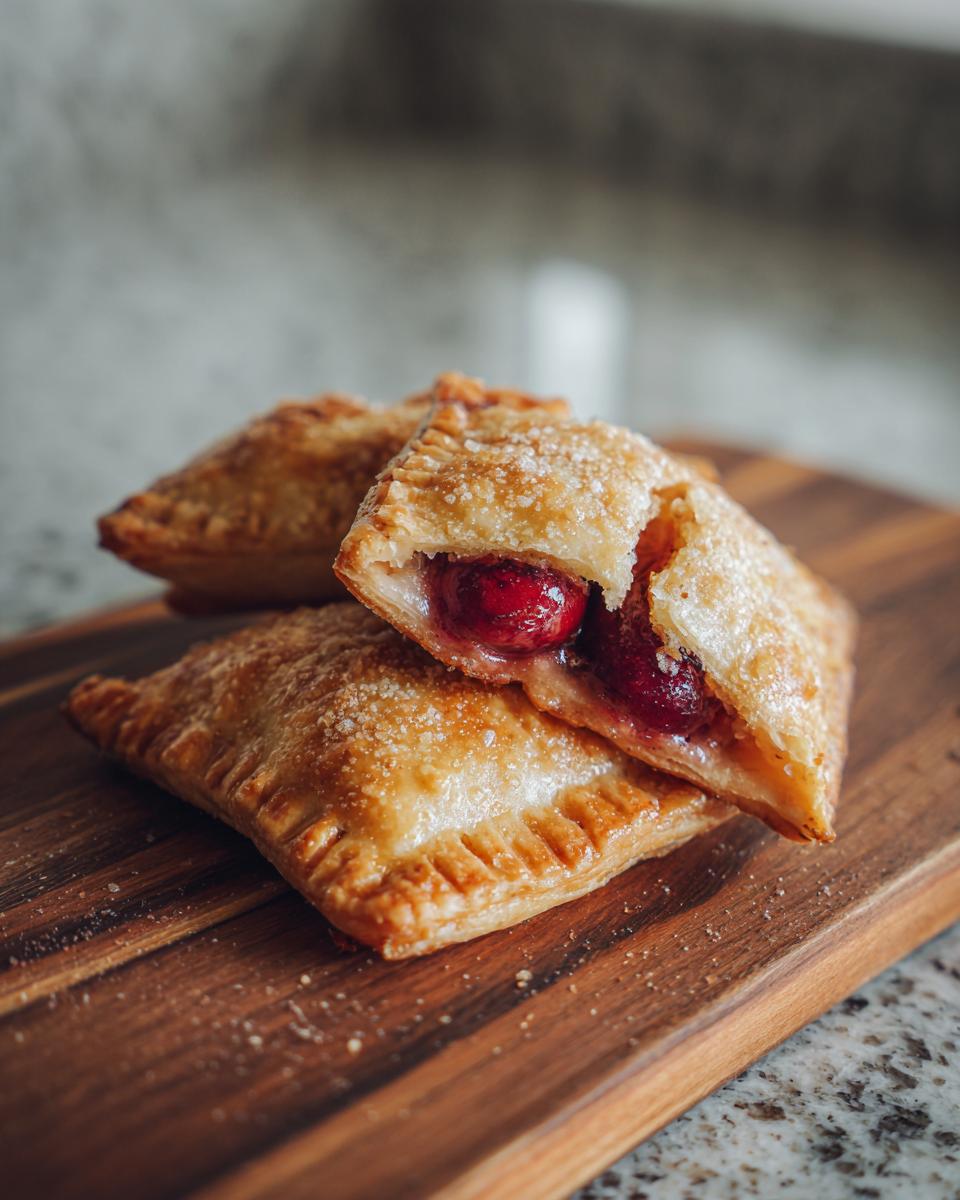
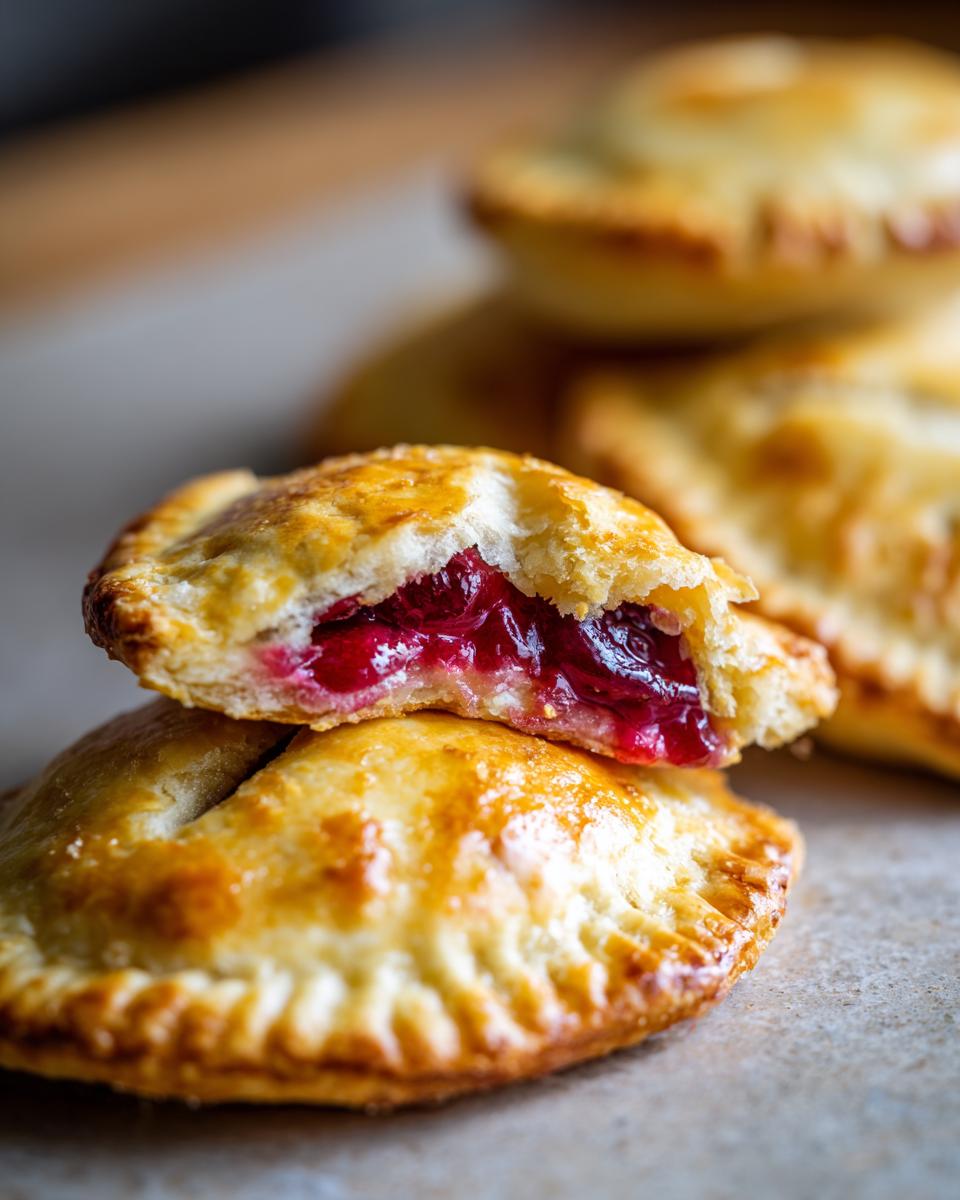
Now for the assembly! Take half of your dough circles. Spoon about 1 to 2 tablespoons of that dreamy cream cheese mixture onto one half of each circle, leaving a little border around the edge. Then, spoon about 1 to 2 tablespoons of the cherry filling right on top. Don’t overfill, or things might get messy!
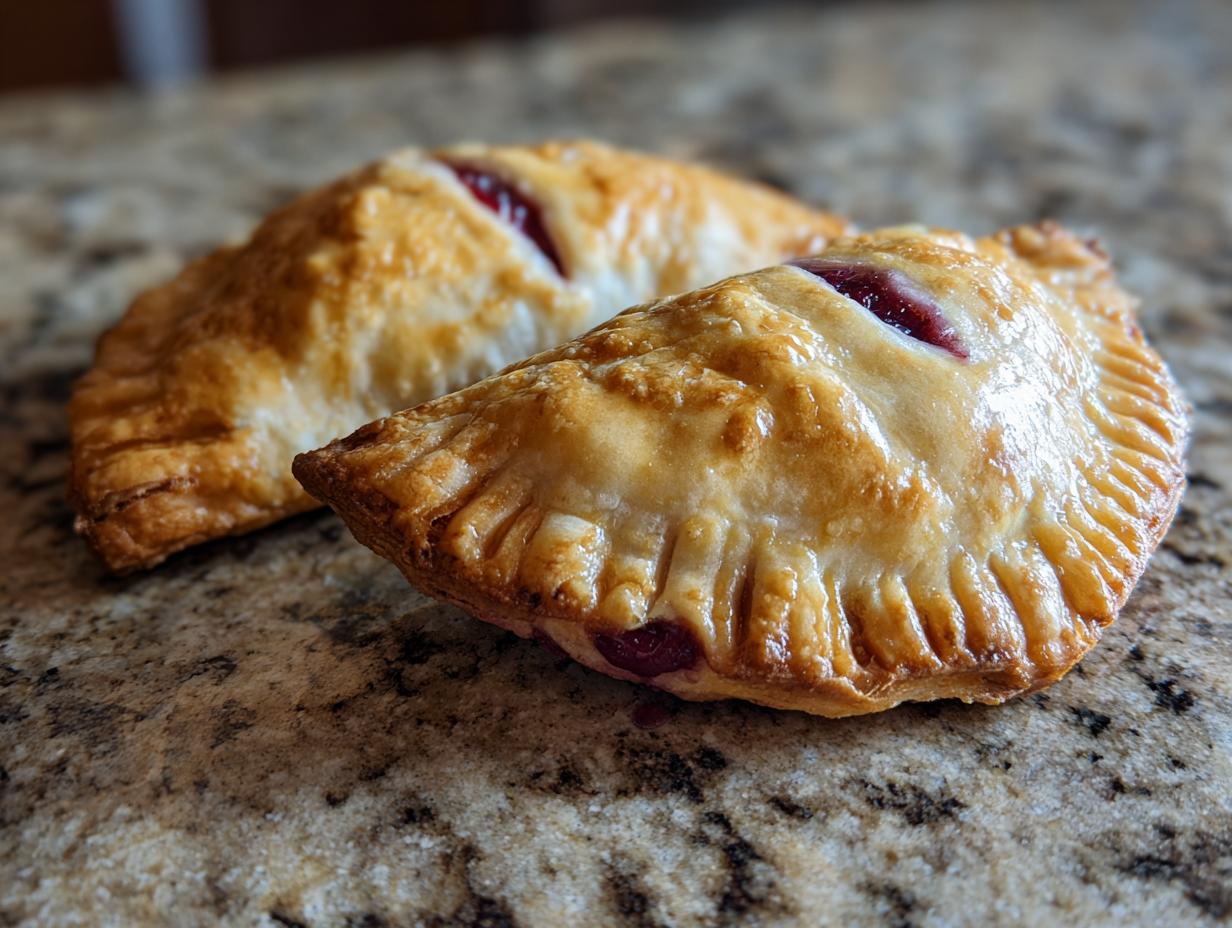
Before sealing, brush the edges of the dough circles with a little bit of that beaten egg white. It’s like glue! Then, carefully fold the other half of the dough circle over the filling to make a perfect half-moon. Press those edges down really, really well to seal them shut. Then, use a fork to crimp those edges – it looks pretty and keeps everything locked in.
Carefully place your adorable cherry cheesecake hand pies onto those prepared baking sheets. Brush the tops with the rest of the egg white and sprinkle generously with the remaining 2 tablespoons of granulated sugar. Oh, and don’t forget to cut a few small slits in the top of each one; this lets the steam escape while baking so they don’t puff up weirdly.
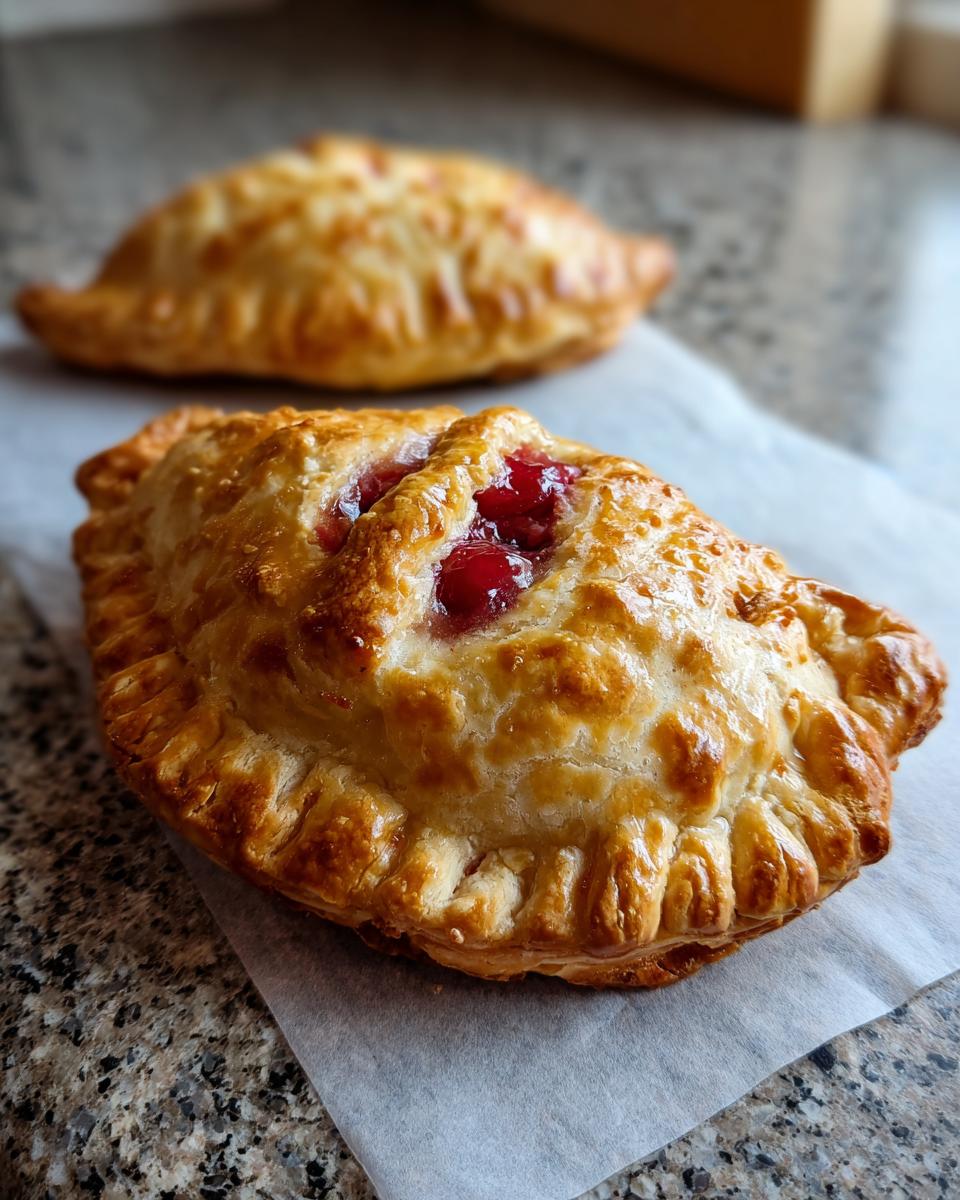
Pop them into your preheated oven and bake for about 20 to 25 minutes. You’re looking for a beautiful golden-brown crust and filling that’s gently bubbling in the center. Let them cool on the baking sheets for just a few minutes – they’ll be hot! – before carefully moving them to a wire rack to cool completely. They’re incredible on the sweeter side, and you can find more easy dessert for parties ideas over here!
Tips for Success with Your Cream Cheese Hand Pies
Alright, let’s talk about making these cream cheese hand pies absolutely perfect, every single time! I’ve picked up a few tricks along the way that really make a difference. First off, that cream cheese? Make sure it’s *really* softened. Like, leave it on the counter for at least an hour before you start. If it’s still cold, you’ll end up with lumpy filling, and trust me, nobody wants that! A smooth filling is key for these little gems.
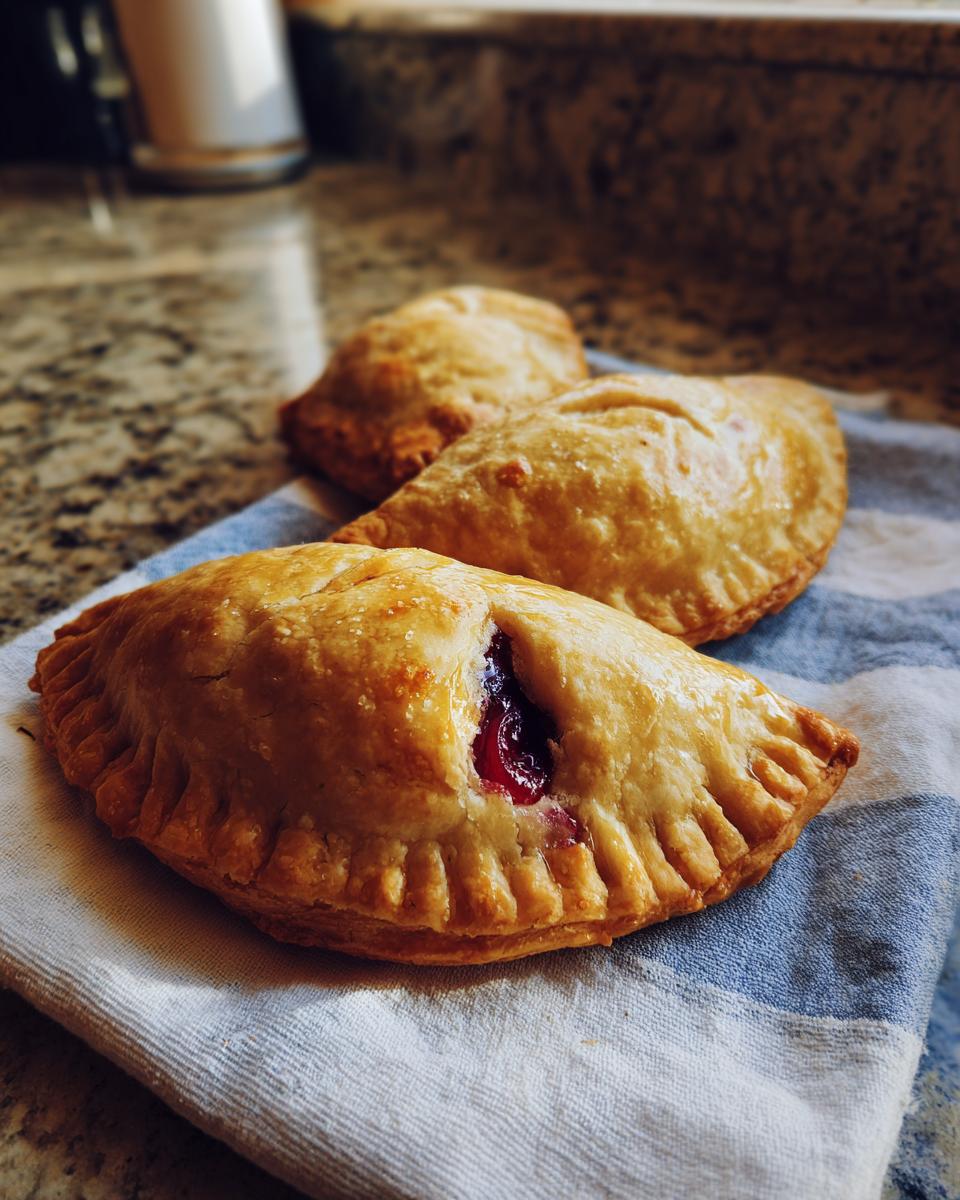
Sealing these babies is also super important. You want to press those edges together really firmly with your fingers, and then give them that pretty crimp with a fork. This little step ensures none of that delicious filling escapes while baking. And that golden-brown crust you see in pictures? It comes from that egg white wash and the sprinkle of sugar. Don’t skip it! It adds that lovely crunch and shine. For more cheesecake magic, check out my no-bake cheesecake filling recipe too!
Make-Ahead and Storage for Cherry Cheesecake Hand Pies
One of the best things about these cherry cheesecake hand pies is how awesome they are for prepping ahead! If you want to get a jump start, assemble the unbaked hand pies completely. Lay them out on a baking sheet (the same one you’ll bake them on later, just make sure it’s clean!) and pop the whole thing right into the freezer. Once they’re firm, you can pop them off the sheet and store them in a freezer bag for up to a month. When you’re ready to bake, just place them on a parchment-lined baking sheet and add a few extra minutes to the baking time – easy peasy!
Got leftovers? Totally fine! Let the baked hand pies cool down completely first. Then, just store them in an airtight container at room temperature for a day or two. If it’s super warm where you are, popping them in the fridge is totally okay too, they’ll just get a little firmer. For more creamy goodness, check out my pumpkin cheesecake!
Frequently Asked Questions about Baked Hand Pies
Got a few lingering questions about these delightful baked hand pies? I get it! Here are some common ones I hear:
Can I use homemade pie crust instead of store-bought?
Absolutely! While store-bought refrigerated pie crusts are my secret weapon for how quick these come together, a good homemade pie crust is fantastic too. Just make sure it’s chilled and rolled out to about the same thickness. You might even get a slightly flakier result with your favorite homemade recipe!
What about adding other fruits to the filling?
You totally can! While cherries are classic, feel free to get creative with other fruit pie fillings. Blueberry or raspberry would be amazing, and you could even mix them with the cream cheese filling for a marble effect. Just remember to use a filling that’s not too watery.
My hand pies leaked filling. What did I do wrong?
Oops! That happens sometimes. The most common reasons are not leaving enough of a border around the edge when you’re filling them, or not sealing the edges tightly enough. Make sure you press down really well with your fingers after folding, and then get a good crimp with the fork. Cutting those steam vents on top also helps prevent excess pressure!
Can I make these in an air fryer?
Yes, you definitely can try making these cherry cheesecake hand pies in an air fryer! Line your air fryer basket with parchment paper (cut to fit). You’ll likely need to cook them in batches at around 350°F (175°C) for maybe 10-15 minutes, keeping a close eye on them. They might brown a little quicker, so watch closely!
For more tips on using pie crust, check out my refrigerated pie crust recipe guide!
Estimated Nutritional Information
Just a heads-up, these numbers are pretty much estimates and can totally wiggle around depending on the brands you use and exactly how full you make those little pockets! But as a general idea, one of these yummy cherry cheesecake hand pies has about:
- Calories: 350
- Fat: 18g
- Carbohydrates: 40g
- Sugar: 25g
- Protein: 5g
These estimates should give you a good idea, but remember, taste is the most important part, right?
Share Your Cherry Cheesecake Hand Pies!
I’d LOVE to hear what you think! Did you make these delightful cherry cheesecake hand pies? Let me know in the comments below how they turned out, or if you tried any fun variations. I can’t wait to see your creations, and don’t forget to check out more dessert recipes!
PrintCherry Cheesecake Hand Pies

Easy handheld desserts combining tangy cream cheese and cherry filling in a flaky crust, perfect for sharing.
- Prep Time: 20 min
- Cook Time: 25 min
- Total Time: 45 min
- Yield: 12-16 hand pies 1x
- Category: Dessert
- Method: Baking
- Cuisine: American
- Diet: Vegetarian
Ingredients
- 2 refrigerated pie crusts
- 1 package (8 ounces) cream cheese, softened
- 1/2 cup granulated sugar
- 1 egg, beaten
- 1 teaspoon vanilla extract
- 1 can (21 ounces) cherry pie filling
- 1 tablespoon lemon juice
- 1 tablespoon cornstarch
- 1 egg white, beaten
- 2 tablespoons granulated sugar
Instructions
- Preheat your oven to 375°F (190°C). Line baking sheets with parchment paper.
- In a medium bowl, beat together the softened cream cheese and 1/2 cup granulated sugar until smooth. Beat in 1 egg and vanilla extract until well combined.
- In a separate small bowl, stir together the cherry pie filling, lemon juice, and cornstarch.
- Unroll the pie crusts. Use a 4-5 inch round cutter to cut out circles from each crust. You should get about 6-8 circles per crust.
- Place about 1-2 tablespoons of the cream cheese mixture onto one half of each circle, leaving a small border.
- Top the cream cheese mixture with about 1-2 tablespoons of the cherry pie filling.
- Brush the edges of the dough circles with the beaten egg white. Fold the other half of the dough circle over the filling to create a half-moon shape. Press the edges firmly to seal. Crimp the edges with a fork.
- Place the hand pies onto the prepared baking sheets. Brush the tops with the remaining egg white and sprinkle with the 2 tablespoons of granulated sugar.
- Cut a few small slits in the top of each hand pie to allow steam to escape.
- Bake for 20-25 minutes, or until the crust is golden brown and the filling is bubbly.
- Let the hand pies cool on the baking sheets for a few minutes before transferring them to a wire rack to cool completely.
Notes
- For a glaze, mix 1 cup powdered sugar with 1-2 tablespoons milk until smooth, then drizzle over cooled hand pies.
- You can freeze assembled, unbaked hand pies on a baking sheet until firm, then transfer to a freezer bag for up to 1 month. Bake from frozen, adding a few extra minutes to the baking time.
- Ensure the cream cheese is fully softened for a smooth filling.
Nutrition
- Serving Size: 1 hand pie
- Calories: 350
- Sugar: 25g
- Sodium: 200mg
- Fat: 18g
- Saturated Fat: 10g
- Unsaturated Fat: 8g
- Trans Fat: 0g
- Carbohydrates: 40g
- Fiber: 2g
- Protein: 5g
- Cholesterol: 40mg