
Listen, if you’re tired of the same old sandwich loaves cluttering up your weekend brunch board, it’s time we got a little sophisticated. I’m talking about taking those complex flavors usually reserved for dessert and folding them right into the structure of real, tangy bread. We’re making Cocoa nib sourdough, and trust me, it’s not sweet—it’s deep, earthy, and utterly phenomenal. You can check out some other great brunch ideas over at our collection of easy breakfast and brunch options.
This recipe is the perfect example of the Dishicious philosophy: we treat baking like a project that needs smart optimization. We’re aiming for that incredible, visible crumb structure and the visual appeal of top-tier artisanal bread, but we’re streamlining the process so you aren’t stuck in the kitchen all day. You get maximum flavor impact from those unsweetened cocoa nibs. This methodical approach ensures you get that stunning, highly-developed flavor and look without wrestling with complicated, rigid rules.
- Why This Cocoa Nib Sourdough is Your Next Project
- Essential Components for Perfect Cocoa Nib Sourdough
- Step-by-Step Instructions for Your Cocoa Nib Sourdough
- Tips for Success with Cocoa Nib Sourdough
- Serving Suggestions for Your Artisanal Bread
- Storage and Reheating Instructions
- Frequently Asked Questions About Chocolate Sourdough
- Estimated Nutritional Data for Cocoa Nib Sourdough
- Share Your Artisanal Bread Creations
Why This Cocoa Nib Sourdough is Your Next Project
If you’re looking to seriously impress without overcomplicating things, this is the loaf. We’re delivering high-end, artisanal bread results using a controlled, efficient process. Making this cocoa nib sourdough is surprisingly satisfying because you see the payoff in both flavor and looks.
-
Savory Chocolate Profile
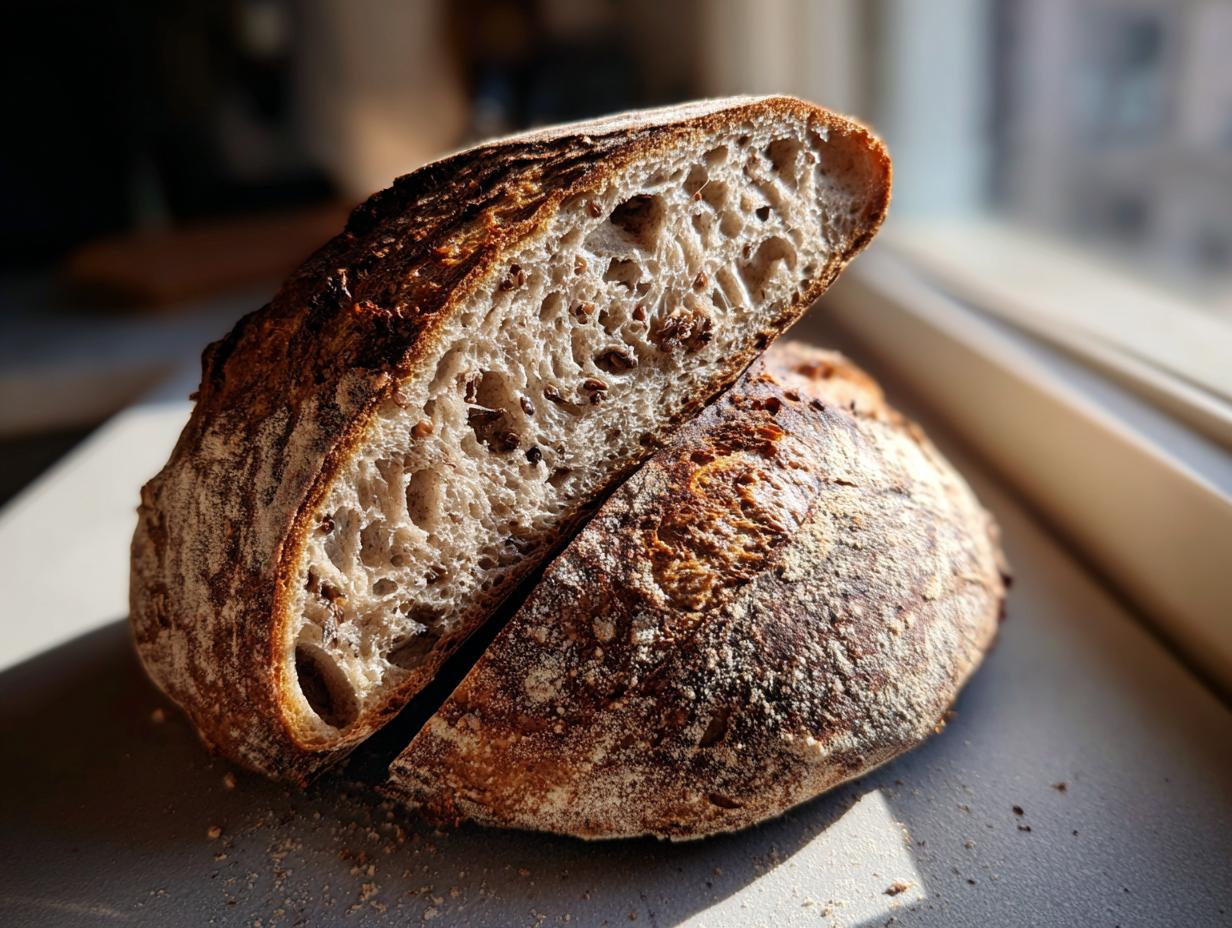
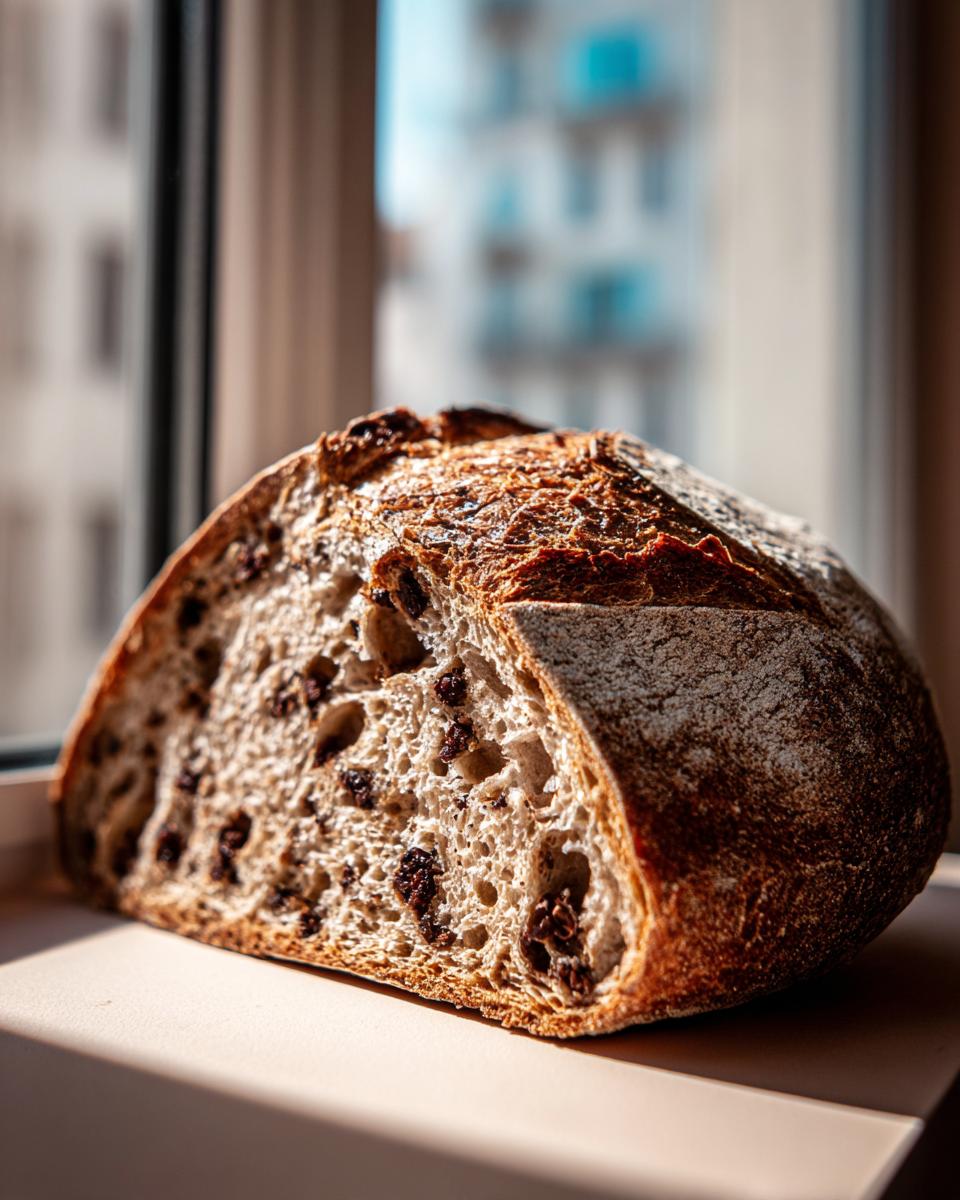
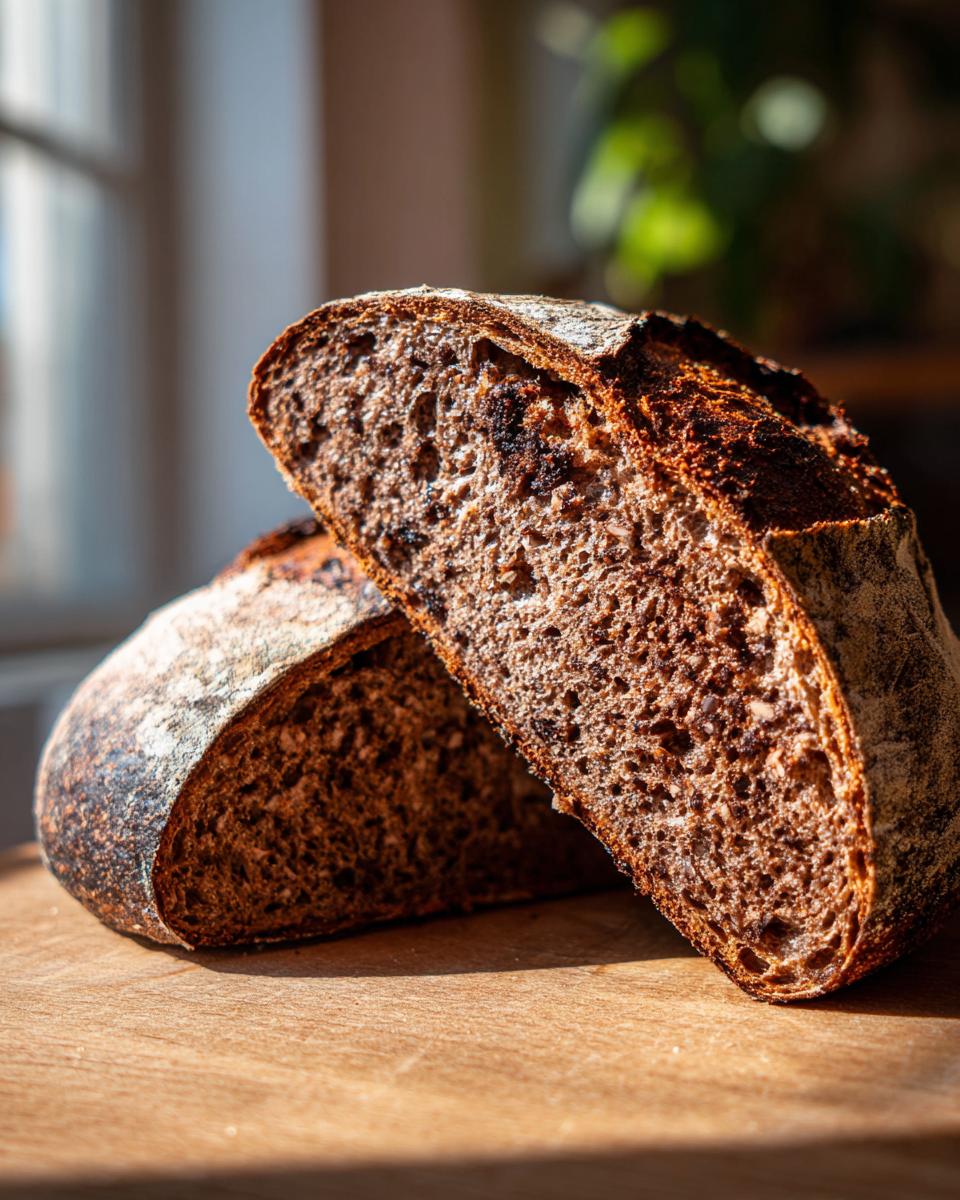
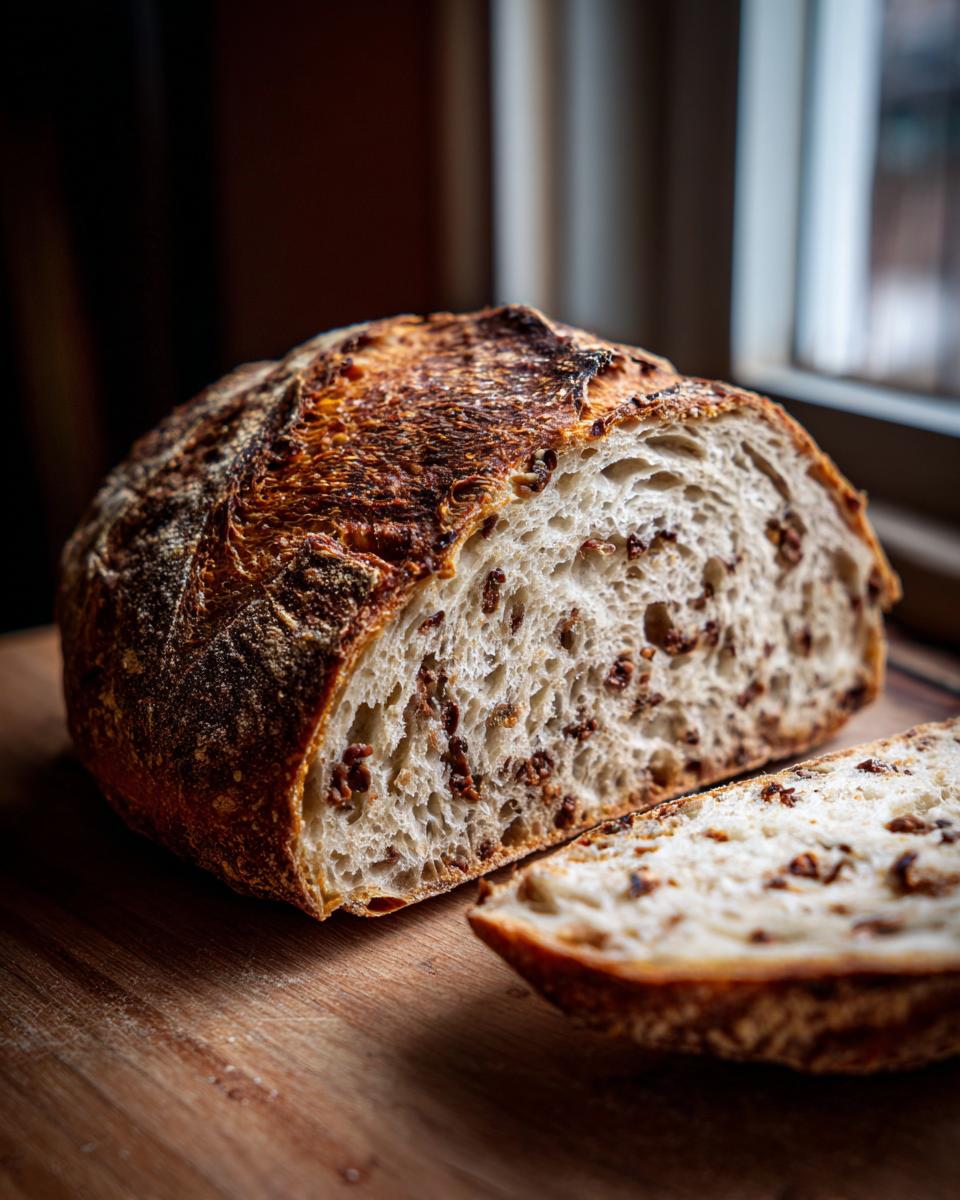
Forget sugary chocolate bread. The cocoa nibs we use are unsweetened. They break down just enough to create dark flecks throughout the dough, providing a fantastic, earthy bitterness that plays amazingly well against the sourdough tang. It’s sophisticated, not sweet!
-
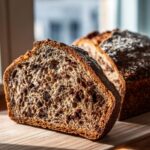
Achieving Stunning Bread Art and Crumb
That beautiful, open internal structure you see in bakery windows? We nail it here thanks to the long fermented-proofing. Plus, when you score the top before baking, those dark flecks peek out of the crust, making your loaf look like true bread art for your serving board.
Essential Components for Perfect Cocoa Nib Sourdough
Okay, just like any good project, we need the right materials upfront. Getting these foundational ingredients right is non-negotiable for achieving that structure and complex flavor profile in your cocoa nib sourdough. Using quality stuff here means you stress less during the long fermentation process later on. You can always learn how to manage your starter better if you need to, check out my guide to sourdough starter from scratch for beginners!
Here is exactly what you need for one beautiful loaf:
- 100g active sourdough starter
- 350g warm water
- 500g bread flour
- 10g fine sea salt
- 30g unsweetened cocoa nibs
Ingredient Notes and Substitutions
The flour matters a ton here since we aren’t kneading much. You absolutely need high-quality bread flour; it has the protein structure necessary to hold up to the weight of those nibs and give you a good oven spring. When you buy your nibs, make absolutely positive they are unsweetened—we want earthy chocolate notes, not sugar!
Also, remember that tip about making the color darker? If you want that deeper hue, swap out 10 grams of the bread flour for dark rye flour. It tightens up the crumb slightly, but adds an amazing earthy baseline flavor.
Step-by-Step Instructions for Your Cocoa Nib Sourdough
Alright, this is where my project management skills really kick in. We’re controlling the variables to ensure this cocoa nib sourdough develops that perfect, tangy flavor and texture. Don’t rush anything, especially the fermentation stages; that long, slow process is what builds our structure and flavor!
First thing’s first: mix that active starter right into your warm water in your main bowl. Then, whisk your flour and salt separately—this ensures the salt is evenly distributed. Add the dry mix to the wet ingredients and just combine until you have a shaggy mess. Then we wait 30 minutes for that autolyse rest period.
Mixing and Bulk Fermentation: Building Structure
After the rest, it’s time for the stretch and folds. This builds strength! Gently stretch a section of the dough up and fold it over itself. Turn the bowl a quarter turn and repeat until you’ve done all four sides. You’ll repeat this series every 30 minutes for two full hours—that’s four sets total.
Here’s the trick with the inclusions: after you finish that fourth set of folds, *then* you gently work in those 30g of unsweetened cocoa nibs. Try to fold them in evenly without ripping the dough structure you just built. Now, let the dough bulk ferment until it looks happy—about 30 to 50% bigger over 3 to 5 hours. Don’t stress the clock on this; watch the volume!
Shaping and Cold Proofing
Once the bulk is done, gently turn the dough out and shape it into a tight round loaf. You want to create surface tension without degassing it too much. Place it seam-side up into a well-floured banneton. Now, this loaf needs a long nap. Put it in the fridge for 12 to 18 hours. That cold proof is crucial for flavor and it makes scoring so much easier later.
Baking for Maximum Oven Spring and Color
Preheat your oven to a blazing 500°F (260°C) with your Dutch oven inside for at least 45 minutes. Seriously, make sure that pot is screaming hot! Carefully drop your dough onto parchment paper into the Dutch oven. Bake covered for 20 minutes. Then, pull the lid off, drop the heat to 450°F (232°C), and bake for another 20 to 25 minutes. We want a dark crust for that professional look and maximum flavor—don’t pull it out early!
If you need inspiration for making your own bread baskets or want to see how I use this shaping methodology for my easy homemade bread bowls, take a peek!
Tips for Success with Cocoa Nib Sourdough
When baking with inclusions like cocoa nibs, you’re adding weight and density to your dough matrix, which demands tight control over your process. Think of it like quality control checkpoints. My biggest disaster early on was trying to mix the nibs in right at the beginning with the flour. What happened? They ripped the delicate gluten network during the first folds, and I ended up with a dense brick instead of an artisanal loaf. It was a total loss.
The key lesson: always add your inclusions *after* the main bulk of the structure is built. Wait until you’ve finished those four sets of stretch and folds. This ensures your gluten has already developed enough strength to handle the extra particulate matter evenly distributed throughout the dough. If you follow this timing precisely, your loaf will resist collapsing and have that incredible open crumb you’re aiming for. For more tips on managing dough structure, check out my guide on sourdough sandwich bread—many principles overlap!
Serving Suggestions for Your Artisanal Bread
When you finally slice into this stunning cocoa nib sourdough, you’ve got a loaf that demands attention on your brunch board. Because the chocolate flavor is savory and earthy, you actually want to lean into salty and creamy pairings rather than sweet ones. Sugar competes with the nibs, and we want to highlight that complex bitterness!
Forget simple jam. You absolutely must try this with high-quality, slightly funky cheeses—think creamy brie or a sharp aged cheddar. A thin smear of cultured butter works wonders too, letting the tang of the bread shine through. Or, if you’re making appetizers, use slices as the base for creamy spreads, maybe even serving it alongside my simple easy baked brie for a perfect sweet/savory contrast.

Storage and Reheating Instructions
Look, an amazing loaf of chocolate sourdough like this deserves to last more than a day, right? The biggest mistake people make is putting it straight into plastic baggies. That traps moisture and your beautiful crust turns soft instantly. Once it’s completely cool, keep it cut-side down on a cutting board, loosely covered with a clean kitchen towel.
If you’ve sliced into it, you can freeze the extras! Wrap sections tightly in plastic wrap, then foil. When you want a slice, just pop it straight into the toaster or oven for a few minutes. That quick blast of dry heat revives that excellent crust every time.
Frequently Asked Questions About Chocolate Sourdough
I know you’re going to have questions once you start the project. Dealing with inclusions can sometimes be a little tricky compared to a plain loaf, but we’ve got this handled with our methodical approach. Jump into the comments if you run into trouble!
Will the cocoa nibs make the cocoa nib sourdough sweet?
Nope! That’s the magic feature of this recipe. We specifically use unsweetened cocoa nibs. They don’t melt or dissolve like chocolate chips do. Instead, they provide that incredible, textured crunch and a deep, slightly bitter, earthy cocoa flavor that pairs perfectly with the sourness of the bread.
How do I get the best open crumb in this unique sourdough?
The open crumb—that gorgeous texture for your bread art—comes down to two things we emphasized: keeping your bulk fermentation strong (that 30-50% rise), and being super gentle during shaping. If you deflate the dough too much when you form the loaf, you lose those gas bubbles the starter worked so hard to create.
Can I use instant yeast instead of a sourdough starter?
Honestly, you’d lose the entire point! This recipe is designed around the long flavor development you only get from that active sourdough starter. If you absolutely had to rush it—and I discourage this for maximum flavor—you would need to drastically cut the proofing times. You can look up recipes that use yeast, but for this specific unique sourdough, stick to the starter, or check out simpler yeast bread guides like my cornbread recipe if you want easy results without the starter complexity for now.
Estimated Nutritional Data for Cocoa Nib Sourdough
As your kitchen strategist, I always like to know the macros, even when baking something this fun. Remember that since this is an artisanal bread made naturally, these figures are estimates based on the flour and ingredient weight distribution. If you use rye flour, the numbers will shift slightly, of course!
- Serving Size: 1 slice
- Calories: 280
- Carbohydrates: 55g
- Protein: 10g
- Fat: 4g (Saturated Fat: 1g)
- Sodium: 250mg
- Fiber: 4g
This loaf is honestly quite filling, and look at that protein content! It’s a great foundation for heavier toppings since we kept the sugar low.
Share Your Artisanal Bread Creations
Alright project managers, the bake is done, and I need to know how your cocoa nib sourdough turned out! Did you nail that tension during shaping? Did your bread art score lines pop the way I hoped they would?
Seriously, rate this recipe and drop a comment below describing that savory chocolate flavor. I love seeing your results! If you’re ready for your next smart cooking project, you can always find more reliable, efficient recipes over on the main Dishicious site here: check out more smart cooking projects.
PrintCocoa Nib Sourdough Bread
Make an artisanal cocoa nib sourdough bread featuring a complex, non-sweet chocolate profile and a unique crumb structure, perfect for a sophisticated brunch.
- Prep Time: 30 min
- Cook Time: 45 min
- Total Time: 15 hr 15 min
- Yield: 1 loaf 1x
- Category: Baking
- Method: No-Knead Baking
- Cuisine: Modern American
- Diet: Vegetarian
Ingredients
- 100g active sourdough starter
- 350g warm water
- 500g bread flour
- 10g fine sea salt
- 30g unsweetened cocoa nibs
Instructions
- Mix the active starter and warm water in a large bowl.
- In a separate bowl, whisk together the bread flour and sea salt. Add this mixture to the wet ingredients and mix until just combined into a shaggy dough.
- Cover the bowl and let it rest for 30 minutes (autolyse).
- Perform the first set of stretch and folds. Gently stretch the dough up and fold it over itself. Repeat four times, turning the bowl a quarter turn after each fold.
- Repeat the stretch and folds every 30 minutes for the next 2 hours (total of 4 sets).
- After the final set of folds, gently incorporate the unsweetened cocoa nibs evenly throughout the dough.
- Place the dough in a lightly oiled bowl, cover, and allow it to bulk ferment at room temperature until it has increased in volume by about 30-50% (this may take 3 to 5 hours depending on your kitchen temperature).
- Gently shape the dough into a round loaf. Place it seam-side up in a floured banneton basket.
- Cold proof the dough in the refrigerator for 12 to 18 hours.
- Preheat your oven to 500°F (260°C) with a Dutch oven inside for at least 45 minutes.
- Carefully remove the hot Dutch oven. Turn the dough out onto parchment paper. Score the top surface of the bread as desired for bread art.
- Carefully lower the dough (using the parchment paper) into the hot Dutch oven. Cover and bake for 20 minutes.
- Remove the lid, reduce the oven temperature to 450°F (232°C), and continue baking for another 20 to 25 minutes until the crust is dark brown.
- Cool the chocolate sourdough completely on a wire rack before slicing.
Notes
- For a darker color, you can substitute 10g of the bread flour with dark rye flour.
- Ensure your cocoa nibs are raw or lightly roasted for the best flavor contrast in this unique sourdough.
- Use a high-quality bread flour for the best oven spring in your artisanal bread.
Nutrition
- Serving Size: 1 slice
- Calories: 280
- Sugar: 1
- Sodium: 250
- Fat: 4
- Saturated Fat: 1
- Unsaturated Fat: 3
- Trans Fat: 0
- Carbohydrates: 55
- Fiber: 4
- Protein: 10
- Cholesterol: 0