
If you’re looking to celebrate National Coconut Cream Pie Day—or any day, really—you need a slice of pure, indulgent nostalgia. Forget those thin, sad custards you sometimes find; we’re going straight for the gold standard here. This recipe delivers that thick, silky homemade custard filling that contrasts perfectly with a crisp, flaky crust. I know that achieving this classic coconut cream pie just right can feel intimidating, but trust me, Leo Grant’s methodical, project-based approach to cooking means we’ve streamlined every tricky step to ensure this recipe works perfectly for you, every single time.
- Why This Old Fashioned Coconut Pie is Your New Go-To Dessert
- Ingredients for the Ultimate Coconut Cream Pie
- Preparing the Flaky Crust for Your Coconut Cream Pie
- Making the Homemade Custard Filling for Coconut Cream Pie
- Chilling and Toasting Coconut Flakes for Your Coconut Cream Pie
- Assembling the Topping for This Traditional Dessert Pie
- Ingredient Notes and Substitutions for Coconut Cream Pie
- Storage and Reheating Instructions for Coconut Cream Pie
- Frequently Asked Questions About Creamy Pies
Why This Old Fashioned Coconut Pie is Your New Go-To Dessert
This isn’t just any pie; this is the definition of comfort food baked right into a flaky shell. If you’ve been hunting for that perfect, thick slice, I’ve engineered the solution for you. This old fashioned coconut pie nails exactly what you want when you turn on the oven for a treat. It’s built on contrasts—richness against lightness—that make every bite unforgettable.
- The filling isn’t runny—it sets up thick, holding its shape beautifully when sliced.
- We nail that deep, toasted coconut flavor that smells like grandma’s kitchen.
- You get that satisfying shatter from the crust followed by the smooth melt of the custard.
Ready to add this to your go-to rotation? You can find more of my favorite dessert project finales here!
Achieving the Best Cream Pie Recipe Texture
Texture is everything when it comes to a slice of heaven like this, which is why we call this the best cream pie recipe. The secret to that unbelievably silky filling is handling the eggs correctly. We aren’t just dumping them in! Tempering the yolks slowly, just like I specify in the steps, ensures you get a perfectly smooth, luxurious custard base. No lumps, no curdling—just pure, creamy delight that works perfectly with that crisp, flaky bottom crust.
Ingredients for the Ultimate Coconut Cream Pie
When you’re aiming for homemade magic, the ingredients list is your blueprint. I’ve broken this down so there’s zero confusion, especially around the coconut, because we use it in two very different ways here! Grab everything ahead of time—it makes the process way smoother. The quality of that milk and cream really pushes this pie over the top into truly special territory.
Here’s everything you need for this spectacular coconut cream pie:
- 1 pre-made 9-inch pie crust
- 1 1/2 cups granulated sugar
- 1/3 cup cornstarch
- 1/4 teaspoon salt
- 2 cups whole milk
- 1/2 cup heavy cream (for the filling)
- 4 large egg yolks, lightly beaten
- 2 tablespoons unsalted butter
- 1 teaspoon vanilla extract (for the filling)
- 1 cup sweetened flaked coconut, divided
- 1 1/2 cups heavy whipping cream (for the topping)
- 2 tablespoons powdered sugar
- 1/2 teaspoon vanilla extract (for the topping)
See? Straightforward components, when managed right, create something truly incredible here. Don’t let that divided coconut confuse you; we use half in the hot filling and save the rest for that incredible toasted topping later on. It’s all about efficiency!
Preparing the Flaky Crust for Your Coconut Cream Pie
Okay, Step 1 is simple, but critical for avoiding that dreaded soggy bottom. Since we are optimizing our time here, I’m perfectly happy starting with a good quality, pre-made pie crust. This saves us a ton of work, but we absolutely must blind bake it correctly.
Preheat your oven to 350 degrees Fahrenheit. You need to bake this crust according to the package directions until it’s lightly golden. This step cooks out any excess moisture, which is vital for a structurally sound foundation for our beautiful, heavy custard. Don’t rush the cooling either; if you try to pour hot filling into a warm crust, you’re asking for trouble with your perfect coconut cream pie.
Let that shell cool down completely on a wire rack. This waiting period is where we get a head start on prepping the other components. If you happen to be feeling ambitious and want to make your pastry from scratch, you can certainly apply my crust principles here, but for now, let’s stick to making this filling shine!
Making the Homemade Custard Filling for Coconut Cream Pie
Okay, this is where the engineering really comes into play. We are moving from crust prep to creating that signature, luxurious homemade custard filling. Remember, consistency is the objective! In a medium saucepan—use one with a heavy bottom, it distributes heat so much better—whisk together your sugar, cornstarch, and salt until they look like one uniform powder. Then, slowly introduce the whole milk and the half-cup of heavy cream, whisking as you go to ensure zero clumps.
Place that saucepan over medium heat. You need to stir this constantly—and I mean constantly—for about 8 to 10 minutes. You’re waiting for it to thicken up so much that it just starts to bubble right at the edges. Once it hits that simmer, pull it right off the heat immediately.
Now, the most critical step for any great custard: tempering the eggs. This is non-negotiable if you want a smooth coconut cream pie. Take about a cup of that hot milk mixture and drizzle it super slowly into your four beaten egg yolks while you whisk those yolks like crazy. If you dump it, you get scrambled eggs. We want silky, so whisk steady! If you’re keen on mastering custard structure in general, I break down the science behind tempering in this deeper dive on custard pies.
Once those yolks are tempered, pour that entire tempered mixture back into the saucepan with the rest of the hot liquid. Put it back on medium heat, stir for just one more minute—seriously, only 60 seconds—and then pull it off for good. Don’t let it boil again! Finally, stir in your two tablespoons of butter, that teaspoon of vanilla, and half a cup of that sweetened flaked coconut. Yes, the coconut goes right into the filling to infuse that flavor deep down!
Expert Tip: Preventing Skin on Your Coconut Cream Pie Custard
You’ve just made incredible hot custard, and the last thing we want is a rubbery skin forming on top while it chills. This is Leo’s non-negotiable rule for any stovetop filling! As soon as you pour that hot custard into your cooled pie shell, take a sheet of plastic wrap and press it *directly* onto the surface of the filling. I mean, make physical contact between the plastic and the custard. This traps the steam right where it condenses, preventing any moisture from drying out the top layer and forming that wrinkly, odd skin. Trust me on this one; it keeps the surface perfectly smooth until it’s time for the whipped cream.
Chilling and Toasting Coconut Flakes for Your Coconut Cream Pie
Now that you’ve got that gorgeous custard filling tucked safely into the crust, we enter the waiting game. This is the part where patience pays off big time for your coconut cream pie structure. You need to let this chill in the refrigerator for a MINIMUM of four hours. If you try to top it sooner, your filling will weep or just collapse when you slice it. We need that homemade custard filling to be completely firm, almost like a cold cheesecake, before we do anything else.
While that’s happening, let’s work on the crown jewel: the contrast! We need those beautiful toasted coconut flakes. Take that remaining half-cup of sweetened flaked coconut and spread it out in a single, thin layer on a dry baking sheet. Pop it into that same 350-degree oven we used for the crust.
Listen, toasting coconut is fast, and I mean fast. It goes from perfect gold to bitter black in about 30 seconds flat. Set a timer for 5 minutes and check it frequently. You want it golden brown and fragrant. As soon as you hit that color, pull it out and spread it on a cool plate to stop the cooking process instantly. This ensures we have those crunchy little gems ready to contrast beautifully with the smooth, chilled filling later. If you want more tips on using coconut in desserts, check out my favorite coconut cupcake frosting guide!
Assembling the Topping for This Traditional Dessert Pie
Alright, the hard work is done! Your custard is set, the coconut is toasted, and now we bring it all together to create that tower of fluffy goodness that defines a great traditional dessert pie. You need the topping to be light and airy, so here’s a little project management hack:
Before you even take the cream out, pop your mixing bowl and whisk attachment into the freezer for about 15 minutes. Cold fat whips up faster! When you’re ready, whip that 1 1/2 cups of heavy whipping cream with the powdered sugar and the vanilla until you hit stiff peaks. You want peaks that stand up straight when you lift the whisk—that means your cream is stable and ready for action.
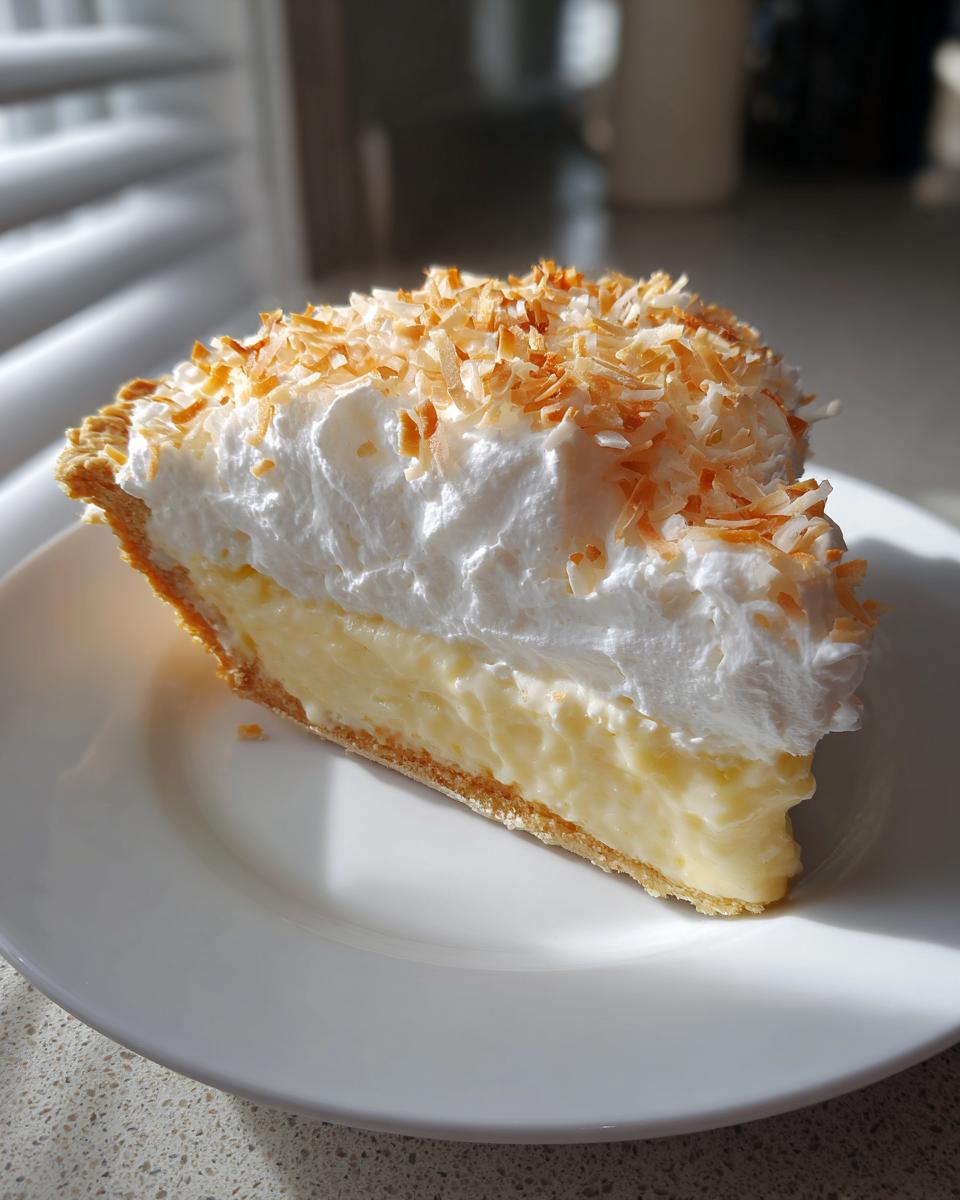
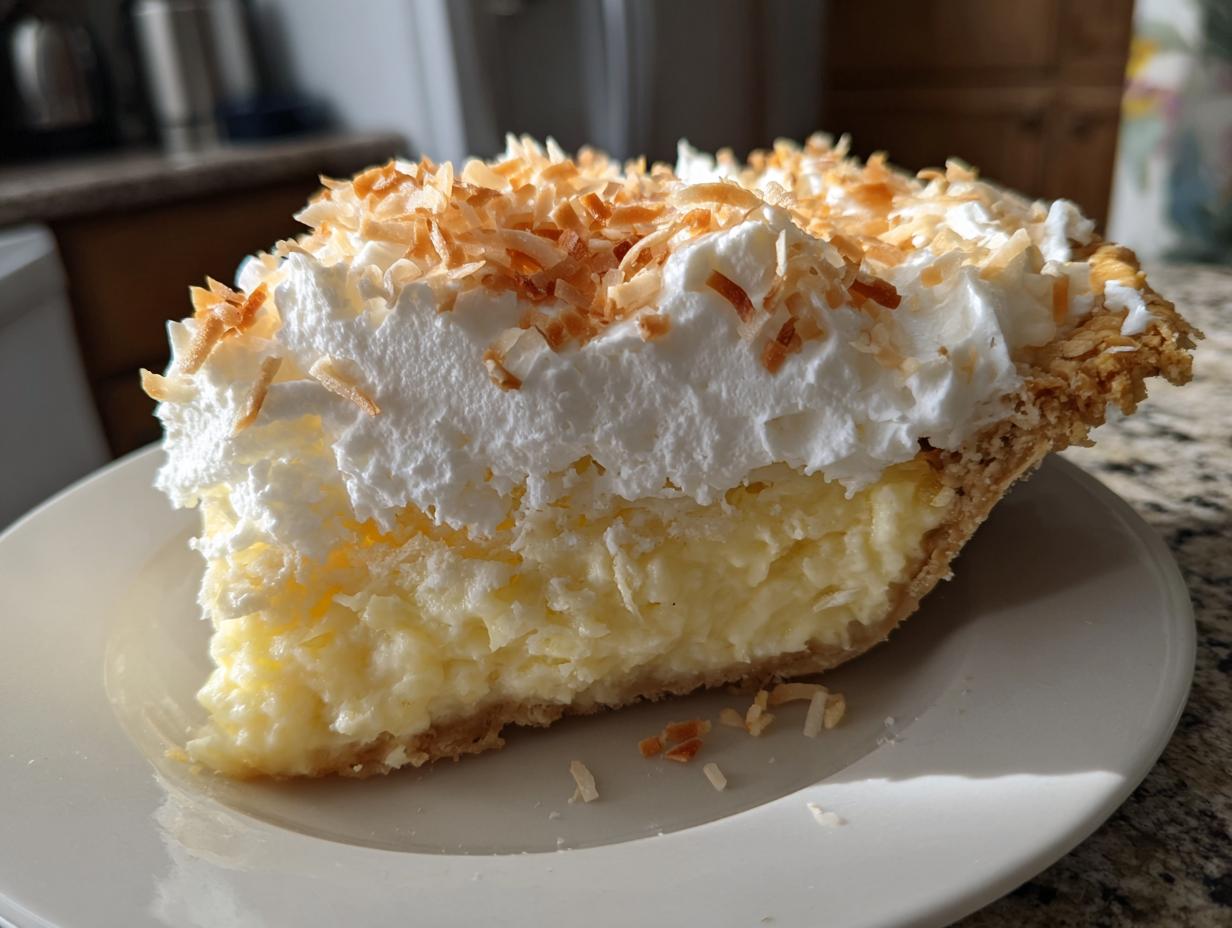
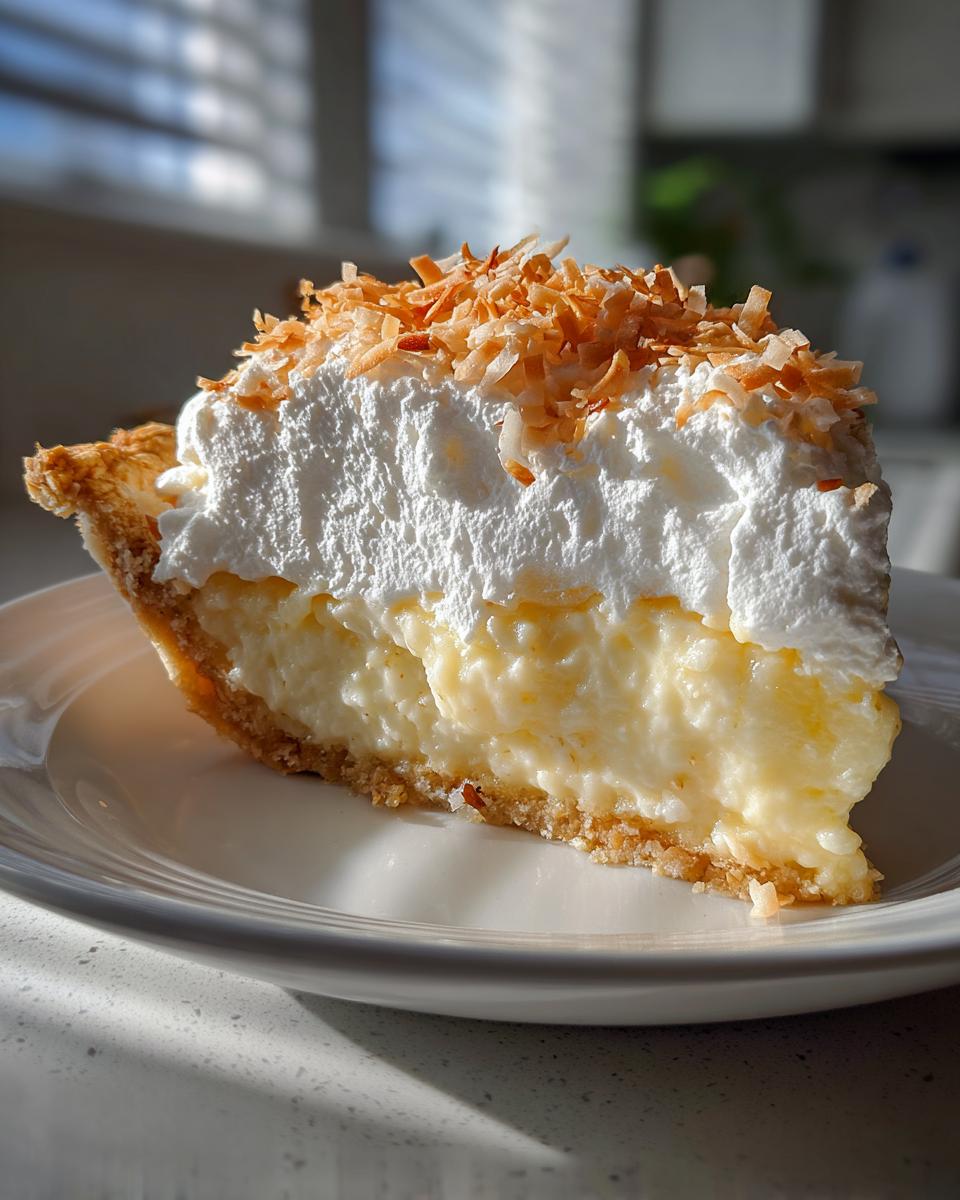
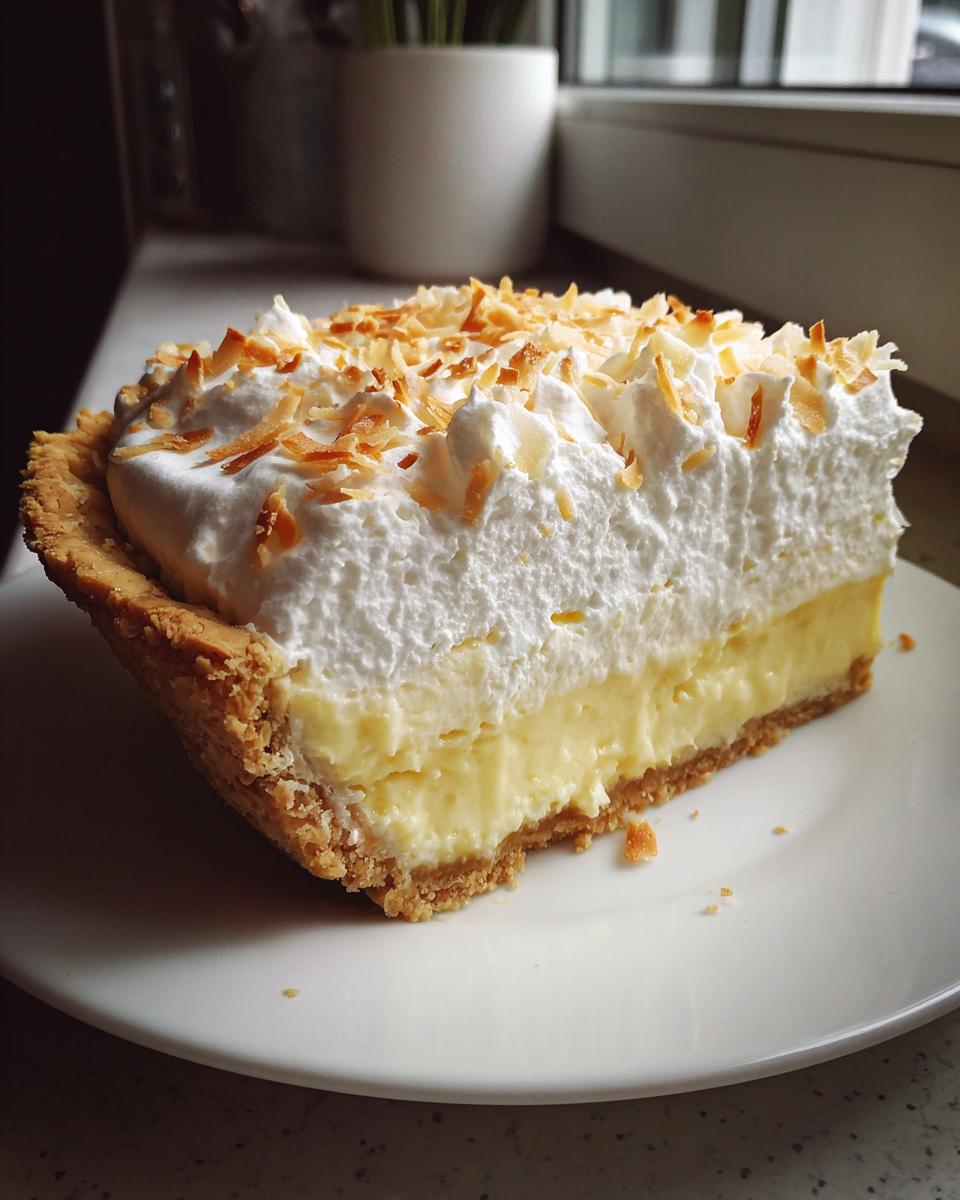
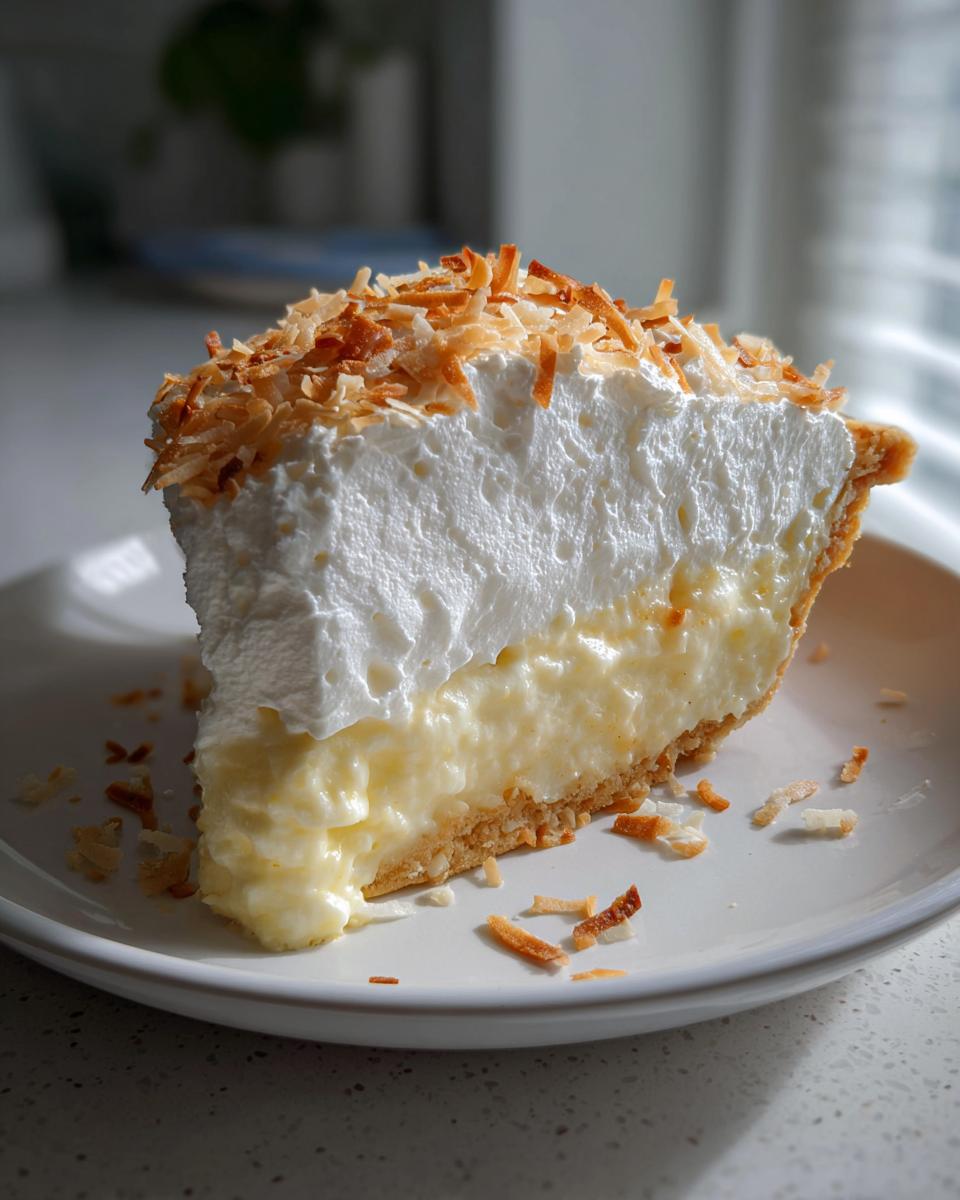
Once you have that gorgeous, stiff whipped cream, gently spread it right over the chilled surface of your coconut custard. Don’t press it down; just create soft billows! Then, take those cooled, crunchy toasted coconut flakes and blanket the whole beautiful mess. This is the moment of truth for your coconut cream pie!
I need to stress one thing about assembly: Serve this pie shortly after topping it. That lovely whipped cream stays firmest when it’s fresh, and you want the contrast between the cold, smooth filling and the crunchy topping right away. If you’re looking for more tips on making flawless dairy toppings, check out how I tackle stable buttercream; the cold bowl trick works there too!
Ingredient Notes and Substitutions for Coconut Cream Pie
Even though I love sticking to the core recipe—that’s what makes it reliable—I always build in options for you to kick the flavor up a notch if you have an extra five minutes. I believe in giving you homework that tastes great, not just extra busywork!
For example, if you want a truly next-level coconut experience in your coconut cream pie, try this: before you start Step 2, gently warm that 1/2 cup of coconut milk right along with your regular whole milk and heavy cream. Let it simmer for about 5 minutes on low heat, turn it off, and let it sit and deepen for 20 minutes before straining out any solids and proceeding with the recipe. That infusion makes the whole homemade custard filling taste intensely more coconutty. It’s a great way to boost the flavor profile without changing the overall structure of the pie because we’ve already perfected the starch and egg ratios.
Also, let’s talk crust again. While the package version is a huge time saver, you absolutely have the flexibility here to use your own favorite recipe for a flaky pastry shell if you prefer. We’ve done the hard structural work on the filling, so you are free to customize the base guilt-free!
Storage and Reheating Instructions for Coconut Cream Pie
This pie is an absolute star, but because we used real milk, cream, and fresh egg yolks for that epic homemade custard filling, we need to treat it right in the fridge. This is not a pie you leave on the counter while you answer emails! You must store this coconut cream pie covered tightly in the refrigerator.
The trick here is covering it without squashing that beautiful mountain of whipped cream. I usually take a few wooden skewers and stick them strategically into the custard around the edge—like little tent poles—before gently draping a piece of plastic wrap over the top. This keeps the wrap from touching the cream or the flakes.
Honestly, for the best experience, this pie needs to be consumed within 24 to 36 hours. The whipped cream topping is at its absolute peak right after assembly. While the custard itself holds up fine for maybe two or three days, the whipped cream starts to deflate and the moisture from the custard can soften your flaky crust over time. There’s also no successful way to reheat a cream pie, so keep those leftovers covered and chilled, but know that fresh is always best with this one!
Frequently Asked Questions About Creamy Pies
When you tackle a classic like this, questions always pop up, and I’ve organized the answers based on what I get asked most often about managing custard and texture in an old fashioned coconut pie. Since my goal is reliability, let’s make sure all your bases are covered regarding setting and timing! If you are rushing through everything, remember I have plenty of super-speedy meal solutions saved up too, but this pie requires a little patience!
Can I make the homemade custard filling ahead of time?
Yes, you absolutely can, and sometimes I even recommend it for efficiency! You can prepare the homemade custard filling completely, press the plastic wrap directly onto the surface, and chill it until it’s totally firm—so, that’s up to 4 hours done. Then, the next morning, you just whip your cream and top it. Just make sure your custard is well-chilled before the topping goes on for the best stability.
What is the best way to get perfectly toasted coconut flakes?
This is key for maximizing that texture contrast! You need to treat the coconut gently. Spread those flakes in a single layer on a dry baking sheet, and I mean single layer—no piling up! Bake them at 350 degrees Fahrenheit, but watch them like a hawk. Seriously, pull the tray out every two minutes to stir them around. They take maybe 5 to 8 minutes total, and they burn faster than you can click refresh on your email. Low and slow on the radar, quick work by hand!
Why did my custard crack when I tried to slice it?
That usually means two things: either you didn’t chill the filling for the full 4 hours required to set the cornstarch and egg structure, or you didn’t press the plastic wrap directly onto the surface during chilling, causing the top layer to dry out and become brittle. A properly set, moist custard slices cleanly—no jagged edges allowed on our perfect pie!
Can I use light coconut milk instead of whole milk for richness?
The recipe calls for whole milk and heavy cream for a reason—that fat content is what makes the filling rich and creamy, not just thick. If you swap to light coconut milk or skim milk, your custard will likely be thinner and less rich. For this specific recipe to achieve that luxurious texture, I really suggest sticking to the whole milk and cream specified. If you want more coconut flavor, try the infusion trick in the notes instead of compromising the structure!
PrintOld Fashioned Coconut Cream Pie

Make this traditional dessert pie featuring a rich, homemade custard filling, a flaky crust, and a generous topping of whipped cream and toasted coconut flakes for an indulgent experience.
- Prep Time: 25 min
- Cook Time: 15 min
- Total Time: 4 hours 40 min
- Yield: 8 servings 1x
- Category: Dessert
- Method: Stovetop and Chilling
- Cuisine: American
- Diet: Vegetarian
Ingredients
- 1 pre-made 9-inch pie crust
- 1 1/2 cups granulated sugar
- 1/3 cup cornstarch
- 1/4 teaspoon salt
- 2 cups whole milk
- 1/2 cup heavy cream
- 4 large egg yolks, lightly beaten
- 2 tablespoons unsalted butter
- 1 teaspoon vanilla extract
- 1 cup sweetened flaked coconut, divided
- 1 1/2 cups heavy whipping cream
- 2 tablespoons powdered sugar
- 1/2 teaspoon vanilla extract
Instructions
- Preheat your oven to 350 degrees Fahrenheit. Bake the pie crust according to package directions until lightly golden. Let it cool completely.
- In a medium saucepan, whisk together the granulated sugar, cornstarch, and salt. Gradually whisk in the whole milk and heavy cream until smooth.
- Cook the mixture over medium heat, stirring constantly, until it thickens significantly and just begins to boil. This takes about 8 to 10 minutes. Remove from heat.
- Temper the egg yolks: Slowly pour about 1 cup of the hot milk mixture into the beaten egg yolks while whisking constantly.
- Pour the tempered egg mixture back into the saucepan with the remaining hot mixture. Return to medium heat and cook for 1 minute more, stirring constantly. Do not boil.
- Remove the custard from the heat. Stir in the butter, 1 teaspoon vanilla extract, and 1/2 cup of the sweetened flaked coconut.
- Pour the hot custard filling into the cooled pie crust. Press plastic wrap directly onto the surface of the custard to prevent a skin from forming. Chill in the refrigerator for at least 4 hours, or until completely firm.
- While the pie chills, toast the remaining 1/2 cup of coconut: Spread the coconut on a dry baking sheet. Bake at 350 degrees Fahrenheit for 5 to 8 minutes, watching closely, until golden brown. Cool completely.
- When ready to serve, prepare the topping: In a large bowl, beat the 1 1/2 cups heavy whipping cream, powdered sugar, and 1/2 teaspoon vanilla extract until stiff peaks form.
- Spread the whipped cream over the chilled coconut custard filling. Sprinkle the top evenly with the toasted coconut flakes. Slice and serve this best cream pie recipe immediately.
Notes
- For a more intense coconut flavor, you can steep 1/2 cup of coconut milk with the whole milk and heavy cream before starting step 2. Strain before use.
- If you prefer a homemade crust, use your favorite recipe for a flaky pastry shell.
- Chill the bowl and whisk attachment before making the whipped cream for better volume.
Nutrition
- Serving Size: 1 slice
- Calories: 410
- Sugar: 38
- Sodium: 250
- Fat: 22
- Saturated Fat: 15
- Unsaturated Fat: 7
- Trans Fat: 0.5
- Carbohydrates: 50
- Fiber: 1
- Protein: 5
- Cholesterol: 95