
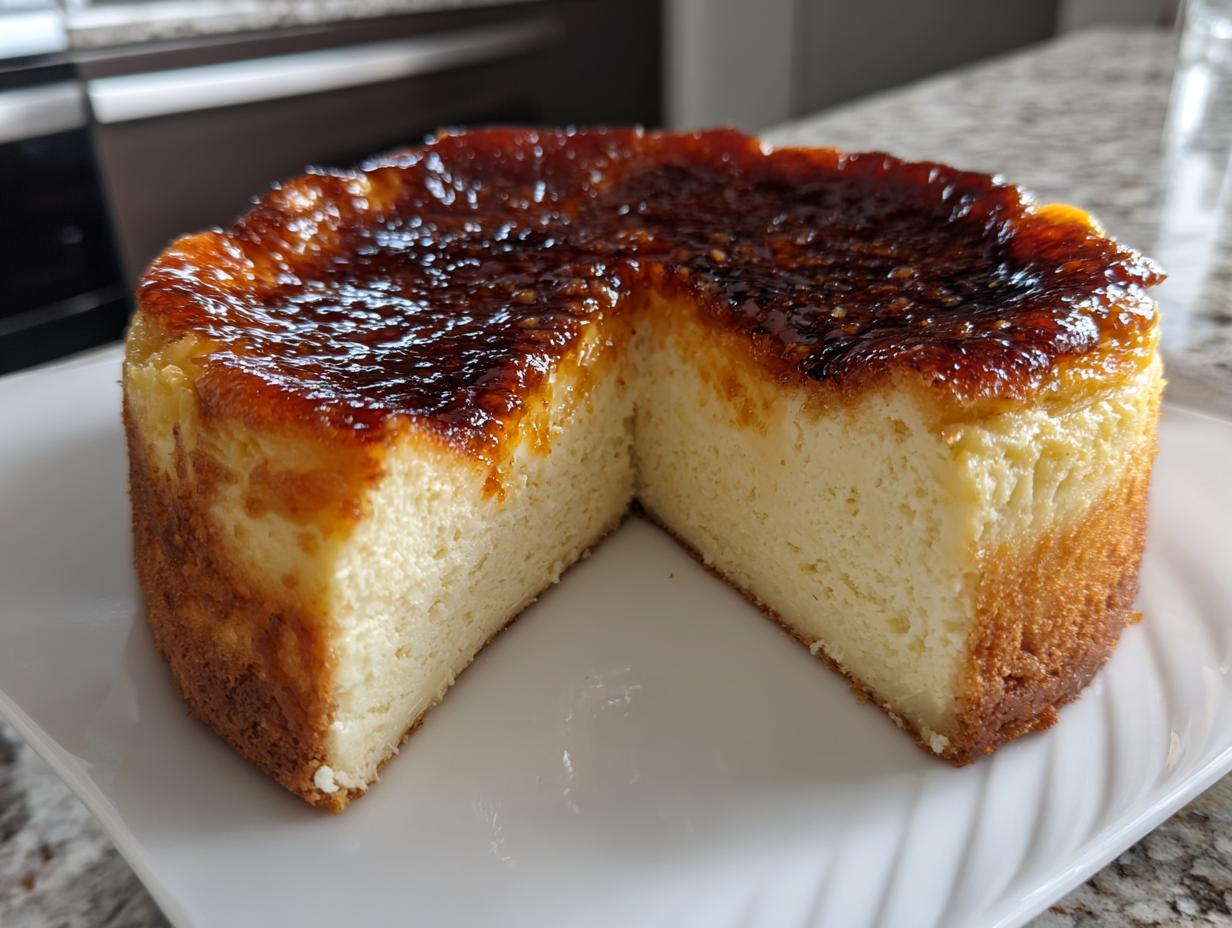
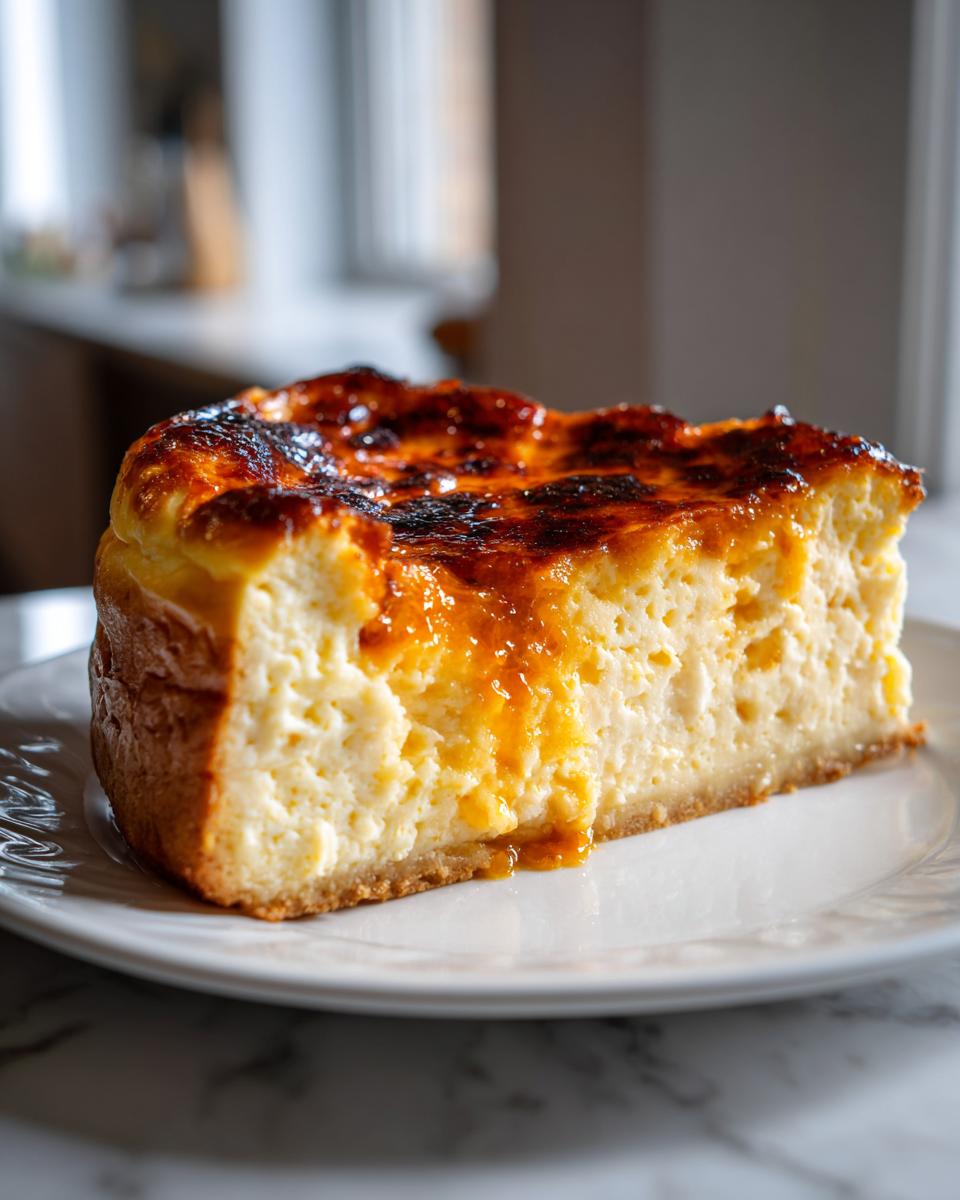
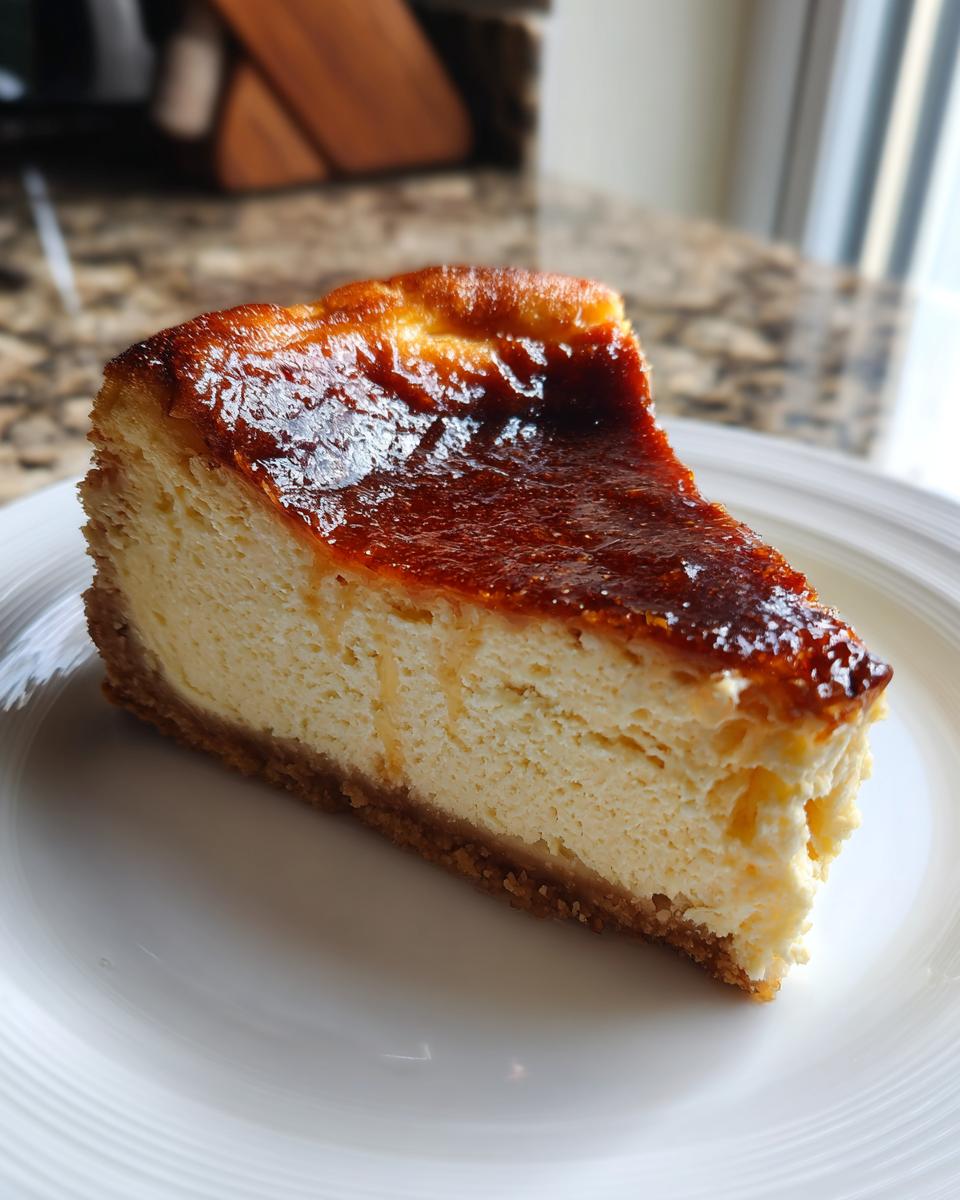
Okay, stop what you’re doing right now, because if you think you love dessert, you haven’t lived until you’ve met the ultimate dessert fusion. I’m talking about something that sounds wildly complicated but is actually totally achievable for us home cooks: the creme brulee cheesecake. This isn’t just a dessert; it’s a culinary marriage—the rich, barely-sweet creaminess of a baked cheesecake perfectly topped with that insanely satisfying, hard, crackly dome of caramelized sugar. That’s the magic right there: creamy meets crisp. When I was first figuring out my own cooking routine back in Chicago, I realized we don’t need to stay up until midnight making fussy restaurant food. We just need smarter recipes. So, I engineered this creme brulee cheesecake recipe to give you that restaurant-style wow factor without juggling seven different complicated steps. Trust me, this is going to be your new favorite showstopper.
- Why This is the Best Creme Brulee Cheesecake Recipe
- Ingredients for Your Indulgent Creme Brulee Cheesecake
- Step-by-Step Instructions for the Perfect Creme Brulee Cheesecake
- Tips for Success with Your Baked Cheesecake Recipe
- Storage and Make-Ahead Tips for Creme Brulee Cheesecake
- Serving Suggestions for This Elegant Dessert Fusion
- Variations: From Creme Brulee Cheesecake Bars to Mini Versions
- Frequently Asked Questions About Making Creme Brulee Cheesecake
- Estimated Nutritional Data for Creme Brulee Cheesecake
- Share Your Indulgent Cheesecake Treats
Why This is the Best Creme Brulee Cheesecake Recipe
Look, I get it. Cheesecake sounds intimidating, and anything involving caramelizing sugar sounds like a fire hazard, right? But that’s where this creme brulee cheesecake wins. We nail the decadent, creamy cheesecake filling texture without all the drama, thanks largely to the good old water bath. That hot water surround keeps things super gentle while it bakes, which is our secret weapon for getting that perfectly smooth, crack-free surface. Forget fussy dessert fusion; this is pure indulgence made surprisingly simple. We focus on achieving that beautiful contrast between the filling and the sugar top.
Key Features of Our Creme Brulee Cheesecake
- It delivers true restaurant-style flavor payoff.
- The method is surprisingly straightforward—you can handle this!
- Amazing texture contrast between the smooth filling and the crisp snap of the sugar.
- It’s the definition of an indulgent cheesecake treat.
Ingredients for Your Indulgent Creme Brulee Cheesecake
When you’re working with a star dessert like a creme brulee cheesecake, you can’t cut corners on the ingredients. But don’t worry, everything here is easy to find at your regular grocery store! I listed out everything you need below. Pay close attention to the temperature of your cream cheese—that’s non-negotiable for a good, smooth texture, especially since we are heading toward that perfect creamy cheesecake filling.
- 1 1/2 cups graham cracker crumbs
- 1/4 cup granulated sugar (for crust)
- 6 tablespoons unsalted butter, melted
- 3 (8 ounce) packages cream cheese, softened—and I mean *softened*!
- 1 1/2 cups granulated sugar (for filling)
- 1 teaspoon vanilla bean paste
- 1/4 teaspoon salt
- 4 large eggs
- 1/2 cup sour cream
- 1/4 cup heavy cream
- 1/2 cup granulated sugar (for topping—this is the magic stuff!)
Ingredient Notes and Substitutions for Creme Brulee Cheesecake
Since this creme brulee cheesecake recipe is all about flavor layering, a few details make a huge difference. First, please, please use vanilla bean paste if you can find it. It looks more expensive than extract, but those tiny black specks actually give you that beautiful flecked look you see in high-end desserts. It really elevates the vanilla bean cheesecake profile.
For the crust, graham crackers are my go-to because they pair so well with the custard flavor. If you can’t find them, digestive biscuits work in a pinch, but crush them really finely—we don’t want huge jagged crumbs messing up our smooth base layer. And remember, that sugar for the topping has to be plain old white granulated sugar. You need that specific crystalline structure for the broiler or torch to melt and then instantly harden into that signature caramelized sugar topping dessert crackle!
Step-by-Step Instructions for the Perfect Creme Brulee Cheesecake
Alright, now for the fun part! We’re turning simple ingredients into something elegant, and I promise, the steps are laid out for maximum success. Remember, with cheesecake, we build flavor in layers. First, get that oven preheated to 325°F (160°C). You absolutely cannot skip wrapping that springform pan in heavy-duty foil—serious double wrap needed here, because water messes with graham crackers worse than anything! We bake that crust for 10 quick minutes and let it cool down just a touch before we pour in the filling.
When you mix the filling, beat the cream cheese and sugar until fluffy, but here’s where we keep it easy: add the eggs one by one. Don’t go crazy whipping it; we want minimal air bubbles. Overmixing is what causes domes later! Pour that lovely batter over your crust, set it in the water bath, and into the oven it goes for about an hour to an hour and a quarter. Then, the hardest part: turning the oven off, cracking the door, and letting it cool slowly for a full hour inside. This patient cooling is mandatory for avoiding cracks in your glorious creme brulee cheesecake!
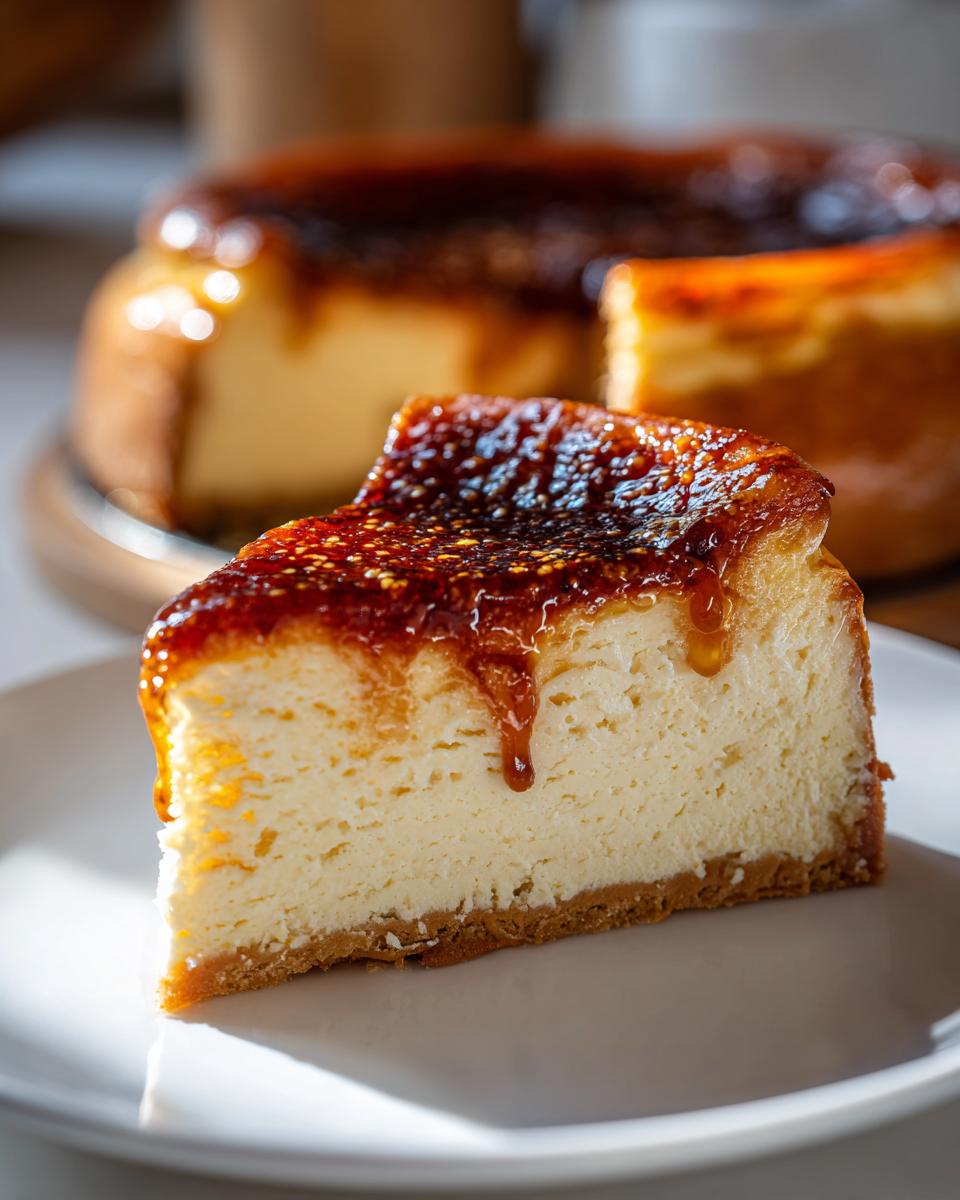
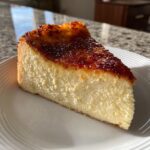
Achieving the Caramelized Sugar Topping Dessert Finish
Here is the moment you’ve been waiting for! Make sure that cheesecake is completely chilled—seriously, six hours minimum, preferably overnight. You want that beautiful surface rock solid before you sprinkle the sugar on. Take about half a cup of plain granulated sugar and scatter it across the top evenly. I mean a thin, consistent layer; too thick and it burns before it melts for the rest of the surface.
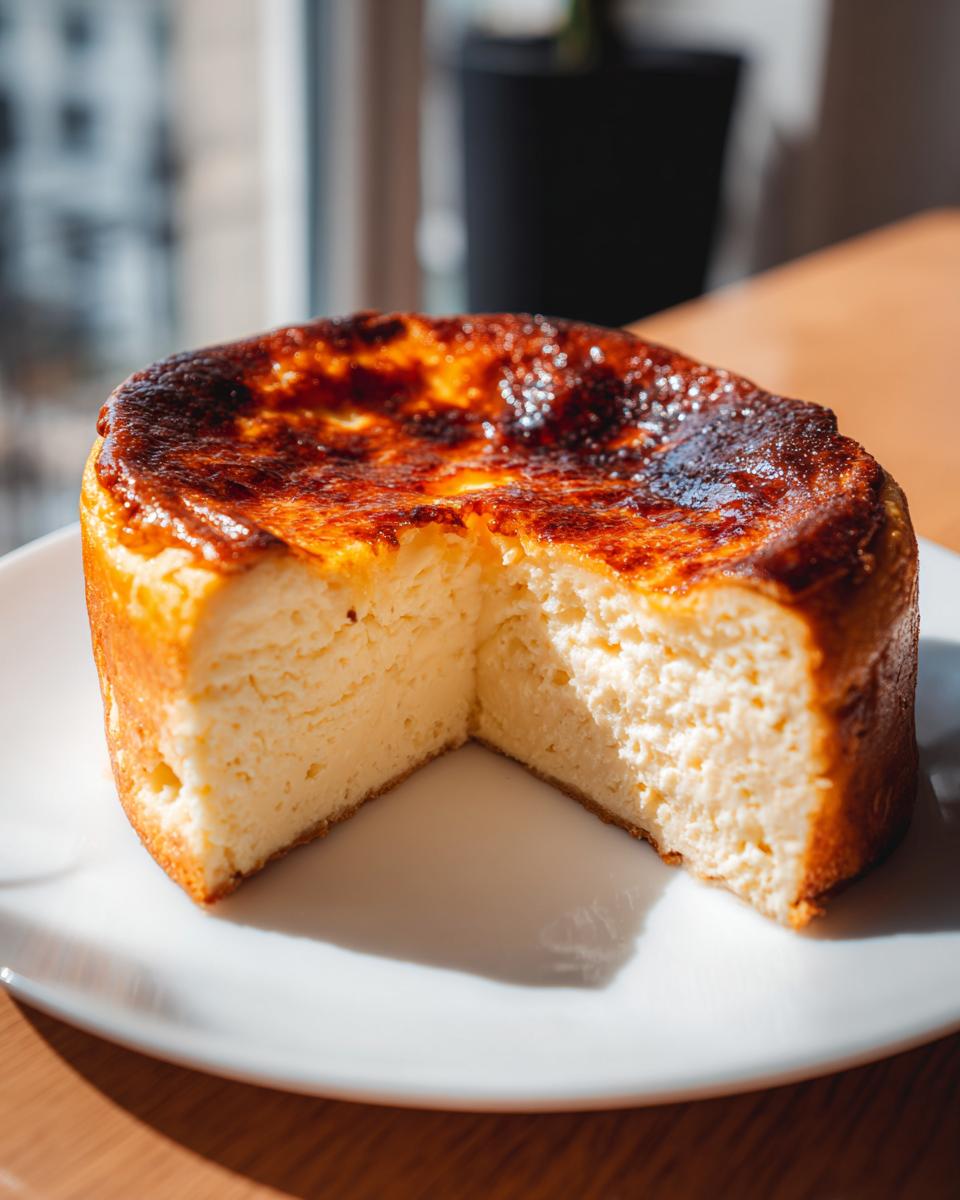
Now, grab your kitchen torch. Hold it a few inches away and sweep the flame across the sugar constantly. It will start to bubble, turn gold, and then—*whoosh*—it turns deep amber. Keep moving! If you don’t have a torch, don’t sweat it; preheat your broiler to high. Put the cheesecake on the highest rack, watch it like a hawk (I mean it, 60 seconds can turn caramel into charcoal!), and pull it out the second it’s bubbling richly. That instant cooling is what gives you that perfect, shatteringly crisp layer on your incredible dessert.
Tips for Success with Your Baked Cheesecake Recipe
Even with the best creme brulee cheesecake recipe laid out, a few little tricks can make the difference between a good cheesecake and a masterpiece that makes people weep with joy. Cheesecake failures usually come down to three things: cracks, curdling, or impatience! I’ve learned these lessons the hard way, believe me, so listen up for these foolproof pointers that guarantee that smooth, creamy cheesecake filling every time.
First, the water bath is your best friend. If you skip wrapping that springform pan properly—we’re talking industrial strength foil coverage—you’ll end up with a soggy crust and a weirdly set bottom layer. The hot water jacket ensures the heat transfer is slow and even, which is exactly what you need for a creamy texture. Don’t try to rush this part just because you’re worried about spills; a little extra prep time saves you a cracked disaster later.
Second, after the bake time is up, you need to respect the cooling process. That one hour where the oven is turned off but the door is cracked open? It’s critical! Cheesecake is sensitive to temperature shocks. If you yank it straight from the 325°F oven into your cool kitchen, you risk that surface shrinking too fast, which equals guaranteed cracking. We want a gradual transition so the structure sets gently. Check out my advice on slow cooking techniques—the same principle applies here: gentle heat equals better results.
Finally, and this is maybe the most important tip for making this creme brulee cheesecake truly restaurant-level: chilling time is NOT optional. Yes, you can see it’s mostly set at 75 minutes, but those last few hours in the fridge are when the filling truly firms up and develops that dense, creamy mouthfeel we are aiming for. Six hours is the absolute minimum, but overnight is truly where this dessert shines. If you try to torch it too early, you’ll just have a messy puddle instead of a perfectly crisp caramelized sugar topping dessert.
Storage and Make-Ahead Tips for Creme Brulee Cheesecake
So you made this amazing creme brulee cheesecake, and now you’re wondering about leftovers or if you can get ahead of the game for a big party. I totally get it! Cheesecake is actually fantastic for making ahead, but *when* you apply the caramelized topping changes everything dramatically.
For the best results—especially for that perfect, shatterproof caramelized top—you should always bake, chill completely, and *then* torch the sugar the same day you plan to serve it. If you torch the sugar and then try to store it, the humidity from the creamy cheesecake filling underneath starts to absorb into that lovely crisp shell. After a few hours in the fridge, your beautiful crackle turns into a sticky, soft mess. Not the desired texture for a creme brulee cheesecake, right?
If you need to make this ahead for an event, bake the entire cheesecake and chill it, wrapped airtight, for up to three days. It’s going to stay perfectly fresh and set. Once you’re ready, take it out, sprinkle that sugar layer on top, and torch it fresh. That’s the secret to stunning presentation.
Can you freeze it? Yes, but only the base part! If you want to save a portion, wrap the *untopped* cheesecake tightly in plastic wrap, then foil, and freeze it for up to a month. When you’re ready to serve it, transfer it straight from the freezer to the fridge to thaw overnight. Once it’s fully thawed and chilled, *then* you can proceed with the sugar topping. I love making a batch just to have on hand for emergencies, kind of like how I make a backup loaf of date nut bread for myself!
Serving Suggestions for This Elegant Dessert Fusion
Now that you’ve created this stunning, elegant dessert idea, you need to know how to present it like a total pro! A dessert this rich and luxurious doesn’t need much interference, but a simple pairing can absolutely elevate the whole experience from ‘amazing homemade treat’ to ‘restaurant-worthy indulgence.’
Since the star here is the creamy vanilla and the crackle of burnt sugar, we want our sidekicks to be bright or deeply aromatic. For a burst of freshness, a quick fruit companion works wonders. My absolute favorite quick trick is making a simple raspberry coulis. You just simmer some fresh or frozen raspberries with a tablespoon of sugar and a tiny squeeze of lemon juice for about five minutes. Strain out the seeds if you want it super silky. That tart, bright berry flavor cuts through the richness of the cheesecake beautifully.
If you’re serving this after a heavy meal, skip the heavy sauces and go straight for coffee. This dessert begs for a strong pairing. A rich espresso shot is amazing, but if you’re looking for something that feels a little more special, try making a batch of my easy coffee cake cookies to serve alongside, or just offer excellent black coffee or a strong decaf. The deep, slightly bitter roasted notes complement the caramelized sugar perfectly.
Keep the plating simple. A slice on a plain white plate, maybe a careful drizzle of that raspberry sauce around the edge, and that’s it. Let that perfect caramelized layer do all the talking. Seriously, when you crack that top with your spoon for the first time, everyone will remember this dessert for ages!
Variations: From Creme Brulee Cheesecake Bars to Mini Versions
Okay, so while this big, beautiful creme brulee cheesecake is my absolute favorite way to serve this dessert fusion, I know sometimes life calls for something a little different. Maybe you are making treats for a bake sale, or maybe your family just prefers something you can grab without needing a fork and plate. Good news! This concept is super flexible.
One of the biggest trends I’ve seen online is the bar format. People absolutely love the creme brulee cheesecake bars, and honestly, why wouldn’t they? They’re easier to slice up for a crowd, and you get a great crust ratio in every bite. The shift in method here is minor: instead of wrapping a springform pan, you just line a 9×13 inch baking dish with parchment paper, letting the edges hang out like little handles—this is key for lifting the whole thing out later.
You might have to adjust the baking time slightly depending on how thick you spread the batter compared to a deep springform, but generally, we are still looking for that same wobble in the center for doneness. It’s a fantastic way to get that creme brulee cheesecake flavor on a giant sheet tray!
And then there are the mini creme brulee cheesecakes. Oh my goodness, these are adorable and perfect for portion control (though I rarely control myself!). For these, you’ll use a standard muffin tin, but you absolutely need paper liners, or even better, silicone liners. The crucial difference here is the bake time. Because these are so much smaller, they cook way faster—usually 15 to 20 minutes, tops. You’ll need to watch them closely! They set up really quickly, and you don’t want that creamy texture to overbake into something rubbery. Torching them is a total blast too; you can torch three or four at a time right on the tray before popping them into individual serving papers!
Whether you prefer the ease of bars, the portion perfect nature of the minis, or going full commitment with the classic big round dessert, the core flavors of that creamy filling and crisp finish remain the same. You can even check out my tips for handling sweet fillings when I talk about pumpkin empanadas; the basics of not overbaking custard-style fillings still apply!
Frequently Asked Questions About Making Creme Brulee Cheesecake
I know you might still have a few little doubts swirling around, which is totally normal when you’re attempting a stunning dessert fusion like this! Cheesecake baking has a few quirks, but I’ve broken down the most common things people ask me about getting this creme brulee cheesecake recipe perfect.
Can I skip the water bath for this creme brulee cheesecake?
Oh, I wish I could tell you yes, but honestly, no, you really shouldn’t skip it! Think of the water bath as mandatory insurance for achieving that incredibly smooth, creamy cheesecake filling. Without it, the edges of the cheesecake bake way too fast while the center is still liquid. This temperature shock is what causes those dreaded cracks, and it will also give you a tougher, slightly curdled texture on the outside layers. If you’re worried about water leaking in, just double or triple wrap that springform pan with heavy-duty foil. A little extra effort wrapping is much easier than trying to patch up a cracked cheesecake later!
How do I get that thin, crisp sugar layer?
This is the whole point of the *brûlée* part, right? The key to a perfect caramelized sugar topping dessert finish is the sugar itself and how you apply the heat. First, the sugar layer must be thin and even. If you pile it on too thick, the top will burn to charcoal before the sugar underneath melts properly. Use about 1/2 cup sprinkled thinly. Second, you need intense, direct heat. A kitchen torch is hands-down the best and fastest way. Sweep it over the top until it bubbles thickly and turns amber brown. If you are using the broiler method, use the highest setting and watch it constantly—and I mean *constantly*—because it goes from perfect to burnt in about three seconds flat!
Can I truly make this creme brulee cheesecake ahead of time?
Absolutely! And I encourage it, especially for a rich dessert like this. The flavor actually deepens overnight, and having it chilled makes it sturdy enough to handle the foil wrapping for storage. This baked cheesecake recipe needs a minimum of six hours of chilling time, but I always recommend baking it completely, chilling it, and then leaving it wrapped in the fridge overnight. You torch that gorgeous sugar top right before you serve it to keep that snappy texture intact. If you prep a day ahead, you just pull it out, sprinkle the sugar, and torch—instant elegant dessert!
What secretly makes this creamy cheesecake filling so good?
If you look at the ingredients, we do a few things differently than a standard New York style, which gives us that signature melt-in-your-mouth texture that screams luxury. Beyond the water bath, it’s the combination of the eggs, sour cream, AND heavy cream. We use four eggs, which provides that rich custard body of a classic custard, but bringing in the sour cream and heavy cream adds fat and a slight tanginess that just cuts the sweetness perfectly. This blending of dairy gives us that dense yet incredibly smooth structure unique to the perfect creamy cheesecake filling. It’s all about balanced richness, and for more tips on creamy bases, you can check out some of my tricks when I’m making creamy tomato pasta too; patience with mixing the base is key in all dairy recipes!
Estimated Nutritional Data for Creme Brulee Cheesecake
Now, I know you’re probably not making this indulgent cheesecake treat because you are counting every single calorie, but it’s good to have an idea of what you’re diving into when you treat yourself! Since this is a homemade recipe, and people dollop frosting differently, these numbers are just estimates based on how the recipe is written with standard ingredient servings. Think of this as a guideline, not gospel, okay?
When you break down one serving size—which is one nice, standard slice—here is what you can generally expect from this dessert fusion:
- **Calories:** Around 450 calories
- **Total Fat:** About 28 grams
- **Carbohydrates:** Roughly 40 grams
- **Protein:** Around 8 grams
- **Sugar:** This checks in near 35 grams (remember, half of that sugar is in the filling and half is caramelized sugar on top!)
We’re loading this up with full-fat cream cheese and butter to get that incredible, rich texture we want for that creamy cheesecake filling, so the fat content is definitely there! But you know what? For a dessert that tastes like it came straight from a fancy bakery, honestly, those numbers aren’t bad at all. Just remember, this is a special occasion bake. Having a sensible serving alongside that perfect hot coffee makes it totally worth it!
Share Your Indulgent Cheesecake Treats
Now that you’ve successfully navigated the world of water baths and kitchen torches, I absolutely want to hear all about it! This whole site is built on the idea that if we share our kitchen wins and fails, we all cook smarter. Did the caramelized sugar topping dessert crackle just right for you? Did you go with the raspberry drizzle I mentioned, or did you pair it with something totally new?
Seriously, please take a moment and leave a rating and a comment down below. Telling me what worked well or if you had a little hiccup helps me so much keep these recipes streamlined and foolproof for the next person tackling this incredible fusion dessert. These aren’t just recipes; they are projects we complete together!
And if you snapped a picture of your gorgeous, crackly creation? Tag me on social media! Seeing your finished indulgent cheesecake treats makes my week. It proves that anyone, regardless of their schedule, can pull off something truly elegant right in their own kitchen. Happy baking, and I can’t wait to read what you think since you baked this stunning dessert!
PrintEasy Creme Brulee Cheesecake Recipe
Make this indulgent dessert fusion featuring a creamy vanilla bean cheesecake base topped with a perfectly crisp, caramelized sugar crust. This recipe delivers restaurant-style flavor with straightforward steps.
- Prep Time: 25 min
- Cook Time: 75 min
- Total Time: 8 hours 40 min
- Yield: 12 servings 1x
- Category: Dessert
- Method: Baking
- Cuisine: American
- Diet: Vegetarian
Ingredients
- 1 1/2 cups graham cracker crumbs
- 1/4 cup granulated sugar (for crust)
- 6 tablespoons unsalted butter, melted
- 3 (8 ounce) packages cream cheese, softened
- 1 1/2 cups granulated sugar (for filling)
- 1 teaspoon vanilla bean paste
- 1/4 teaspoon salt
- 4 large eggs
- 1/2 cup sour cream
- 1/4 cup heavy cream
- 1/2 cup granulated sugar (for topping)
Instructions
- Preheat your oven to 325°F (160°C). Wrap the outside of a 9-inch springform pan tightly with heavy-duty aluminum foil.
- Prepare the crust: Mix graham cracker crumbs, 1/4 cup sugar, and melted butter. Press the mixture firmly into the bottom of the prepared springform pan. Bake for 10 minutes. Let cool slightly.
- Prepare the filling: In a large bowl, beat the softened cream cheese and 1 1/2 cups sugar until smooth. Mix in vanilla bean paste and salt.
- Beat in the eggs one at a time, mixing just until combined after each addition. Gently stir in the sour cream and heavy cream. Do not overmix.
- Pour the cheesecake batter over the cooled crust. Place the springform pan inside a larger roasting pan. Carefully pour hot water into the roasting pan until it reaches halfway up the sides of the springform pan (water bath).
- Bake for 60 to 75 minutes, or until the edges are set but the center still jiggles slightly.
- Turn off the oven, crack the door open slightly, and let the cheesecake cool in the oven for 1 hour.
- Remove the cheesecake from the water bath and let it cool completely on a wire rack. Chill in the refrigerator for at least 6 hours, or preferably overnight.
- When ready to serve, remove the cheesecake from the springform pan. Sprinkle an even, thin layer of the remaining 1/2 cup sugar over the top.
- Use a kitchen torch to melt and caramelize the sugar until it forms a hard, amber crust. Serve immediately after torching for the best crackle.
Notes
- For the best creamy cheesecake filling texture, ensure your cream cheese is fully at room temperature before mixing.
- If you do not have a kitchen torch, you can place the sugared cheesecake under a preheated broiler for 1-2 minutes, watching constantly to prevent burning.
- This recipe makes an elegant dessert fusion that works well for dinner parties.
Nutrition
- Serving Size: 1 slice
- Calories: 450
- Sugar: 35g
- Sodium: 250mg
- Fat: 28g
- Saturated Fat: 17g
- Unsaturated Fat: 11g
- Trans Fat: 0.5g
- Carbohydrates: 40g
- Fiber: 1g
- Protein: 8g
- Cholesterol: 120mg