
Okay, let’s talk about conquering the culinary Mount Everest: Beef Wellington. I know, I know—it sounds intimidating! People see this dish and immediately picture fine dining restaurants or cooking shows where chefs yell about pastry integrity. But I promise you, we’re going to debunk that myth right now. This is my Ultimate Foolproof beef wellington recipe, designed specifically for you, the busy home cook who wants a showstopper without the stress. Back when Leo Grant started Dishicious, he approached recipes like a project, breaking down the complexity until all that was left was simple, elegant success. That’s the approach we’re taking today to ensure you nail that golden crust and perfectly pink center on your first try!
- Why This is the Ultimate Beef Wellington Recipe You Need
- Gathering Ingredients for Your Classic Beef Wellington
- Step-by-Step Instructions: How to Make Beef Wellington
- Tips for Success with Your Showstopper Main Course
- Serving Suggestions for Your Elegant Dinner Party Centerpiece
- Storage and Reheating Instructions for Leftover beef wellington recipe
- Frequently Asked Questions About the beef wellington recipe
- Estimated Nutritional Data for This beef wellington recipe
- Share Your Showstopper Main Course Success
Why This is the Ultimate Beef Wellington Recipe You Need
If you think this meal is only for professional chefs, think again! This is the ultimate showstopper main course because we’ve engineered the process for you. It’s designed to be foolproof, meaning you get restaurant quality results without the panic attack!
- We focus on structure so you don’t end up with a soggy mess.
- Every chilling step is mandatory—trust me, it matters!
- You get that stunning, golden presentation without fuss.
If you want quick, easy dinners usually, this is your weekend splurge that feels surprisingly manageable!
Achieving Flaky Puff Pastry Beef Every Time
The secret weapon against the dreaded soggy bottom? Temperature control and drainage! You absolutely *must* cook almost all the water out of your mushroom duxelles. If it’s wet, it steams the pastry. Once it looks thick and paste-like, spread it out on a plate to cool right down before it touches the prosciutto and beef. Then, after you wrap everything up, you chill it. A cold Wellington bakes up gloriously flaky; a warm Wellington melts the butter too fast.
Mastering the Perfect Beef Tenderloin Recipe
We sear that beef tenderloin hard and fast! We want deep, dark color on the outside for maximum flavor—that’s your baseline flavor layer. But here’s the key detail for your Perfect Beef Tenderloin Recipe component: you are pulling it out *before* it hits your final target temp, aiming for about 115°F internally before it even goes near the pastry. It finishes cooking inside the crust, so you nail that perfect medium-rare center every single time. Done right, it’s incredibly tender!
Gathering Ingredients for Your Classic Beef Wellington
Alright, gathering supplies is like prepping for a mission! For this showstopper, we need high-quality ingredients because there aren’t a ton of hiding places for mediocre stuff. Since the beef wellington recipe is basically three main parts—the beef, the mushroom duxelles, and the wrapping—I’ve broken the list down so you can organize your shopping trip. Remember, we want that ultra-flaky result, so pay attention to the pastry choice!
Here is exactly what you need for your center-cut perfection:
- For the Beef: 2 pound beef tenderloin center cut (this is non-negotiable!), 1 tablespoon olive oil, Salt and black pepper to taste, 1 tablespoon Dijon mustard.
- For the Mushroom Duxelles Recipe: 1 pound cremini mushrooms (they give the best earthiness!), 2 shallots, finely chopped, 2 sprigs fresh thyme (just the leaves!), 1/4 cup dry white wine, 1/4 cup heavy cream, 1/2 teaspoon salt, 1/4 teaspoon black pepper.
- For Assembly: 12 thin slices prosciutto, 1 package (14.1 ounces) all-butter puff pastry (yes, the all-butter kind!), 1 large egg, beaten (for that gorgeous golden egg wash), All-purpose flour, just for dusting your work surface.
If you want to check out some other quick dinner ideas while you’re grabbing groceries, you can sneak a peek at my beef and broccoli recipe!
Ingredient Notes and Substitutions for Your beef wellington recipe
Don’t panic if you can’t find one specific item! We can pivot. If you absolutely cannot source prosciutto for your wrapping, thin slices of good quality, fatty ham will work in a pinch, but prosciutto really brings the salty flavor boost that pairs so well with the duxelles.
For the mushrooms, cremini are my jam, but you can certainly mix in some shiitake or even portobello to deepen the richness of that Mushroom Duxelles Recipe. Just make sure whatever you use, you cook out every drop of moisture!
And for the pastry? Please, if you can swing it, use all-butter puff pastry. The flavor and flakiness are just miles better than the oil-based stuff. It’s worth the slight splurge for this Elegant Dinner Party Centerpiece!
Step-by-Step Instructions: How to Make Beef Wellington
Okay, time to get messy! This is where the work pays off. Remember, the goal here is structure and dryness, which leads to that beautiful golden crust everyone raves about. Follow the recipe, and don’t skip those chilling breaks—they are your secret weapon in this whole beef wellington recipe journey. You’re going to feel like a Michelin star chef by the time we’re done!
Searing the Beef and Preparing the Mushroom Duxelles Recipe
First things first: we want intense color! Get your skillet screaming hot with that olive oil. Sear the beef tenderloin hard—about 1 to 2 minutes per side—giving it a deep, beautiful crust. You’re not cooking it through; you’re flavor-building! Once it comes off, let it cool just enough so you can handle it, and then brush it completely with Dijon mustard. That mustard layer is amazing because it adds tang and helps the duxelles stick.
Now for the Mushroom Duxelles Recipe. Pulse those mushrooms and shallots until they look really finely chopped—almost like wet sand. Into the hot pan they go! This is the longest bit of cooking: Medium heat, stir constantly until all the liquid hisses away. Seriously, keep stirring until it looks like thick mud, not soup. You’ll know you’re done when the pan is practically dry. Stir in the wine, let that evaporate, then the little bit of cream, and cook it down until it’s a dense paste.
Wrapping and Chilling for the Best Beef Wellington for Beginners
This part is all about creating a tight package. Lay out your plastic wrap, arrange the prosciutto neatly overlapping, and spread that cooled duxelles evenly over it. Okay, place the mustard-coated beef on top and start rolling! Use that plastic wrap to really press everything tight—we’re creating a perfect log shape here. Then, twist the ends and pop it into the fridge for at least 30 minutes. This tight stage is key for a neat slice later.
When you take it out, roll it into the puff pastry. Make sure you trim the excess dough so you don’t end up with big floppy bits. Pinch those seams shut nice and tight, fold the ends under neatly, and guess what? Back into the fridge it goes for another 30 minutes! This second chill ensures the pastry holds position before it hits high heat.
The Final Assembly and Baking of Your beef wellington recipe
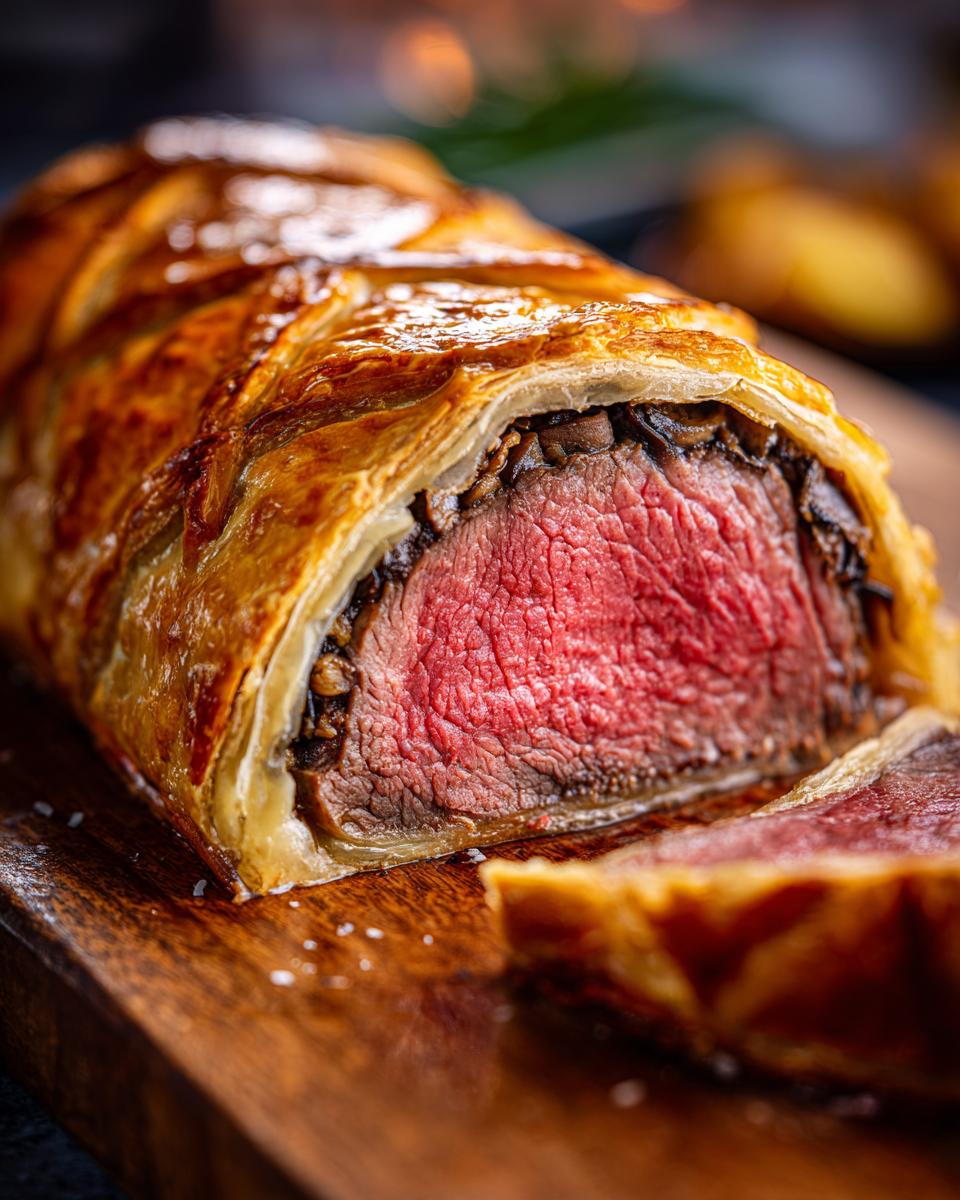
Time to make it pretty! Oven to 400°F. Take the plastic off, place the Wellington seam-side down on parchment paper, and brush everything liberally with that egg wash. You can score the top lightly with the back of a knife—just a pretty pattern, don’t cut all the way to the meat!
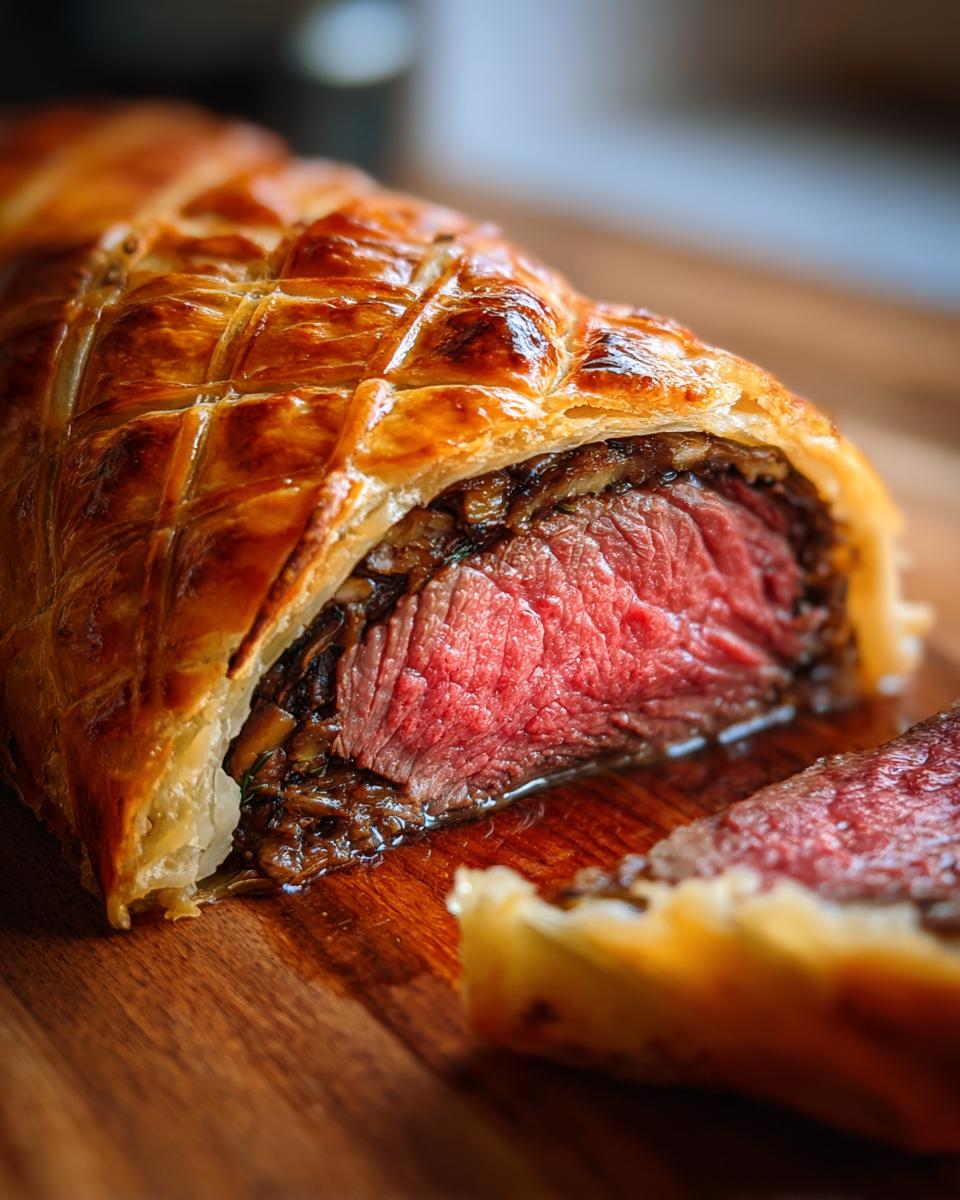
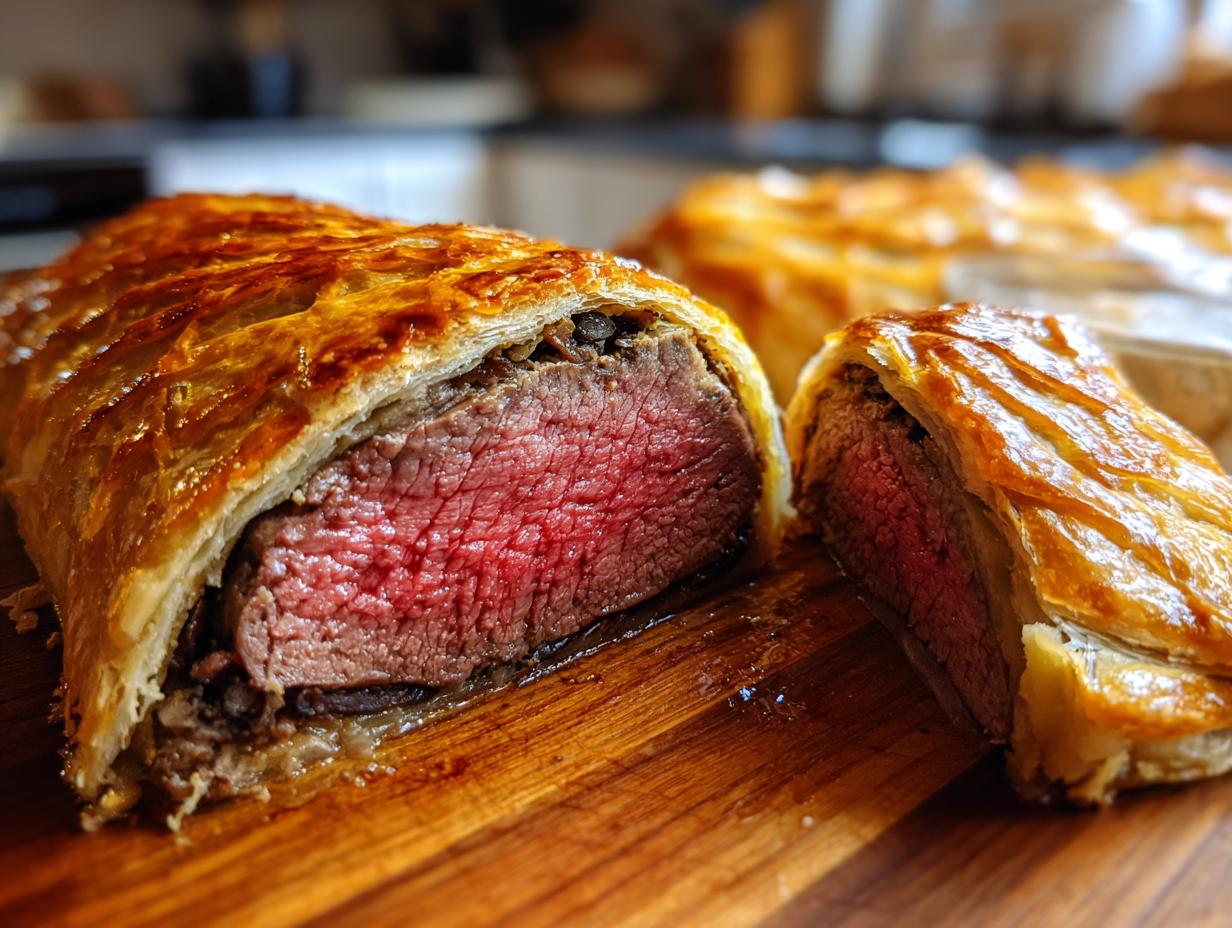
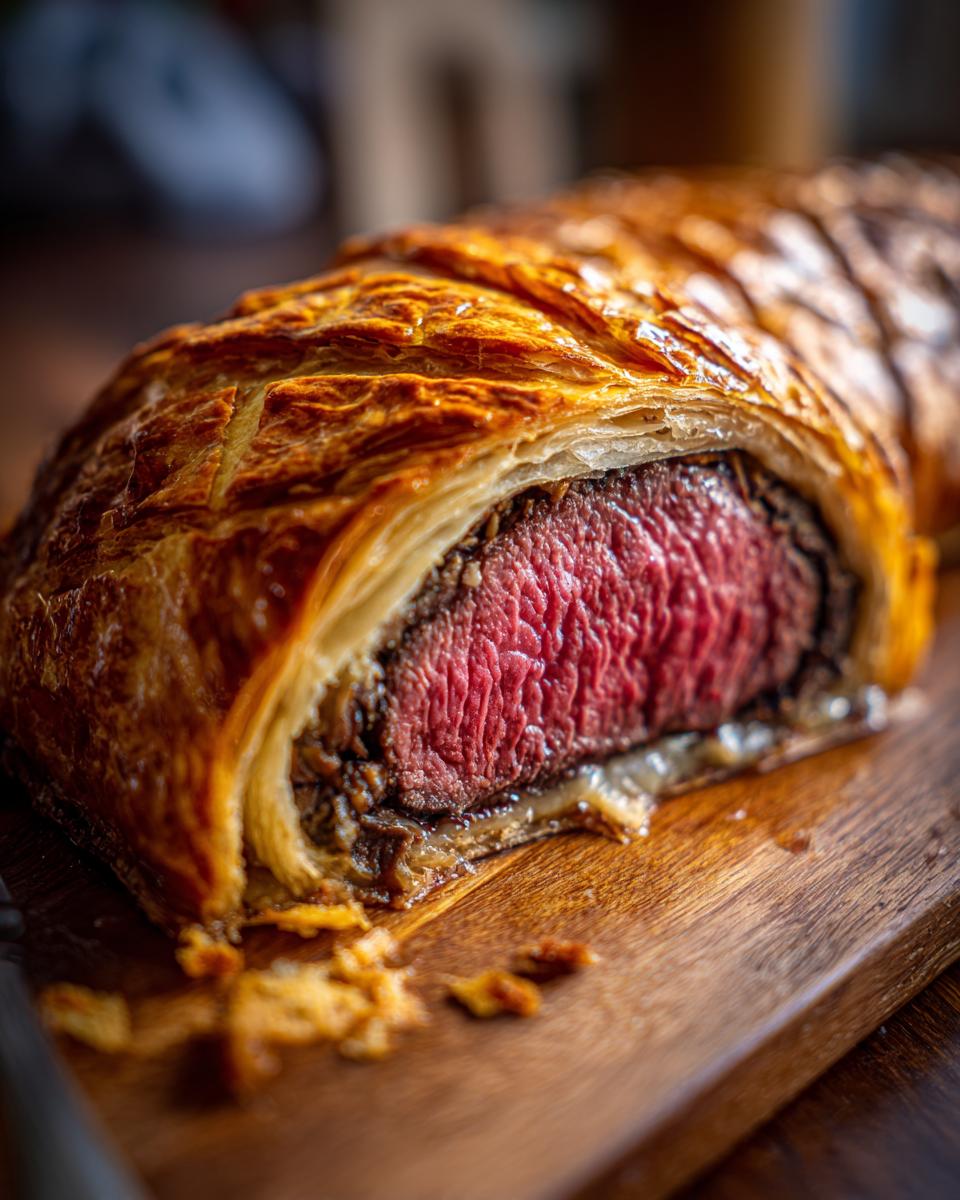
The Best Beef Wellington Temperature is everything. You must use a meat thermometer. Pop it into the thickest part of the center. For that perfect medium-rare, you’re aiming to pull it out when the thermometer hits 125°F to 130°F. It keeps cooking while it rests, which is crucial so you don’t end up with tough, overcooked meat!
If you’re looking for alternatives on preparing that beautiful beef cut, you might want to look up my maple mustard pork tenderloin recipe inspiration, though nothing beats a perfect Wellington!
Tips for Success with Your Showstopper Main Course
Now that you’ve baked your incredible creation, we hit the most commonly skipped, yet wildly important step. You’ve done all that work focusing on getting the duxelles dry and the pastry golden, but if you cut into that gorgeous Wellington the second it comes out of the oven, you’re going to be left with dry beef swimming in a puddle of juices on your cutting board. We do not want that!
This dish is rich, it’s elegant, and it deserves a moment to settle down. It’s not like dinner that needs to be on the table *right this second*. Give it respect!
Resting: The Secret to a Juicy beef wellington recipe
Meat, especially beef tenderloin, has been under some serious heat stress. When it cooks, all those delicious internal juices are violently jostled and forced toward the center. If you slice it immediately, those juices just burst right out onto the board. No good!
We need those juices to redistribute evenly through the meat fibers. That’s what resting does. It lets the muscle fibers relax and reabsorb that flavor and moisture.
My absolute minimum resting time for something this size—your beef wellington recipe masterpiece—is 10 minutes. Seriously, set a timer. If you are serving a very large Wellington, you might push that closer to 15. Don’t worry about the pastry cooling down too much; it stays warm under a loose tent of foil. While you wait, you can quickly throw together some amazing sides, like my recipe for twice-baked potatoes, which pair perfectly with the richness!
Serving Suggestions for Your Elegant Dinner Party Centerpiece
When you’ve managed to pull off the Classic Beef Wellington, the plating needs to match the effort, right? You’ve got this rich, savory, decadent package of beef, mushroom goodness, and buttery pastry. Because the Wellington is so luxurious and filling on its own, we don’t want sides that fight it for attention. Simple, bright, and elegant sides are what give this dish the spotlight it deserves.
Think about what balances richness. We need a little acidity and maybe some green color to cut through all that butter and beef fat. This isn’t the time for heavy casseroles!
For vegetables, I always lean toward something slightly sweet or slightly sharp because they complement the earthy duxelles so well. Roasted asparagus with a little lemon zest is a winner—it takes 20 minutes and looks beautiful arranged around slices of the Wellington.

Another great option is simple, refined greens. A light arugula salad tossed with toasted walnuts and a sharp vinaigrette makes a fantastic textural contrast. You want crunch against the soft pastry, trust me!
And of course, you can’t forget a sauce! A deeply flavored red wine reduction is traditional and adds that glossy, restaurant-quality finish. It truly elevates the entire Gourmet Beef Fillet Recipe. Even if you only have 15 minutes, whipping up a quick pan sauce using the drippings from your sear adds immense depth.
If you want the ultimate comfort pairing—which I sometimes do even for a special meal—you can never go wrong with perfectly creamy mashed potatoes. Check out my instructions for the best mashed potatoes; they are perfect for soaking up any juices!
Storage and Reheating Instructions for Leftover beef wellington recipe
First off, if you have leftovers of this magnificent beef wellington recipe, consider yourself lucky! It’s rare in my house, but it happens. We treat leftovers with the respect they deserve, because we don’t want to ruin that pastry we worked so hard to make golden! You can keep your cooked Wellington stored in an airtight container in the fridge. I wouldn’t push it past three days; the pastry sort of absorbs moisture from the rich filling over time, and we want that crispness!
Now, the giant warning: Do NOT reheat slices in the microwave. Please, for the love of flaky pastry, avoid the microwave! It turns puff pastry into sad, chewy rubber in about thirty seconds flat. It totally destroys the texture.
The best way to revive leftovers is to use dry heat. If you have slices, pop them onto a baking sheet and reheat them in a moderate oven—say, 325°F—until they are heated through. This dries out the pastry surface just enough to bring back some of that glorious flakiness. Even better? An air fryer! If you have an air fryer, it’s fantastic for reheating individual slices quickly and giving that crust an extra crisp edge.
If you’re thinking way ahead, yes, you can freeze it unbaked! Wrap that whole raw log super tight in plastic wrap, then foil, and it lasts for about two months. When you bake from frozen, just add about 15 to 20 minutes to the total bake time, but keep an eye on that internal temperature. It’s a lifesaver for planning holiday meals ahead of time!
If you want to browse some other great beef ahead of your next big dinner, check out my crockpot beef stroganoff recipe—it’s the total opposite of fancy, but just as delicious in its own way!
Frequently Asked Questions About the beef wellington recipe
It’s a showstopper, so it’s natural to have questions! People always worry they’ll mess up that beautiful puff pastry or end up with beef that’s way too done. I get it; this beef wellington recipe deserves perfection. I put together the things I get asked most often about making this classic dish so you can bake with total confidence.
Can I use the Gordon Ramsay Beef Wellington Guide techniques in this beef wellington recipe?
Absolutely! When you look up the Gordon Ramsay Beef Wellington Guide, you’ll see he focuses heavily on two crucial things: getting every ounce of moisture out of the duxelles and keeping everything intensely cold during the wrapping process. We absolutely incorporate those philosophies here. My goal was just to streamline the process a little bit and focus on providing Easy Beef Wellington Instructions so the home cook feels calmer. So yes, you’re using the same foundational, expert techniques, just without the high-pressure film crew!
What is the ideal internal temperature for this beef wellington recipe?
This is probably the single most important detail, especially if you want that stunning, pink center for your Elegant Dinner Party Centerpiece. We are pulling the Wellington out of the oven when the center registers between 125°F and 130°F for a perfect medium-rare. That’s the temperature we need *before* you let it rest! Remember, because it is completely insulated by the duxelles, prosciutto, and pastry, the internal temperature continues to climb by about 5 degrees while it rests for those mandatory 10 minutes. If you wait until 135°F in the oven, you’ll get medium or well-done when you cut into it, and nobody wants that dry texture in their Classic Beef Wellington!
If you’re looking for other great beef ideas for the future, you can check out my page on quick easy dinners, but honestly, once you master this Wellington, you’ll want to make it every holiday!
Estimated Nutritional Data for This beef wellington recipe
Okay, let’s talk numbers for our delicious beef wellington recipe. I always like to give people a heads-up on what they are digging into when they serve up such a rich, amazing dish, especially if you’re planning a big holiday meal!
Keep in mind, since this is such a luxurious meal using beef tenderloin and all-butter pastry, these numbers reflect a generous serving of what is truly a Showstopper Main Course meant for a special occasion, not necessarily an everyday meal. These figures are estimates based on the ingredient breakdown of the recipe above before any additions like side sauces.
Here’s the general breakdown per slice:
- Calories: About 550
- Fat: Roughly 35g (Be careful, a good chunk of that is the pastry butter, but wow, is it worth it!)
- Protein: A solid 35g, thanks to that gorgeous beef fillet!
- Carbohydrates: Around 25g, mostly coming from the pastry and the mushrooms.
- Sugar: Surprisingly low at just 2g!
- Sodium: Around 450mg. Watch your salt when searing because the prosciutto adds natural saltiness.
This is seriously impressive nutrition for something that tastes like it came straight from a top-tier steakhouse. No wonder it feels like such a treat!
If you’re ever looking for lighter options after your indulgence, remember I have a whole section on my smarter cooking methods over at my anti-inflammatory dinners page. Enjoy this Wellington, and then maybe we can balance things out later!
Share Your Showstopper Main Course Success
Wow! We did it! You successfully navigated the entire beef wellington recipe, from searing that tenderloin to achieving that perfect golden, flaky crust. High five! Now, the most important part: I want to hear all about it!
When you pull that gorgeous Showstopper Main Course out of the oven, do me a favor: take a picture before you slice it! Seriously, the moment you cut through the pastry and reveal that perfect pink interior? That’s the money shot.
If you post it online—maybe on Instagram or Facebook—please tag me so I can celebrate with you! I also absolutely love reading your feedback right here in the comments section below. Did the searing time work perfectly for your piece of beef? Did you serve it with roasted asparagus or perhaps a fancy sauce?
Leave a star rating if you loved this recipe, and tell me your favorite part of mastering the Classic Beef Wellington. Your feedback helps the Dishicious community grow, and honestly, seeing your successful bakes keeps me motivated to simplify the next big culinary challenge for you. If you need to reach out privately about specific issues, you can always head over to my contact page. Happy cooking, and enjoy that incredibly fancy dinner. And hey, if you need more impressive meal inspiration, don’t forget to check out this amazing Wellington inspiration from Nyra Recipes!
PrintThe Ultimate Foolproof Beef Wellington Recipe: Master the Classic Showstopper

Make the classic Beef Wellington, a show-stopping main course featuring tender beef tenderloin wrapped in mushroom duxelles, prosciutto, and flaky puff pastry. Follow these straightforward steps for a guaranteed impressive result.
- Prep Time: 45 min
- Cook Time: 40 min
- Total Time: 1 hour 55 min
- Yield: 4-6 servings 1x
- Category: Dinner
- Method: Baking
- Cuisine: British
- Diet: Low Fat
Ingredients
- 2 pound beef tenderloin center cut
- 1 tablespoon olive oil
- Salt and black pepper to taste
- 1 tablespoon Dijon mustard
- 1 pound cremini mushrooms, finely chopped
- 2 shallots, finely chopped
- 2 sprigs fresh thyme, leaves removed
- 1/4 cup dry white wine
- 1/4 cup heavy cream
- 1/2 teaspoon salt
- 1/4 teaspoon black pepper
- 12 thin slices prosciutto
- 1 package (14.1 ounces) all-butter puff pastry, thawed
- 1 large egg, beaten (for egg wash)
- All-purpose flour, for dusting
Instructions
- Season the beef tenderloin generously with salt and pepper. Heat the olive oil in a large skillet over high heat. Sear the beef on all sides until deeply browned, about 1-2 minutes per side. Remove the beef and let it cool slightly. Brush the cooled beef evenly with Dijon mustard.
- Prepare the duxelles: Place the chopped mushrooms, shallots, and thyme leaves in a food processor and pulse until finely chopped. Transfer the mixture to the same skillet used for the beef. Cook over medium heat, stirring frequently, until all the moisture has evaporated, about 10-15 minutes.
- Add the white wine to the mushroom mixture and cook until it evaporates. Stir in the heavy cream, salt, and pepper. Cook until the mixture is thick again. Spread the duxelles onto a plate to cool completely.
- Lay a large sheet of plastic wrap on your counter. Arrange the prosciutto slices on the plastic wrap, overlapping them slightly to form a rectangle large enough to wrap the entire tenderloin.
- Spread the cooled duxelles evenly over the layer of prosciutto. Place the mustard-coated beef tenderloin at one end of the prosciutto.
- Use the plastic wrap to tightly roll the prosciutto and duxelles around the beef. Twist the ends of the plastic wrap to secure the log shape. Chill the wrapped beef in the refrigerator for at least 30 minutes, or up to 24 hours.
- Lightly dust a clean surface with flour. Unfold the thawed puff pastry sheet. If necessary, gently roll it out slightly to ensure it can fully enclose the beef.
- Remove the plastic wrap from the chilled beef log. Place the beef log near one edge of the pastry. Brush the edges of the pastry with the beaten egg wash.
- Roll the pastry tightly around the beef, trimming any excess pastry. Pinch the seams together firmly to seal. Trim the ends and fold them neatly underneath the log.
- Wrap the entire Wellington tightly in a final layer of plastic wrap, twisting the ends to create a neat, compact shape. Chill for another 30 minutes.
- Preheat your oven to 400 degrees Fahrenheit (200 degrees Celsius). Remove the plastic wrap. Place the Wellington seam-side down on a baking sheet lined with parchment paper. Brush the entire surface with the egg wash. Score the top lightly with the back of a knife in a decorative pattern, avoiding cutting through to the meat.
- Bake for 30-40 minutes for medium-rare (internal temperature of 125-130 degrees Fahrenheit). Use a meat thermometer inserted into the center of the thickest part of the beef.
- Let the Beef Wellington rest on a cutting board for at least 10 minutes before slicing into thick portions. Serve immediately.
Notes
- Chilling the beef after wrapping in duxelles and again after wrapping in pastry is crucial for maintaining shape and achieving flaky pastry.
- For a perfect medium-rare, aim for an internal temperature of 125 degrees Fahrenheit before resting. The temperature will rise during the rest period.
- If the pastry begins to brown too quickly, loosely tent the Wellington with aluminum foil during the last 10 minutes of baking.
Nutrition
- Serving Size: 1 slice
- Calories: 550
- Sugar: 2
- Sodium: 450
- Fat: 35
- Saturated Fat: 15
- Unsaturated Fat: 20
- Trans Fat: 1
- Carbohydrates: 25
- Fiber: 3
- Protein: 35
- Cholesterol: 120