
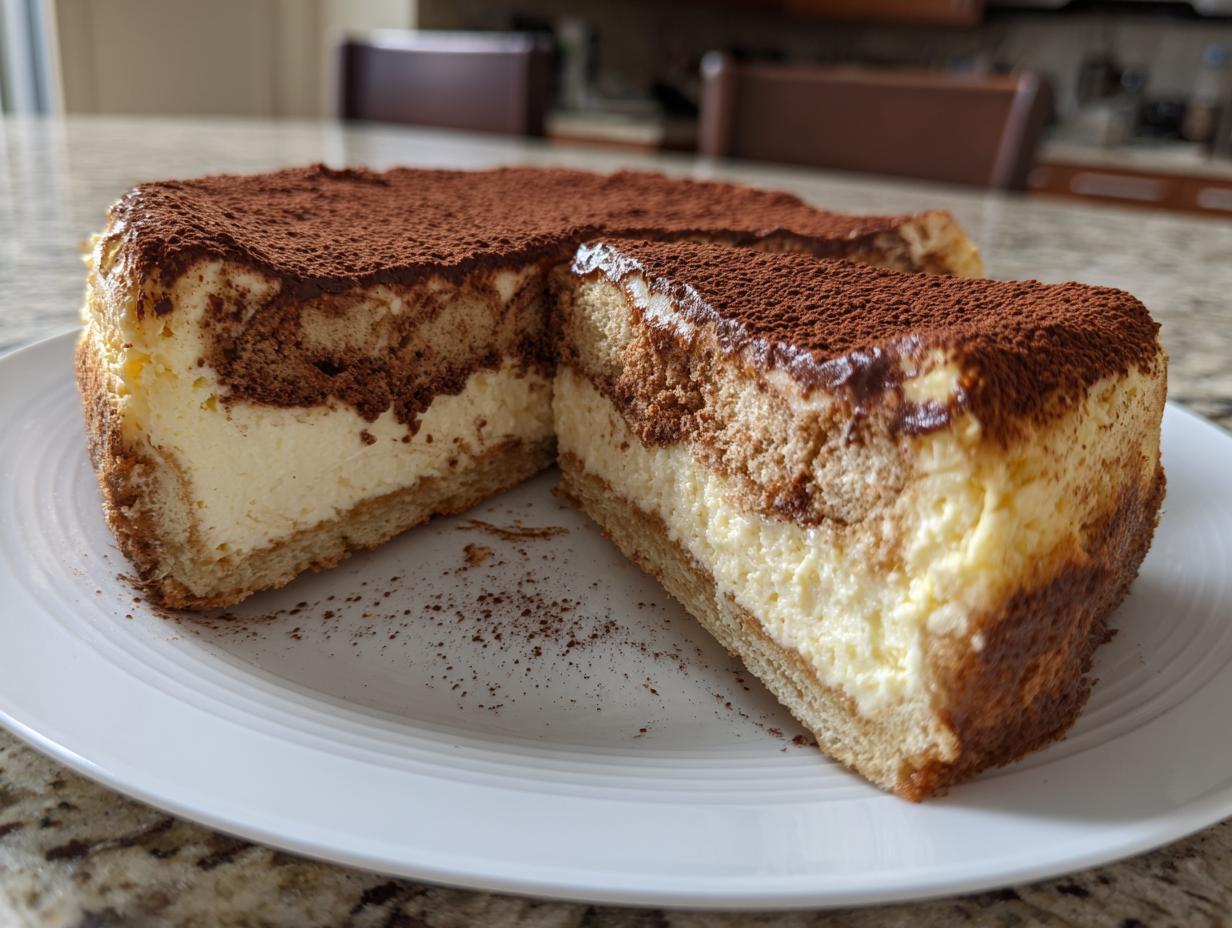
Oh, you have to trust me on this one. If you think you know great desserts, wait until you try merging two titans of sweets: rich, creamy cheesecake and the intense, coffee-soaked magic of Tiramisu. It sounds ambitious, right? People ask me all the time how you balance that classic Italian espresso punch with the sturdy, decadent structure of an American baked cheesecake. Honestly, getting that balance right in this tiramisu cheesecake was a major project, but when you nail it? Wow. It’s elegant, it’s comforting, and it’s totally foolproof once you follow my steps.
This recipe gives you that show-stopping, *Decadent Baked Tiramisu Cheesecake* that looks like it came straight out of a fancy bakery, but I promise it comes together with a simple process. We’re leaning into that creamy goodness and deep coffee flavor. If you love our tiramisu cookies, you’ll definitely want to bookmark this one for your next celebration!
- Why This Tiramisu Cheesecake Recipe Is a Must-Try
- Ingredients for Your Decadent Baked Tiramisu Cheesecake
- Step-by-Step Instructions for This Tiramisu Cheesecake Recipe
- Tips for the Best Tiramisu Cheesecake Ever
- Variations: Baked Tiramisu Cheesecake vs. No Bake Tiramisu Cheesecake
- Serving Suggestions for Your Italian Inspired Cheesecake
- Storing and Reheating Your Rich Cocoa Topping Cake
- Serving Suggestions for Your Italian Inspired Cheesecake
- Estimated Nutritional Data for This Tiramisu Cheesecake
- Share Your Tiramisu Cheesecake Experience
- Estimated Nutritional Data for This Tiramisu Cheesecake
- Share Your Tiramisu Cheesecake Experience
Why This Tiramisu Cheesecake Recipe Is a Must-Try
This isn’t just another fusion mashup; this tiramisu cheesecake is special because we nail both sides of the equation. Here’s why you need to try this version:
- It uses a baked method, giving you that stable, sophisticated structure you expect from a great cheesecake.
- The espresso soak is intense enough to deliver authentic tiramisu flavor.
- It’s a definite show-stopper for any holiday or dinner party!
Achieving the Perfect Creamy Mascarpone Dessert Texture
The secret to a silky, smooth cheesecake filling—that true creamy mascarpone dessert experience—is simple but critical: temperature. You absolutely have to make sure your cream cheese and mascarpone are fully softened, at room temperature. Don’t rush it; cold spots mean lumps, and we don’t want lumps! Also, when you add those eggs, mix them in slowly, one at a time, just until they disappear. Over-beating the eggs is the fastest route to a gritty texture or a sunken center. Trust me on this one!
Ingredients for Your Decadent Baked Tiramisu Cheesecake
Putting together this amazing tiramisu cheesecake requires a few dedicated components, but don’t let the list scare you! I’ve broken it down into three simple groups: the crust, the lovely filling, and the parts that give it that classic Tiramisu flavor. If you’re organized, gathering these items is half the battle won. Remember, you can find our tips for cream cheese chicken taquitos if you need more simple comfort food ideas!
Crust Ingredients:
- 1 1/2 cups chocolate wafer crumbs
- 1/4 cup granulated sugar (for crust)
- 6 tablespoons unsalted butter, melted
Cheesecake Filling Ingredients:
- 1 (8 ounce) package cream cheese, softened
- 8 ounces mascarpone cheese, softened
- 1 cup granulated sugar (for filling)
- 3 large eggs
- 1 teaspoon vanilla extract
Espresso Soak & Topping:
- 1/4 cup strong brewed espresso, cooled
- 1/2 cup ladyfingers, split
- 1/4 cup coffee liqueur (optional—we do love a little kick!)
- 1/4 cup cocoa powder, for dusting
Ingredient Notes and Substitutions for Tiramisu Cheesecake
Let’s talk swaps for a second. Since the coffee flavor is so essential to a great tiramisu cheesecake, that espresso has to be strong. Don’t use regular drip coffee if you can help it; go for an espresso shot or even concentrate if that’s all you have. About the alcohol: if you skip the coffee liqueur, just add two extra tablespoons of strong espresso to the soaking bowl to keep that coffee punch strong. You’ll notice I listed chocolate wafer crumbs. These give a lovely dark base that echoes the cocoa topping. If you only have graham crackers, use those instead! They will work fine, but the chocolate ones give it an extra layer of complexity that I think it deserves.
Step-by-Step Instructions for This Tiramisu Cheesecake Recipe
Okay, time to put the magic together! This is where we take those beautiful ingredients and turn them into an unforgettable Baked Tiramisu Cheesecake. Don’t let the water bath part stress you out; it’s the key to that super smooth, crack-free surface we are going for! We’ll start with that dark chocolate crust and get it baked first. Grab your 9-inch springform pan and wrap the outside *really* well in heavy-duty foil—like, twice around. We don’t want any water sneaking in later! If you’re looking for other great baked recipes to master, you absolutely have to check out my tips for twice-baked potatoes!
Once the crust is baked for 10 minutes and cooled down, it’s ready for its coffee bath. We mix up the espresso and optional liqueur in a shallow dish. This next part is crucial for the final texture.
Preparing the Espresso-Soaked Ladyfinger Layer
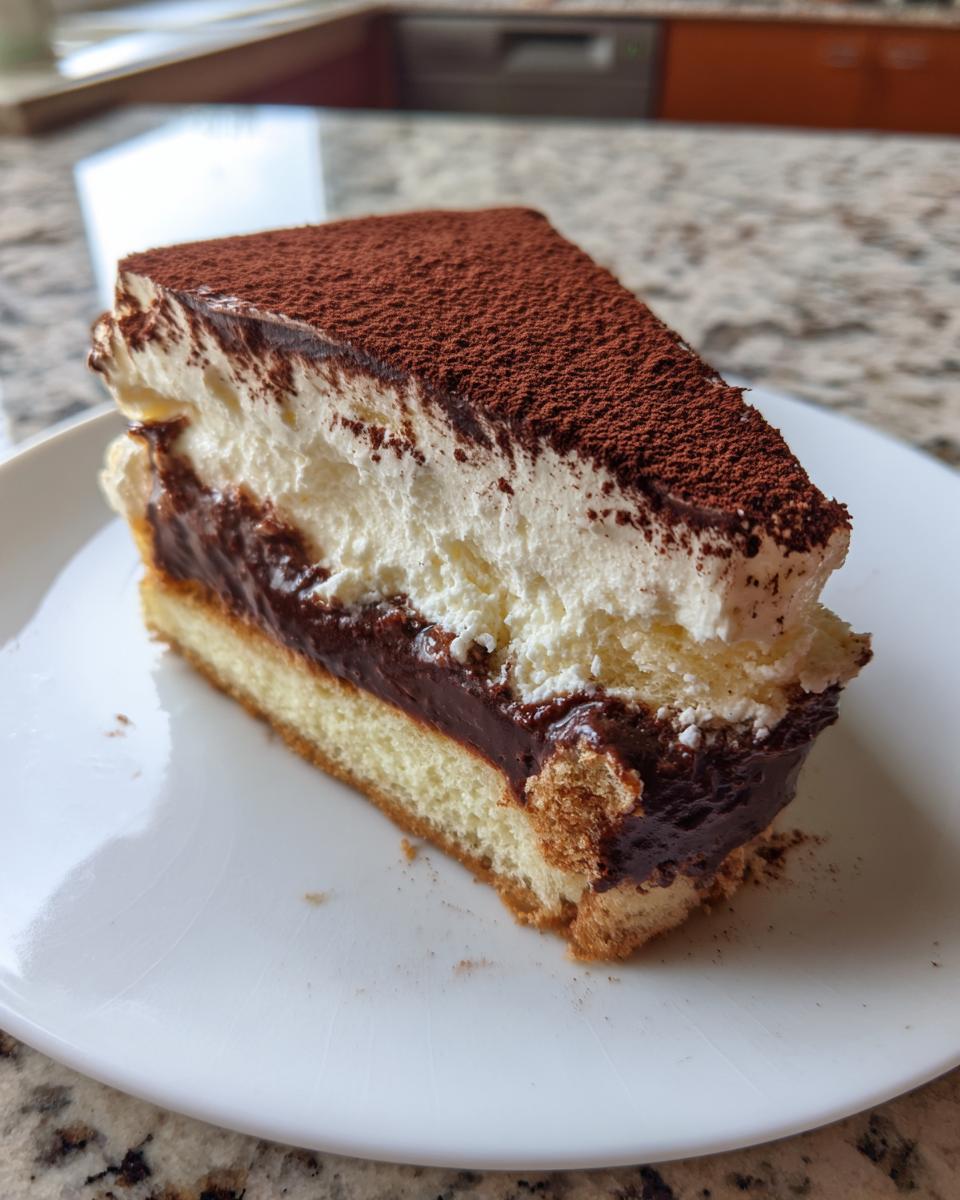
When you dip your ladyfingers, you need to work fast! Think quick dunk—one second per side, tops. You want them moist and bursting with coffee flavor, but if you let them sit, they turn to mush. Soggy ladyfingers mean you’ll have a soupy layer instead of a nice defined middle for your Ladyfinger Cheesecake. Lay those dipped halves down snugly over the cooled crust. They should make a nice, even platform for our creamy filling to sit on.
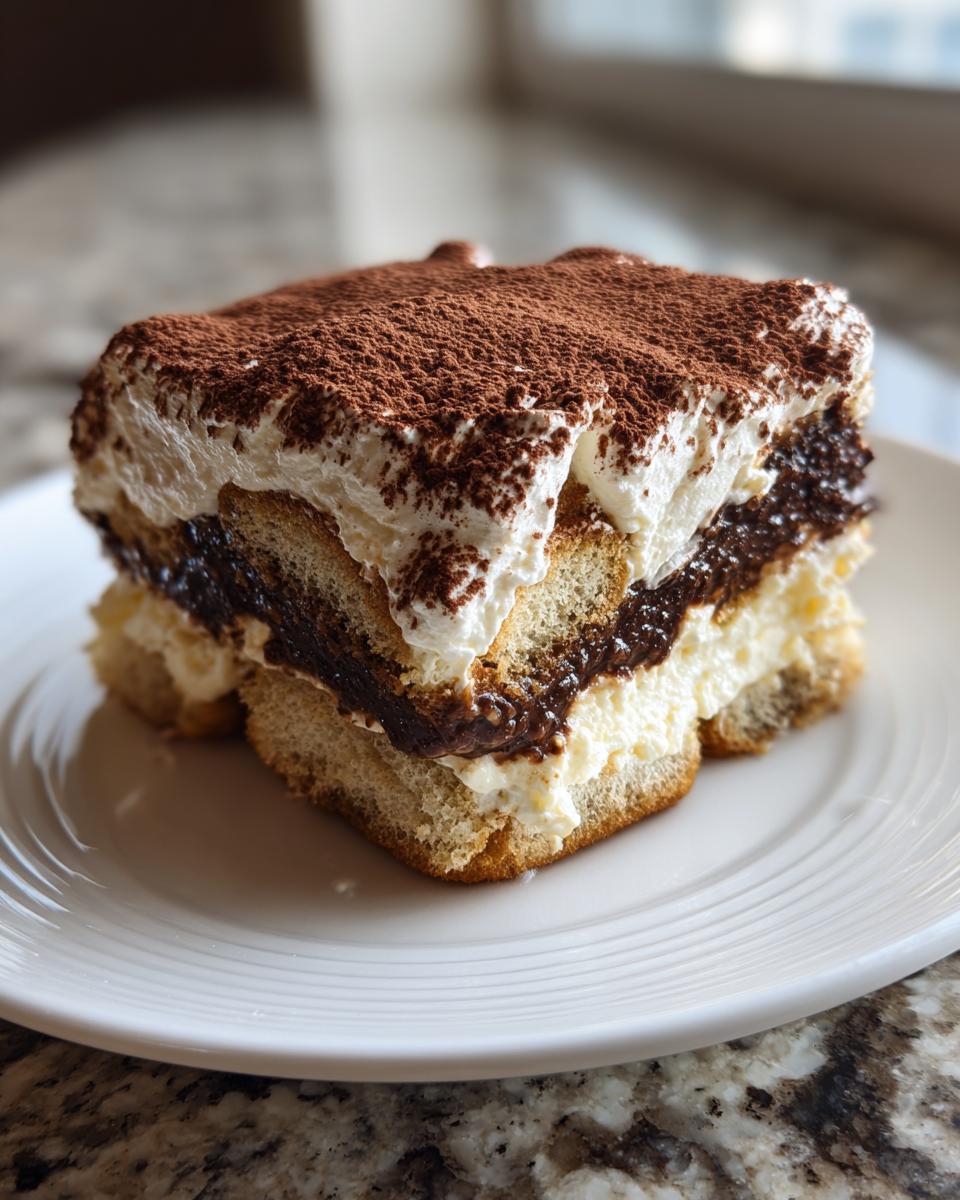
After the ladyfingers are set, gently pour in half of that rich mascarpone batter. Spread it carefully with an offset spatula so you don’t disturb the coffee layer underneath. Then top it with the rest of the batter and smooth the top smooth. This is going into the water bath!
Baking and Cooling the Coffee Cheesecake Dessert
The water bath is non-negotiable for this dessert, folks. Place your foil-wrapped springform pan inside a larger roasting pan, and then pour boiling water into the larger pan until it comes about halfway up the side of the cheesecake pan. That hot water creates steam, which cooks the cheesecake gently and evenly. We’re aiming for about 55 to 65 minutes. You know it’s done when the edges look set but the center wiggles just a smidge when you nudge the oven rack—that slight jiggle is the sign of perfection for this Coffee Cheesecake Dessert!
Now, here’s the trick to avoiding that disastrous crack: DO NOT take it out right away! Turn the oven off, crack the door open just a tiny bit, and let it sit in that warm environment for a full hour. This slow cooling process lets the cheesecake temperature drop gradually, ensuring a beautiful, unblemished top. After that hour? Then you take it out to cool completely on a rack before chilling overnight. Patience pays off!
Tips for the Best Tiramisu Cheesecake Ever
Honestly, executing a perfect Tiramisu Cheesecake Recipe is all about those little details that separate a good dessert from a legendary one. After all this work, we want to guarantee success, right? Think of these following points as my personal, refined checklist—the things I always double-check before setting this beauty in the fridge. These are the little secrets that make mine the Best Tiramisu Cheesecake in my circle!
First up—and this is something I learned the hard way—is sealing that pan for the water bath. You want water vapor *inside* the oven, not dripping *into* your crust! Use heavy-duty aluminum foil and wrap the bottom and sides of your springform pan at least twice. If I think my foil is slightly weak, I’ll even put the whole wrapped pan inside a large Ziploc bag before setting it in the roasting pan. It saves you from a soggy chocolate wafer mess, guaranteed!
Next, the chilling time. I know you want this magnificent Creamy Mascarpone Dessert right now, but you absolutely cannot rush the chill. Seriously. You need a minimum of six hours, but I’m telling you from experience: overnight is when the flavors really meld and the structure sets up perfectly. If you cut it early, it might still slide apart a bit.
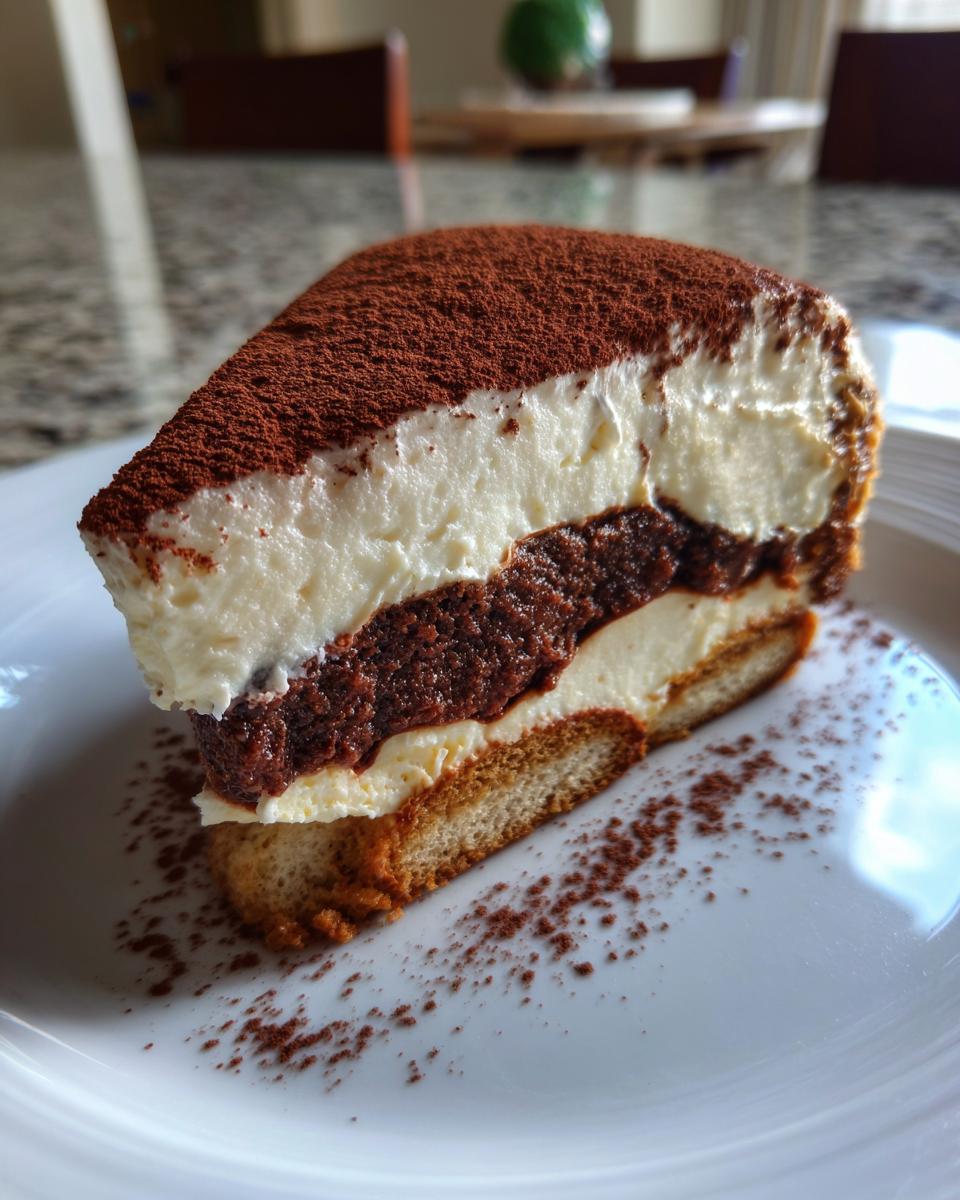
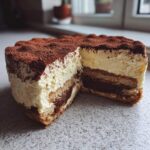
Finally, let’s talk about the presentation finish—that deep cocoa dusting. Don’t just dump the cocoa powder on top when it’s still cold from the fridge. If you do, the moisture makes little clumps. I always let mine sit out for about 20 minutes before dusting, and I use a very fine-mesh sieve—almost like sifting flour. This creates a beautiful, velvety, even cloud of dark chocolate that really sets off the creamy white filling underneath. It’s the perfect final touch before cutting into your amazing potato stacks counterpart!
Variations: Baked Tiramisu Cheesecake vs. No Bake Tiramisu Cheesecake
People always ask me if they can skip the oven for this recipe, and the answer is yes! I totally get it; sometimes you just need something quick, especially when those sudden dessert cravings hit. The good news is that our recipe easily shifts into a No Bake Tiramisu Cheesecake. As noted above, you just skip the entire baking ritual—no water bath needed! You assemble it exactly the same way, but then you just chill it down until it’s firm, which takes at least eight hours.
Now, the texture is where things change! My baked version gives you that rich, dense, almost cakey structure—it truly stands tall. The no-bake version, though? That’s lighter, almost like a luxurious mousse or pudding layered on top of those coffee-soaked ladyfingers. If you’re looking for something that tastes incredible but feels a little less heavy, the no-bake is perfect! We use a similar approach for our no-bake pumpkin cheesecake, so you already know the technique works beautifully!
Serving Suggestions for Your Italian Inspired Cheesecake
Now that you have this gorgeous, *Italian Inspired Cheesecake* sitting perfectly chilled in your fridge, the final step is making it look as incredible as it tastes! This isn’t just dessert; this is a centerpiece moment. We developed such a rich profile—coffee, cream, deep chocolate notes—so you want toppings that enhance, not fight, those flavors.
The absolute classic move, and my personal favorite, is keeping the topping super simple. After you dust it with that glorious cocoa powder, add a dollop of freshly whipped heavy cream right on top of each slice as you serve it. Those flakes of white cream against the dark cocoa are so dramatic. If you haven’t tried the honey peach cream cheese cupcakes, you know I love a good cream cheese element, but for Tiramisu? Keep it light with straight whipped cream.
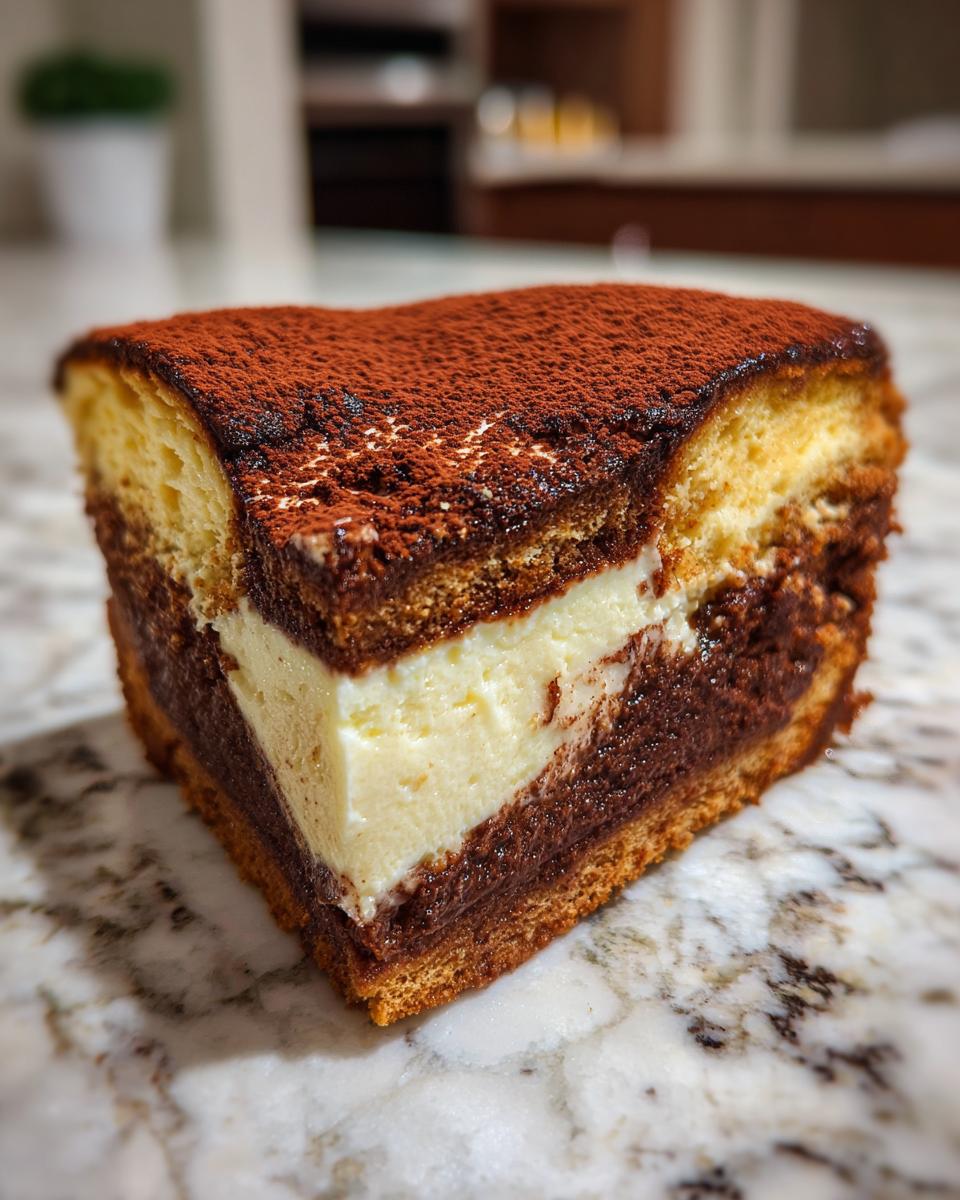
If you’re serving a smaller crowd or just want a little extra texture contrast, consider using high-quality dark chocolate shavings. Don’t use chips; you need thin, delicate shavings. You can use a vegetable peeler on a nice bar of dark chocolate. The slight bitterness of the dark chocolate plays wonderfully against the sweetness of the cheesecake base.
And remember, because we baked it and it’s packed with mascarpone, it needs to be served cold. It should be chilled for at least six hours, remember? Serving it straight from the fridge maintains that perfect density. Don’t let it sit out for too long before slicing, or you’ll lose that beautiful structure we worked so hard to achieve!
Storing and Reheating Your Rich Cocoa Topping Cake
Look, once you make this incredible Tiramisu Cheesecake Recipe, you need to know how to keep it perfect until you’re ready to enjoy it. Since this is a layered, creamy masterpiece, storage is really straightforward, but you have to do it right. This beautiful Rich Cocoa Topping Cake is best kept completely chilled. As soon as you’ve served it—or if you didn’t finish the whole thing in one sitting, which I doubt, but hey, I support you!—you need to get it back into the fridge ASAP.
The key here is to keep the air out. You don’t want any of that fridge air drying out the creamy top layer or absorbing any lingering smells. I always cover the top gently with plastic wrap first, making sure the plastic doesn’t actually touch that lovely cocoa dusting if you can help it. Then, I cover the whole springform plate or whatever dish you served it on with a layer of aluminum foil. It needs to stay sealed tight in the refrigerator. It’s perfectly safe to eat for four to five days, sometimes even six if you’re lucky!
Now, about reheating—and this is important! We are talking about a delicate, baked cheesecake here, not a dense loaf cake. Please, please do not try to microwave this or heat it up in the oven. It will melt, separate, and turn into a sad coffee puddle. Seriously, don’t bother. The whole point of this recipe is that amazing, cool, creamy texture. If you follow my advice on chilling it overnight, you shouldn’t even need to let it sit out long, which keeps everything perfectly stable.
If you really must let it sit out for a minute because you like it slightly less bone-chillingly cold, go ahead and pull it out about 20 minutes before you plan to serve it. That little bit of warmth just takes the edge off the cold so you can really taste the mascarpone and espresso infusion. If you’re looking for something that *can* be reheated, maybe try my recipe for Death by Chocolate Cake next time, but for this cheesecake fusion? Cold is king!
Serving Suggestions for Your Italian Inspired Cheesecake
Now that you have this gorgeous, *Italian Inspired Cheesecake* sitting perfectly chilled in your fridge, the final step is making it look as incredible as it tastes! This isn’t just dessert; this is a centerpiece moment. We developed such a rich profile—coffee, cream, deep chocolate notes—so you want toppings that enhance, not fight, those flavors.
The absolute classic move, and my personal favorite, is keeping the topping super simple. After you dust it with that glorious cocoa powder, add a dollop of freshly whipped heavy cream right on top of each slice as you serve it. Those flakes of white cream against the dark cocoa are so dramatic. If you haven’t tried the honey peach cream cheese cupcakes, you know I love a good cream cheese element, but for Tiramisu? Keep it light with straight whipped cream.
If you’re serving a smaller crowd or just want a little extra texture contrast, consider using high-quality dark chocolate shavings. Don’t use chips; you need thin, delicate shavings. You can use a vegetable peeler on a nice bar of dark chocolate. The slight bitterness of the dark chocolate plays wonderfully against the sweetness of the cheesecake base.
And remember, because we baked it and it’s packed with mascarpone, it needs to be served cold. It should be chilled for at least six hours, remember? Serving it straight from the fridge maintains that perfect density. Don’t let it sit out for too long before slicing, or you’ll lose that beautiful structure we worked so hard to achieve!
Estimated Nutritional Data for This Tiramisu Cheesecake
Okay, so this is absolutely a treat, not an everyday snack, so the numbers reflect that rich, decadent experience! But I know a lot of you are curious about what you’re digging into, so here is the breakdown for this incredible Tiramisu Cheesecake Recipe. Please remember these are just estimates based on the ingredients in the recipe card—your ingredient brands can change things up a tiny bit, so treat this as a guideline, not gospel!
We aimed high on flavor here, and that means we’re bringing some richness along for the ride. It’s worth every creamy, coffee-soaked bite, I promise! If you’re looking for lighter fare afterwards, maybe check out my roasted vegetable lasagna!
- Serving Size: 1 slice
- Calories: 450
- Sugar: 35g
- Sodium: 250mg
- Fat: 30g
- Saturated Fat: 18g
- Unsaturated Fat: 12g
- Trans Fat: 0.5g
- Carbohydrates: 40g
- Fiber: 2g
- Protein: 8g
- Cholesterol: 120mg
Share Your Tiramisu Cheesecake Experience
Seriously, don’t keep this culinary victory to yourself! I put so much work into getting the balance just right in this tiramisu cheesecake, and I absolutely live to see your results. When you make this decadent fusion dessert, promise me you’ll come back here and drop a rating! Did you stick to the baked method or did you go for the no-bake version?
I’m dying to see your cocoa dustings and your perfectly set layers! If you post pictures on social media, tag me! Seeing your beautiful versions of this cheesecake treat really makes my day. Happy baking, everyone, and enjoy every single bite!
Estimated Nutritional Data for This Tiramisu Cheesecake
Okay, so this is absolutely a treat, not an everyday snack, so the numbers reflect that rich, decadent experience! But I know a lot of you are curious about what you’re digging into, so here is the breakdown for this incredible Tiramisu Cheesecake Recipe. Please remember these are just estimates based on the ingredients in the recipe card—your ingredient brands can change things up a tiny bit, so treat this as a guideline, not gospel!
We aimed high on flavor here, and that means we’re bringing some richness along for the ride. It’s worth every creamy, coffee-soaked bite, I promise! If you’re looking for lighter fare afterwards, maybe check out my roasted vegetable lasagna!
- Serving Size: 1 slice
- Calories: 450
- Sugar: 35g
- Sodium: 250mg
- Fat: 30g
- Saturated Fat: 18g
- Unsaturated Fat: 12g
- Trans Fat: 0.5g
- Carbohydrates: 40g
- Fiber: 2g
- Protein: 8g
- Cholesterol: 120mg
Share Your Tiramisu Cheesecake Experience
Seriously, don’t keep this culinary victory to yourself! I put so much work into getting the balance just right in this tiramisu cheesecake, and I absolutely live to see your results. When you make this decadent fusion dessert, promise me you’ll come back here and drop a rating! Did you stick to the baked method or did you go for the no-bake version?
I’m dying to see your cocoa dustings and your perfectly set layers! If you post pictures of your gorgeous creation on social media, tag me! Seeing your beautiful versions of this cheesecake treat really makes my day. Happy baking, everyone, and enjoy every single bite of that incredible tiramisu cheesecake!
PrintDecadent Baked Tiramisu Cheesecake with Espresso-Soaked Ladyfingers
A rich, creamy baked cheesecake that merges classic tiramisu flavors—espresso, mascarpone, and cocoa—with a smooth cheesecake base. This recipe includes espresso-soaked ladyfingers for authentic flavor.
- Prep Time: 30 min
- Cook Time: 60 min
- Total Time: 7 hours 30 min
- Yield: 12 servings 1x
- Category: Dessert
- Method: Baking
- Cuisine: Italian Inspired
- Diet: Vegetarian
Ingredients
- 1 1/2 cups chocolate wafer crumbs
- 1/4 cup granulated sugar (for crust)
- 6 tablespoons unsalted butter, melted
- 1 (8 ounce) package cream cheese, softened
- 8 ounces mascarpone cheese, softened
- 1 cup granulated sugar (for filling)
- 3 large eggs
- 1 teaspoon vanilla extract
- 1/4 cup strong brewed espresso, cooled
- 1/2 cup ladyfingers, split
- 1/4 cup coffee liqueur (optional)
- 1/4 cup cocoa powder, for dusting
Instructions
- Preheat your oven to 325°F (160°C). Wrap the outside of a 9-inch springform pan tightly with heavy-duty aluminum foil.
- Prepare the crust: Mix the chocolate wafer crumbs, 1/4 cup sugar, and melted butter until combined. Press the mixture firmly into the bottom of the prepared springform pan. Bake for 10 minutes. Let cool.
- Prepare the espresso soak: In a shallow dish, combine the cooled espresso and coffee liqueur, if using. Quickly dip both sides of the ladyfinger halves into the liquid. Arrange the soaked ladyfingers in a single layer over the cooled crust.
- Prepare the cheesecake filling: In a large bowl, beat the softened cream cheese, mascarpone cheese, and 1 cup sugar with an electric mixer until smooth. Beat in the eggs one at a time, mixing just until combined after each addition. Mix in the vanilla extract.
- Pour half of the cheesecake batter over the ladyfingers in the pan. Gently spread the batter to cover the ladyfingers completely.
- Pour the remaining cheesecake batter over the first layer. Smooth the top with a spatula.
- Bake using a water bath: Place the foil-wrapped springform pan inside a larger roasting pan. Carefully pour hot water into the roasting pan until it reaches halfway up the sides of the springform pan.
- Bake for 55 to 65 minutes, or until the edges are set but the center still has a slight jiggle.
- Turn off the oven, crack the oven door open slightly, and let the cheesecake cool inside the oven for 1 hour. This prevents cracking.
- Remove the cheesecake from the water bath and foil. Cool completely on a wire rack, then chill in the refrigerator for at least 6 hours, or preferably overnight.
- Before serving, carefully remove the sides of the springform pan. Dust the top generously with cocoa powder. Slice and serve cold.
Notes
- For a no-bake variation, skip the water bath and oven steps. Chill the assembled cheesecake for a minimum of 8 hours until firm.
- If you do not use coffee liqueur, increase the espresso amount slightly for stronger coffee flavor.
- Use high-quality mascarpone cheese for the best creamy texture.
Nutrition
- Serving Size: 1 slice
- Calories: 450
- Sugar: 35g
- Sodium: 250mg
- Fat: 30g
- Saturated Fat: 18g
- Unsaturated Fat: 12g
- Trans Fat: 0.5g
- Carbohydrates: 40g
- Fiber: 2g
- Protein: 8g
- Cholesterol: 120mg