
You know how sometimes you see a photo of food online and think, “Wow, I could never make my party look like that”? I totally get that feeling. For me, coming from a background where I had to engineer efficiency into everything, I always wanted entertaining to look gorgeous without needing an entire weekend of prep. This is where the true art of presentation comes in. Forget fussy cooking; we’re talking about assembly that delivers maximum impact. Learning to build the ultimate cheese plate with honeycomb is your secret weapon for instant sophistication. It’s one of those simple projects that looks incredibly high-end, proving you’ve mastered the art of aesthetic food presentation effortlessly.
- Why Your Next Gathering Needs a Cheese Plate with Honeycomb
- Essential Components for Your Aesthetic Food Cheese Plate with Honeycomb
- Step-by-Step Assembly: Creating the Perfect Cheese Plate with Honeycomb
- Expert Tips for Next-Level Cheese Plate with Honeycomb Presentation
- Pairing Suggestions for Your Appetizer Platter
- Making Ahead and Storing Your Cheese Plate with Honeycomb
- Frequently Asked Questions About Building a Charcuterie Board
- Estimated Nutritional Overview
- Share Your Stunning Cheese Plate with Honeycomb Creations
Why Your Next Gathering Needs a Cheese Plate with Honeycomb
Listen, for the busy host, the charcuterie board is perfect, but adding that piece of fresh honeycomb takes things to an entirely different level. It’s about optimizing your visual presentation with minimal extra cooking effort. Trust me, this simple addition transforms an everyday appetizer platter into something guests talk about long after they leave.
- Unbeatable Visual Impact: That glistening, golden honeycomb immediately captures attention. It’s pure aesthetic food magic against the simple backdrop of crackers and cheese.
- Flavor Punch: The flavor contrast between savory gourmet cheese and pure, natural sweetness is addictive. It’s guaranteed crowd-pleasing flavor engineering.
- Instant Conversation Starter: It looks so professional, your friends will immediately ask where you ordered it from. It’s the easiest way to elevate your party hosting reputation!
If you’re looking for more simple ways to wow your guests, check out my roundup of essential appetizer snacks.
Essential Components for Your Aesthetic Food Cheese Plate with Honeycomb
For any successful presentation—whether it’s a complex report or a simple appetizer platter—you need the right materials. Think of building this cheese board like setting up a precision engineering project; every component has to fit together perfectly for the finale. We are focusing on variety here, which is crucial for showing quality in your gourmet cheese selection.
Here is the checklist of components you’ll need to make this stunning cheese plate. Remember, variety in texture and color is the key to that high-end look.
- 1 wedge soft cheese (like creamy Brie or maybe Camembert)
- 1 wedge hard cheese (I always reach for an Aged Cheddar or a nutty Gruyère)
- 1 wedge blue cheese (Gorgonzola or Roquefort work great for that pungent sharpness)
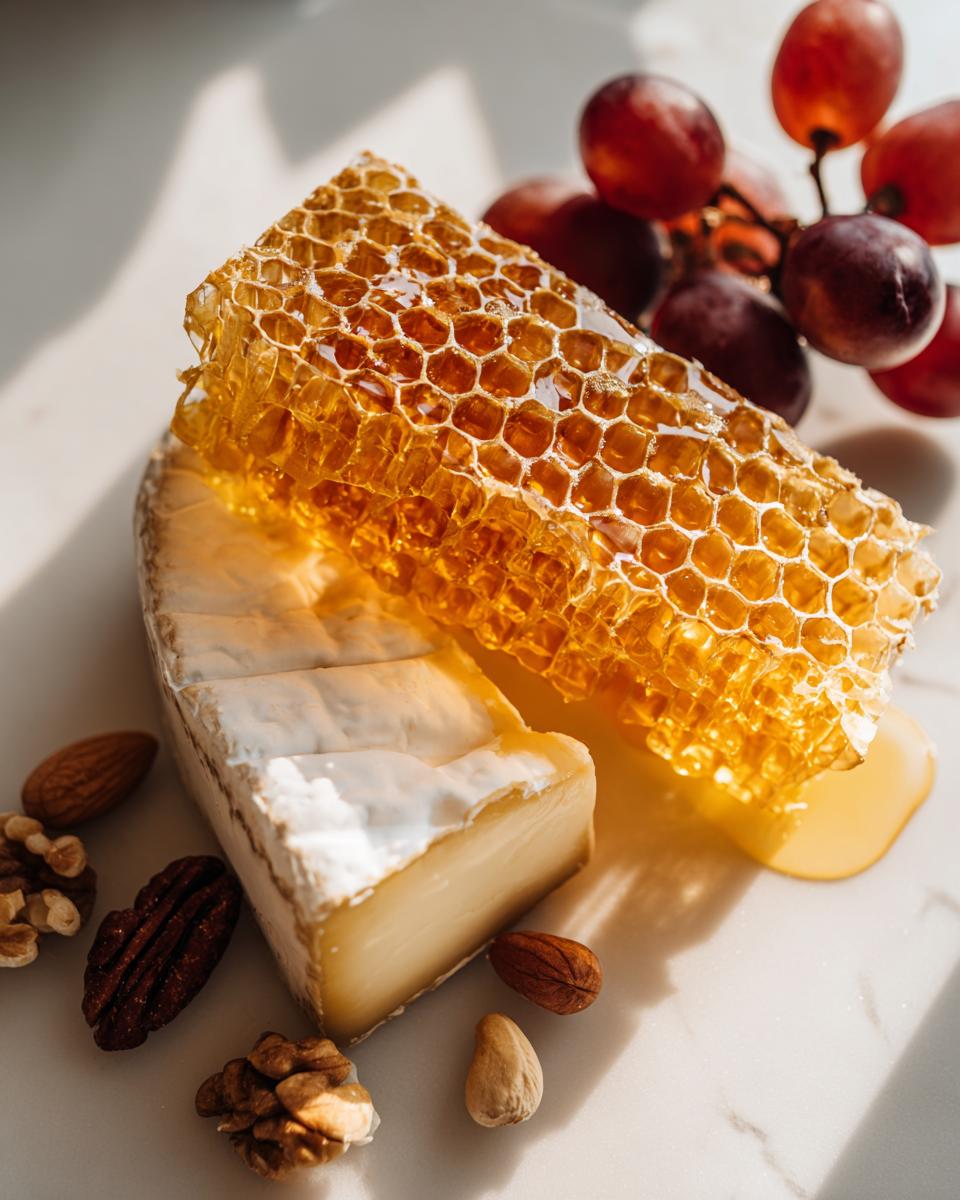
- 1 piece fresh honeycomb (We need about three ounces of this liquid gold!)
- 1 cup assorted crackers or thin baguette slices
- 1/2 cup fresh grapes or bright berries for color
- 1/4 cup toasted nuts (Marcona almonds are my preferred crunch factor)
- 2 tbsp honey for drizzling, just in case the comb runs low (optional)
Selecting Gourmet Cheeses for Contrast
Never bring just one type of cheese to the party! For a truly balanced cheese plate, you must have the trilogy: soft, hard, and pungent (the blue). This variation ensures that whatever your guest prefers, you have them covered on texture and flavor profile. This range is vital for an impressive appetizer platter.
Expert Tip: Don’t pull these straight from the fridge when the guests arrive! You need to let them sit out for at least 30 minutes—maybe an hour if your room is cool—before serving. Cheese just tastes better when it’s tempered; it releases all its complex aromas. If you don’t let them temper, you’re missing half the flavor experience!
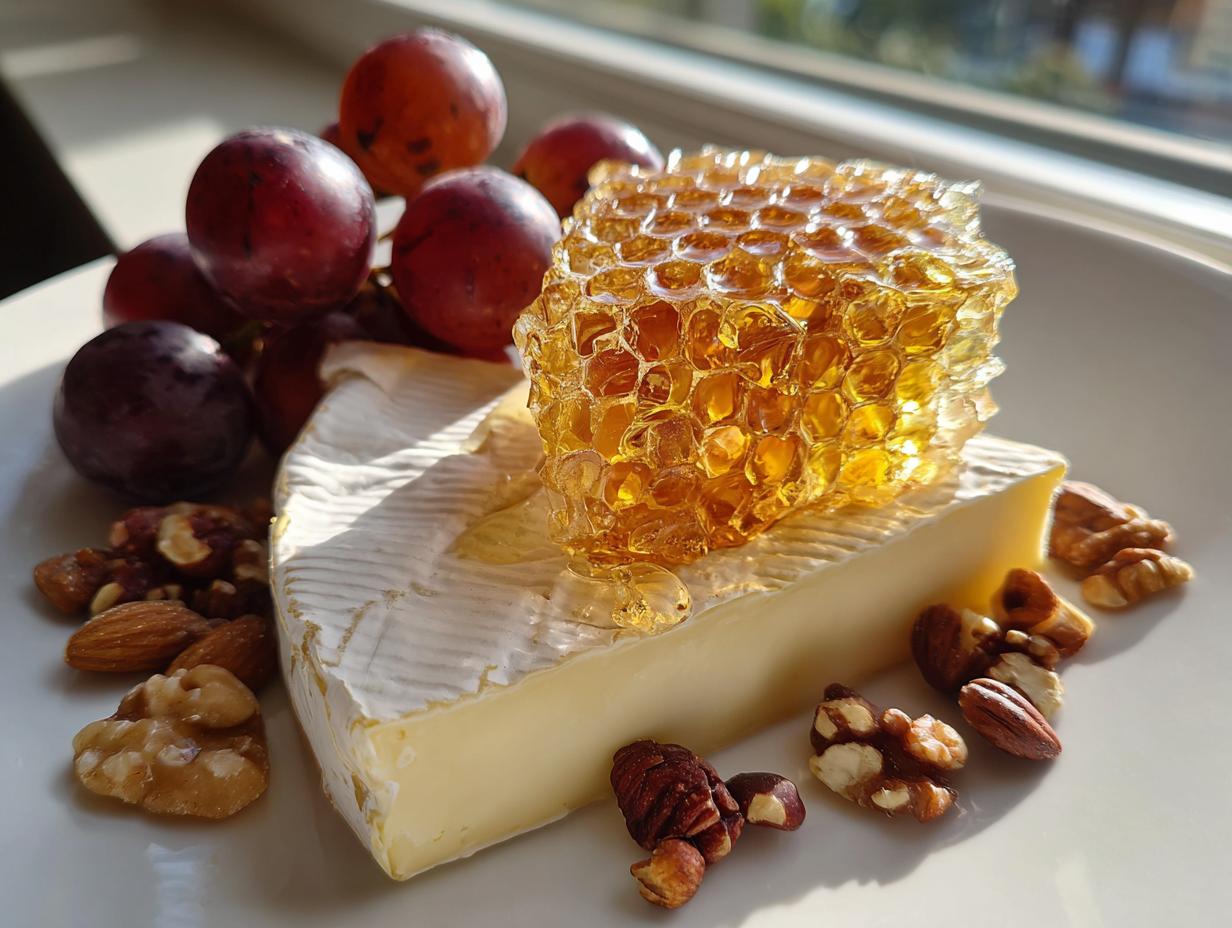
The Star: Sourcing Perfect Fresh Honeycomb
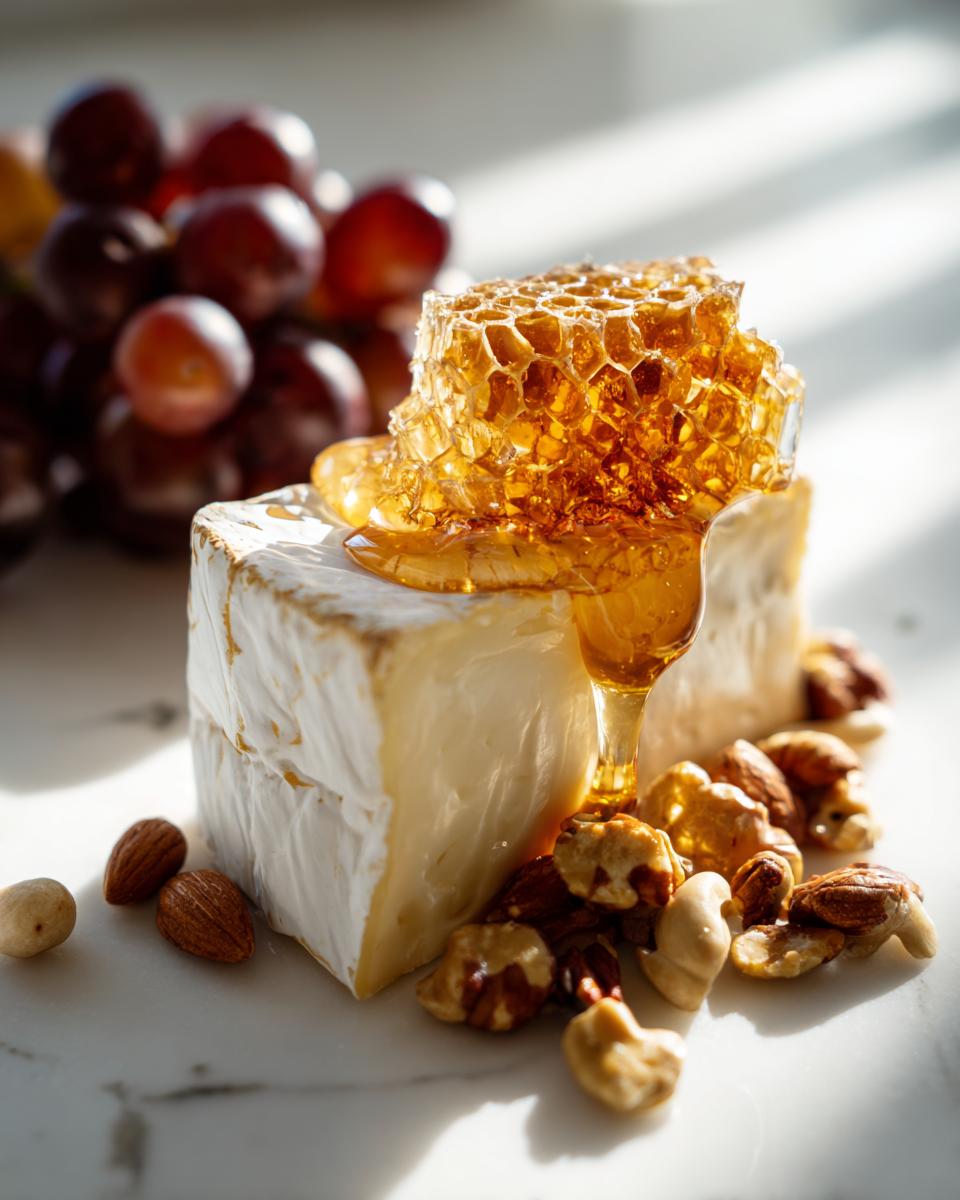
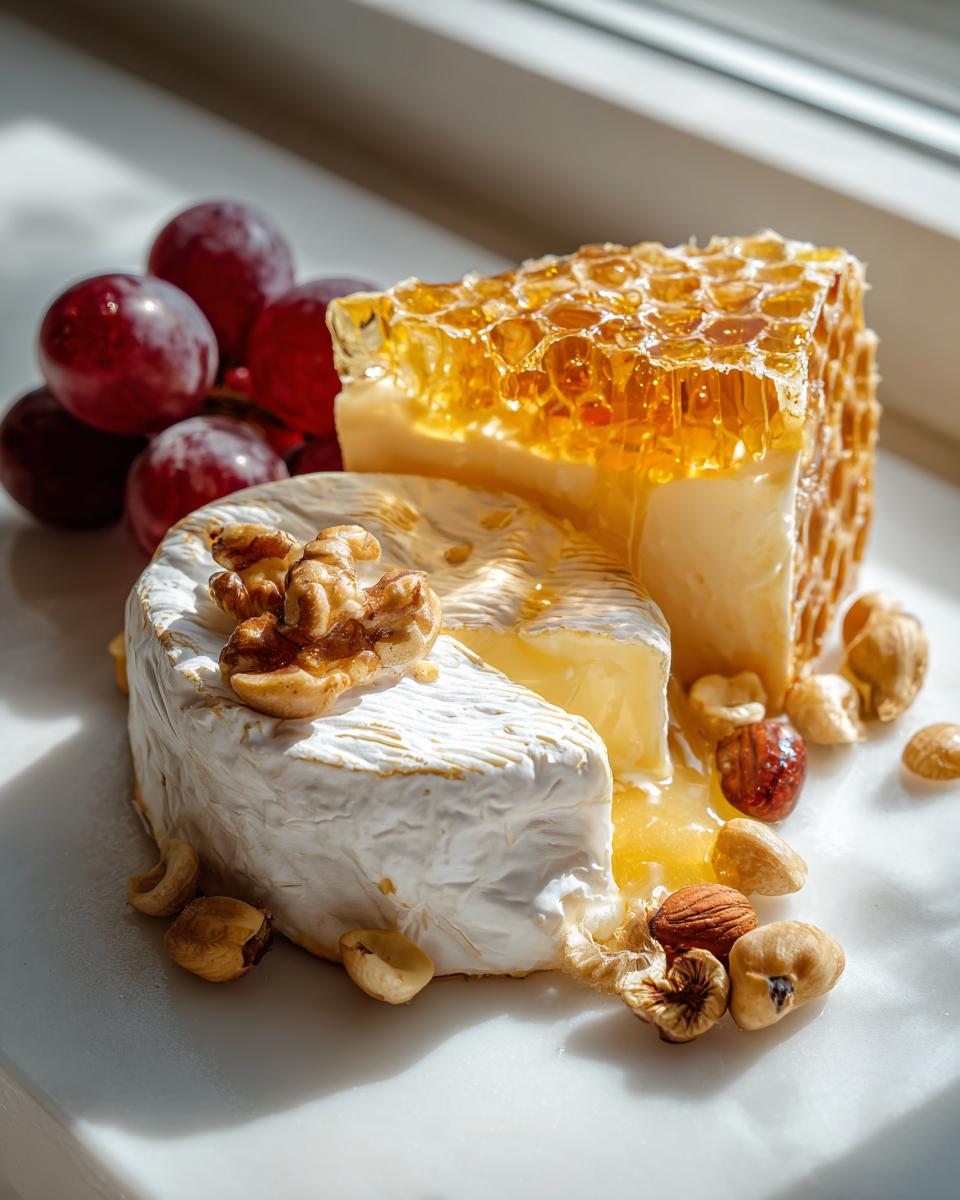
The honeycomb isn’t just a garnish; it’s the showstopper in this entire setup. When you source it, look for that vibrant yellow color and make sure the wax structure looks intact. When you place it on the board, you want it to look like a gorgeous, edible geological formation.
If your honeycomb piece is large, you can carefully use a knife to cut a section that fits nicely near your soft cheese—Brie loves honeycomb! Just make sure you have a small, dedicated serving knife right next to it so guests know they can cut off what they want without making a sticky mess everywhere else.
Step-by-Step Assembly: Creating the Perfect Cheese Plate with Honeycomb
Okay, now that we have all our high-quality components assembled on the counter, it’s time for the fun part: putting it all together! This is where my project manager brain kicks in. We’re building a functional, beautiful layout. Remember, the goal for great party hosting is maximum visual appeal, so we need to think about visual flow when assembling this cheese plate with honeycomb.
Board Foundation and Cheese Placement
First things first: pick your canvas. You need a large surface for an abundant look—a big wooden board or a cool slate platter works best for this type of appetizer platter. Next, place your three main cheese anchors. Don’t just clump them together! Distribute the hard, soft, and blue cheeses around the board in a triangular or staggered pattern. This intentional spacing helps define the different zones and makes sure everyone can easily access what they want.

Integrating Honeycomb and Accoutrements
Once your cheese structure is set, we introduce the stars. Place that gorgeous piece of honeycomb fairly close to your soft cheese—maybe the Brie. That’s where the flavors want to mingle. Next, fan out your crackers or baguette slices in a couple of spots; maybe one near the hard cheese and one near the soft. Don’t just dump them! We want texture and volume.
The remaining open areas are for filling in—this is what gives you that abundant, lush look we are going for with any aesthetic food setup. Scatter the grapes and nuts right into the remaining gaps. You want the board to look completely covered, dense, and overflowing. If you want an extra wow factor, you can drizzle a tiny bit of extra honey over the fruit or nuts, but usually, the honeycomb does all the heavy lifting!
If you already have a baked brie ready to go, you can check out my tips for incorporating it into a similar setup here: Easy Baked Brie Appetizer Recipe.
Expert Tips for Next-Level Cheese Plate with Honeycomb Presentation
We’ve got the structure down, but to make this truly look professional, we need to think about the details—the things that separate good party hosting from great party hosting. These aren’t complicated steps, they are just thoughtful additions to maximize that beautiful presentation of your cheese plate with honeycomb.
First, serving utensils. This is crucial for hygiene and ease of eating. Grab a tiny spreader or a separate knife for each cheese type. You don’t want the creamy Brie flavor contaminating your sharp blue cheese! It seems small, but it makes such a difference.
And remember that refrigeration note? Pull the whole thing out about 30 minutes before serving. Cold cheese just doesn’t have the right mouthfeel. We want that creamy, yielding texture the moment your guests dig in!
Balancing Sweetness and Texture
The honeycomb often provides most of the sweetness, but using that optional extra honey drizzle can be strategic. If your hard cheese, like the Cheddar, is particularly sharp, just a tiny bit of honey right next to it helps to mellow that bite perfectly. It’s all about planned flavor adjacency on the board.
Speaking of crunch, make sure you place your nuts near the areas where you have softer fruit, like grapes. Nobody wants a crunchy nut stuck to a sticky piece of honeycomb, right? If you need something extra savory and crunchy to balance all that sweetness, I have an amazing savory recipe for Crispy Southern Cheddar Cheese Straws that you can place right off the edge of the board!
Pairing Suggestions for Your Appetizer Platter
You’ve perfected the look, now let’s perfect the experience. When serving a rich appetizer platter like this, your beverage choices should complement the creaminess of the cheese and the intense sweetness of the honey without overpowering them. Complexity isn’t the goal here; balance is everything for successful party hosting.
For wine drinkers, a crisp Pinot Grigio or a dry Riesling cuts through the richness beautifully. If you prefer beer, stay away from heavy IPAs; aim for a lighter Saison or a crisp Pilsner. Honestly, my favorite thing to serve alongside a sweet and savory board like this—especially when I want to keep things festive—is a great cocktail.
You might want to try making the Apple Cider Moscow Mule I perfected! It has that earthy, slightly sweet profile that goes incredibly well with aged cheddar and nuts. You can find the simple instructions here: Apple Cider Moscow Mule Recipe. It’s simple, it’s vibrant, and it keeps the hosting effortless!
Making Ahead and Storing Your Cheese Plate with Honeycomb
I know the temptation is to build this incredible cheese plate with honeycomb the second you get home from the store. But for presentation and food safety, timing is everything. As a project manager, I always break down the timeline so hosting is stress-free.
Here is the honest truth: You can get almost everything prepped ahead of time. You can slice the crackers, toast the nuts, and even slice the hard cheeses—but keep them separate and wrapped tightly. The fruits are fine washed and ready to go.
The key step, though, is the structure. Assemble the entire board—cheeses, honeycomb, everything—and cover it tightly with plastic wrap. Keep this beauty in the fridge. But heed this warning: pull it out a solid 30 minutes before your guests arrive. We need that cheese to warm up just enough to release its flavor. That 30-minute window is non-negotiable for the best appetizer platter experience!
Frequently Asked Questions About Building a Charcuterie Board
I get so many questions about building these boards because everyone wants that perfect, fully loaded look for their party hosting duties. These aren’t complicated culinary challenges; they are just smart styling choices. Let’s tackle a few common snags people run into when putting together their ultimate charcuterie spread.
Can I substitute the fresh honeycomb?
Look, if you absolutely cannot find fresh honeycomb, I won’t tell anyone, but know that you are losing the main visual punch! If you must substitute, use a really thick, high-quality honey—something almost crystallized—and drizzle it over your soft cheese and some of the fruit *after* the board is assembled. You lose the texture of the comb, but you keep the sweetness. It works, but it won’t have the same jaw-dropping effect as the real thing on your cheese plate.
How many items should I include on a standard cheese board?
This is all about project scope! For a casual gathering where this appetizer platter is just one of a few things out, aim for 3 cheeses, 2 meats (if you’re adding them to your charcuterie), 2 crackers/breads, and 2-3 accent fruits/nuts. But if this is the *main* event, you need more variety. When in doubt, always lean toward having more textures available. People love grazing!
If you’re looking for an entirely different kind of centerpiece that is guaranteed to please (though much less aesthetic!), you can check out my recipe for Easy Chicken Enchiladas. Sometimes you just need a hot main dish!
Estimated Nutritional Overview
When you’re building an abundant looking appetizer platter, you’re not often thinking about the numbers, right? Most of the time, I’m focused only on making sure everything fits beautifully onto the board. But because we believe in full transparency here at Dishicious—even with assembly recipes—I wanted to give you a rough idea of what you’re looking at per serving for this amazing cheese plate.
These are just estimates, mind you! If you use a super aged cheddar versus a mild one, or if you pile on twice as much honeycomb, these numbers will shift. This overview is based on the recommended ingredient amounts listed above, assuming 6 servings total.
- Serving Size: 1 portion
- Calories: 350
- Fat: 25g (Saturated Fat: 15g)
- Carbohydrates: 18g
- Protein: 14g
- Sugar: 15g
- Sodium: 300mg
Just remember, this is for the cheese, nuts, fruit, and honeycomb—it doesn’t account for how many crackers you personally scoop up while assembling! It’s just helpful data for you to have on hand, showing that this delicious spread is actually quite balanced for a rich snack.
Share Your Stunning Cheese Plate with Honeycomb Creations
And there you have it! We’ve gone from raw ingredients to a professional-grade presentation. Honestly, seeing that perfect arrangement of gourmet cheese, fruit, and that golden honeycomb makes all the planning worth it. I always feel like I’ve achieved something really elegant when I step back and admire the finished cheese plate.
Now that you’ve got the blueprint for party hosting mastery, I really want to see what you come up with! Did you source an amazing blue cheese? Did your honeycomb look spectacular? Head down to the comments below and let me know how the assembly went. Was it as easy as I promised?
Take a picture of your final appetizer platter and tag us on social media—we love seeing how everyone interprets these projects! If you want to learn more about the philosophy behind making cooking simpler and more intentional, feel free to check out the About Page. Happy entertaining, and enjoy that beautiful cheese plate!
PrintAesthetic Honeycomb and Cheese Plate Assembly

Learn how to arrange a professional-looking cheese board featuring gourmet cheeses and fresh honeycomb for impressive party hosting.
- Prep Time: 20 min
- Cook Time: 0 min
- Total Time: 20 min
- Yield: 6 servings 1x
- Category: Appetizer
- Method: Assembly
- Cuisine: American
- Diet: Vegetarian
Ingredients
- 1 wedge soft cheese (e.g., Brie or Camembert)
- 1 wedge hard cheese (e.g., Aged Cheddar or Gruyère)
- 1 wedge blue cheese (e.g., Gorgonzola or Roquefort)
- 1 piece fresh honeycomb (about 3 oz)
- 1 cup assorted crackers or baguette slices
- 1/2 cup fresh grapes or berries
- 1/4 cup toasted nuts (e.g., Marcona almonds)
- 2 tbsp honey for drizzling (optional)
Instructions
- Select a large serving board or platter for your appetizer platter.
- Place the three types of cheese strategically on the board, leaving space between them.
- Place the honeycomb piece near the soft cheese for visual appeal.
- Arrange the crackers or bread slices in small stacks or fanned out near the cheeses.
- Fill the remaining open spaces with the fresh fruit and toasted nuts.
- If the honeycomb is not fully intact, you can drizzle a small amount of extra honey over the fruit or nuts.
- Present the finished cheese board for your guests.
Notes
- For the best aesthetic food presentation, use cheeses with varying textures and colors.
- Place small serving utensils near each cheese type.
- Keep the board refrigerated until 30 minutes before serving.
Nutrition
- Serving Size: 1 portion
- Calories: 350
- Sugar: 15
- Sodium: 300
- Fat: 25
- Saturated Fat: 15
- Unsaturated Fat: 10
- Trans Fat: 0
- Carbohydrates: 18
- Fiber: 1
- Protein: 14
- Cholesterol: 70