
Okay, seriously, who hasn’t been there? You’re scrolling through dinner ideas, and all you can think about is that perfect, juicy, cheesy bite of a classic burger. But it’s windy outside, or maybe you just don’t feel like standing over the grill flipping patties. That’s exactly where my ‘problem-solving’ brain kicks in. We’re taking the best parts of that American classic flavor—the savory beef, the sharp cheddar, the tang of mustard and ketchup—and engineering them into something easier. This cheeseburger meatloaf is my streamlined solution. It’s comfort food mixed with burger craving satisfaction, all baked up neatly in one pan. Trust me, this recipe gets the big flavors of a burger without any of the fuss!
- Why This Cheeseburger Meatloaf Recipe Works for Weeknights
- Ingredients for the Best Cheeseburger Meatloaf
- How to Prepare Your Juicy Cheeseburger Loaf
- Tips for Achieving Perfect Cheeseburger Meatloaf Texture
- Creative Meatloaf Glaze Ideas for Your Cheeseburger Meatloaf
- Serving Suggestions for Your American Classic Dinner Remix
- Storage and Reheating Instructions for Leftover Cheeseburger Meatloaf
- Frequently Asked Questions About Making Cheeseburger Meatloaf
- Nutrition Estimate for Homemade Cheeseburger Loaf
Why This Cheeseburger Meatloaf Recipe Works for Weeknights
Look, my whole goal here at Dishicious is efficiency. If a recipe takes too long or creates a massive cleanup saga, it’s not solving any problems, right? That’s why this version of Cheeseburger Meatloaf Recipe is perfect for Tuesday night. You throw everything in one bowl, press it into a single loaf pan, and let the oven do the heavy lifting. It’s the ultimate Simple Weeknight Meatloaf hack.
It’s also a fantastic way to get the whole family excited about dinner again. It checks all the boxes for Kid Friendly Meatloaf Variations:
- Minimal active cooking time—think 15 minutes prep, tops!
- Cleanup is a breeze; one pan goes into the dishwasher.
- It tastes exactly like a perfectly seasoned burger, just bundled up nice and cozy.
If you want to streamline things even further, you can look at my advice for sheet pan methods; sometimes, baking them as individual portions speeds up the cook time significantly.
Ingredients for the Best Cheeseburger Meatloaf
When building a reliable recipe, clarity on ingredients is paramount—that’s the project management side of cooking coming through! We need structure, and fat provides that structure for flavor. Always reach for 2 lbs ground beef (80/20 recommended) here; anything leaner tends to dry out, and we’re aiming for that juicy texture you get from a roadside diner burger.
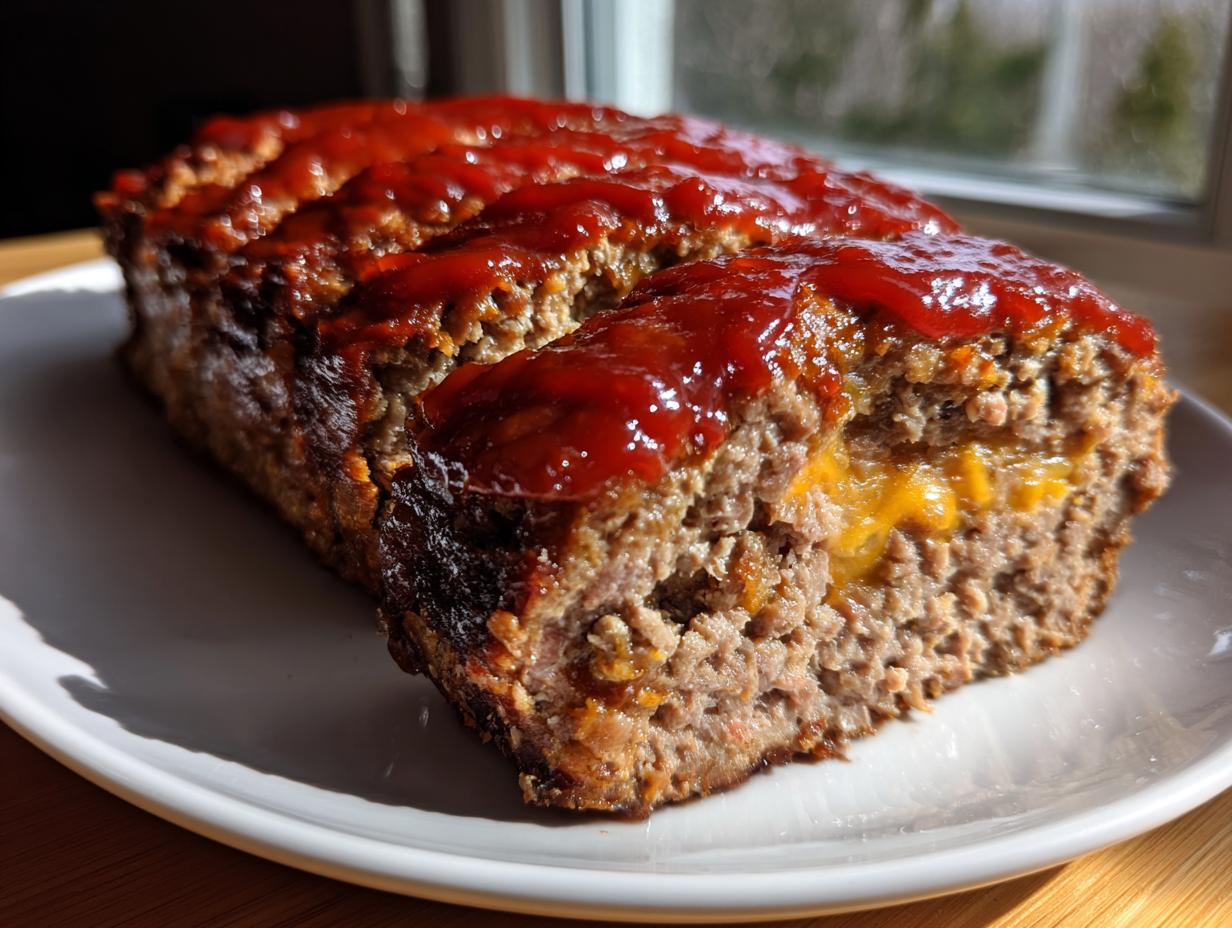
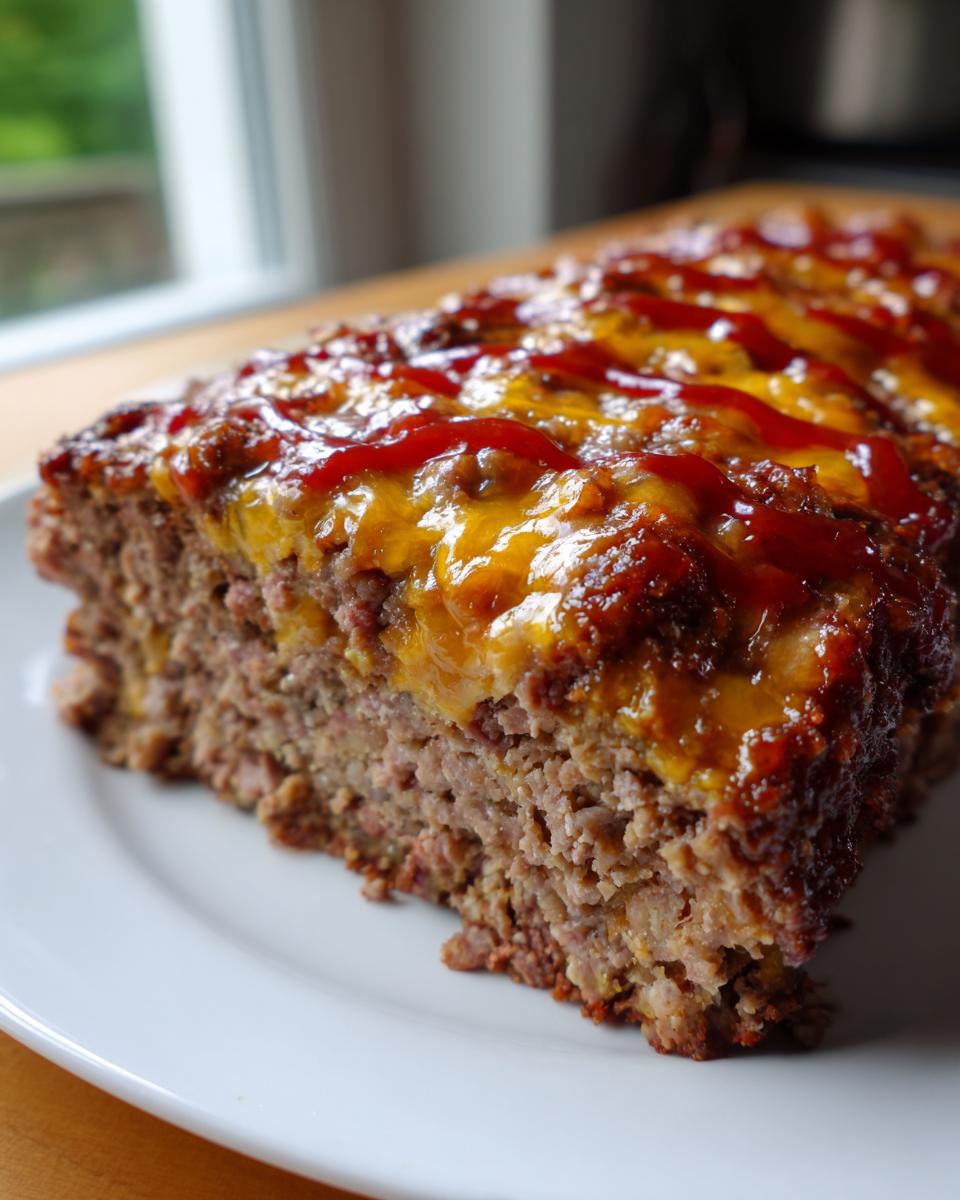
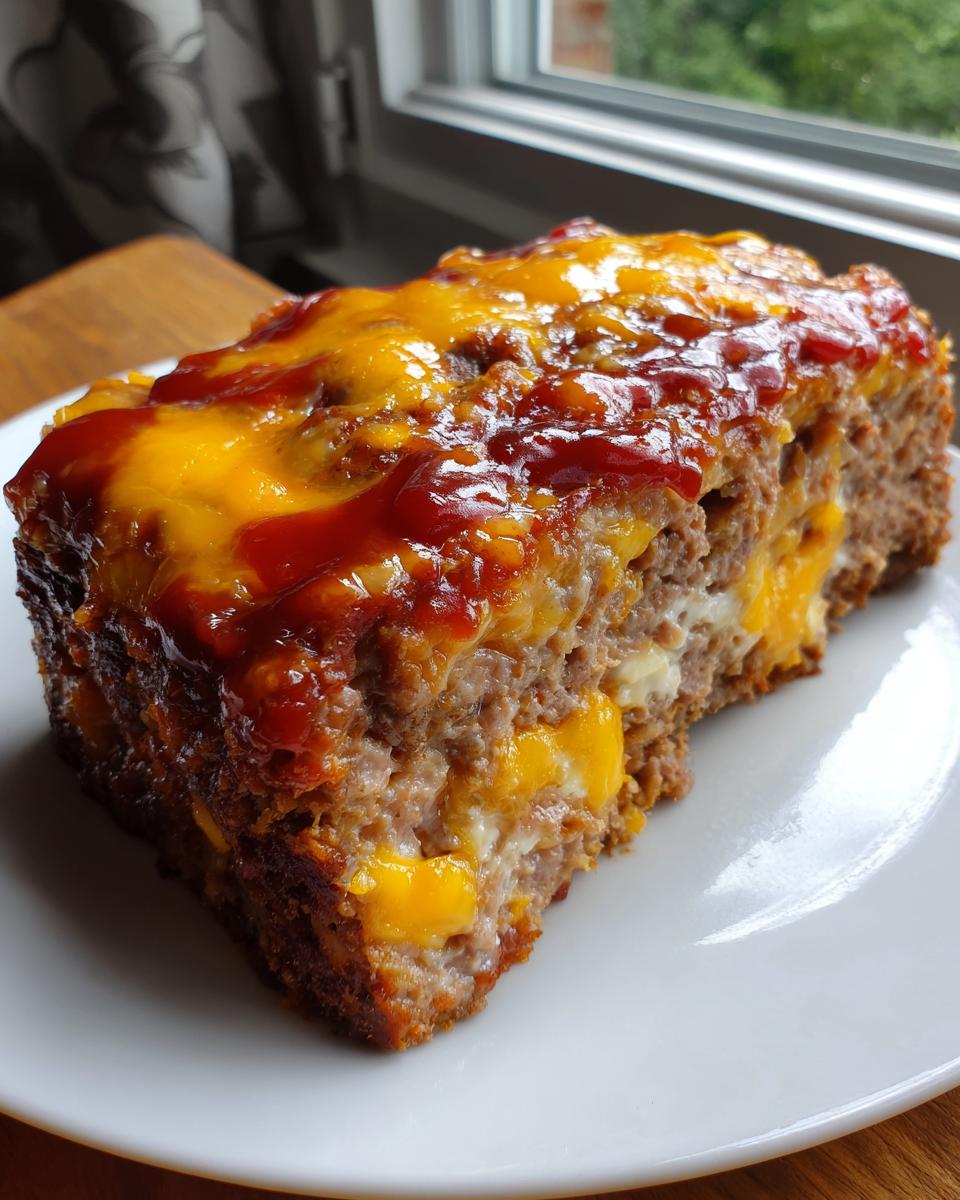
You’ll want to separate your binder ingredients from your flavor boosters. And pay attention to the cheese divisions! That sharp cheddar is going to be split:
- 3/4 cup shredded sharp cheddar needs to disappear right into the meat mixture for that ‘inside-out’ melt.
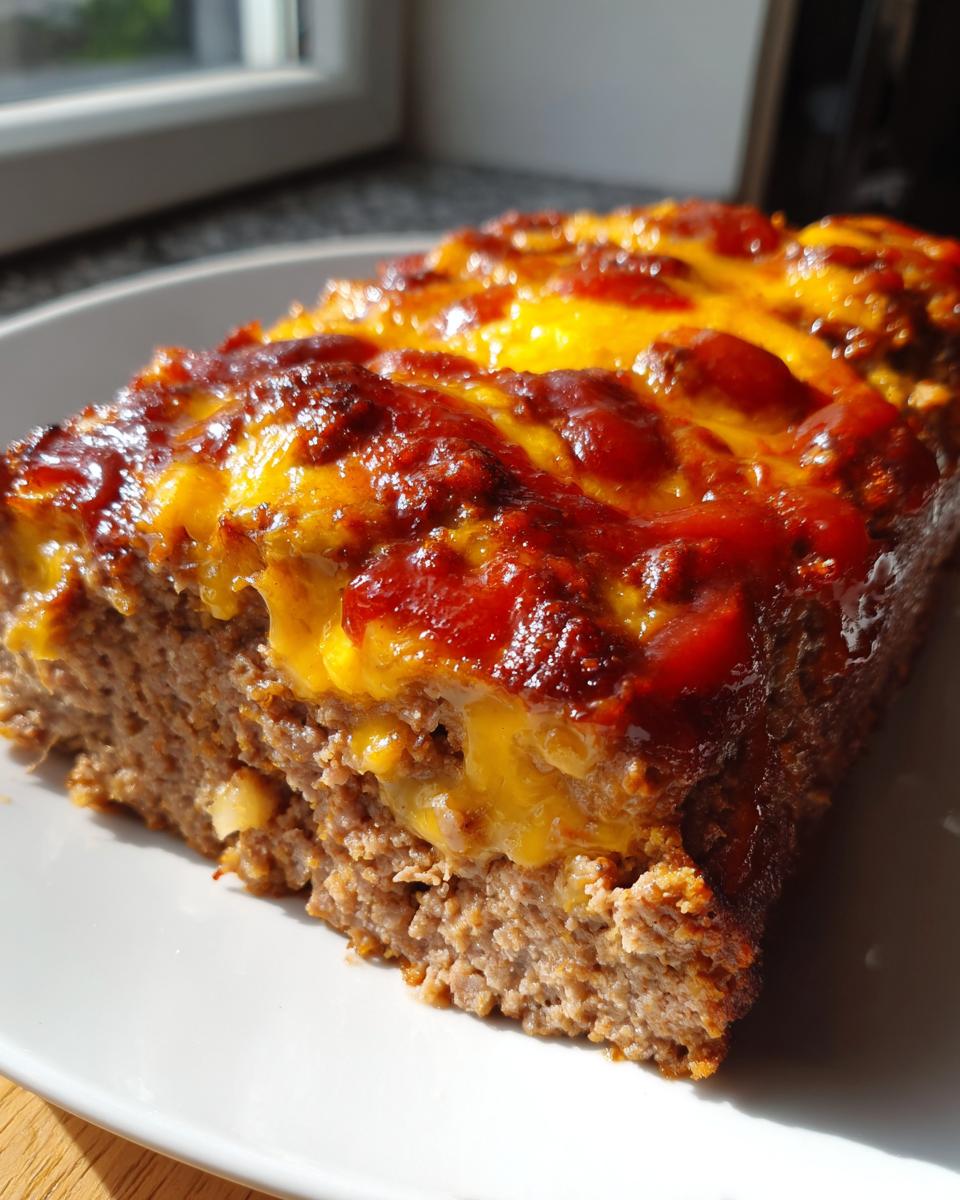
- The final 1/4 cup is reserved for that glorious, bubbly blanket we put on top just before it finishes baking.
The rest is straightforward burger stuff: breadcrumbs, egg, milk, onion, and the essential little dashes of ketchup, mustard, and Worcestershire that bring that signature BBQ tang. If you want even more deep-dive tips on selecting the best beef base, check out my guide on the best juicy classic meatloaf recipe for beef selection insights.
How to Prepare Your Juicy Cheeseburger Loaf
Getting a meatloaf right is all about managing the mix—too much handling, and you end up with a dense brick. We are aiming for that perfect, slightly rustic texture you get when you bite into a great homemade burger, so pay attention when mixing this Hearty Beef and Cheese Bake.
First things first: get your oven set to 375 degrees Fahrenheit and make sure that loaf pan is lightly greased. Trust me, no one wants to wrestle a baked meatloaf out of the pan. When you’re looking for quick, satisfying mains, this is going to be a go-to. We love pairing this with something starchy, like my recipe for a loaded hamburger potato casserole, for an over-the-top comfort dinner.
Mixing the Cheeseburger Meatloaf Base
In your biggest bowl, combine every single non-cheese ingredient: the ground beef, breadcrumbs, egg, milk, chopped onion, and all those key flavor boosters—ketchup, mustard, Worcestershire, salt, pepper, garlic, and onion powder. Now, here is the crucial part: mix it gently, just using your hands, until you don’t see any obvious streaks of raw egg or milk anymore. Seriously, stop mixing right there! I know it’s tempting to keep stirring until it’s perfectly uniform, but that develops the proteins too much and ruins your moisture. Once combined, mix in 3/4 cup of that cheddar. Then, press that mixture firmly but gently into your prepared pan.
Glazing and Baking the Cheeseburger Meatloaf
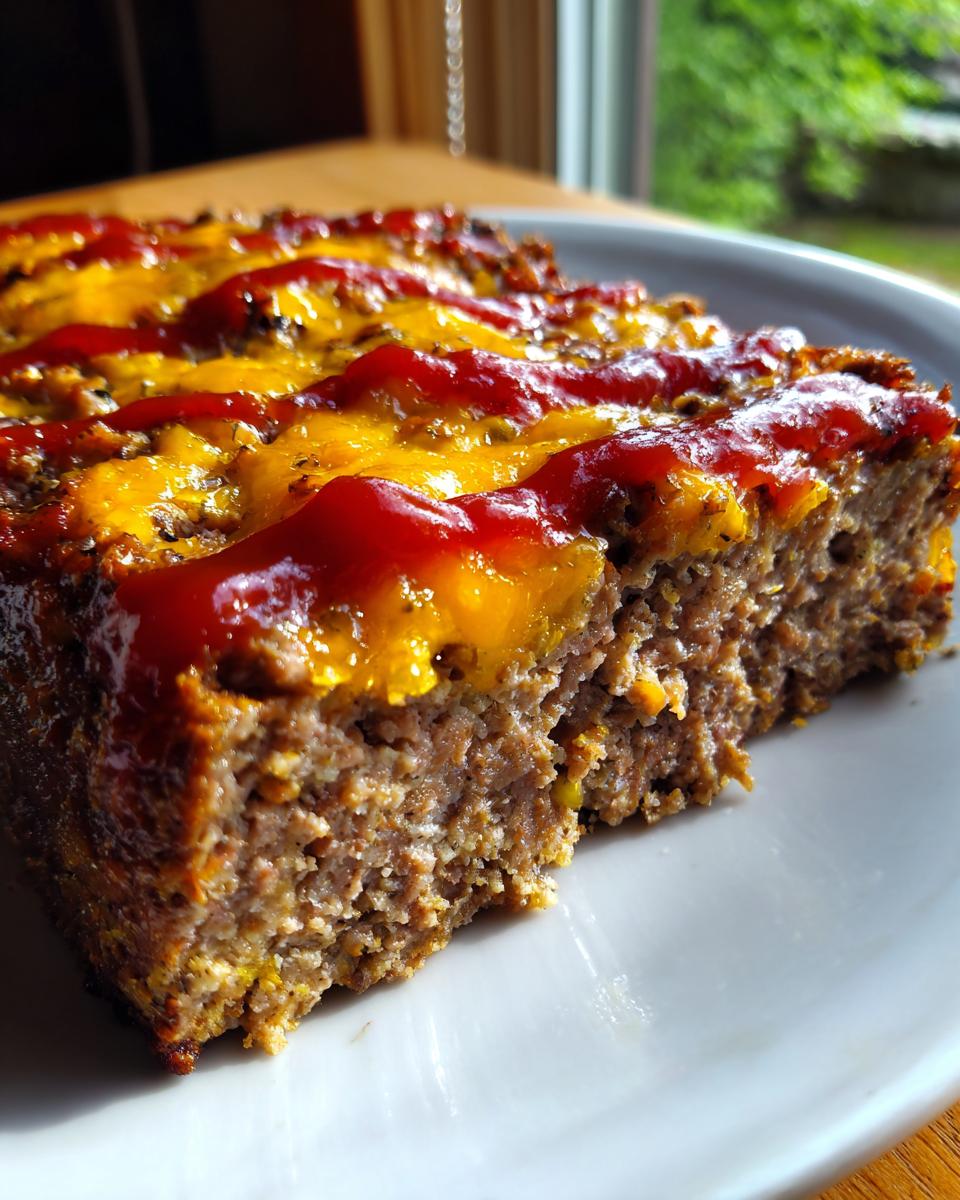
Next up is the glaze, which really locks in that sweet-and-sour burger profile. Whisk together the remaining 1/4 cup of ketchup with the tablespoon of brown sugar—that subtle sweetness is mandatory. Spread that glaze evenly across the top of the loaf. Now, slide it into the oven for 45 minutes. When that timer goes off, pull it out, sprinkle the very last 1/4 cup of cheese right over the top. Pop it back in for just 5 to 10 more minutes, until that cheese is beautifully melted and the internal temp hits 160°F for safety. The final, non-negotiable step for a truly Juicy Cheeseburger Loaf? Let it rest! Ten minutes in the pan before slicing helps all those juices settle back into the meat.
Tips for Achieving Perfect Cheeseburger Meatloaf Texture
When I talk about making the Best Burger Flavored Loaf, the texture is honestly more important than the glaze. If it comes out dry, it’s just a disappointing beef brick, and nobody wants that on their dinner plate. My entire philosophy revolves around creating dinners that satisfy, and that means moisture control is a top priority.
The easiest lever you have for making a truly Juicy Cheeseburger Loaf is your choice of beef. I always specify 80/20 ground beef—that means 80% lean meat and 20% fat. That 20% fat renders out while baking, basting the meatloaf from the inside and keeping it tender, kind of like how the fat melts on a perfectly grilled patty.
If you try to sneak in 93/7 lean beef, you’re basically guaranteeing a dry result unless you compensate heavily, and that usually means adding heavy breadcrumbs, which isn’t the goal.
Here’s a little trick I picked up when I was trying to add depth without altering the classic burger flavor too much: try swapping out the regular milk called for in the main recipe for buttermilk. Buttermilk is slightly acidic, and that acidity helps tenderize the meat just a touch more. It adds a very subtle tanginess that works beautifully with the cheddar, but most importantly, it contributes extra moisture without making the mixture runny. It’s a small change, but it definitely elevates this from being just a standard bake to feeling like a special, well-engineered dish. For more moisture-boosting tricks, you can always check out how I approach texture in things like French Onion Meatloaf.
Creative Meatloaf Glaze Ideas for Your Cheeseburger Meatloaf
That simple ketchup and brown sugar glaze we use in the main recipe is fantastic—it gives you that classic sweetness and tang that pairs perfectly with beef—but sometimes, you want to lean even harder into the burger concept, right? As a project manager, I believe in having options ready before the primary execution phase. If you’ve got your cheeseburger meatloaf looking gorgeous halfway through baking and you want to upgrade that top layer, I’ve got two excellent alternatives that feel totally authentic to the burger theme.
First off, let’s talk about ramping up the smoky element. If you love that deep, grilled flavor you get from a backyard cookout, try a Smoky BBQ Glaze. This is super easy to mix up while your meatloaf is baking away. You really just want to boost that standard ketchup flavor profile.
Smoky BBQ Upgrade Glaze
Instead of the basic two-ingredient glaze, combine 1/2 cup of your favorite, slightly smoky BBQ sauce (not too vinegary!) with 1 tablespoon of Worcestershire sauce and just a teaspoon of apple cider vinegar. The vinegar helps keep it from tasting flat. Brush this on halfway through the first baking session—around the 25-minute mark. It caramelizes beautifully without burning too fast, protecting the meat underneath.
The “Secret Sauce” Topping
This might be my favorite because it literally screams burger joint. We’re mimicking that famous tangy, creamy sauce you drown your patties in. For this, forget the oven for two minutes and whip up a quick topping for the final five minutes of baking.
Mix together 1/4 cup mayonnaise, 2 tablespoons of yellow mustard, 1 tablespoon of sweet pickle relish (drained well!), and a dash of paprika for color. This mixture won’t bake down like a standard sugar glaze; it will just warm up and slightly caramelize the cheese blanket beautifully. You spread this on after the initial 45 minutes, right before you put the final layer of cheddar on. Honestly, this addition makes the final flavor profile almost indistinguishable from a gourmet burger!
If you want to get deeply involved in the flavors that make smash burgers so addictive, check out my recipe for easy smash burger sauce—you can easily adapt the ratios from that if you want a full-on special sauce vibe on your loaf!
Serving Suggestions for Your American Classic Dinner Remix
We’ve engineered the perfect loaf, but dinner isn’t complete without the right supporting cast, right? Since this Hearty Beef and Cheese Bake is essentially a giant, neatly packaged cheeseburger, we should treat it like one when it comes to sides. Forget that tired idea of a side salad; we’re going for the full diner experience, but obviously, optimized for minimal effort.
When I serve this Homemade Cheeseburger Loaf, I immediately transport the table setting to a classic American joint. That means something crunchy and salty is non-negotiable. My go-to choice, hands down, is oven fries—crispy, golden, and needing way less effort than deep-frying. If you want that perfect texture without the fryer oil messing up your kitchen safety standards, you absolutely have to check out my guide on the air fryer french fries technique. They come out shatteringly crisp every single time.
Onion rings are also a massive win here, providing that familiar sweetness that balances the savory beef and sharp cheese.
The Burger Swap: Serving Meatloaf on a Bun
Now, here’s the fun part that really closes the loop on this burger concept: serving it like one! Don’t just slice it onto a plate. Take a sturdy hamburger bun, lightly toast it if you have a minute, and place a thick, warm slice of the cheeseburger meatloaf right in the middle. It holds together surprisingly well. Then, top it with the fresh ingredients you’d normally pile onto a burger.
When you serve it this way, you get the best textural contrast: the dense, saucy loaf against the soft bun and that fresh crunch from crisp lettuce and maybe a slice of ripe tomato and onion. It’s ingenious, honestly—all the satisfaction of a burger but made easier throughout the process. You’re utilizing a single, well-prepared item in two different, delicious ways. That’s efficiency right there!
Storage and Reheating Instructions for Leftover Cheeseburger Meatloaf
One of the biggest wins with any well-engineered recipe, especially one using 2 lbs of ground beef, is the leftovers! This cheeseburger meatloaf tastes fantastic the next day, sometimes even better as those burger seasonings have a chance to really settle in. But to maximize those next-day meals, you need to store it correctly. If you don’t store it right, you lose all that precious moisture we worked so hard to keep in there.
The golden rule here is speed and sealing. Once the meatloaf has cooled down completely—and I mean truly cooled, don’t put hot food into an airtight container—get it wrapped up. I highly recommend storing individual slices rather than the whole loaf if you think you’ll be eating it over several days. This prevents you from constantly cutting into the main block and exposing more surface area to air.
Use heavy-duty plastic wrap and then tuck those wrapped slices into a quality zip-top bag or an airtight container. I find that if you treat the slices like pre-made burger patties, they keep beautifully in the fridge for up to 3 days. Any longer, and you’re pushing it, so make sure you plan your meals!
Reheating for Maximum Moisture
Reheating is where things can go sideways if you’re not careful. The microwave is fast, absolutely, but it can turn leftovers chewy if you blast them for too long. If you need a slice ready in two minutes for a quick lunch, definitely wrap the slice in a damp paper towel before microwaving for short 45-second intervals until heated through. That damp towel creates a little steam tent, which helps immensely with moisture retention.
However, if you have 20 minutes, the oven is my preferred method for bringing that Meatloaf with Melted Cheese back to life. Wrap your slice loosely in foil—don’t seal it tight, but loosely tent it—and pop it into a 325-degree oven for about 15 to 20 minutes. The foil traps the heat but allows a little air circulation, which keeps the residual glaze from getting sticky while ensuring the beef heats evenly all the way to the center. You want it hot, but never dried out, so keep an eye on it!
Frequently Asked Questions About Making Cheeseburger Meatloaf
I’ve answered the top questions I get about this American Classic Dinner Remix below. Anytime someone tries to substitute an ingredient in a balanced recipe like this, I always suggest having a backup moisture strategy! If you’re looking for something fun and portion-controlled, you should also check out my tips for making Cheese Stuffed Meatloaf Bites.
Can I use leaner ground beef, like 93/7, for this recipe?
Technically, yes, you can use leaner beef if you absolutely prefer it, but you’re sacrificing flavor and moisture insurance. Remember, fat equals tenderness in a meatloaf! If you insist on using leaner beef for your Simple Weeknight Meatloaf, you must compensate heavily. Try adding an extra tablespoon of Worcestershire sauce and maybe swapping the milk for heavy cream to introduce some necessary fat back into the mix.
What is the best type of cheese to use for the cheeseburger flavor?
For this specific application—the Meatloaf with Melted Cheese—Sharp Cheddar is my non-negotiable choice. It provides that unmistakable, slightly tangy flavor spike that defines a great cheeseburger. Monterey Jack is a decent second if you want something milder and even gooier, but Cheddar brings the necessary punch to stand up against the mustard and ketchup in the glaze.
Is it okay to skip the breadcrumbs in the Cheeseburger Meatloaf Recipe?
Honestly, I strongly recommend against skipping the breadcrumbs, whether you use regular or Panko. These act as the primary binder alongside the egg. Without them, the ground beef mixture won’t hold its structure when you try to slice your Homemade Cheeseburger Loaf; it will just crumble apart instead of holding a nice sliceable shape.
Can I prepare this mixture ahead of time?
You definitely can! This is another great efficiency move. You can mix everything except the final cheese topping up to 24 hours in advance. Just pack the mixture firmly into the loaf pan, cover it tightly with plastic wrap, and keep it in the fridge for your Unique Ground Beef Dinners tomorrow night. Be sure to let it sit on the counter for about 20 minutes before you glaze and bake it so it heats a little more evenly in the oven.
Nutrition Estimate for Homemade Cheeseburger Loaf
I always include the nutritional breakdown for my recipes because, as much as we love our comfort food, being organized about what we eat is part of being a smart home cook. Knowing the stats upfront helps when planning out the rest of the week. This data is based purely on the specific ingredients listed in the recipe, so keep in mind minor variations in your beef fat content or brand of ketchup can shift these numbers a little.
For one slice of this incredibly satisfying Homemade Cheeseburger Loaf, here’s what you can generally expect:
- Serving Size: 1 slice
- Calories: 420
- Fat: 25g (Note: Saturated Fat: 11g)
- Protein: 34g (That’s a solid protein punch!)
- Carbohydrates: 15g
- Sugar: 8g
- Sodium: 550mg
It’s important to remember that this is a hearty dinner—we’re using 80/20 beef for maximum moisture, which naturally brings up the fat content compared to a super lean bake. But look at that protein count! It truly is a magnificent, filling meal that perfectly remixes the best parts of a classic American dinner.
PrintCheeseburger Meatloaf Recipe
Make a satisfying, burger-flavored dinner using this straightforward cheeseburger meatloaf recipe. It combines ground beef, cheese, and classic burger seasonings into an easy-to-bake loaf.
- Prep Time: 15 min
- Cook Time: 55 min
- Total Time: 70 min
- Yield: 6 servings 1x
- Category: Dinner
- Method: Baking
- Cuisine: American
- Diet: Low Fat
Ingredients
- 2 lbs ground beef (80/20 recommended)
- 1 cup breadcrumbs (Panko or regular)
- 1 large egg
- 1/2 cup milk
- 1/2 cup finely chopped onion
- 2 tablespoons ketchup
- 1 tablespoon yellow mustard
- 1 teaspoon Worcestershire sauce
- 1 teaspoon salt
- 1/2 teaspoon black pepper
- 1/2 teaspoon garlic powder
- 1/4 teaspoon onion powder
- 1 cup shredded sharp cheddar cheese, divided
- 1/4 cup ketchup for glaze
- 1 tablespoon brown sugar for glaze
Instructions
- Preheat your oven to 375 degrees Fahrenheit. Lightly grease a standard loaf pan.
- In a large bowl, combine the ground beef, breadcrumbs, egg, milk, chopped onion, 2 tablespoons ketchup, mustard, Worcestershire sauce, salt, pepper, garlic powder, and onion powder. Mix gently with your hands until just combined; do not overmix.
- Stir in 3/4 cup of the shredded cheddar cheese into the meat mixture.
- Press the mixture evenly into the prepared loaf pan.
- In a small bowl, whisk together the 1/4 cup ketchup and brown sugar for the glaze. Spread this mixture evenly over the top of the meatloaf.
- Bake for 45 minutes.
- Remove the meatloaf from the oven. Sprinkle the remaining 1/4 cup of shredded cheddar cheese over the top.
- Return the meatloaf to the oven and bake for an additional 5 to 10 minutes, or until the cheese is melted and bubbly and the internal temperature reaches 160 degrees Fahrenheit.
- Let the juicy cheeseburger loaf rest in the pan for 10 minutes before slicing and serving.
Notes
- For a moister loaf, use 80/20 ground beef.
- You can serve slices on hamburger buns with your favorite burger toppings like lettuce and tomato.
- Pair this hearty beef and cheese bake with oven fries or onion rings for a complete meal.
Nutrition
- Serving Size: 1 slice
- Calories: 420
- Sugar: 8
- Sodium: 550
- Fat: 25
- Saturated Fat: 11
- Unsaturated Fat: 14
- Trans Fat: 1
- Carbohydrates: 15
- Fiber: 1
- Protein: 34
- Cholesterol: 110