
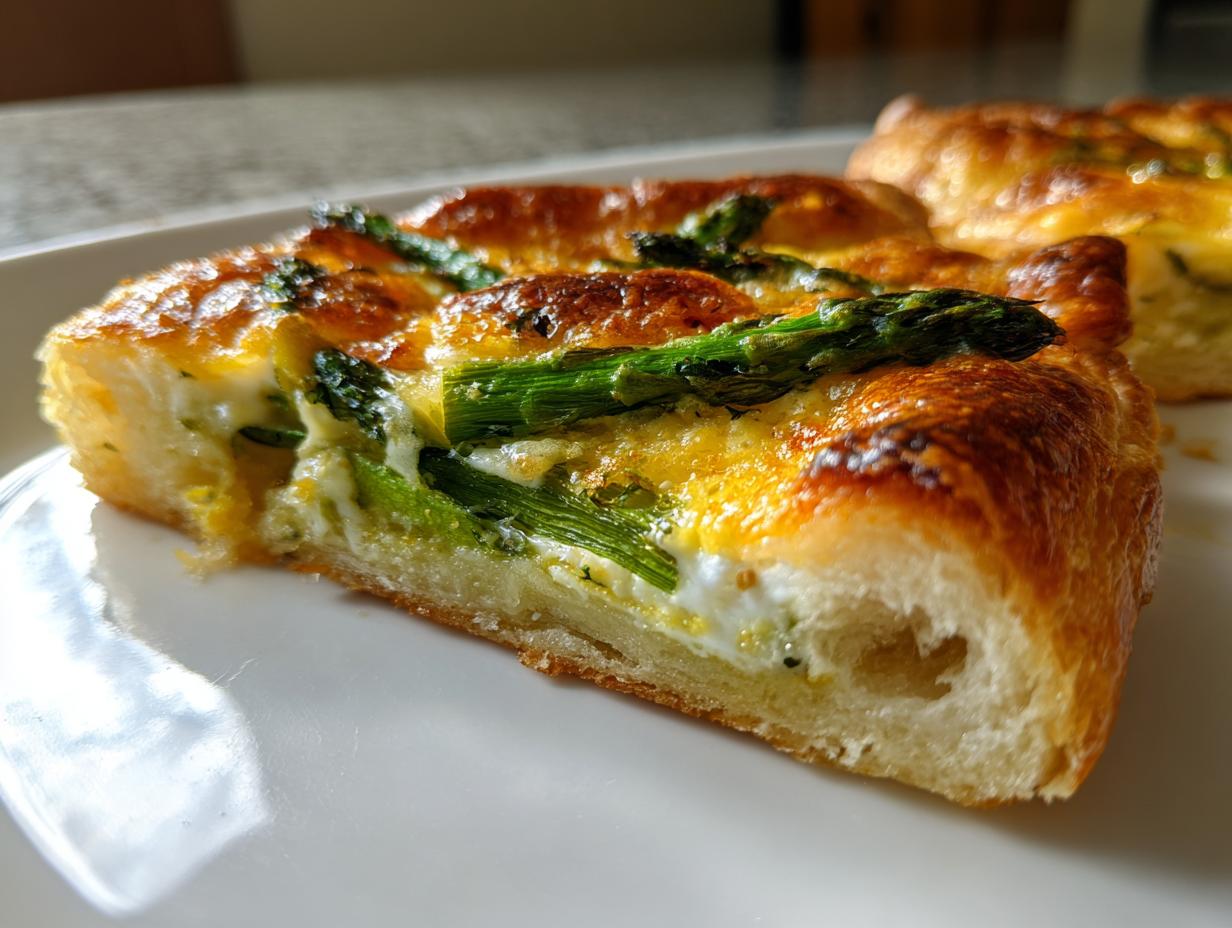
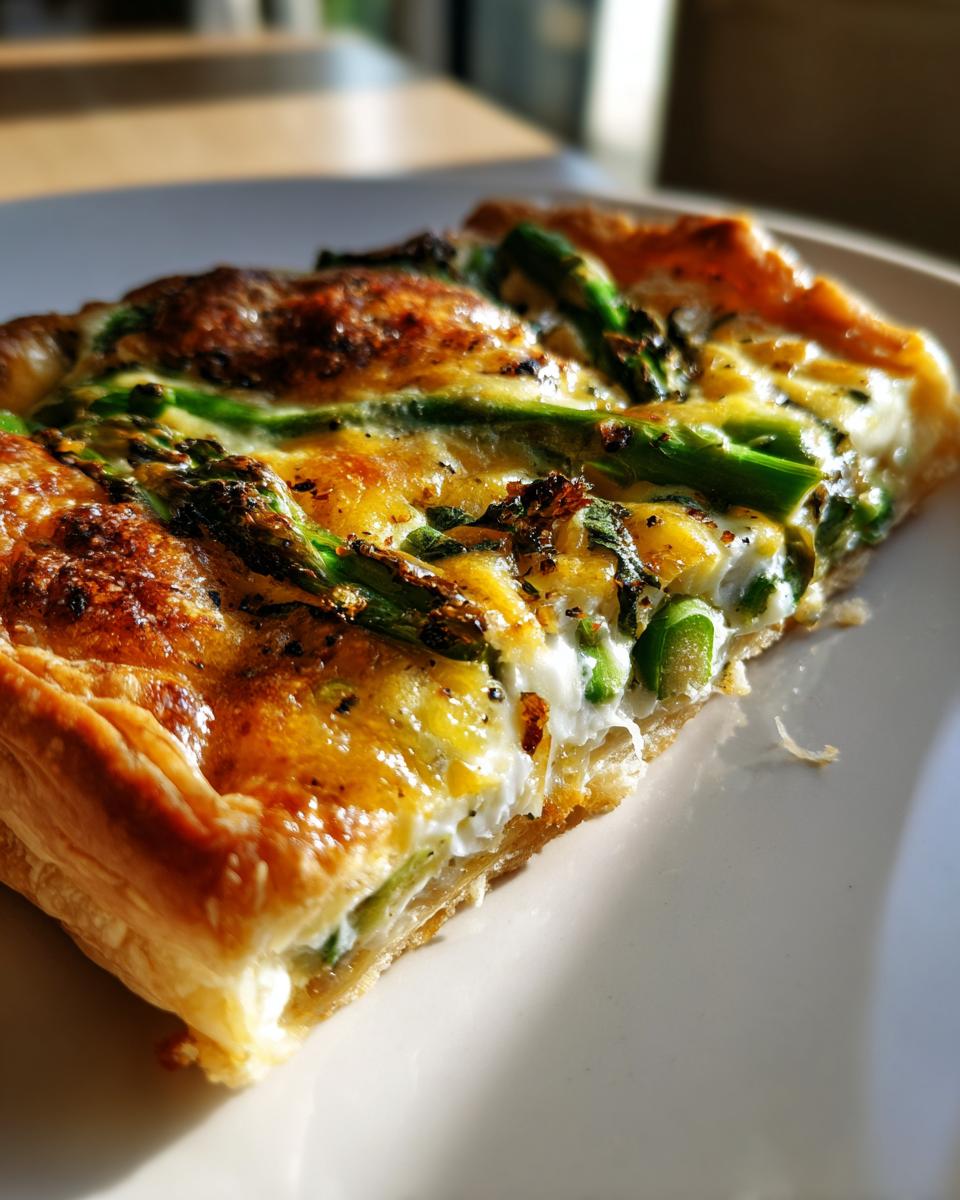
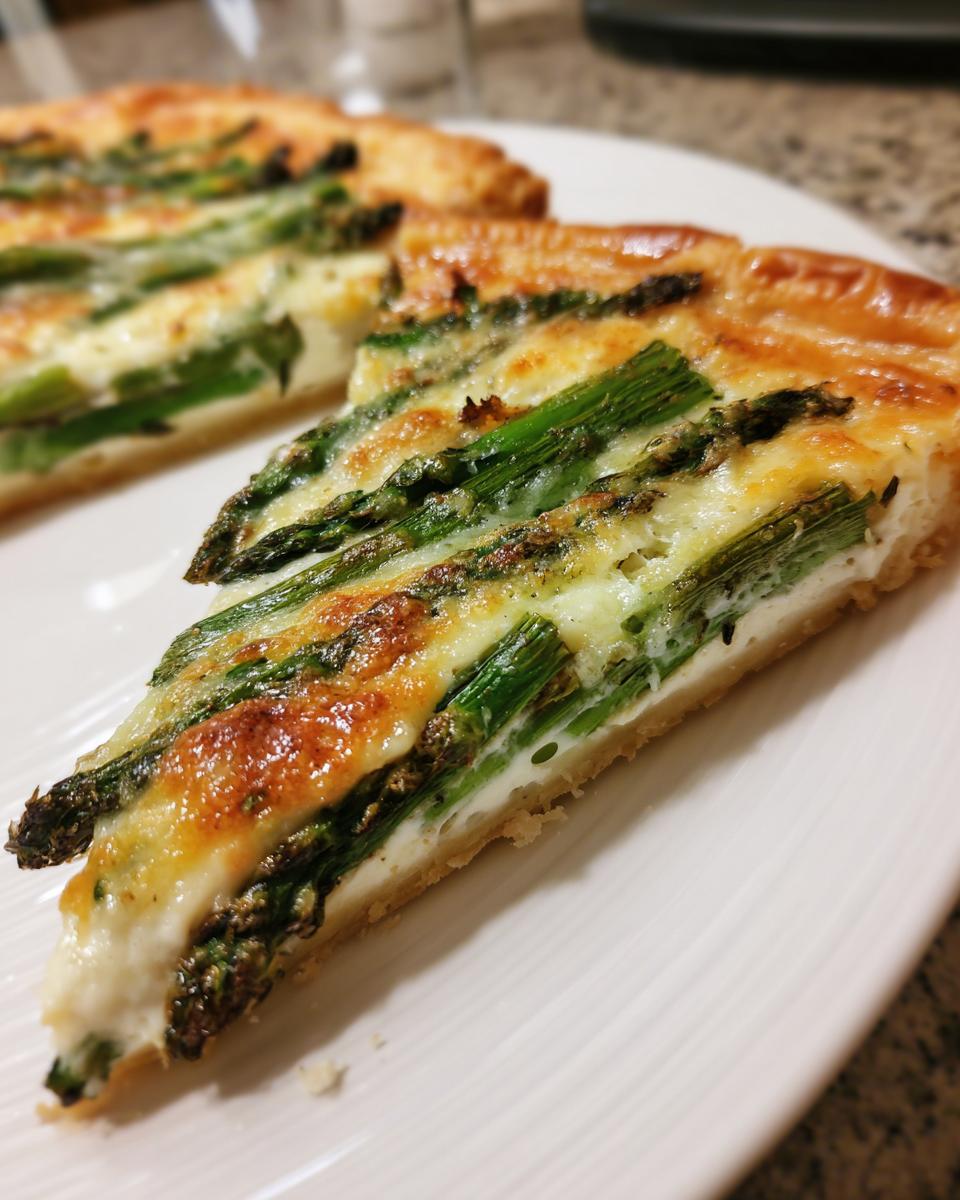
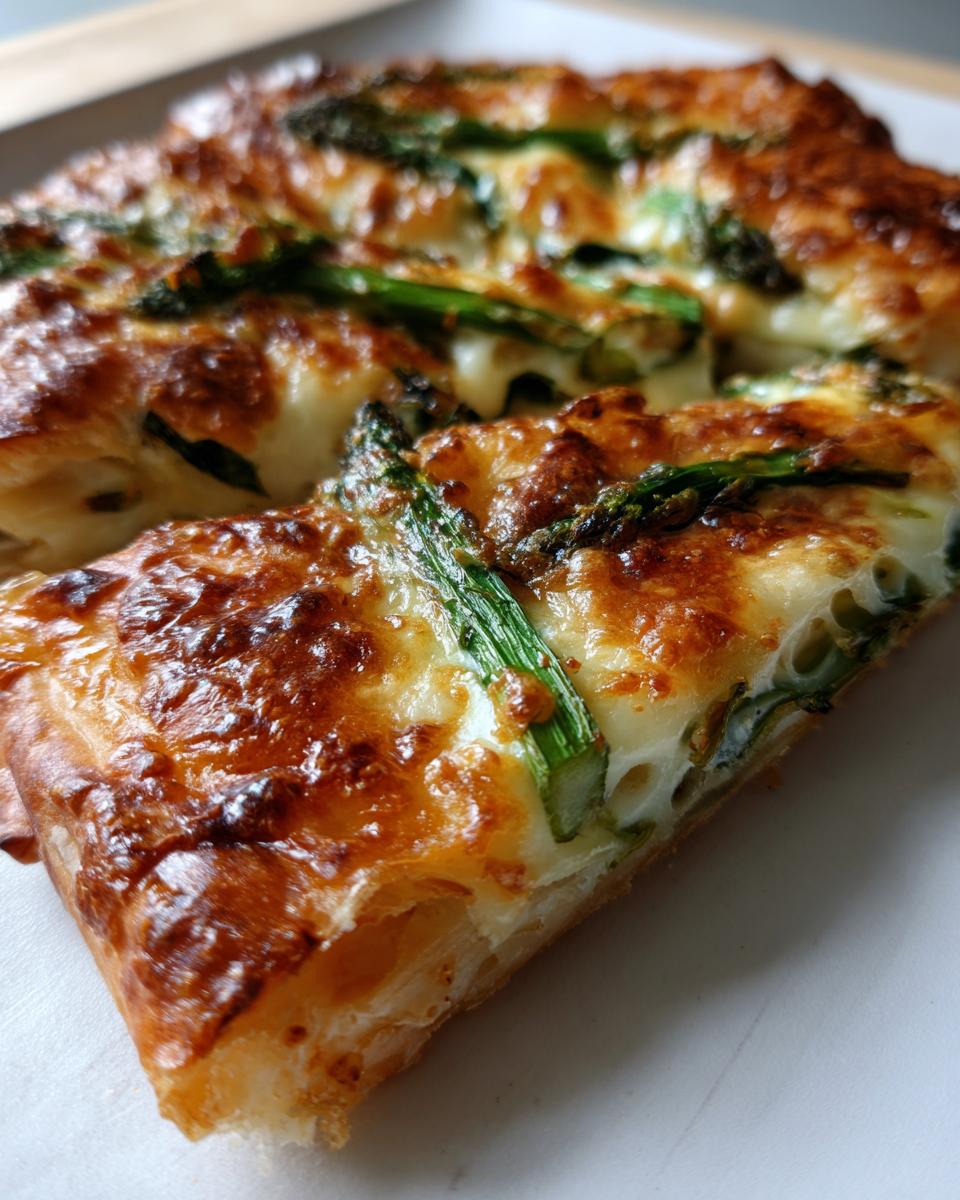
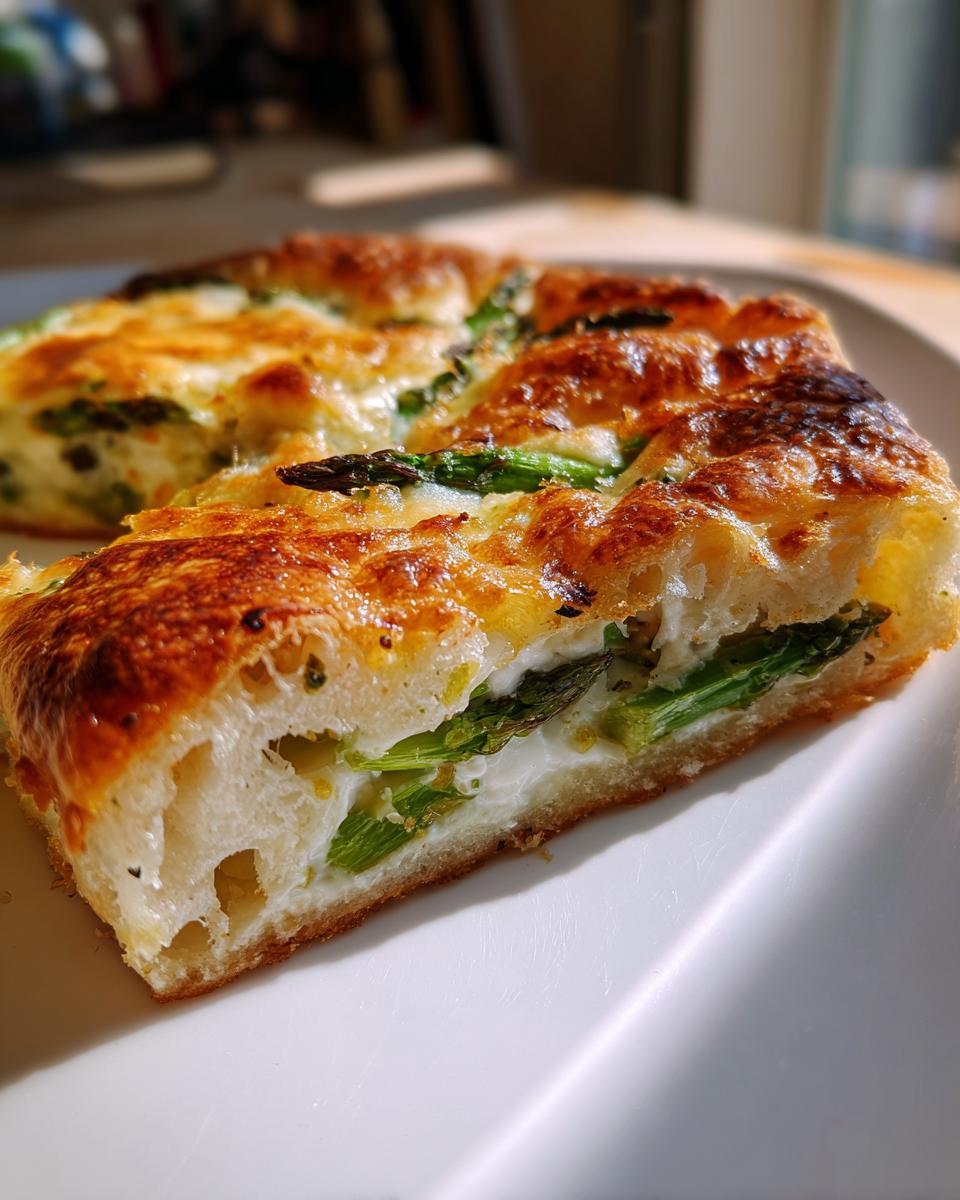
Let’s be honest, planning a brunch where you actually want to *enjoy* the event instead of nervously babysitting a complicated roast can be tough. You need that showstopper, right? That one dish that makes everyone say, “Wow, you made that?” Well, I’ve cornered the market on that feeling without demanding you use up your entire Saturday. This **Cheesy asparagus tart** is my go-to centerpiece. It’s visually stunning—all golden pastry framing bright green spears and melted, salty Gruyère—but here’s the trick: it takes almost no effort.
When I started Dishicious, it was because I realized cooking should be engineered, not agonizing. This tart is the perfect example of that philosophy. We’re relying on one genius shortcut—frozen puff pastry—which handles 90% of the structural work for us. We combine that buttery crust with sharp cheese and fresh asparagus, and BAM! You have an elegant **savory tart** ready in under 40 minutes total time. Trust me, if you can unfold a sheet of pastry, you can absolutely nail this impressive brunch idea. You can check out some of my other favorite [easy breakfast and brunch ideas] if you need more quick wins!
- Why This Cheesy Asparagus Tart is Your Perfect Brunch Centerpiece
- Ingredients Needed for the Cheesy Asparagus Tart
- Step-by-Step Instructions for Your Cheesy Asparagus Tart
- Expert Tips for the Ultimate Cheesy Asparagus Tart
- Serving Suggestions for Your Asparagus Tart
- Storage and Reheating Instructions for Leftover Cheesy Asparagus Tart
- Troubleshooting Common Issues with Puff Pastry Tarts
- Estimated Nutritional Information for This Cheesy Appetizer
- Share Your Impressive Cheesy Asparagus Tart Creations
Why This Cheesy Asparagus Tart is Your Perfect Brunch Centerpiece
You want that *wow* factor without breaking a sweat, right? That’s exactly what this tart delivers. I engineered this recipe to look like you spent hours fussing with dough, when really, we just optimized the process. It looks incredibly sophisticated, but it’s shockingly simple. It’s the definition of high return on low investment.
- It’s a genuine showstopper: The geometric arrangement of the asparagus looks professional.
- Dinner party stress? Gone. The total time is only 40 minutes!
- The flavor profile is unbeatable for a spring brunch.
Quick Assembly Using Puff Pastry Recipes
If you are using one of my trusted [puff pastry recipes], you already know the power of that pre-rolled sheet. We don’t mess around with fussy doughs; we just score, fill, and bake. When you can get this entire **Cheesy asparagus tart** assembled in 15 minutes, you have more time to focus on making coffee!
Flavors That Impress: Gruyère and Fresh Asparagus
For a **savory tart**, you need ingredients that fight for attention. Gruyère brings that nutty, salty punch that makes your palate sit up and notice. Paired with crisp-tender asparagus, it’s just elegant. It’s rich without being heavy, which is crucial for a midday meal.
Ingredients Needed for the Cheesy Asparagus Tart
Okay, this is where the project management shines. We are sticking only to the essentials. No chasing down obscure spices for this brunch idea. Everything you need for this incredible [cheesy appetizer] is usually on hand or easy to grab. I’ve listed exactly how I prep mine so you don’t skip an important structural step.
- 1 sheet frozen puff pastry, thawed (Don’t rush this—let it sit on the counter for 30 minutes first!)
- 1 tablespoon olive oil
- 1 pound fresh asparagus, trimmed (Make sure those woody ends are snapped right off!)
- 1/2 cup heavy cream
- 1 large egg
- 1/4 teaspoon salt
- 1/8 teaspoon black pepper
- 1 cup shredded Gruyère cheese (This is non-negotiable for the best flavor, but see my notes later if you absolutely must swap it.)
- 1 tablespoon fresh thyme leaves
That’s it. See? We’re not overcomplicating this. Reliable, accessible ingredients that deliver maximum impact.
Step-by-Step Instructions for Your Cheesy Asparagus Tart
Alright, let’s get down to execution. This is where my project management style kicks in—we lay out the phases clearly, and before you know it, the oven timer is dinging. We are aiming for a perfect 400 degrees Fahrenheit oven temp right out of the gate. Having the right tools, like a good baking sheet and, of course, your trusted [puff pastry recipes] framework, makes the assembly phase feel seamless.
Preparing the Puff Pastry Base for the Cheesy Asparagus Tart
First thing’s first: unfold that pastry. Lay it flat on parchment paper and line your sheet pan. Now, this next part is critical for that gorgeous, raised border that makes this a proper centerpiece. Take your knife and gently *score* a 1-inch box around the outside edge. Stress the word *gently*—you’re just marking the dough, not cutting through to the bottom! That border is what puffs up beautifully in the oven. Then, poke the inside section all over with a fork. This stops the middle from puffing up like a balloon while the edges get their lift.
Assembling the Asparagus Tart Filling
While the oven is heating up, whisk your simple liquid binder: egg, heavy cream, salt, and pepper. This mixture is what binds everything together so nothing slides off later. Next, layer your flavors. Spread that beautiful shredded Gruyère evenly across the scored center—don’t let it climb over your walls! Then, arrange the asparagus spears over the cheese. I like to lay mine diagonally because it just looks fancier, you know? Pour the remaining cream mixture over the top, making sure it trickles down around the asparagus stalks. Then, 20 to 25 minutes later, you have gold!
Expert Tips for the Ultimate Cheesy Asparagus Tart
Even though this recipe is streamlined, I always look for ways to guarantee success for my readers. When I first started testing this, I dealt with a soggy middle more times than I care to admit! That’s why I always recommend taking the extra minute to ensure maximum crispness. These aren’t extra steps; they’re structural reinforcements for your perfect presentation.
Achieving a Crispy Crust on Your Savory Tart
If you are serving this to actual company and want zero risk of a damp base—which, trust me, ruins the whole aesthetic of a gorgeous **savory tart**—you bake the pastry alone first. Pull out that note about blind-baking? Do it. Pop the scored pastry in the oven for about 10 minutes before you add any filling whatsoever. That initial blast of heat sets the bottom layer. When people ask me for next-level brunch ideas, that’s my secret handshake.
Ingredient Substitutions for This Cheesy Appetizer
Part of my philosophy is flexibility; we adjust the project scope when necessary. If you’ve run out of Gruyère, don’t panic and run to the store! Swiss cheese works just fine, or you can use a sharp white cheddar if you want a slightly stronger flavor profile. That’s what makes this cheesy appetizer so reliable—it rolls with the punches.
Serving Suggestions for Your Asparagus Tart
So, your **Cheesy asparagus tart** is baked, it looks incredible, and the whole house smells like heaven. What do you put next to it? Remember, this is the star of the show, especially for brunch, so we don’t want sides that compete with that rich Gruyère and fresh thyme. You want light, bright counterpoints that offer a little palette cleanser.
I usually aim for something acidic and simple. A massive bowl of fresh berries—strawberries, blueberries, maybe some raspberries—is always a win because the sweetness plays so nicely against the savory pastry. If you’re looking for something a little more structured, pair it with a very light vinaigrette salad.
I recently made this tart alongside my simple [cucumber and tomato salad]. That recipe uses only a whisper of red wine vinegar, which cuts right through the richness of the cream and cheese without weighing the meal down. Keep the sides fresh and minimal, and your guests will focus entirely on that perfectly puffed pastry!
Storage and Reheating Instructions for Leftover Cheesy Asparagus Tart
Look, if you made this tart for a crowd, chances are you’ll have leftovers. And that’s fine! But we have to handle puff pastry correctly in storage, or you’ll end up with a sad, soggy square the next day. I treat this leftover tart like I treat every other optimized project: quick cleanup, smart storage.
Wrap any leftover slices tightly in plastic wrap, making sure to get a good seal. Then, place them in an airtight container in the fridge. It’ll keep nicely for about two to three days. Don’t crowd the container, though; we want to keep air moisture away from that flaky crust as much as possible.
Now for reheating. Please, take my advice here: never, ever microwave this if you care about the texture. Microwaves make pastry chewy—and we worked too hard to get that perfect lift! For the best results, use a toaster oven or a conventional oven set to 350 degrees Fahrenheit. Pop the slice directly on the rack for about 8 to 10 minutes. You’ll hear the pastry crackle back to life, and the cheese will become perfectly melted again. It’s almost as good as fresh!
Troubleshooting Common Issues with Puff Pastry Tarts
Even when we optimize a recipe, variables happen. Temperature fluctuations, humidity, the mood of your oven—it all interferes! When I’m fielding questions about my [puff pastry recipes], the issues usually fall into the same two categories: puff failure or soggy bottoms. Let’s analyze the data and deploy some quick fixes, treating this like minor project scope creep.
If your pastry border didn’t puff up nicely around the edges, it means the scoring depth wasn’t quite right, or the butter in the dough was too warm when it went in the oven. Did you handle the dough a lot? Heat transfers fast! For next time, chill the whole assembled tart for 15 minutes before it even hits the oven. That cold shock gives the butter crystals time to reset before they melt.
The undercooked center issue, which is common when you load up a **savory tart** with heavy toppings like cheese and cream, usually points back to baking time vs. temperature. If your edges look golden brown but the center is still liquid, pull it out! Tent the edges loosely with aluminum foil—this protects the crust—and drop the oven temperature slightly, maybe down to 375 degrees. Then, let it bake for another 5 to 10 minutes until that custard sets. Patience solves most culinary problems!
Estimated Nutritional Information for This Cheesy Appetizer
Look, when you’re engineering a delicious meal, you also need to know what you’re putting into it. Since we are using rich ingredients like Gruyère and heavy cream in this **Cheesy asparagus tart**, we need to be upfront about what the macros look like. I ran the numbers based on achieving 6 clean slices, but remember, this is an estimate.
I always stress transparency in my findings. The exact values can shift based on how thick you cut the pastry or the specific brand of Gruyère you choose, so treat this as a solid baseline for planning your brunch ideas, not a scientific guarantee. This data helps you understand that while this is a beautiful **cheesy appetizer**, it’s certainly a bit richer than a simple bowl of fruit!
- Serving Size: 1 slice
- Calories: 320
- Fat: 24g (This comes mainly from the butter in the pastry and the cheese!)
- Protein: 12g
- Carbohydrates: 17g
- Sodium: 450mg
- Sugar: 1g
It’s important to know what you’re working with when planning a full menu. I feel good about these numbers because we’ve kept the sugar load extremely low and focused on quality fats for flavor.
Share Your Impressive Cheesy Asparagus Tart Creations
Okay, you’ve made the tart. You’ve successfully executed the plan, wowed your guests, and probably enjoyed the best brunch centered around a **Cheesy asparagus tart** you’ve ever made at home. Now, I need to hear about it!
This is the payoff for me. Leo Grant here—I designed Dishicious to prove that efficient cooking leads to delicious results, and you just proved my whole philosophy right. Leave me a comment below, please! Tell me how it went. Did your border puff up perfectly? Did your guests fight over who got the last slice of this amazing **savory tart**?
Don’t be shy about sharing photos if you have them, or just drop a rating if you loved the simplicity. Did you try my technique for keeping the crust crisp? Did you serve it with a simple side salad? Every piece of feedback helps refine the process for the next busy person looking for reliable [smarter, simpler cooking] solutions. Come back soon, and let’s tackle the next project!
PrintImpressive Gruyère and Asparagus Puff Pastry Tart

Create a visually stunning savory tart centerpiece for brunch using puff pastry, fresh asparagus, and salty Gruyère cheese.
- Prep Time: 15 min
- Cook Time: 25 min
- Total Time: 40 min
- Yield: 6 servings 1x
- Category: Brunch
- Method: Baking
- Cuisine: American
- Diet: Vegetarian
Ingredients
- 1 sheet frozen puff pastry, thawed
- 1 tablespoon olive oil
- 1 pound fresh asparagus, trimmed
- 1/2 cup heavy cream
- 1 large egg
- 1/4 teaspoon salt
- 1/8 teaspoon black pepper
- 1 cup shredded Gruyère cheese
- 1 tablespoon fresh thyme leaves
Instructions
- Preheat your oven to 400 degrees Fahrenheit. Line a baking sheet with parchment paper.
- Unfold the puff pastry sheet onto the prepared baking sheet. Score a 1-inch border around the edges of the pastry with a knife, being careful not to cut all the way through. Prick the center area lightly with a fork.
- In a small bowl, whisk together the heavy cream, egg, salt, and pepper.
- Brush the scored border of the pastry lightly with some of the cream mixture.
- Spread the shredded Gruyère cheese evenly over the center of the pastry, inside the scored border.
- Arrange the trimmed asparagus spears over the cheese in a decorative pattern.
- Pour the remaining cream mixture evenly over the asparagus and cheese.
- Bake for 20 to 25 minutes, or until the pastry is golden brown and puffed, and the cheese is melted and bubbly.
- Remove the tart from the oven and sprinkle with fresh thyme leaves. Let it cool for 5 minutes before slicing and serving.
Notes
- For a crispier crust, you can blind-bake the pastry base for 10 minutes before adding the filling.
- If you do not have Gruyère, Swiss cheese or sharp white cheddar works as a substitute in this cheesy appetizer.
- Trim the woody ends off the asparagus spears for the best texture.
Nutrition
- Serving Size: 1 slice
- Calories: 320
- Sugar: 1
- Sodium: 450
- Fat: 24
- Saturated Fat: 14
- Unsaturated Fat: 10
- Trans Fat: 0
- Carbohydrates: 17
- Fiber: 2
- Protein: 12
- Cholesterol: 75