

Look, we all want that perfect, salty, crispy edge you only get at the best burger joints, right? But who has time for complicated layering and fancy aging processes? That’s exactly what drove me, Leo Grant, to engineer the ultimate weeknight solution in my Chicago apartment. We’re stripping away the fluff to focus on pure structure and flavor. This method delivers the Classic smash burger—thin, utterly irresistible, and ready faster than you can decide on toppings.
My project manager mindset kicked in when I realized cooking shouldn’t be a headache. The secret here isn’t fancy ingredients; it’s the smash technique itself. If you follow this tightly optimized structure, you’ll get that amazing sear using basic kitchen gear. Trust me, this system is streamlined for maximum flavor with minimum fuss. It’s the easiest path to incredible results, perfect for your quick easy dinners or your next big cookout.
- Why This Classic Smash Burger Technique Works (The Dishicious Method)
- Gather Your Ingredients for the Classic Smash Burger
- Step-by-Step Instructions for the Perfect Classic Smash Burger
- Expert Tips for Your Next Classic Smash Burger Cookout
- Assembling and Serving Your Classic Smash Burger
- Storage and Reheating Instructions for Leftover Classic Smash Burger Components
- Frequently Asked Questions About Making a Classic Smash Burger
- Estimated Nutritional Data for the Classic Smash Burger
- Share Your Perfect Classic Smash Burger Experience
Why This Classic Smash Burger Technique Works (The Dishicious Method)
When I talk about efficiency, this smash technique is the shining example. We aren’t striving for a thick, slow-cooked patty; we are optimizing for speed and crust development. The goal is to maximize the surface area that hits the screaming-hot cooking surface—that’s where the magic happens.
Smashing the meat instantly triggers the Maillard reaction, which is just a fancy way of saying we build incredible flavor and get that dark brown, lacy crust. You need intense, unwavering heat for this; if your skillet isn’t hot enough, you’ll end up steaming the meat, and that ruins the whole plan.
This method works because it’s simple and reliable. It takes low-effort ingredients (just salt, pepper, and beef) and applies the perfect amount of pressure at the perfect moment to guarantee you a fantastic, flavorful crispy burger every single time. No guesswork, just solid execution.
Gather Your Ingredients for the Classic Smash Burger
This recipe shines because it uses easily found, quality ingredients. Remember, complexity doesn’t equal flavor when we’re aiming for simplicity here at Dishicious. I want you set up for success, so make sure you grab the right ground beef blend—that fat content is non-negotiable for the best results!
Essential Components for Your Classic Smash Burger
- 1.5 lbs ground beef (80/20 blend recommended—this fat renders out nicely!)
- 1 teaspoon kosher salt
- 0.5 teaspoon black pepper
- 8 slices American cheese (Don’t skimp on the classic orange!)
- 8 potato buns
- 2 tablespoons unsalted butter, softened
- Dill pickle chips, for serving
- Yellow mustard, for serving
- Ketchup, for serving
Step-by-Step Instructions for the Perfect Classic Smash Burger
Okay, this is where the assembly line mentality comes in handy. We move fast, but we move deliberately. The key to handling these burgers, especially when you are dealing with a large batch for your grilling burgers party, is having everything ready right beside your cooker.
Prep Work: Toasting Buns and Portioning Meat
First things first, get that cast-iron skillet roaring hot over medium-high heat—seriously, let it get smoking hot. While it heats up, divide your 80/20 beef into eight loose, little balls, about three ounces each. Don’t try to force them into perfect pucks; keeping them loose is part of the smash process. Next, brush a little softened butter on the cut sides of your potato buns and toast them on a cooler area of the griddle until they’re just golden. Pull those buns off immediately and set them aside. They wait patiently for the meat!
The Smash: Achieving Maximum Crust on Your Classic Smash Burger
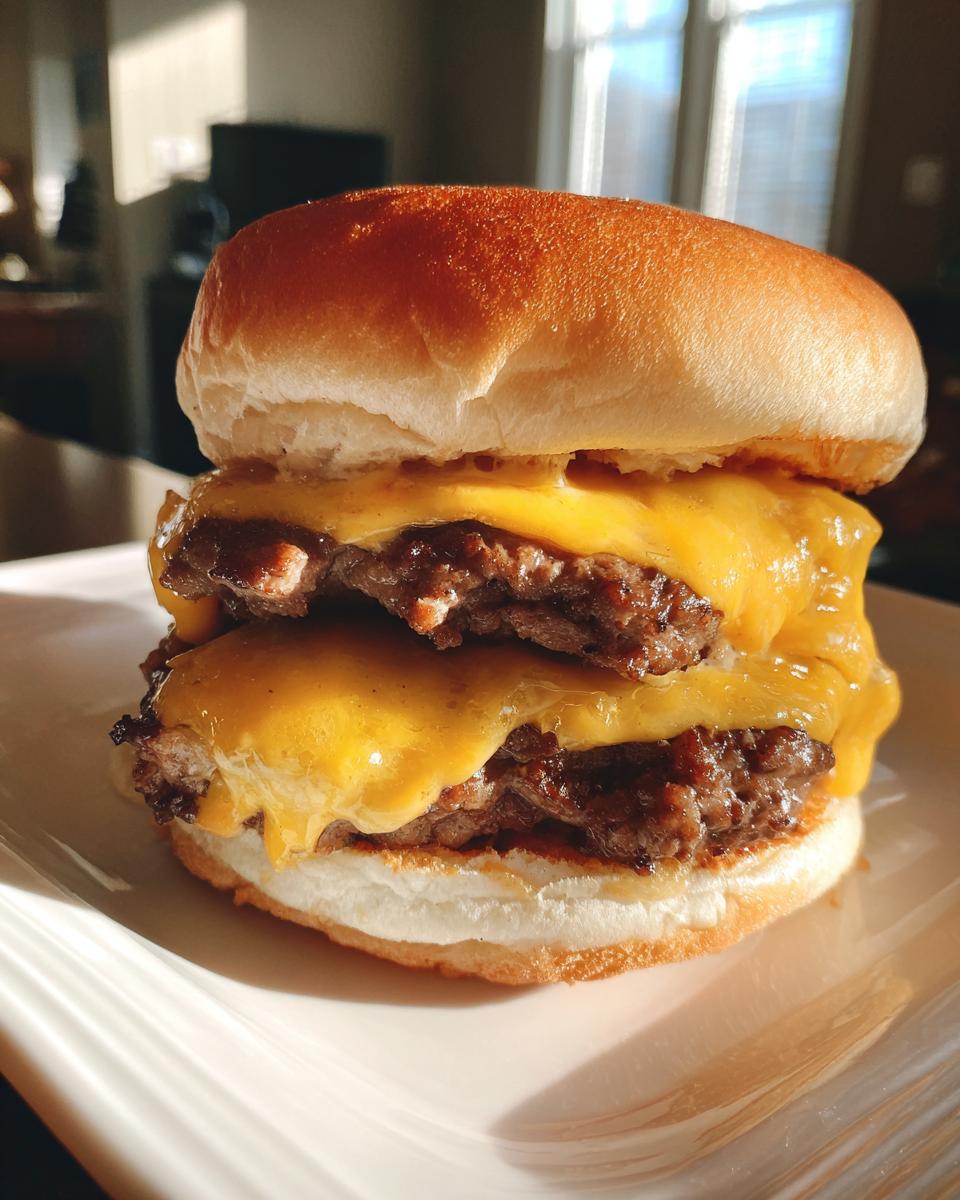
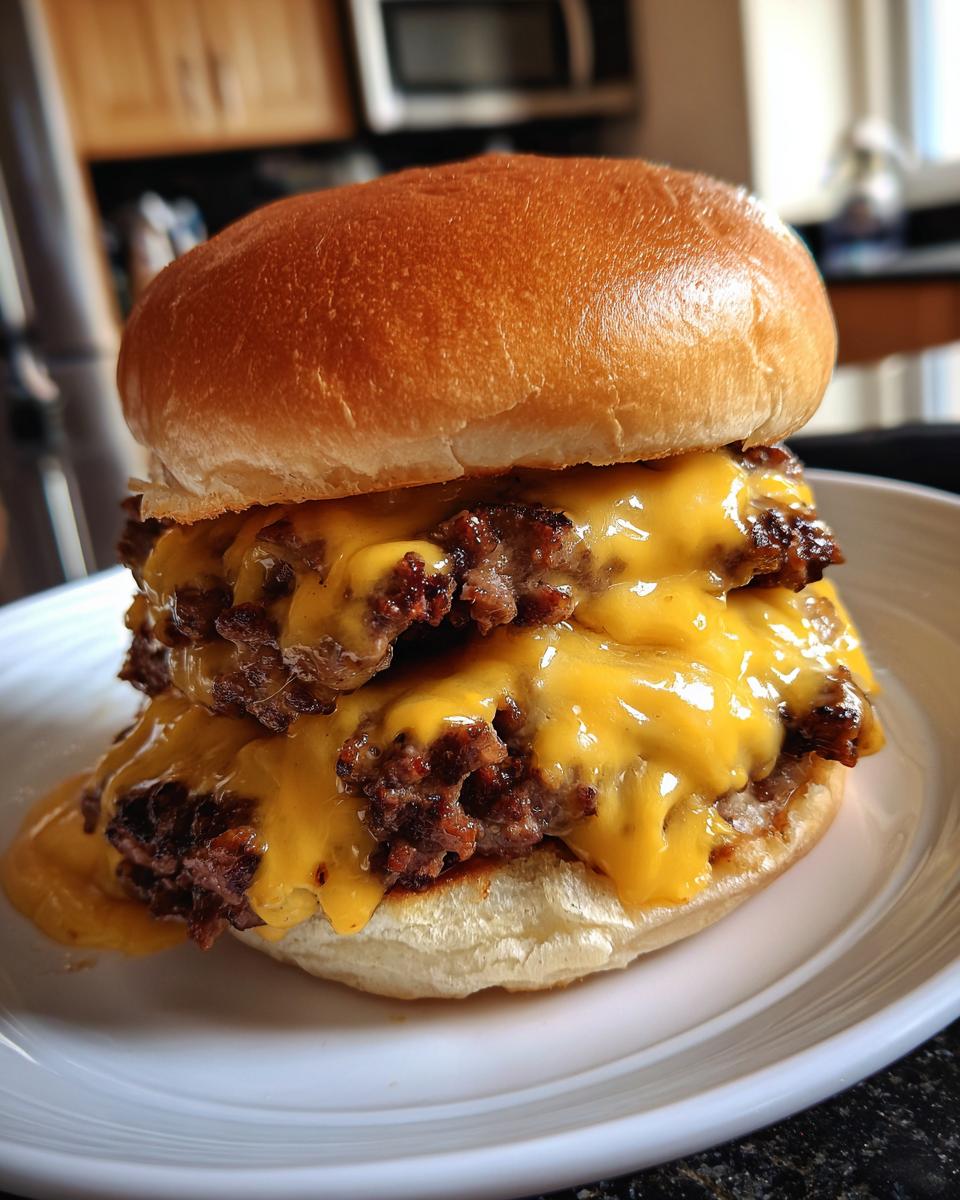
Drop two or three of your loose meat balls onto the bare, hot surface—no oil needed, the fat handles that! Immediately cover one ball with parchment paper. Now, grab your heavy spatula and press down hard and fast for about ten seconds until the meat is paper-thin, about a quarter-inch. Lift the spatula and the parchment paper right off. That’s it—that’s your one smash! You want to see those beautiful lacy edges forming around the base of your Classic smash burger. Let it cook, untouched, for about ninety seconds.
Flipping and Melting Cheese for the Best Burger Recipe
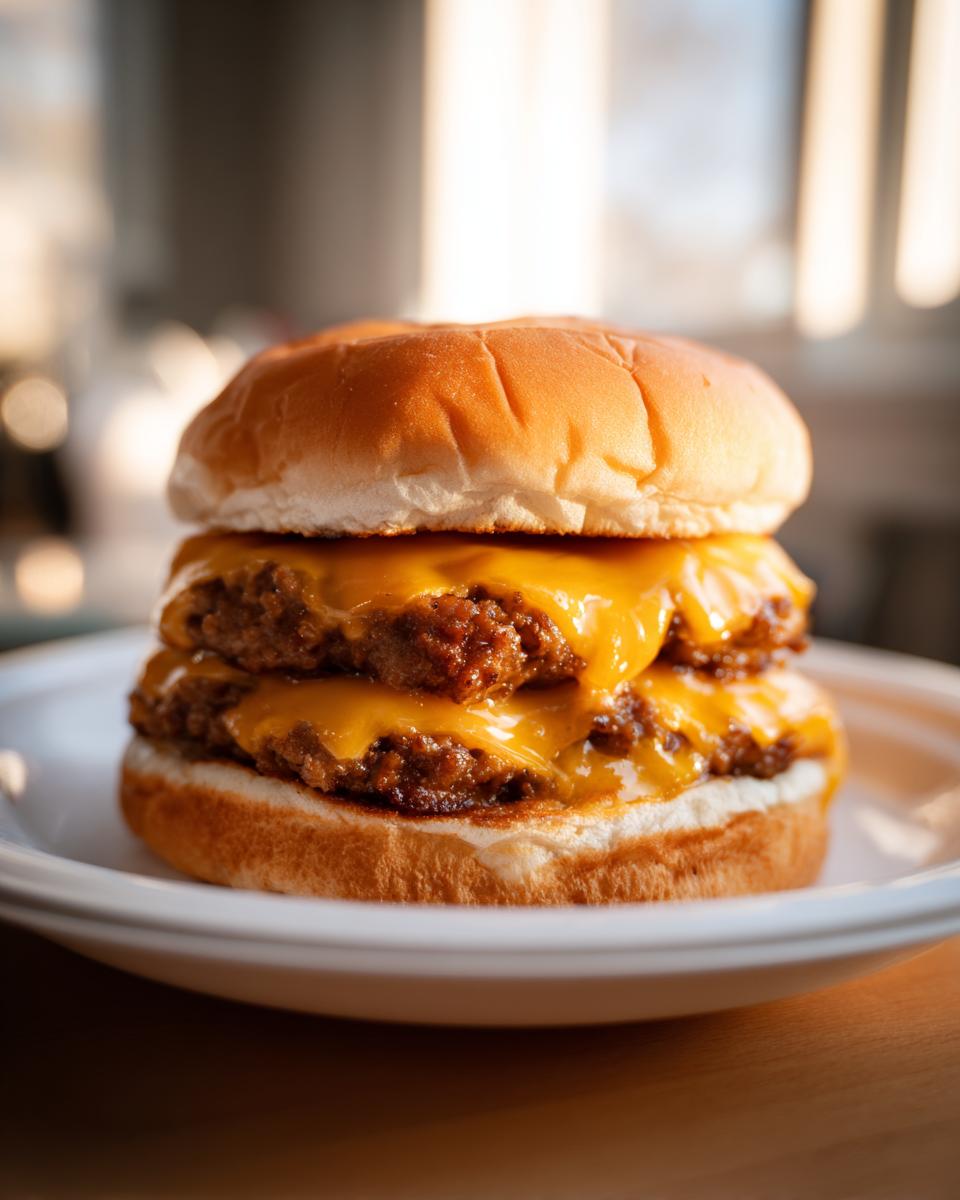
When the edges look deep brown and crispy, slide your spatula underneath to scrape up the whole patty—you want to keep all that crusty goodness attached! Flip it right over, and immediately lay one slice of American cheese on top. Cook it for just another 30 to 60 seconds until the cheese is gooey and loving the patty. Now you stack them up on those toasted buns with your favorite toppings, and you’ve created the best burger recipe for your cookout.
Expert Tips for Your Next Classic Smash Burger Cookout
Following the steps gets you 90% of the way there, but these little details are what move you from “good burger” to “restaurant quality.” When I first started optimizing this process, I got impatient. I remember one sunny afternoon trying to get lunch ready quickly; I threw the meat down before my griddle was fully hot. What happened? The meat just steamed and flopped around gray—no sear, no flavor. Honestly, it was mush. Don’t make my mistake! Let that iron get properly hot before anything touches it.
This is the kind of advice you only get when you’ve messed it up a hundred times. Check out my background here if you want a little more about how I approach kitchen projects!
Why Fat Content Matters for a Great Classic Smash Burger
When I say 80/20 blend, I mean it. That 20 percent fat is crucial because it’s what renders out to create that stunning, lacy crust as the meat spreads. If you go too lean, you lose the sizzle, and if you lose the sizzle, you lose the signature texture of the Classic smash burger.
The Critical Rule: Do Not Press After the Initial Smash
This is huge, so listen up. That one powerful smash ensures contact and searing. If you go back in for a second press—even just to check if it’s done—you are squeezing out all those precious rendered juices and fat. You’ll end up with a hockey puck, not a delicious, thin patty. Just let the bottom cook undisturbed until edges crisp, then flip, cheese, and done!
Assembling and Serving Your Classic Smash Burger
The most rewarding part is stacking these beauties up! Since we made our patties thin, you absolutely need two per burger for that satisfying, stacked height. Take your perfectly toasted potato buns—they are waiting patiently for this moment. Place your double layer of cheesy, crisp patties right onto the bottom half of that soft bun.
Now, load up the toppings! Don’t overcomplicate it; the flavor is in the beef and cheese. A layer of those crisp dill pickle chips, a zigzag of tangy yellow mustard, and just a touch of ketchup is all you need. Seriously, keep it classic. This setup is optimized for flavor!
Serve these immediately while the cheese is still molten. They disappear fast, especially when you’re hosting a big crowd for the memorial day bbq. They go great alongside some crispy air-fryer fries or maybe some simple grilled corn. Enjoy the fruits of your efficient labor!
Storage and Reheating Instructions for Leftover Classic Smash Burger Components
You’ll be surprised how well these patties hold up, provided you store them correctly. Listen, the buns should always be eaten fresh—they get sad fast. So, keep the toasted potato buns wrapped tightly in foil or a plastic bag on the counter overnight.
For the cooked patties and cheese, stack them loosely and wrap them tightly in plastic wrap before chilling them in the fridge. They last about three days safely.
When you reheat, you need to bring back that crispiness. I skip the microwave completely. Instead, put the patties in a dry skillet over medium heat or right back on a hot griddle for just a minute per side. Don’t press them! This wakes up the edges without drying out the middle. Then re-toast your buns, and you’re golden.
Frequently Asked Questions About Making a Classic Smash Burger
I get a ton of questions after people try this recipe because once you taste that perfect sear, you start thinking about the science behind it! It’s all about eliminating weak points in the process. If you’re looking at achieving that perfect crispy burger that rivals your favorite spot downtown, these answers should help you troubleshoot.
If you’re planning brunch the next day, check out some of my easier recipes over here!
Can I use a regular frying pan instead of cast iron for my smash burger?
You sure can, but you have to treat that pan right! Cast iron is my top pick because it retains heat like a champ, which is what we need for that immediate sear on the Classic smash burger. If you’re using stainless steel, you need to preheat that pan longer—I mean, let it sit on medium-high for a full five to seven minutes until it’s radiating serious heat. If you rush it, the meat steams, and we talked about how bad that is for the crust!
What is the best cheese for a crispy burger?
Forget what you think you know about fancy cheese when it comes to this style. The best burger recipe demands American cheese. Why? It melts incredibly fast and smoothly, adhering right to the surface of the patty as it cooks. It creates that gooey seal that holds everything together. Provolone or Swiss just don’t melt with the same cohesive structure.
How do I get those lacy, crispy edges on my Classic smash burger?
Those beautiful lacy edges are the signature of a perfect smash. It comes down to two non-negotiables: one, the cooking surface must be screaming hot so the outside cooks instantly, and two, you must apply firm, even pressure only once, right when the ball hits the pan. That initial press spreads the meat just enough to allow the fat to sizzle up the sides, creating that glorious crust. Never press again!
Estimated Nutritional Data for the Classic Smash Burger
So, while we are focused on flavor optimization here, I know some of you track your intake. These numbers below are just estimates for one burger using the 80/20 beef and American cheese.
- Serving Size: 1 burger
- Calories: 450
- Fat: 28g (with 12g saturated)
- Sodium: 650mg
- Protein: 28g
Remember, these figures change wildly depending on which brand of cheese you grab or if you decide to double up the mustard. This should just give you a ballpark for your meal planning!
Share Your Perfect Classic Smash Burger Experience
That’s it—we’ve optimized the process and engineered the perfect, thin, crispy patty. Now I genuinely want to see what you cooked up for your next cookout!
Did you nail the sear? Did the kids devour all four servings faster than you expected? Rate this method on a scale of 1 to 10 and shoot me a picture through the contact page. I love seeing my streamlined recipes in action!
PrintClassic Smash Burger: Restaurant Quality at Home

Make the ultimate, nostalgic American burger with thin, crispy patties and perfectly melted cheese using this straightforward technique for your next cookout.
- Prep Time: 10 min
- Cook Time: 10 min
- Total Time: 20 min
- Yield: 4 servings 1x
- Category: Dinner
- Method: Grilling
- Cuisine: American
- Diet: Low Fat
Ingredients
- 1.5 lbs ground beef (80/20 blend recommended)
- 1 teaspoon kosher salt
- 0.5 teaspoon black pepper
- 8 slices American cheese
- 8 potato buns
- 2 tablespoons unsalted butter, softened
- Dill pickle chips, for serving
- Yellow mustard, for serving
- Ketchup, for serving
Instructions
- Prepare your cooking surface. Heat a large cast-iron skillet or flat-top griddle over medium-high heat until very hot. This high heat is key for a good sear.
- Divide the ground beef into 8 equal portions (about 3 ounces each). Do not pack or form them into tight patties; keep them loose. Season each portion lightly with salt and pepper.
- Lightly butter the cut sides of the potato buns. Place the buns cut-side down on a cooler section of the griddle or in a separate pan over medium heat until lightly toasted, about 1 to 2 minutes. Remove and set aside.
- Place two or three beef balls onto the hot, dry cooking surface, leaving space between them.
- Immediately place a piece of parchment paper over a ball. Use a heavy, flat metal spatula or a burger press to firmly smash the meat down until it is very thin (about 1/4 inch thick). Press hard for about 10 seconds to ensure good contact with the hot surface. Remove the parchment paper.
- Cook the patty undisturbed for 90 seconds to 2 minutes until the edges are brown and crispy.
- Scrape under the patty with your spatula to lift it, flipping it over. Immediately place one slice of American cheese on top of each patty.
- Cook for another 30 to 60 seconds until the cheese is fully melted and the patty is cooked through.
- Assemble your best burger recipe: Place two cheesy patties on the bottom half of a toasted bun. Top with pickles, mustard, and ketchup as desired. Place the top bun on and serve immediately.
Notes
- For the best smash burger results, use a high-fat ground beef blend like 80/20. The fat renders out, creating the crispy edges you want.
- Do not press the patties after the initial smash. Pressing again will squeeze out the juices and result in a dry burger.
- If your griddle is not hot enough, the meat will steam instead of sear, preventing the formation of the flavorful crust.
Nutrition
- Serving Size: 1 burger
- Calories: 450
- Sugar: 6
- Sodium: 650
- Fat: 28
- Saturated Fat: 12
- Unsaturated Fat: 16
- Trans Fat: 1
- Carbohydrates: 25
- Fiber: 1
- Protein: 28
- Cholesterol: 90