
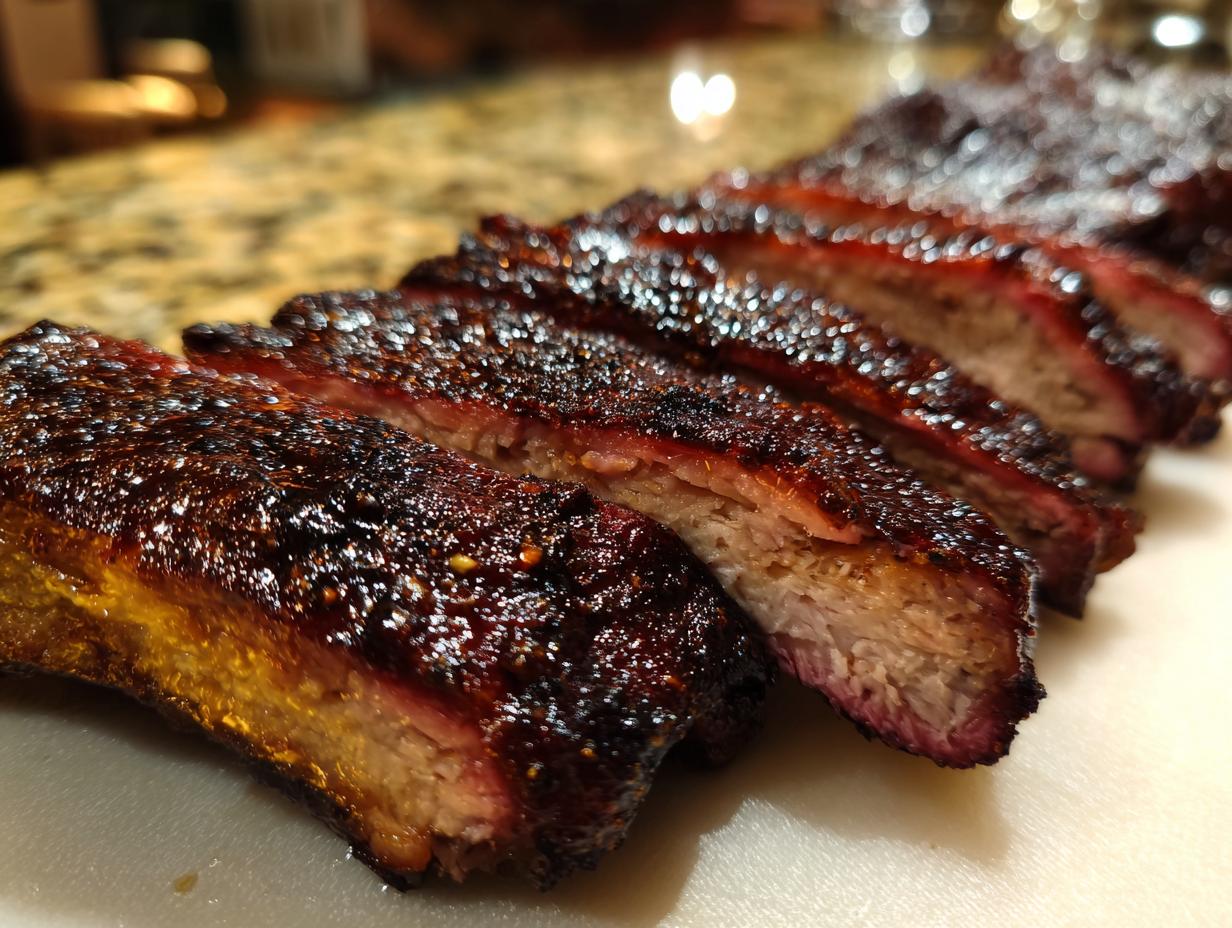
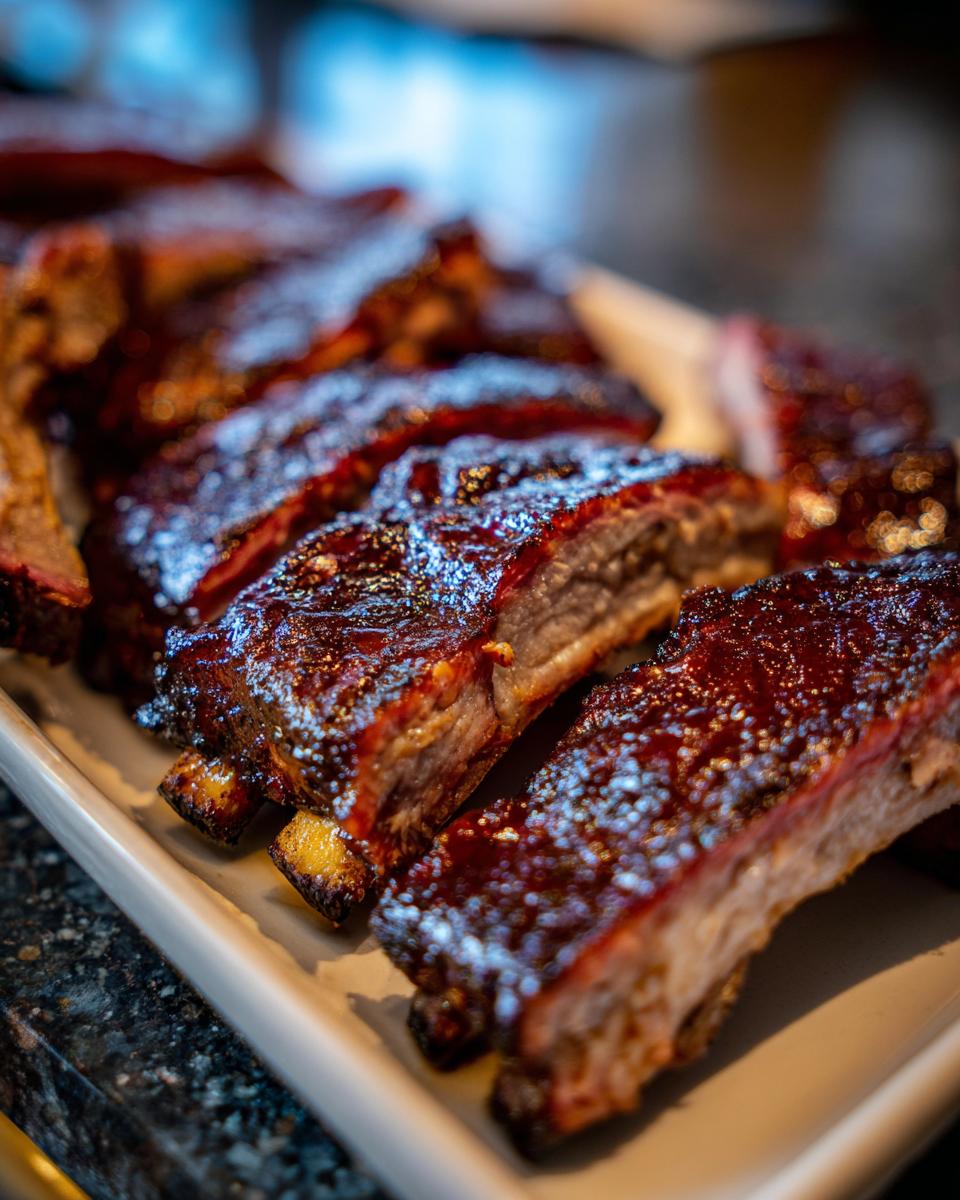
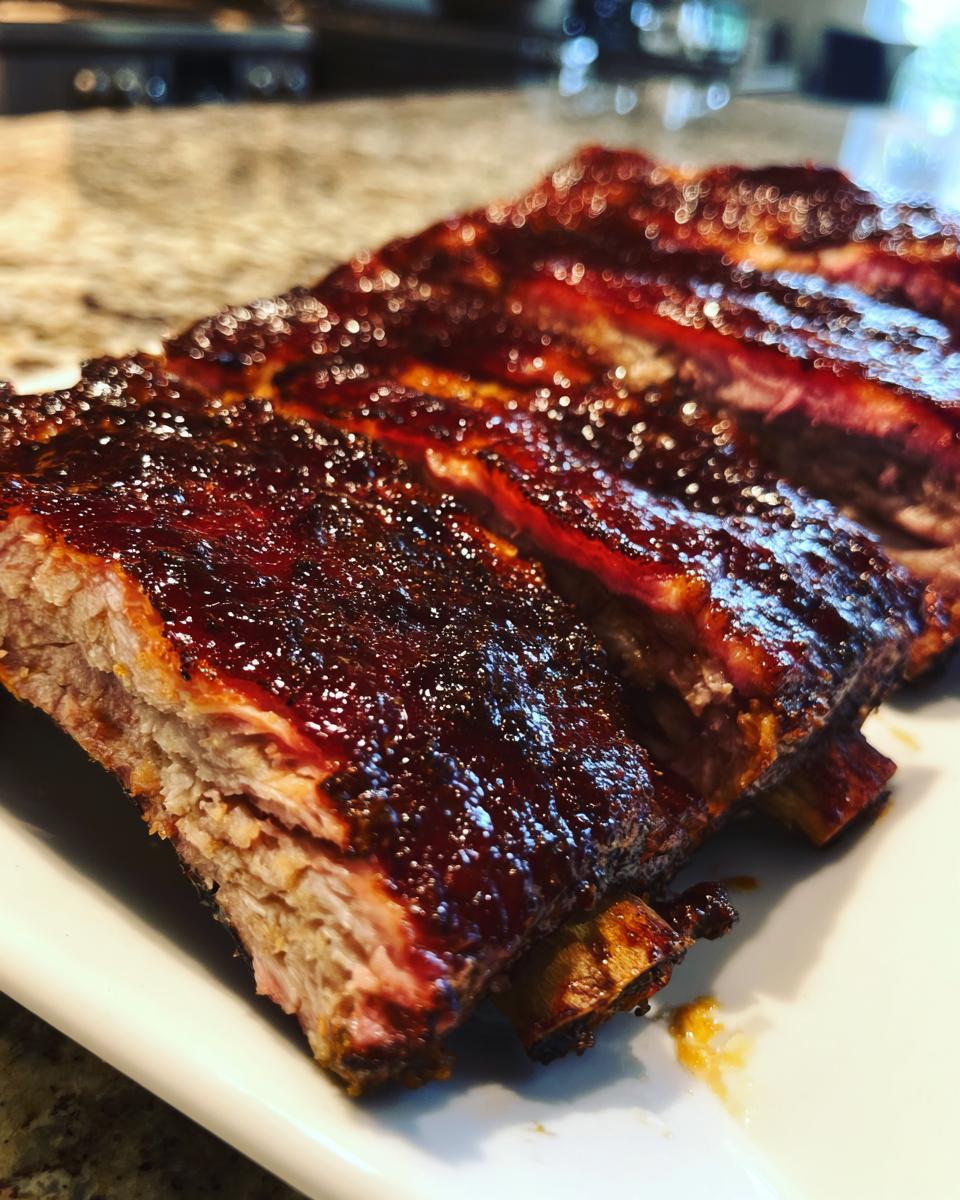
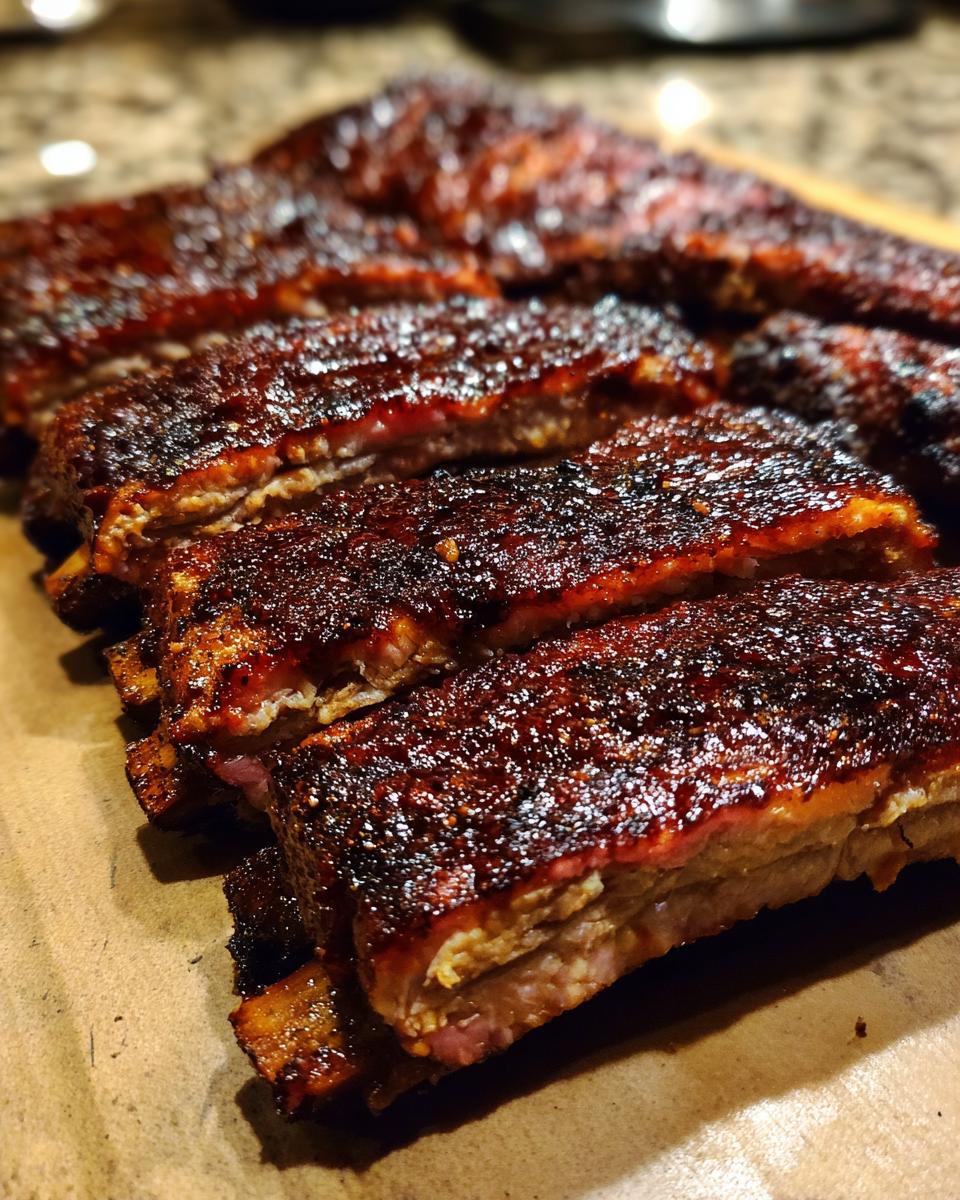
Look, holidays call for big, impressive food. When Memorial Day rolls around, you want something off the grill that makes people stop talking and just stare for a second—you want that iconic centerpiece. I’m talking about Smoky BBQ ribs that practically disintegrate when you look at them, but still have that incredible, glossy char on the outside. I get it; complex grilling recipes can feel intimidating when you’re managing a big group. That’s why I engineered this method. Forget the guesswork; this low and slow approach is about managing time and temperature so you end up with consistently perfect pork ribs. Trust me, after mastering this project, you’ll feel like you’ve unlocked the secret to all holiday grilling.
- Why These Smoky BBQ Ribs Are Your Memorial Day Centerpiece
- Gathering Ingredients for Perfect Smoky BBQ Ribs
- Step-by-Step Instructions for Low and Slow Smoky BBQ Ribs
- Expert Tips for Perfect Smoky BBQ Ribs Every Time
- Making Your Smoky BBQ Ribs the Ultimate Memorial Day Food
- Equipment Needed for These Grilling Recipes
- Storing and Reheating Leftover Smoky BBQ Ribs
- Frequently Asked Questions About Smoky BBQ Ribs
- Share Your Success with These Smoky BBQ Ribs
Why These Smoky BBQ Ribs Are Your Memorial Day Centerpiece
When you’re planning the big memorial day food spread, you need something reliable that screams ‘master of the grill.’ These bbq ribs deliver maximum impact with minimum last-minute stress. I engineered this streamlined, low and slow method because I believe building confidence in the kitchen starts with foolproof, high-reward projects.
- The 5-hour process guarantees that true fall-off-the-bone tenderness, but because we manage the heat, they hold together perfectly for serving.
- That final trip back onto the heat creates the incredible, tacky, glossy char that looks amazing on the platter.
- You get that deep, authentic smoked meat flavor we all chase in our grilling recipes.
If you want your people talking about your pork ribs for weeks, this is the foolproof way to do it. Check out more easy grilling recipes that work every time.
Gathering Ingredients for Perfect Smoky BBQ Ribs
Okay, sticking to the plan means using the right components. For this method, we need three main groups: the beautiful racks themselves, the wet binder, and the dry rub. I always lay everything out first; it keeps the process moving fast once we hit the grill. Having the right mix of smoke and spice is non-negotiable for great bbq ribs.
For the Dry Rub Components
You’ll need 1/4 cup of brown sugar, 2 tablespoons of smoked paprika, 1 tablespoon each of garlic powder, onion powder, kosher salt, and 1 teaspoon of black pepper.
For the Ribs and Binder
Start with 3 racks of pork spare ribs—aim for about 3 lbs each. For the binder that helps everything stick, mix 1 cup of yellow mustard, 1/2 cup of apple cider vinegar, and 1/4 cup of Worcestershire sauce. We’ll also need 1 cup of your favorite final BBQ sauce ready to go for the end.
Step-by-Step Instructions for Low and Slow Smoky BBQ Ribs
This is where the project management comes in—we control the process so the ribs don’t control us! Follow these timings exactly; they are crucial for developing deep smoke flavor before we focus on tenderness. This whole process takes about five hours, so plan your day around the grill, not the other way around.
Preparing and Seasoning the Pork Ribs
First things first, flip those racks bone-side up. You absolutely have to get that thin, papery membrane off the back. Use a paper towel for grip—it makes pulling that off layer so much easier. Once clean, mix up all your dry rub ingredients. Then, lightly coat every surface of the ribs with that mustard/vinegar/Worcestershire binder. Don’t be shy with it! Then, pile on that dry rub generously. Make sure it’s pressed on there. Now, let them sit out on the counter for 30 minutes while you get your smoker ready. That rest time lets the rub start doing its job.
The Initial Smoke Phase for Smoky BBQ Ribs
Set up your grill or smoker for indirect heat; we need a steady environment at 225 degrees Fahrenheit. This low temperature is what builds flavor without drying things out. Place the seasoned ribs directly on the grates, bones down, away from the heat source. Here’s the real test of patience, but stick with it: you must not open the lid for the first 3 hours. Don’t even check! You are trapping all that beautiful smoke in there to deeply season that smoked meat.
Wrapping for Tenderness and Final Glaze
After those three hours, pull the ribs off. Place each rack on a big sheet of heavy-duty aluminum foil and wrap them up tight. Get them back on the 225°F grill for another 2 hours. This wrapping steams them just enough to get that pull-apart tenderness we want. When they come out of the foil, carefully unwrap them—it’ll be steamy! Crank the temp up to 300°F. Brush that favorite BBQ sauce on one side, grill for 15 minutes until tacky, flip, sauce the other side, and grill another 15 minutes until it’s charred and gorgeous. Then, pull them off and let them rest for 10 minutes before slicing.
Expert Tips for Perfect Smoky BBQ Ribs Every Time
You’ve done the hard project management setting up the temperature and timing, but a few small details can truly elevate these bbq ribs from great to legendary. My notes confirmed that wood choice is massive for that authentic flavor. If you can, use hickory or apple wood chunks when you set up your charcoal or gas heat source; that’s where the deep smoke comes from.
Also, don’t stress if you hate mustard! While I use the mustard, vinegar, and Worcestershire mix specifically because it helps that dry rub glue on perfectly, my notes show you can swap the mustard binder out for olive oil if you prefer. The goal is just coating the surface before the rub goes on.
And one more thing for that glossy finish—if you want things extra sweet on your final glaze, stir 2 tablespoons of honey right into the BBQ sauce before you brush it on during those final 30 minutes! It really helps that final char caramelize beautifully. For even more flavor combinations, check out my guide on making easy homemade BBQ sauce.
Making Your Smoky BBQ Ribs the Ultimate Memorial Day Food
Since we’ve wrapped up the tough part—the five hours of slow cooking—now it’s about presentation! These Smoky BBQ ribs absolutely have to be the star of your memorial day food table. The beauty of perfectly cooked pork ribs is that they don’t need much to accompany them; you want your sides to support the meat, not fight it.
Keep things simple and cool. I always pair a big rack of these with a creamy, bright coleslaw—the crunch is an amazing textural contrast to the tender meat. Some classic potato salad and maybe some grilled corn on the cob are perfect neighbors. You don’t want anything too heavy that will weigh people down after all that delicious smoked meat. If you need ideas for things to kick off the party before the main event, check out some easy appetizers and snacks!
Equipment Needed for These Grilling Recipes
Since this is a structured workflow—a project—we need to make sure our tools are ready to go. You don’t need a huge basement full of gadgets for these grilling recipes, but a couple of things are non-negotiable for hitting that 225°F target for over five hours and keeping the mess manageable.
The most important piece is your heat source. You need a reliable smoker or a grill that you can confidently set up for sustained, indirect heat and hold it steady at 225°F. If your equipment can’t hold that temperature safely, you won’t get the right smoke penetration or tenderness.
Next, you absolutely need heavy-duty aluminum foil. I mean the thick stuff. We are wrapping those racks to steam them toward tenderness, and if you use flimsy foil, you’re going to end up with leaks and a huge mess on your grill grates. Finally, while it’s implied, having a reliable meat thermometer is crucial for checking the internal temp during that final phase to ensure your smoked meat is perfect.
Storing and Reheating Leftover Smoky BBQ Ribs
If you actually managed to have any leftovers of these amazing bbq ribs (which I doubt, because they vanish fast!), storage is easy. Once the ribs are completely cool, wrap them tightly, maybe use a double layer of plastic wrap inside an airtight container. They’ll last about three or four days in the fridge, or you can freeze them for up to three months if you’re planning way ahead.
Reheating is the tricky part because we don’t want to lose that great texture we worked five hours to create! You want to introduce moisture back in. Do not just toss them straight on the grill; they’ll seize up fast. My favorite technique is actually using the oven, kind of like a slow bath.
Wrap the cold ribs back up in foil, maybe add a tablespoon of water or broth inside that foil packet before you seal it. Pop them into a 300°F oven for about 25 to 35 minutes until they are heated through. If you want that little sheen back, you can unwrap them for the last 5 minutes and brush on a little more sauce. If you need more ideas for utilizing that leftover smoked flavor, check out how I handle BBQ chicken in the slow cooker!
Frequently Asked Questions About Smoky BBQ Ribs
When you’re diving into long grilling recipes like this, questions always pop up, and that’s totally normal. My goal with these smoked meat projects is that the process feels straightforward, but let’s clear up any last doubts before we fire up the grill.
Can I use a standard oven instead of a grill for these bbq ribs?
Yes, you absolutely can! If the weather isn’t cooperating or you just don’t want to tend the fire, the oven works fine for the low-and-slow phase. Set your oven to 225°F. Follow the exact same timings: 3 hours unwrapped, then 2 hours tightly wrapped in foil. The key thing you miss out on is that wonderful smoky flavor unless you add liquid smoke to your binder. Keep the final sauce-and-char step for the broiler if you want that crust, or just thicken the sauce slightly at 300°F in the oven. For more quick fixes for busy nights, look at my quick and easy dinners collection.
How do I know when the pork ribs are truly fall-off-the-bone tender?
Time is a guide, but feel is the truth! After the 5 total hours of cooking (3 smoke + 2 wrap), the best way to check is the bend test. Pick up a whole rack gently with tongs from the center. If the rack bends deeply, almost folding in half, and the surface meat starts to tear slightly around the bones, you’re there. If it stays stiff, wrap them back up and give them another 30 minutes. You should barely need a knife to get through them!
Share Your Success with These Smoky BBQ Ribs
I am genuinely excited for you to try these Smoky BBQ ribs out for your next gathering. Seriously, executing this low-and-slow project is going to make you look like the king or queen of the grill—especially on the Fourth of July or for a future memorial day food event. Finishing that five-hour process and pulling out perfect, glossy pork ribs is such a high point!
Once you get them sliced and served, don’t just eat them silently! I want to hear how it went. Come back here and tell me what you thought. Did the smoke flavor come through perfectly? Did your guests go back for seconds?
I’d love it if you could give this recipe a rating right here on the page. And if you snapped a picture of those beautiful, charred racks, share it on social media and tag me! Seeing your successful holiday grilling projects is what makes developing these optimized recipes worthwhile. Don’t forget to check out the home page at Dishicious for more simple, effective cooking solutions!
PrintLow and Slow Smoky BBQ Ribs for Memorial Day
Achieve fall-off-the-bone pork ribs with a glossy, charred finish using this straightforward, low and slow grilling method, perfect for your holiday centerpiece.
- Prep Time: 20 min
- Cook Time: 5 hr 30 min
- Total Time: 5 hr 50 min
- Yield: 3 racks 1x
- Category: Main Course
- Method: Smoking/Grilling
- Cuisine: American
- Diet: Low Calorie
Ingredients
- 3 racks pork spare ribs (about 3 lbs each)
- 1 cup yellow mustard
- 1/2 cup apple cider vinegar
- 1/4 cup Worcestershire sauce
- 1/4 cup brown sugar
- 2 tablespoons smoked paprika
- 1 tablespoon garlic powder
- 1 tablespoon onion powder
- 1 tablespoon kosher salt
- 1 teaspoon black pepper
- 1 cup your favorite BBQ sauce
Instructions
- Prepare the ribs: Remove the thin membrane from the back of each rack of ribs using a paper towel to grip it.
- Make the rub: In a small bowl, combine the brown sugar, smoked paprika, garlic powder, onion powder, kosher salt, and black pepper.
- Apply the binder: Lightly coat all sides of the ribs with yellow mustard, apple cider vinegar, and Worcestershire sauce mixture. This acts as a binder.
- Apply the rub: Generously sprinkle the dry rub mixture over all surfaces of the coated ribs. Let the ribs sit at room temperature for 30 minutes.
- Set up your smoker or grill for indirect heat at 225 degrees Fahrenheit. You need a consistent low temperature for this process.
- Smoke the ribs: Place the seasoned ribs directly on the grill grates, bone-side down, away from the direct heat source. Maintain the 225°F temperature.
- Smoke for 3 hours. Do not open the lid during this time to maintain the smoke environment.
- Wrap the ribs: After 3 hours, remove the ribs. Place each rack on a large sheet of heavy-duty aluminum foil. Wrap them tightly.
- Return wrapped ribs to the grill and cook for an additional 2 hours at 225°F. This steams them for tenderness.
- Unwrap and sauce: Carefully unwrap the ribs. Increase the grill temperature to 300 degrees Fahrenheit. Brush the top side of the ribs generously with your favorite BBQ sauce.
- Grill for 15 minutes, then flip and brush the other side with sauce. Grill for another 15 minutes until the sauce is tacky and slightly charred.
- Remove the smoky meat from the grill and let rest for 10 minutes before slicing between the bones.
Notes
- For the best smoke flavor, use hickory or apple wood chunks alongside your charcoal or gas heat source.
- If you prefer a sweeter finish, add 2 tablespoons of honey to your final layer of BBQ sauce.
- You can substitute the mustard binder with olive oil if preferred, but mustard helps the rub adhere well.
Nutrition
- Serving Size: 1 rack section
- Calories: 650
- Sugar: 35
- Sodium: 850
- Fat: 35
- Saturated Fat: 12
- Unsaturated Fat: 23
- Trans Fat: 0
- Carbohydrates: 40
- Fiber: 2
- Protein: 45
- Cholesterol: 150