

When you need that perfect little burst of comfort food that’s crispy on the outside and ridiculously creamy on the inside, you can’t beat a good fried snack. And I’m talking about transforming humble leftovers into something legendary. We’re diving deep into the world of rice balls today, but forget the complicated stuff—we’re focusing on the absolute best, most manageable version: classic Italian Arancini. If you’re looking for a highly flavorful, reliably delicious finger food that fits right into a busy schedule, stick with me. Because here at Dishicious, we streamline complexity, and I promise these stuffed, cheesy **Italian rice balls** are totally achievable for any home cook! Check out all my go-to appetizers and snacks for more inspiration.
- Why You Will Make These Italian Rice Balls Often
- Essential Ingredients for Perfect Rice Balls (Arancini)
- Step-by-Step Instructions to Make Homemade Fried Rice Balls
- Tips for Success with Your Italian Rice Balls
- Variations: Beyond Classic Italian Rice Balls
- Serving Suggestions for These Party Appetizers Rice
- Storage and Reheating Instructions for Crispy Rice Balls Snack
- Frequently Asked Questions About Rice Ball Recipes
- Estimated Nutritional Information for Cheesy Rice Balls
- Estimated Nutritional Information for Cheesy Rice Balls
Why You Will Make These Italian Rice Balls Often
Seriously, these aren’t just any rice balls; they’re my blueprint for converting a boring dinner leftover into an absolute showstopper. You’ll want to make them again and again because they hit every single craving point.
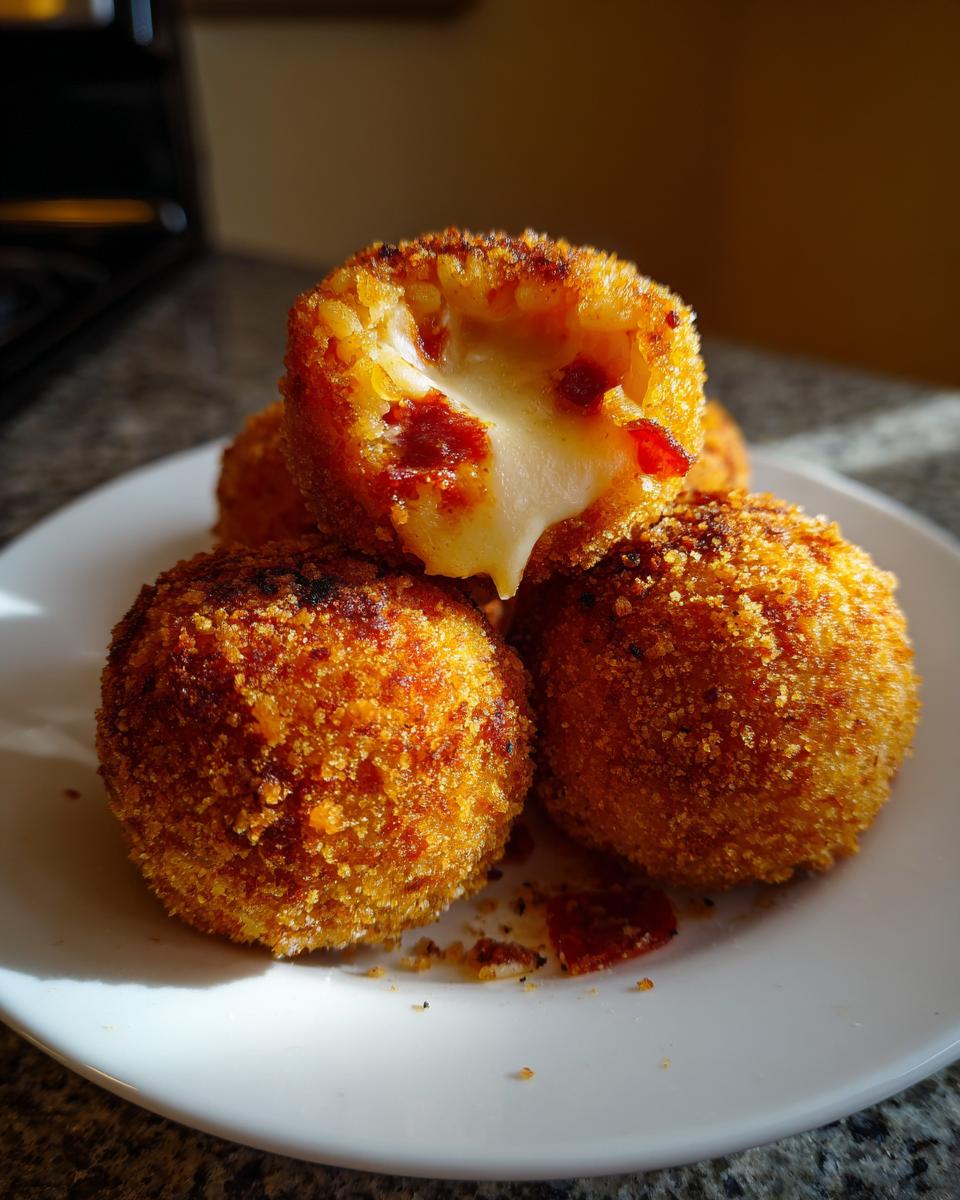
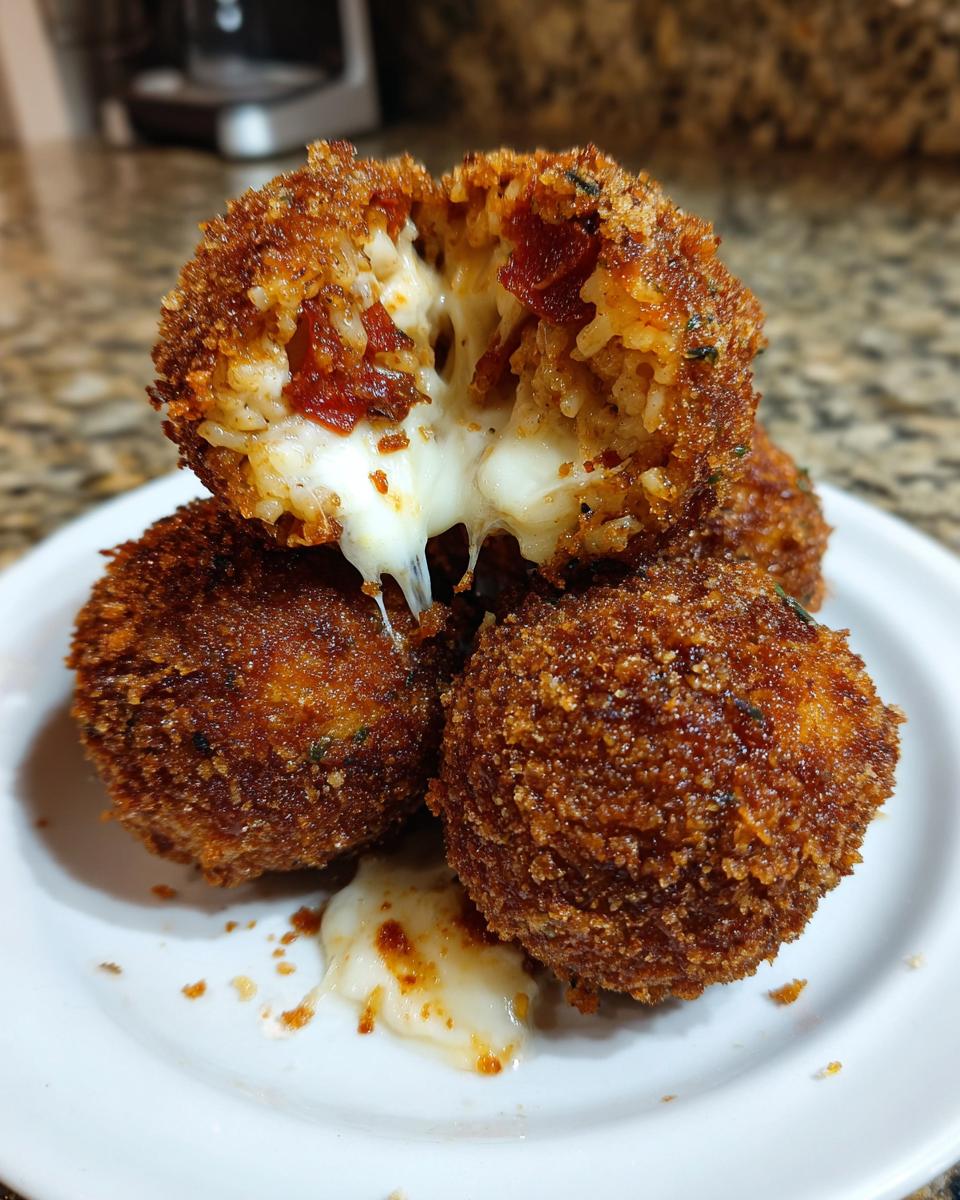
- That perfect texture contrast: That shatteringly crispy Panko exterior gives way to a tender, warm risotto center. It’s what everyone dreams about in a fried snack!
- Gooey Factor: We’re stuffing them with mozzarella, so get ready for that glorious cheese pull when you break one open. Truly the best cheesy rice balls experience.
- Built-in Flavor: Using risotto packed with Parmesan and savory pepperoni means they are bursting with flavor even before dipping them in sauce.
- It’s a Great Use of Leftovers: This recipe shines when you use day-old risotto, making it an incredibly efficient comfort food endeavor.
- Easy Appetizers Rice: They are perfectly portioned, making them ideal for parties, game days, or just a quick, satisfying snack. They are surprisingly easy finger foods once you get the forming down.

Essential Ingredients for Perfect Rice Balls (Arancini)
This is where the strategy comes in, right? You need the right components to get that crispy outside and melty inside without the whole thing turning into a mushy mess. Trust me, using leftovers here actually makes the final result better! I always have my day-old risotto ready for this. If you don’t have risotto, you can check out my guide for making easy, fluffy rice, but risotto truly provides the necessary binding texture.
For the Cheesy Rice Ball Mixture
The base needs to be sturdy yet flavorful. You want the risotto cold so it handles being rolled!
- 3 cups cooked risotto. (I can’t stress this enough—it must be cold, day-old risotto!)
- 1 cup shredded mozzarella cheese—this is your gooey surprise!
- 1/2 cup finely diced pepperoni (or whatever savory filling you choose).
- 1/4 cup grated Parmesan cheese for extra depth.
- 1 large egg, lightly beaten, just to help bind that main mixture together.
For the Crispy Coating and Frying
This three-step dredging station is non-negotiable for proper crispiness. We need structure!
- 1/2 cup all-purpose flour for the initial coat.
- 2 large eggs, beaten well, for the wet layer.
- 1 1/2 cups breadcrumbs—please, if you have them, use Panko! They make the best crispy rice balls snack.
- Vegetable oil, or another high smoke point oil, enough to safely fill your pot for frying.
Step-by-Step Instructions to Make Homemade Fried Rice Balls
Okay, we have our incredible ingredients ready to go. This is where the project management side of my brain loves things—it’s assembly, and assembly is straightforward if you follow the sequence! We are going to move with purpose, but gently, so we don’t squish all the air out of that lovely risotto. If you want to see how I handle breading for another crispy treat, check out my guide for crispy fried shrimp; the dredging technique is the same!
Mixing the Base and Preparing the Filling
First things first, grab your biggest bowl. Gently fold together your cold risotto, the main portion of your mozzarella, the diced pepperoni, the Parmesan cheese, and that single beaten egg. You want to combine everything until uniformity is *just* reached. Don’t go wild stirring! If you overmix, you crush the rice grains, and the final texture won’t work as well. We want it cohesive, not paste-like.
Forming and Coating the Stuffed Rice Balls
Set up your stations: flour first, then the two beaten eggs, and finally those glorious breadcrumbs. Now, take about two tablespoons of your risotto mix and flatten it right onto your palm. This is the crucial part: take a small cube of the reserved mozzarella—this is the surprise inside—and place it dead center in the flattened rice. Now, cup your hand around it and carefully, gently, roll it into a smooth ball, maybe 1.5 inches wide. Make sure that mozzarella is totally sealed inside, or things get messy during frying!
Achieving the Crispy Rice Balls Snack Texture
Once sealed, it’s dredging time. Roll the ball first in the flour, give it a good shake, dip it into the egg wash, and then roll it completely in the Panko breadcrumbs. Press those crumbs on lightly so they stick tight. Next, heat your oil in a sturdy pot or Dutch oven until it hits 350°F (175°C). Working in small batches—seriously, don’t crowd the pot—carefully lower your rice balls into the hot oil. Fry them for about 4 to 6 minutes, turning them now and then, until they are deep golden brown. Scoop them out onto paper towels immediately to drain. For authenticity, you can peek at how other chefs handle this step over at Cooking Heavenly.
Tips for Success with Your Italian Rice Balls
Making these Italian rice balls (Arancini) is all about having a solid game plan—just like any good project! If you skip the small prep steps, you risk everything turning into a soupy, greasy mess. We want that perfect crispness, so listen up for the keys to reliably awesome results. For example, if you’re looking for another reliable dish you can prep easier, check out my thoughts on easy chicken pot casserole, which shares that make-ahead quality.
First up: the risotto. I keep saying it, but I mean it: day-old risotto is non-negotiable. Fresh risotto is too wet and sticky; it won’t hold its shape when you try to form the ball around the cheese. When the risotto has been chilled overnight, the starches firm up, giving you the stability you need to create a tight package. This prevents heartbreak when they hit the hot oil!
Second critical point is that oil temperature! You *must* maintain 350°F (175°C). If the oil is too cool, the rice balls will soak up grease and become heavy and soggy—the opposite of what we want for a crispy rice balls snack. If it’s too hot, the outside burns long before that hidden mozzarella center gets a chance to melt. Use a thermometer if you have one; it’s the difference between success and a disappointing mess.
Now, what if you are just totally against deep frying? I get it, it can be messy! For a fantastic lighter version, you can definitely make these Baked Rice Balls Alternative. You simply spray your fully breaded rice balls lightly with some cooking spray or olive oil and bake them on a rack over a sheet pan at 400°F (200°C) for about 15 to 20 minutes, flipping them halfway through. They won’t get quite the same blast of crunch as the fried ones, but they are still wonderfully satisfying. You can find another great baked take on the idea by seeing how others approach the oven method over at Food Travelist.

Oh, and one last quick thing: when you’re sealing in that center filling, make sure it’s fully coated. Give the initial layer of risotto a gentle squeeze to make sure there are no cracks before you dredge it. A tight seal means the cheese steams inside without leaking out and causing your dredging layers to slide off in the fryer!
Variations: Beyond Classic Italian Rice Balls
So, while these cheesy Italian rice balls, or Arancini, are my absolute favorite comfort food dish, the concept of delicious, compact rice balls isn’t just an Italian thing! The world is full of amazing variations, and once you master the basic rolling technique, you can pivot to almost any style of savory rice ball filling or preparation you might be craving that day.
If you’re looking for lighter fare or trying to use up different pantry staples, switching things up is super fun. For instance, if you happen to have leftover tuna that needs using up, check out how I handle that ingredient in my easy tuna casserole recipe—you could easily adapt that vibe into a simpler, non-fried rice ball!
Asian Rice Ball Ideas: Onigiri Style
If you want to swap coasts entirely, you’re looking at Japanese Onigiri. This is a totally different world of rice balls, usually built around short-grain starchy sushi rice rather than creamy risotto. They are rarely fried; instead, they are often pressed into triangles or balls and sometimes brushed with soy sauce and grilled, yielding that fantastic Yaki Onigiri crust.
The fillings are simpler too, often involving pickled plum, seasoned salmon flakes, or even that popular tuna mayo. If you try making them, you usually skip the heavy breading and might wrap the bottom edge in a small sheet of nori (seaweed) for stability and flavor. It’s a completely different, but equally satisfying, experience in the realm of handheld rice snacks!
Making Baked Rice Balls Alternative
I know sometimes you just don’t want to deal with frying. Dealing with hot oil definitely slows down my project timeline at home! That’s why I always keep the oven method on hand for anyone who wants a healthier spin on this appetizer. This is your go-to option if you want less oil but still crave that crunchy exterior.
Remember what I said earlier? You follow the entire recipe through the dredging step—flour, egg, Panko—to get that nice outer coating, but instead of deep-frying, you place the prepped rice balls onto a rack set over a baking sheet. You need to give them a quick, generous spritz with cooking spray or brush them lightly with olive oil. Then, bake them hot at 400°F (200°C) for about 15 to 20 minutes. Make sure you flip them about halfway through so both sides get nice and golden brown. They steam up a little differently than the fried ones, but they are totally worth it, and they are excellent candidates for meal prep!
Serving Suggestions for These Party Appetizers Rice
The marinara sauce is traditional, yes, and it works perfectly for dipping these crispy rice balls! But don’t stop there if you’re trying to impress your guests. Since we made these Italian rice balls so savory with pepperoni and Parmesan, they pair beautifully with creamy dips too. Seriously, try serving some alongside a batch of my rich caramelized onion dip—the cool creaminess against the hot, crunchy ball is amazing.
If you’re serving them as an easy appetizer at a gathering, just piling them high on a platter with small forks or toothpicks is the key. They are designed to be wonderful quick finger foods that disappear fast!
Storage and Reheating Instructions for Crispy Rice Balls Snack
Look, I know these homemade fried rice balls are so good you’ll probably eat them all in one sitting, but maybe, just maybe, you have a few leftovers. Don’t stress about saving them! The biggest challenge with any fried food is bringing back that original crunch the next day, but we can absolutely solve that puzzle through good project management.
For short-term storage, let them cool down completely on the wire rack first. Once cooled, you can store them in a single layer in an airtight container in the fridge for up to three days. If you layer them, they tend to stick together or sweat themselves soggy, and nobody wants a soft rice ball!
Now for the reheat—and this is where we avoid the microwave at all costs! Microwaving turns the moist interior into mush and makes the crust chewy. We need dry, high heat to pull that moisture back out of the Panko. Your best bet is the oven or, even better, an air fryer, which is amazing for refreshing almost any crispy snack. If you’ve ever tried my crispy air fryer chicken wings guide, you already know how powerful that machine is for bringing back that shatter!
To reheat in the oven, spread your leftover rice balls out on a baking sheet (don’t overlap them!) and pop them in at 375°F (190°C) for about 8 to 10 minutes until they are sizzling hot throughout and crunchy again. If you use an air fryer, 360°F (180°C) for about 5 minutes does the trick much faster! This method instantly restores that satisfying texture we worked hard to achieve in the first place.
Frequently Asked Questions About Rice Ball Recipes
Whenever I finish a recipe, I always have a few lingering thoughts about troubleshooting or swapping ingredients, and I bet you do too! Let’s quickly run through some common questions I get about making these amazing Italian rice balls and other versions. If you need something super fast for tonight, remember my guide on quick and easy dinners!
Can I make the risotto mixture for these rice balls ahead of time?
Oh yes, you absolutely should! In fact, the risotto mixture needs to chill for the best results. Making the risotto one day and then assembling the rice balls the next is the perfect workflow. The chilling process lets the starches firm up and fully absorb the liquid. If you try to form warm or room-temperature risotto, it’s going to be way too soft, and those precious mozzarella centers will just fall right out. Make sure the mixture is chilled for at least four hours, but honestly, overnight is better!
What is the best oil to use for frying these homemade fried rice balls?
When you’re deep-frying anything, especially something you want to turn into a perfect crispy rice balls snack, you need an oil with a high smoke point to keep things safe and crunchy. I strongly recommend using standard vegetable oil or canola oil. They are neutral in flavor and stand up beautifully to the 350°F temperature we need. Avoid olive oil unless it’s a refined or light one; the smoke point on pure extra virgin olive oil is too low and it breaks down too fast, which is not ideal for getting those gorgeous golden-brown surfaces on your cheesy rice balls.
Can I use regular breadcrumbs instead of Panko for my stuffed rice balls?
You can, but you’ll notice a difference! Panko breadcrumbs are Japanese-style flakes; they are lighter, airier, and create a significantly crispier, more open crust. That crunch texture is honestly what makes Italian rice balls so addictive. If you only have regular fine breadcrumbs, they will still work—you just might need to double-dip them in the egg wash to make sure they adhere well. However, if you want that satisfying crunch so they qualify as a great Italian savory rice ball filling appetizer, try to snag some Panko!
Estimated Nutritional Information for Cheesy Rice Balls
Since our recipe includes pepperoni and cheese, these are definitely more on the indulgent side, but they are fantastic party appetizers! Please keep in mind these numbers are just estimates based on the proportions listed in the recipe above, using standard ingredients and portion sizing (it assumes 2 balls per serving). As with any fried comfort food dish, the fat content is higher, but the reward is huge!
- Calories: Approximately 320 per serving (2 balls)
- Fat: Around 18g (with 8g saturated)
- Carbohydrates: About 28g
- Protein: Roughly 12g
Don’t sweat the small stuff, though—these are meant to be savored!
PrintUltimate Cheesy Italian Arancini Rice Balls

Make crispy fried risotto balls stuffed with gooey mozzarella and savory pepperoni. These Italian rice balls are perfect as a party appetizer or comfort food snack.
- Prep Time: 25 min
- Cook Time: 20 min
- Total Time: 45 min
- Yield: 12 servings 1x
- Category: Appetizer
- Method: Frying
- Cuisine: Italian
- Diet: Vegetarian
Ingredients
- 3 cups cooked risotto (day-old works best)
- 1 cup shredded mozzarella cheese
- 1/2 cup finely diced pepperoni
- 1/4 cup grated Parmesan cheese
- 1 large egg, beaten
- 1/2 cup all-purpose flour
- 2 large eggs, beaten (for dredging)
- 1 1/2 cups breadcrumbs (Panko recommended)
- Vegetable oil, for frying
- Marinara sauce, for serving
Instructions
- In a large bowl, gently combine the cooked risotto, mozzarella cheese, diced pepperoni, Parmesan cheese, and the first beaten egg. Mix until just combined; avoid overmixing.
- Place the flour, the second set of beaten eggs, and breadcrumbs into three separate shallow dishes.
- Take about 2 tablespoons of the risotto mixture and flatten it in your palm. Place a small cube of mozzarella in the center, then carefully form the mixture around the cheese to create a tight ball, about 1.5 inches in diameter.
- Dredge each rice ball first in the flour, shaking off excess.
- Dip the floured ball into the beaten egg mixture, allowing excess to drip off.
- Roll the ball thoroughly in the breadcrumbs until completely coated. Press lightly to ensure the crumbs adhere.
- Heat about 2 inches of vegetable oil in a deep pot or Dutch oven to 350°F (175°C).
- Carefully fry the rice balls in batches, turning occasionally, until they are deep golden brown and crispy, about 4 to 6 minutes. Do not overcrowd the pot.
- Remove the fried arancini with a slotted spoon and place them on a wire rack lined with paper towels to drain excess oil.
- Serve the crispy rice balls hot with marinara sauce for dipping.
Notes
- For a baked alternative, spray the breaded rice balls lightly with cooking spray and bake at 400°F (200°C) for 15-20 minutes, flipping halfway, until golden.
- Use leftover risotto for the best texture in your homemade fried rice balls.
- You can substitute the pepperoni with cooked ground meat or ham for a different savory filling.
Nutrition
- Serving Size: 2 balls
- Calories: 320
- Sugar: 2
- Sodium: 550
- Fat: 18
- Saturated Fat: 8
- Unsaturated Fat: 10
- Trans Fat: 0
- Carbohydrates: 28
- Fiber: 1
- Protein: 12
- Cholesterol: 75