
When the weather heats up or you just desperately need a dessert that screams ‘refreshing’ but screams ‘easy’ even louder, you gotta pull out a no-bake recipe. And trust me, nothing fits that bill better than the Classic Creamy No-Bake Grasshopper Pie we have here! It’s got that crunchy Oreo crust and that impossibly cool, minty filling. This is the kind of dessert that really proves the point our founder Leo Grant talks about over on the About page—that good food shouldn’t be complicated! It truly delivers on that ‘Simply Delicious’ promise. If you are looking for the ultimate quick fix, this simple grasshopper pie recipe is your ticket.
- Why This No Bake Grasshopper Pie Is Your New Favorite Dessert
- Gathering Ingredients for Your Grasshopper Pie
- Step-by-Step Instructions for No Bake Grasshopper Pie
- Tips for the Best Creamy Grasshopper Dessert
- Make Ahead Dessert Ideas for Your Grasshopper Pie
- Serving Suggestions for This Refreshing Mint Chocolate Treat
- Frequently Asked Questions About Grasshopper Pie
- Understanding the Nutrition in a Slice of Grasshopper Pie
- Share Your Experience Making This Classic Chocolate Mint Pie
Why This No Bake Grasshopper Pie Is Your New Favorite Dessert
Honestly, friends, this pie is a showstopper without any of the oven drama. If you’re like me, sometimes you just can’t face turning the stove on once the sun gets too bright. This recipe is the definition of efficiency, which is exactly what Dishicious is all about!
Zero Oven Time for Ultimate Ease
This is one of the best No Oven Desserts you will ever make. Seriously. You mix, you press, you chill. That’s it! That means less cleanup and more time spent enjoying that irresistible no bake grasshopper pie flavor. It’s perfect for those last-minute potlucks or when you need a Quick Cream Pie Recipe ready to go.
- It sets itself in the fridge—no babysitting necessary!
- It’s the ultimate Refreshing Mint Chocolate Treat for summer holidays.
Perfectly Creamy Grasshopper Dessert Texture
We nail that amazing mouthfeel using two key players: softened cream cheese and whipped topping. When you beat them just right, you get a filling that is unbelievably luscious. If you loved the vibe of a cheesecake but wanted something lighter, this is it. It’s so light and airy, yet deeply satisfying.
- The texture is always velvety, never icy, making it the ultimate Creamy Grasshopper Dessert experience.
- It’s also a fantastic Easy Mint Chocolate Pie because the base ingredients are so easy to source!
Gathering Ingredients for Your Grasshopper Pie
Okay, let’s talk about the fun part: the ingredients list! The success of any No Bake Grasshopper Pie really hinges on making sure everything is prepped just right. Remember, since we aren’t baking, there’s no fixing texture issues later, so pay attention to how things should be prepared. This is where The Dishicious philosophy kicks in—using accessible items to get maximum flavor payoff. You want this to be impressive, right? For tips on other great dips that use simple spreads, check out my notes on creamy caramelized onion dip!
For the Oreo Crust Mint Pie Base
The crust needs to be solid, people! A loose crust means a messy slice, and we aren’t having that. You need about 30 full Oreo cookies—pushed down until they are fine crumbs, not chunky bits. Then we mix that with just 6 tablespoons of melted butter. We want it moist enough to stick together like wet sand, but not soaking in butter.
- 1 1/2 cups chocolate cookie crumbs (needs to be about 30 Oreos, crushed finely!)
- 6 tablespoons unsalted butter, completely melted
For the Filling and Topping of the Grasshopper Pie
This is where the magic green color and mint flavor come in. Make sure your cream cheese is truly soft—no shortcuts here, or you’ll get lumps! If you are going the boozy route, use the liqueur. If you need to skip the alcohol, my secret is 1/4 cup of good mint extract and adding 1/4 cup of milk. A couple of drops of green coloring makes it look exactly like the classic, but it’s totally optional!
- 1 (8 ounce) block cream cheese, softened
- 1 cup powdered sugar
- 1 (12 ounce) container thawed whipped topping (like Cool Whip)
- 1/2 cup crème de menthe liqueur (or the mint extract/milk swap)
- 1/4 cup Regular Milk
- 1 teaspoon vanilla extract
- Green food coloring (just a drop or two if you like the color!)
- For topping: 1 cup heavy cream, whipped, and chocolate shavings.
Step-by-Step Instructions for No Bake Grasshopper Pie
Following the right order here is key to that perfect set. If you’re looking for ways to speed up your weeknight routine, remember that prepping a dessert like this means you’ve already got something ready to go later! Check out my guide to quick, easy dinners if you need more efficient cooking ideas!
Creating the Chocolate Cookie Crust
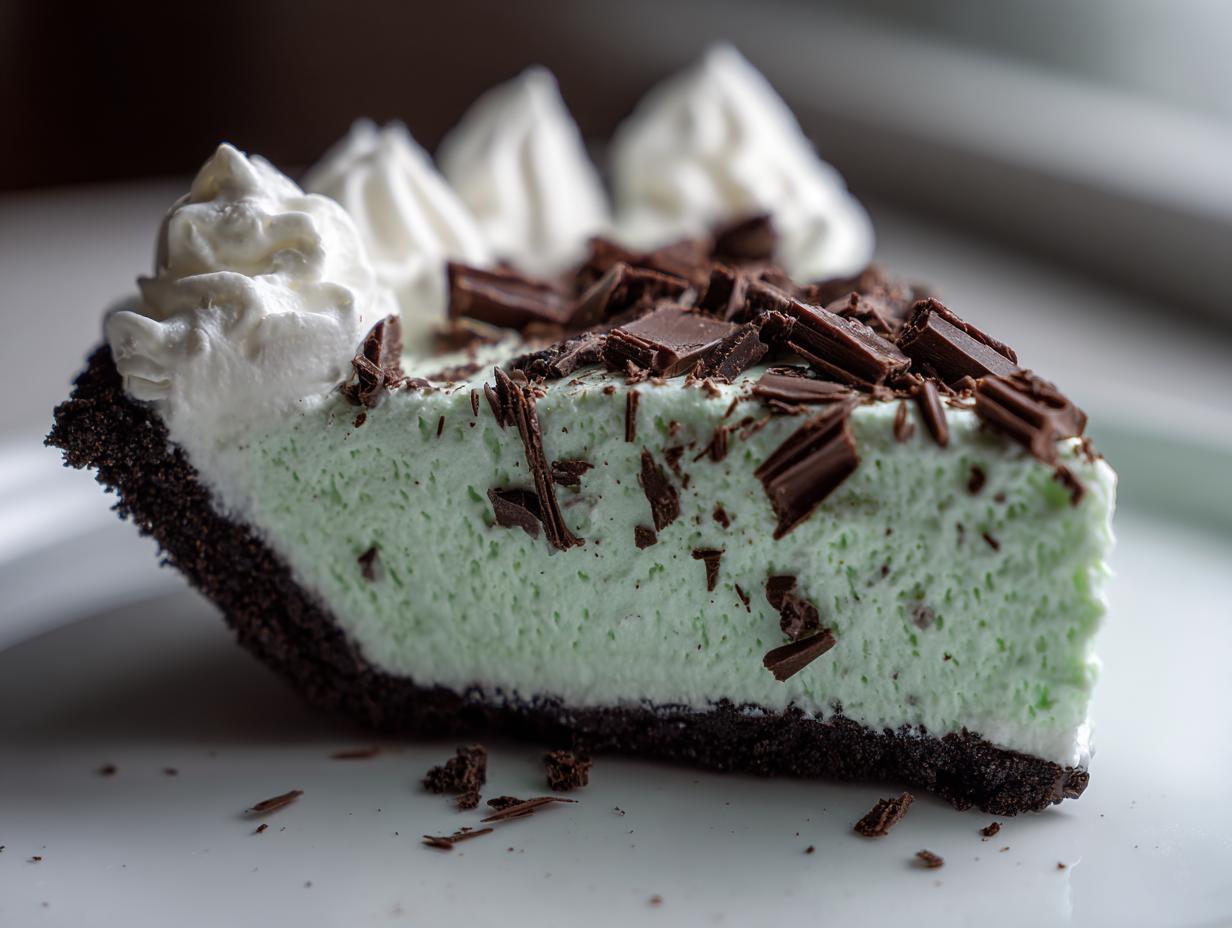
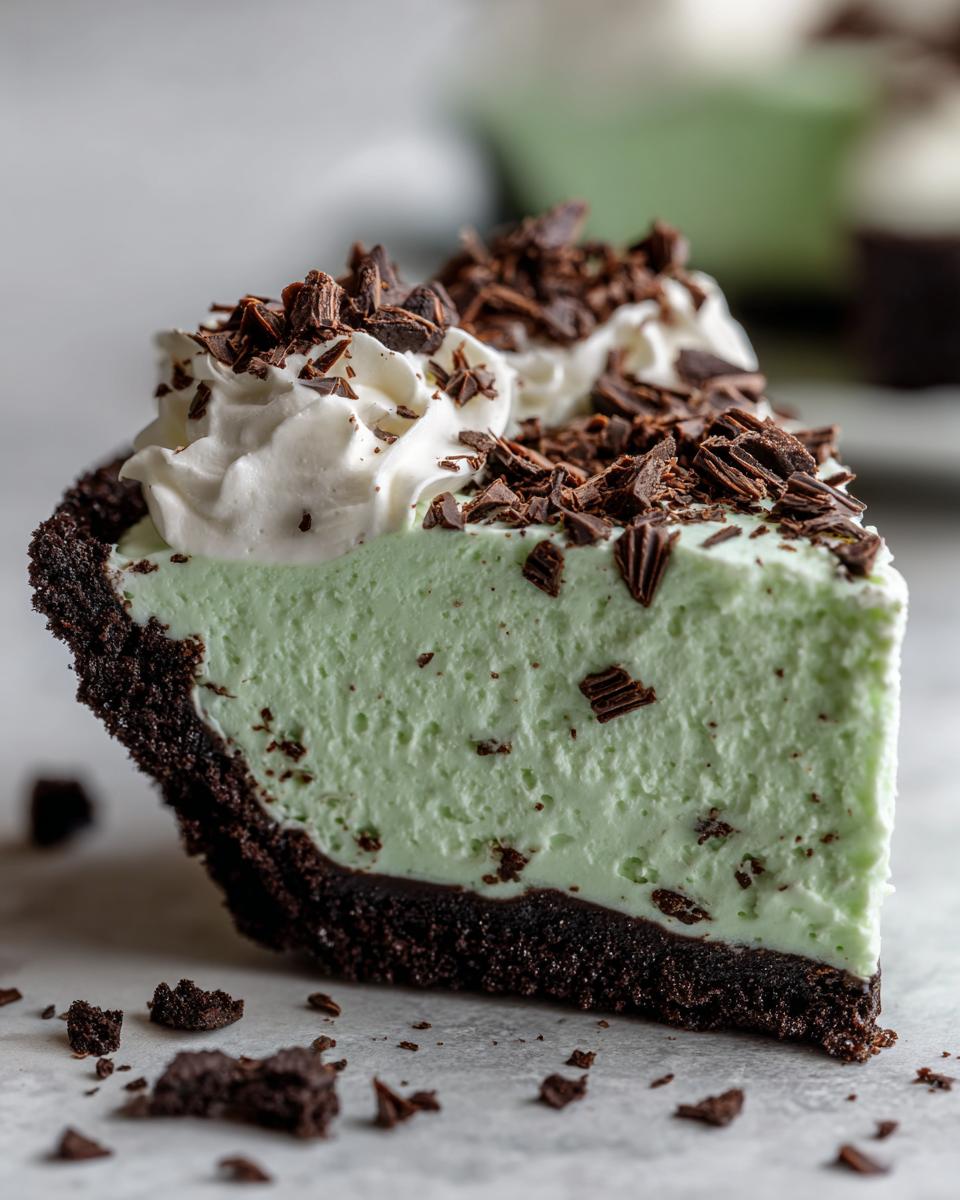
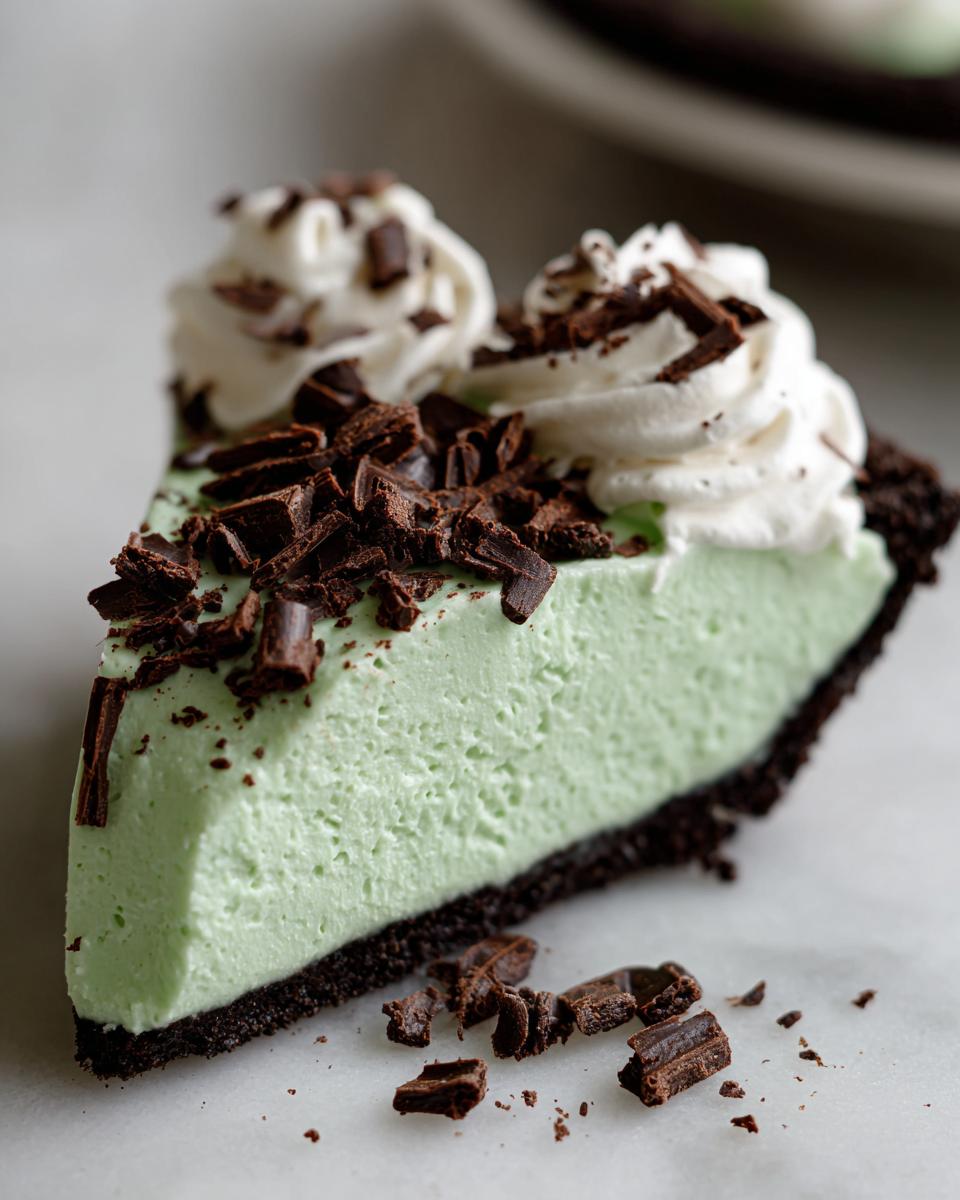
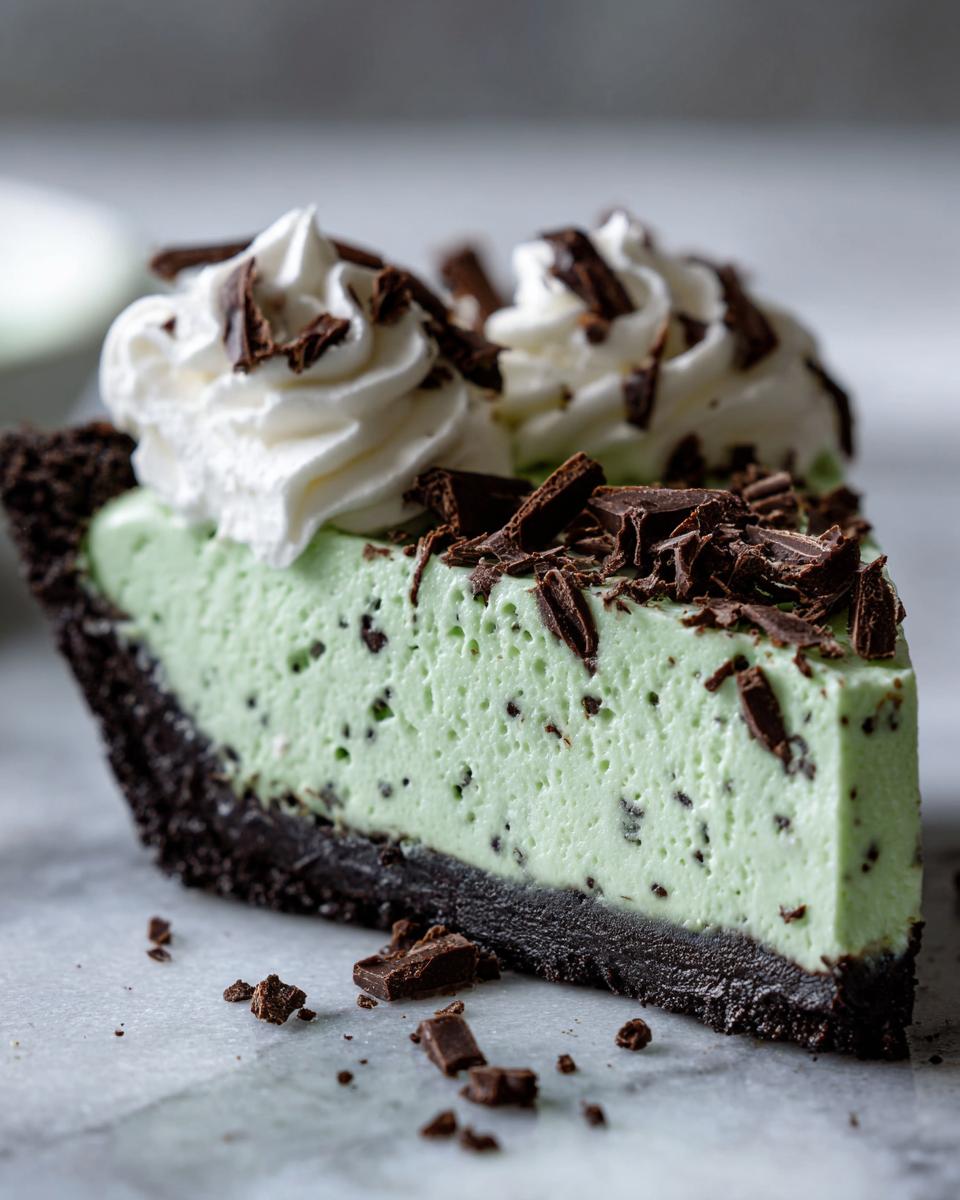
First things first, get that crust sorted. Mix your chocolate cookie crumbs and that melted butter until everything is evenly damp—it should look like soil ready for planting. Press this mixture firmly into your 9-inch pie plate. I use the bottom of a measuring cup to really pack it tight around the base and up the sides. We want this to be a super sturdy Oreo Crust Mint Pie base. Pop that plate straight into the freezer. It needs to firm up while you whip up the filling!
Mixing the Creamy Mint Chocolate Filling
Now for the good stuff! Grab your biggest bowl. You must beat the softened cream cheese and powdered sugar until it’s totally smooth first. I mean, completely velvety. Then, slowly beat in your liquids—that sweet crème de menthe (or your mint/milk combo) and the vanilla. Mix until it just comes together. The final, delicate step is folding in that thawed whipped topping. Gently fold it in until you don’t see any more white streaks. Seriously, don’t overmix it, or you’ll knock all the air right out!
Chilling and Garnishing Your Grasshopper Pie
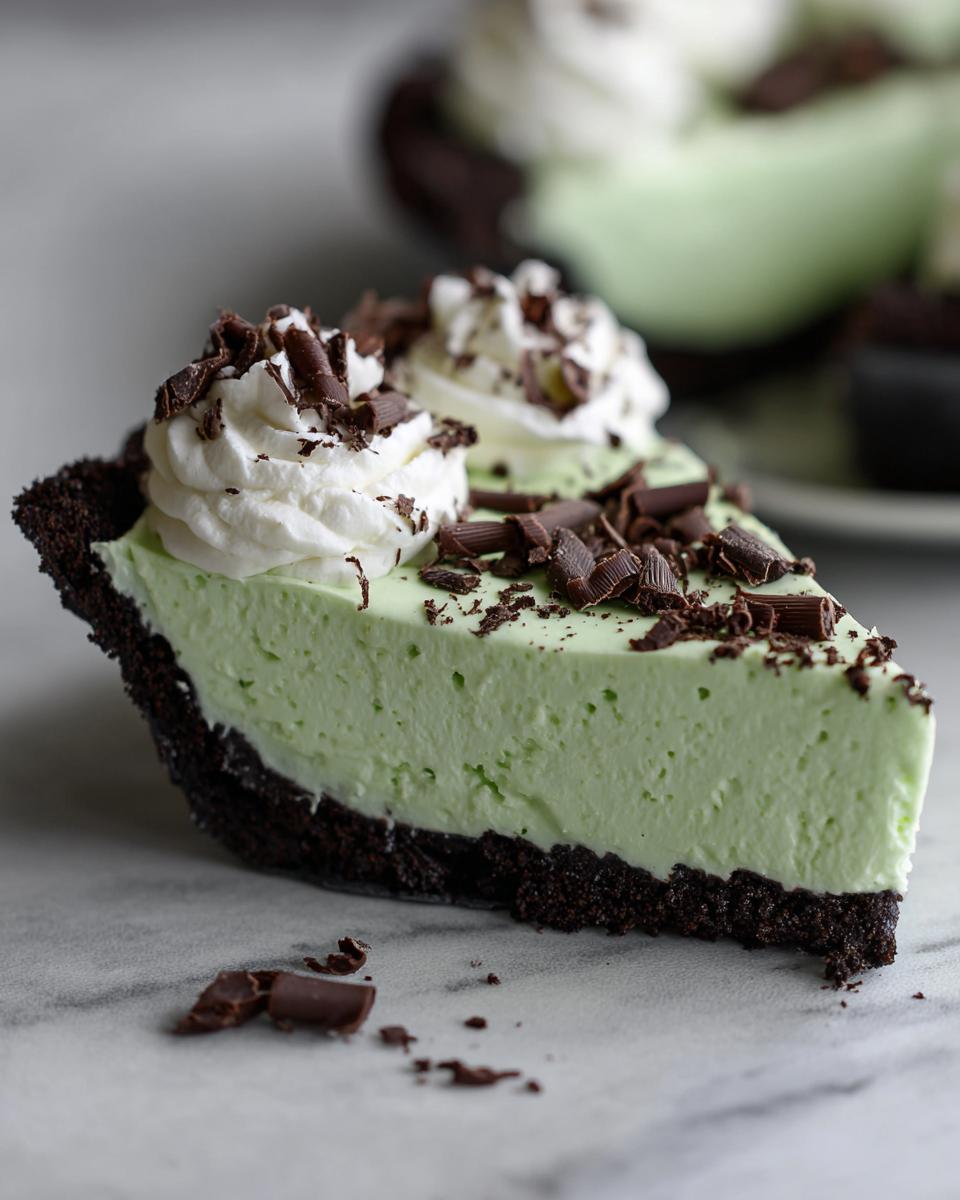
Once the filling is blended, pour it right into that chilled crust and smooth the top with a spatula. Now comes the waiting game, but it’s the easy part! This No Bake Grasshopper Pie needs at least four hours in the fridge to fully set up to that creamy texture we want. If you’re in a rush, you can freeze it for about two to three hours instead. Right before serving, dollop on that freshly whipped heavy cream and sprinkle generously with chocolate shavings. It looks so fancy, but we know how easy it was!
Tips for the Best Creamy Grasshopper Dessert
When you’re making a Quick Cream Pie Recipe like this, a few little tweaks can take it from good to absolutely legendary. Since everything relies on the balance of flavor and texture, I always follow these small rules. We aren’t trying to reinvent the wheel here, just making sure our Creamy Grasshopper Dessert is perfect every single time!
Achieving the Ideal Mint Flavor in Your Grasshopper Pie
If you use the crème de menthe liqueur, you get that classic, slightly boozy depth that pairs so well with the chocolate crumbs. If you skip it, don’t just dump in mint extract, please! Extract is potent, so start small. I always recommend using just a tiny bit to start, tasting the filling with a clean spoon, and adding drops until you hit that perfect sweet spot. For color, you can try mixing a pinch of matcha powder with the cream cheese for a natural green, but honestly, one or two drops of standard green food coloring does the job quickly and reliably, which is very much in line with our philosophy here!
Texture Control: Creamy vs. Frozen Mint Chocolate Treat
This is where you tell the pie who’s boss! If you chill it for the minimum four hours, you get that beautiful, soft, scoopable texture—the ultimate creamy experience. But if you need a really firm slice, pop it in the freezer for about 2 to 3 hours instead. That turns it into a wonderfully solid Simple Frozen Mint Dessert. Just remember, if you freeze it, let it sit on the counter for about ten minutes before slicing so it doesn’t shatter when you cut it!
Oh, and one more note from the recipe card (I’ve included a similar trick for our chewy cookies): If you want a deeper flavor profile that really sings, try beating in a quarter cup of unsweetened cocoa powder right along with the powdered sugar and cream cheese. It balances the sweetness and makes the chocolate in the crust feel even richer.
Make Ahead Dessert Ideas for Your Grasshopper Pie
This is honestly one of the biggest selling points for me when I grab this recipe! It falls perfectly into my category of Easy Make Ahead Dessert Ideas. You simply cannot beat having a gorgeous dessert ready to go when company shows up or when you realize you forgot about dessert for Tuesday night.
Because the base of this pie relies heavily on that stable, thawed whipped topping structure, it holds up like a champ in the fridge. You absolutely want to make this the day before you plan to serve it. That four-hour minimum chill time is truly the sweet spot. If you make it the night before serving, that filling firms up magnificently, giving you those clean, gorgeous slices.
If you are prepping for a big weekend event, go ahead and make the whole Cool Whip Mint Pie assembly on Friday! It keeps beautifully, covered tightly but loosely with plastic wrap, in the refrigerator for up to three days. You absolutely want to make this the day before you plan to serve it. That four-hour minimum chill time is truly the sweet spot. If you make it the night before serving, that filling firms up magnificently, giving you those clean, gorgeous slices. Just wait until the very last minute to put on that gorgeous whipped cream topping and the chocolate shavings. If you put the topping on too early, it can start to weep or get a little watery.
If you decide to freeze it solid, you can keep it for longer, maybe a week or two, but remember that texture changes. For the absolute Easy Mint Chocolate Pie consistency—creamy, lush, and perfect—refrigeration is where it shines. For more ways to save time during busy weeks, you should check out my recipe for make-ahead egg muffins!
Serving Suggestions for This Refreshing Mint Chocolate Treat
When you bring this beauty out to the table, you want it to look as good as it tastes! This is definitely a showstopper Potluck Dessert Recipe because it just looks so festive and perfectly green. The combination of that dark, crunchy Oreo crust against the bright, creamy filling is already half the battle won.
For serving, I always like to keep things simple but elegant. We already topped it with fresh whipped cream and chocolate shavings, which is honestly perfect on its own. But if you want to go the extra mile—and since you didn’t have to use your oven, give yourself a little extra flourish!
- Drizzle! A light zig-zag of homemade chocolate sauce over the top right before cutting elevates this immediately. If you need a quick recipe for that, I’ve got you covered with my favorite simple chocolate sauce recipe.
- Pairing: Mint and coffee are natural friends, so serve slices alongside freshly brewed hot coffee—the bitterness cuts through the sweetness perfectly.
- For an extra cool bite, serve each slice on a tiny bed of crushed, extra-dark chocolate cookie crumbs. It just makes the presentation pop!
When you’re heading out the door to a gathering, this pie travels well in the pan, just make sure the topping is added after you arrive. It’s the perfect, cool finish to any heavy meal.
Frequently Asked Questions About Grasshopper Pie
Whenever I share this recipe, I get a flood of questions, which is great because it means everyone wants to make this Best No Bake Pie Recipe! Here are the things folks ask me most often about getting that perfect slice.
Can I make this Grasshopper Pie without alcohol?
Absolutely, you totally can! Lots of people need a non-alcoholic version, and it turns out great. If you skip the crème de menthe liqueur, just use 1/4 cup of actual mint extract mixed with 1/4 cup of regular milk. The flavor is still super bright and minty. You might need an extra drop of green food coloring if you are going for that vibrant look of a classic Crème de Menthe Pie, but the flavor payoff is exactly what you want.
What is the best way to store leftovers of this Easy Mint Chocolate Pie?
Storing this pie is easy breezy because we didn’t bake it! For texture control, refrigeration is your best friend here. Cover the pie loosely with plastic wrap and keep it in the fridge for up to three days. It stays perfectly creamy like that. If you freeze large leftovers, just remember that the texture changes. It turns into something closer to ice cream, which is fun, but to get back to that luscious, creamy texture, always give the frozen slices about 15 minutes on the counter before serving.
How do I ensure my Oreo crust doesn’t become soggy?
This is a common worry with any of the No Bake Grasshopper Pie options! The key here is making sure that crust is rock hard before the filling ever touches it. After you mix the crumbs and butter, really press it down hard—use the bottom of a glass, if you need to! Then, stick that crust in the freezer for at least 30 minutes while you start making your filling. If the crust is completely chilled and firm before you pour in the wet mint mixture, it locks right into place and stays satisfyingly crunchy.
Understanding the Nutrition in a Slice of Grasshopper Pie
Okay, let’s be real for a second. We’re dealing with cream cheese, butter, cookies, and whipped topping here, so this isn’t exactly a salad! But if you’re going to indulge—and you absolutely should, because this dessert is worth every single bite—it’s good to know what you are enjoying. Remember that these numbers are estimates based on the ingredients we used, so they might vary slightly depending on the brand of whipped topping or how much chocolate you pile on top!
When I look at the breakdown for one generous slice of this Easy Summer Pie, it gives me a good idea of when to serve it—definitely not as a pre-bed snack, unless that’s your jam!
- Calories: Around 380. That’s a decent treat, but perfect when you know you’ve got a good few hours of socializing ahead of you!
- Total Fat: About 25 grams. Remember, that includes the good fats mixed in there, but yes, it is rich!
- Carbohydrates: Coming in around 35 grams, mostly from the cookie crust and powdered sugar.
- Protein: We get about 4 grams of protein per slice, just a little something to balance out the sugar rush.
It’s proof that sometimes the most satisfying, simple desserts pack a delicious punch. Since this is inherently a rich, indulgent treat, I always slot it in as my choice for a Holiday Mint Pie or a special weekend gathering. Enjoy it guilt-free, because you earned it!
Share Your Experience Making This Classic Chocolate Mint Pie
So, that’s it! That’s the entire plan for turning some humble ingredients into this legendary Classic Chocolate Mint Pie. I truly hope you give this Easy Mint Chocolate Pie a shot, especially the next time you need a stunning dessert that requires absolutely zero sweat!
I want to hear all about it! Did you go for the boozy filling or the non-alcoholic version? Did you prefer it chilled firm or frozen solid? Let me know in the comments below! Seriously, your feedback is what helps our community grow and makes us feel like we’re all sharing these simple, delicious recipes together.
If you made this Creamy Grasshopper Dessert and it was a hit—and I bet it was!—please consider rating the recipe right here on the page. It’s super helpful to other busy cooks looking for reliable methods!
And hey, if you got some amazing photos of your stunning green creation, don’t be shy! Tag us on social media. We absolutely love seeing how you bring these efficient recipes to life in your own kitchens. We’ve all learned so much from each other, just like Leo intended when he started this whole project to make busy life easier. If you need to reach out directly for specific questions, you can always find us over on the Contact page.
Now go forth and enjoy that perfect scoop of minty, chocolatey goodness! If you need another simple, satisfying treat for a future gathering, be sure to check out that amazing recipe I referenced earlier for an irresistible no bake grasshopper pie too!
PrintClassic Creamy No-Bake Grasshopper Pie

Make this easy, no-bake Grasshopper Pie featuring a crunchy Oreo crust and a cool, creamy mint chocolate filling. This simple dessert requires no oven time and is perfect for any gathering.
- Prep Time: 20 min
- Cook Time: 0 min
- Total Time: 4 hr 20 min
- Yield: 8 servings 1x
- Category: Dessert
- Method: No-Bake
- Cuisine: American
- Diet: Vegetarian
Ingredients
- 1 1/2 cups chocolate cookie crumbs (about 30 Oreo cookies)
- 6 tablespoons unsalted butter, melted
- 1 (8 ounce) package cream cheese, softened
- 1 cup powdered sugar
- 1 (12 ounce) container frozen whipped topping (like Cool Whip), thawed
- 1/2 cup crème de menthe liqueur (or use 1/4 cup mint extract and 1/4 cup milk for non-alcoholic)
- 1/4 cup milk
- 1 teaspoon vanilla extract
- Green food coloring (optional, for color)
- 1 cup heavy cream, whipped (for topping)
- Chocolate shavings or mini chocolate chips (for garnish)
Instructions
- Prepare the crust: Mix the chocolate cookie crumbs and melted butter in a bowl until evenly moistened. Press the mixture firmly into the bottom and up the sides of a 9-inch pie plate. Place the crust in the freezer while you prepare the filling.
- Make the cream cheese base: In a large bowl, beat the softened cream cheese and powdered sugar together with an electric mixer until the mixture is smooth and creamy.
- Add liquids and flavor: Beat in the crème de menthe liqueur (or mint extract/milk substitute), milk, and vanilla extract until just combined. If you want a greener color, add a few drops of green food coloring now.
- Fold in whipped topping: Gently fold in the thawed whipped topping until no streaks remain. Do not overmix.
- Fill the crust: Pour the mint filling into the chilled cookie crust and spread it evenly.
- Chill: Cover the pie loosely with plastic wrap and refrigerate for at least 4 hours, or until firm. For a firmer, frozen texture, you can freeze it for 2-3 hours.
- Garnish and serve: Before serving, top the pie with freshly whipped heavy cream and sprinkle with chocolate shavings or mini chocolate chips. Slice and serve cold.
Notes
- For a richer chocolate flavor in the filling, add 1/4 cup of cocoa powder to the cream cheese mixture.
- If you prefer a firmer, frozen dessert, skip the heavy cream topping and freeze the pie for 4 hours. Let it sit at room temperature for 10 minutes before slicing.
- This recipe is a great make ahead dessert; it keeps well in the refrigerator for up to three days.
Nutrition
- Serving Size: 1 slice
- Calories: 380
- Sugar: 30
- Sodium: 250
- Fat: 25
- Saturated Fat: 14
- Unsaturated Fat: 11
- Trans Fat: 0.5
- Carbohydrates: 35
- Fiber: 1
- Protein: 4
- Cholesterol: 55