
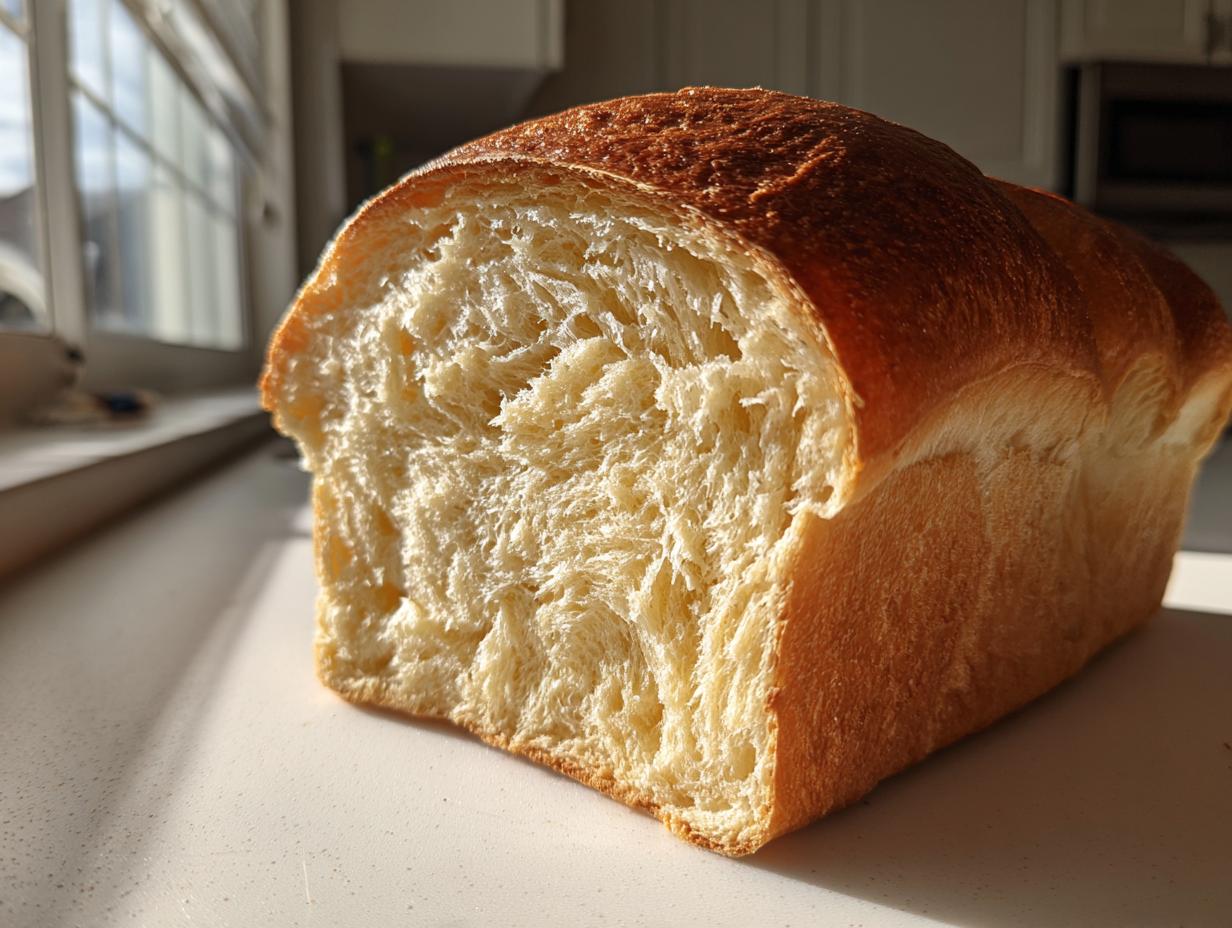
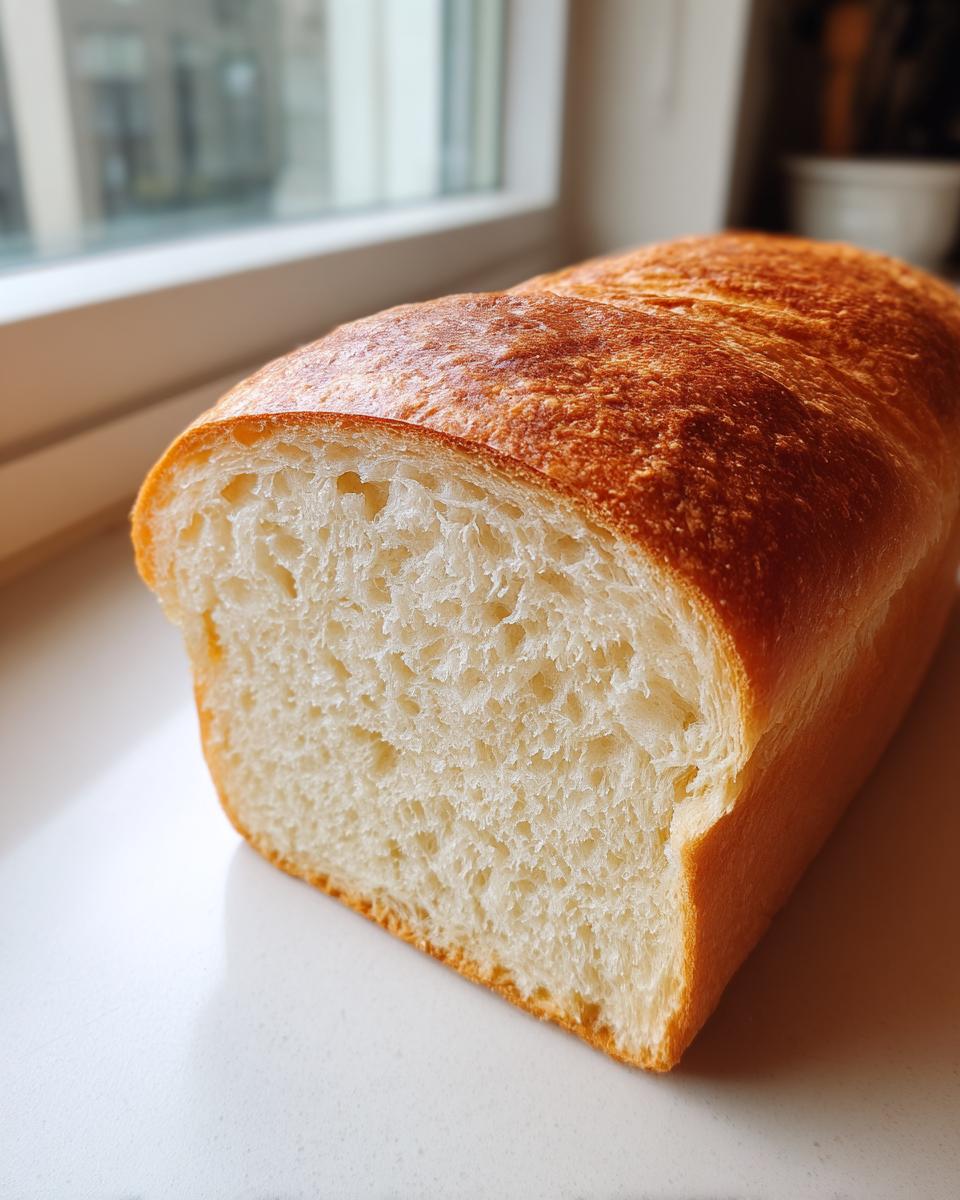
If you could only take one bread recipe with you to a deserted island, what would it be? For me, it’s this incredibly soft **Honey milk bread**. Forget dry sponges or dense bricks; we’re talking about that pillow-soft, pillowy Japanese-style loaf that you can literally squish without ruining. I know bread baking, especially something as precise as Hokkaido milk bread, can look intimidating. That’s why I approached this recipe like I approach any big project: I broke it down, streamlined the steps, and focused only on what guarantees success. Using the famous tangzhong method, I’ve engineered this recipe so that you, even if you’re new to yeast, will end up with the fluffiest **milk bread** you have ever made. Trust me, this is baking simplified.
- Why This Honey Milk Bread Recipe Works (The Project Manager’s Approach)
- Gathering Ingredients for Perfect Honey Milk Bread
- Step-by-Step Instructions to Make Soft Honey Milk Bread
- Baking and Cooling Your Beautiful Honey Milk Bread
- Tips for Success Making Japanese Milk Bread
- Storage and Reheating Instructions for Soft Bread
- Serving Suggestions for Your Sweet Honey Bread
- Frequently Asked Questions About Making Honey Milk Bread
- Share Your Soft Bread Success
Why This Honey Milk Bread Recipe Works (The Project Manager’s Approach)
When I look at a bread recipe, I see a process flow chart. The goal here? Maximum squish factor. That pillowy, airy texture you see in those viral videos—that’s achievable, but only if you nail the moisture retention. I engineered this specifically to be reliable, getting you perfect results without needing acres of extra time. The key component that separates this **soft bread** from every other recipe is actually a simple technique borrowed from Japan.
The Secret to Ultra-Soft Bread: Tangzhong Explained
This is the heart of the operation. Tangzhong is just a cooked paste made from flour and liquid from the recipe. When you cook it until it hits about 160°F, you literally gelatinize the starches. What does that mean for you? It means those starches can now hold onto way more water than they could otherwise. That trapped moisture is what keeps your **Honey milk bread** soft and fresh for days. It’s genius efficiency—a small step that guarantees a huge payoff in texture.
Gathering Ingredients for Perfect Honey Milk Bread
As a project manager, I always insist on a perfect Bill of Materials before starting anything important. With this **honey bread**, precision on the input side means success on the output side. We aren’t hunting for anything obscure here; these are standard pantry items made better by paying attention to preparation. Make sure you check the state of your ingredients before you start mixing everything together.
Specifically, grab that butter when you are getting the rest of your items, because it needs to be softened. And your eggs? They absolutely have to be at room temperature for better incorporation. We are mixing 1 cup of milk, 1/4 cup of rich honey, 2 room temperature eggs, 1/4 cup of softened unsalted butter, 3 1/2 cups of bread flour, 1 tablespoon of instant yeast, and 1 teaspoon of salt. For the proofing, warm water is needed, and don’t forget that single egg yolk mixed with a teaspoon of water for our beautiful egg wash later.
Ingredient Notes and Substitutions for Your Honey Milk Bread
For this style of **soft bread**, the flour choice is non-negotiable if you want that ‘squish.’ You must use high-protein bread flour. It develops the gluten structure necessary to trap all that moisture from the tangzhong.
Also, we are using honey because it adds such a lovely, subtle sweetness and retains moisture better than granulated sugar, keeping your **shokupan** tender longer. Keep substitutions simple; we are optimizing for stellar results, not trying to reinvent the wheel here. Sticking to these measurements is the fastest route to success.
Step-by-Step Instructions to Make Soft Honey Milk Bread
Alright, let’s get our hands messy! Think of this as assembling the components for a high-performance machine. Everything needs to be added in the right order to get that perfect, lofty structure. Don’t rush the mixing or the proofing stages—that’s where we unlock the softness. Once you’ve mixed your wet and dry ingredients, you’re ready to see some magic happen right there in your stand mixer bowl.
Creating the Tangzhong Base for Your Honey Milk Bread
This is step one, and you cannot fake it. Whisk a small part of your bread flour—just a quarter cup—with half a cup of the milk until it’s totally smooth, like pancake batter. Now, put it on medium-low heat. You need to stir this constantly until it thickens into a real paste. You are aiming for about 160°F, or until it looks like thick pudding. Please, I beg you, let this tangzhong cool down completely before you mix it with anything else. If it’s warm, it will wake up your yeast too early, and that’s a disaster for this delicate **milk bread**.
Kneading and Achieving the Windowpane Test for Soft Bread
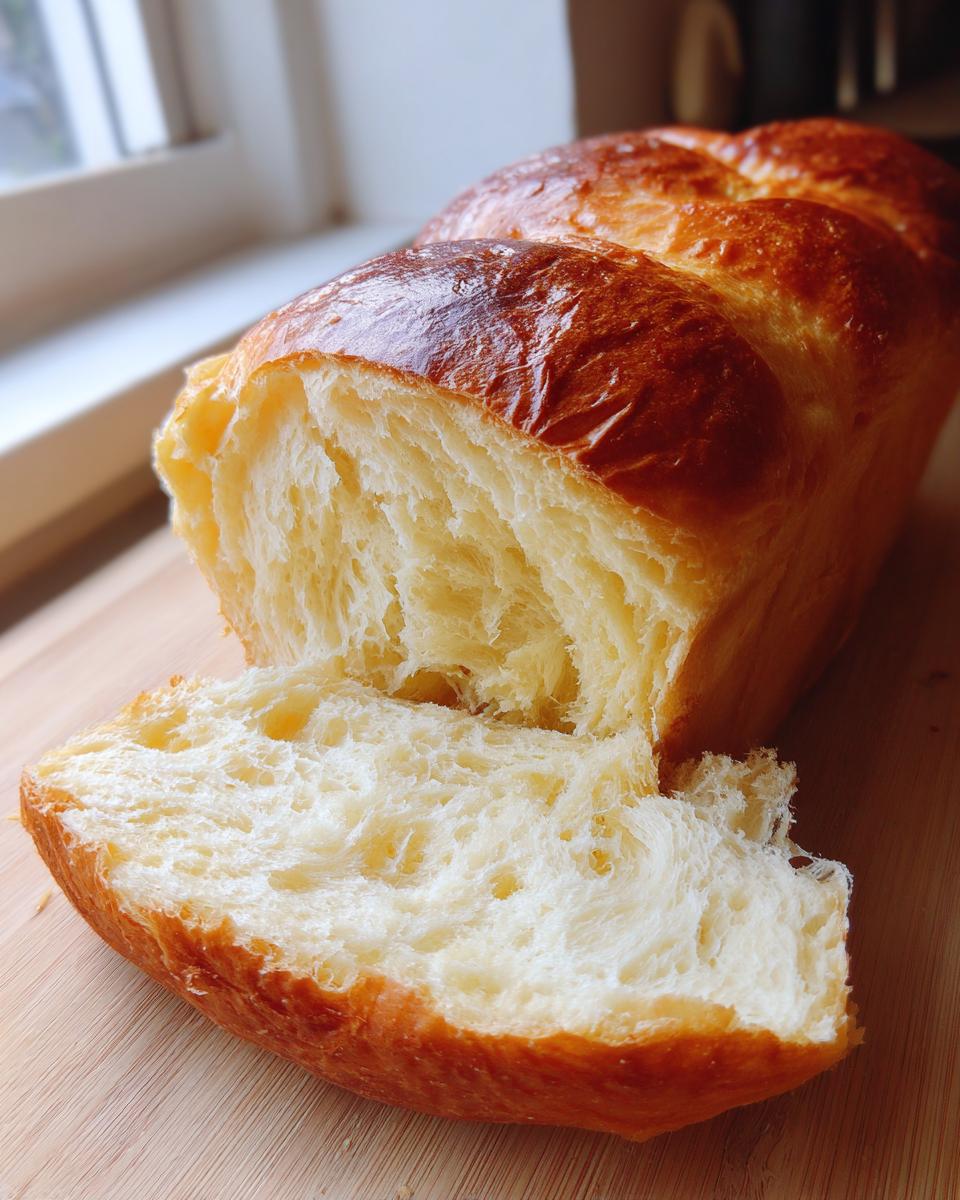
Once the tangzhong is cool, mix it in with the rest of your wet ingredients and then add the dry ones. After you mix it into a shaggy dough, you need to commit to the knead. Turn that mixer up to medium-low and let it run for a solid 8 to 10 minutes. We are building serious gluten here. If you aren’t sure if you kneaded enough, try the windowpane test. You should be able to gently stretch a small piece of dough thin enough to see light through it without it tearing. That elasticity is exactly what guarantees that signature squishy, fluffy final product in your **Honey milk bread**.
Shaping and Proofing the Honey Milk Bread Loaf
When the first proof is done and the dough has doubled, gently punch it down—no need to be aggressive! Divide that beautiful dough into three equal parts. Now, this technique is important for those neat layers: roll each piece into a tight little log. Place these three logs side-by-side, seam-side down, in your greased 9×5 inch pan. Don’t skip the second proof! Let it rest until the dough has risen about an inch above the rim of the pan. It should look proud and puffy before it goes into the oven. You can check out my guide on basic yeast bread techniques if you need a refresher on handling proofing times.
Baking and Cooling Your Beautiful Honey Milk Bread
Okay, the shaping is done, the dough is resting like it deserves, and now the oven needs to be ready. Preheat your oven to 350°F (175°C). This temperature is key for gentle baking—we don’t want a crust that’s too hard because that ruins the ‘squish’ factor we worked so hard for!
Before it goes in, grab that little bowl with the beaten egg yolk and water. Brush this egg wash lightly over the top of your dough. It gives you that gorgeous, shiny golden-brown finish that makes people stop and ask what kind of **milk bread** you made. Bake it for about 30 to 35 minutes. You’re looking for a deep golden color, but the real confirmation is the internal temperature—pull it when it hits 200°F.
Here’s a non-negotiable moment, so listen up! As soon as this **honey milk bread** comes out of the oven, you have to take it out of the pan immediately. Seriously, turn that loaf over onto a wire rack right away. If you leave it sitting in that hot metal pan, the trapped steam will turn the bottom crust into a gummy, sad mess. Letting it cool completely on the rack is crucial; it stabilizes that airy crumb structure. Don’t slice into it when it’s warm, no matter how tempting that soft bread smells! You can learn more about handling delicate loaves in my guide to baking whole wheat bread, as cooling techniques are often similar.
Tips for Success Making Japanese Milk Bread
Baking is often about managing variables. Since we are treating this like a project, we need contingency plans for when things go slightly sideways. My goal is to eliminate risk, meaning focusing on consistency in both ingredients and oven conditions. Once you have that wonderfully elastic dough from the windowpane test, the rest is mostly watching the clock and managing heat.
Always remember the notes: higher-protein bread flour makes the structure strong enough to hold the honey and milk without collapsing. Also, if you notice the top getting a rich mahogany color way too fast during baking, don’t panic. Just quickly tent that loaf pan with a piece of aluminum foil. This is a simple heat deflector that lets the inside finish baking thoroughly without burning the crust of your beautiful **honey milk bread**.
Troubleshooting Common Honey Milk Bread Issues
If your dough seems sluggish during the first proof, check the temperature of your warm water for the yeast activation, or where you left it to rise. Yeast hates being too cold, but it also dies if it gets too hot. We need that happy, cozy environment, usually around 78–82°F, for the yeast to perform correctly. A slow rise usually means a weak final structure.
Now, if your loaf comes out dense, it’s almost always an under-kneading issue. Did you really commit to those 8 to 10 minutes until you achieved that perfect windowpane? That’s the single most important factor for this **soft bread**. If you’re new to this, check out my guide on making milk bread with yudane; sometimes a slightly different pre-ferment method can help newer bakers gauge dough development better.
Storage and Reheating Instructions for Soft Bread
Let’s talk about maintenance. You’ve created this amazing, squishy loaf of **Honey milk bread**, so you want to protect that investment! Because of the high moisture content we locked in with the tangzhong, this bread tends to stay incredibly soft for about 48 hours—that’s the peak performance window.
My recommendation is simple: Store it at room temperature in an airtight container or a heavy-duty Ziploc bag. Don’t put it in the fridge! Refrigeration is the enemy of soft bread; it speeds up staling way too fast. Keep it out of direct sunlight on the counter.
Now, if you’ve hit day three and it’s just *slightly* less pillowy than it was yesterday, don’t throw it out! We have a fix for this, too, thanks to efficient reheating. If you want to bring back that melt-in-your-mouth texture but need it faster than baking a whole new loaf, here’s the trick: Slice a thick piece, give it a quick spritz of water—just a light mist—wrap it loosely in foil, and pop it in a 300°F oven for about 5 to 7 minutes. It re-steams itself slightly, and boom, it’s fresh again! If you need ideas for using up slightly older loaves, check out my recipe for bread bowls, although I hope this **milk bread** disappears before you need that workaround!
Serving Suggestions for Your Sweet Honey Bread
So, you’ve got this masterpiece sitting on the rack, perfectly cool, slightly springy? The hardest part is over! Now comes the fun part: deciding how to eat it before you inevitably eat the entire loaf yourself. Since this **Honey milk bread** is naturally sweeter and softer than standard sandwich bread, it feels almost like a treat straight out of the oven, even when it’s totally cool.
The simplest approach is usually the best one to truly appreciate the texture. Toasting is mandatory, but don’t overdo it! Just watch it until the edges get golden brown. Slather it with some real, high-quality salted butter—the contrast between the salty butter and the sweet **honey bread** is just incredible. It’s perfect for that slow weekend breakfast.
If you’re serving it with coffee or tea, it’s wonderful as is. But don’t limit it to just morning time. I’ve been using thin slices for elevated grilled cheese sandwiches—seriously, try it with brie and sliced pear! It’s gourmet without any extra effort. If you’re looking for more appetizer ideas using baked goods, you need to check out how easily you can make delicious copycat breadsticks, but honestly, tearing off pieces of this **shokupan** with soup is tough to beat!
Frequently Asked Questions About Making Honey Milk Bread
I get a ton of questions every time I post pictures of this loaf online, so I figured I’d get ahead of the inevitable queries right here. When you’re tackling a recipe like this, especially when you’re aiming for that perfect, photogenic softness, people always have specific operational questions. My job is to make sure your process is smooth and efficient, just like managing a good project timeline.
Can I use regular all-purpose flour instead of bread flour for this honey milk bread?
This is the most common question I get. My honest answer is: you *can*, but you shouldn’t if you’re chasing that incredible, elastic texture. Bread flour has a higher protein content, which means it develops the strong gluten network necessary to trap all the moisture we force in using the tangzhong method. If you use AP flour, your final bread will still taste delicious, but it won’t have that same towering height or that signature, super-squishable chewiness that true **shokupan** is famous for. It’s a small trade-off, but for this specific result, stick to the bread flour.
How is this recipe different from standard milk bread?
That’s a great question that gets to the heart of what I optimized here. We are using the tangzhong method, which is common in high-quality **milk bread**, but the difference lies in two spots. First, the honey. It’s not just for sweetness; honey is a humectant, meaning it naturally draws and holds onto moisture better than standard granulated sugar. This locks in the softness for longer.
Second, the specific fat-to-liquid ratio, which I tweaked slightly alongside the honey, supports that extra moisture. The result is a **soft bread** that is noticeably sweeter, stays fresher slightly longer on the counter without drying out, and has a beautiful, tender crumb structure that’s just heavenly when toasted.
Does the tangzhong prep really add that much time to the total process?
If you look at the total time (about 2 hours 45 minutes), the tangzhong prep only takes about 10 minutes of actual hands-on cooking, plus cooling time. While it’s cooking, you can measure out all your dry ingredients, so you’re multitasking! Considering that this one simple step prevents your loaf from turning into a dense brick, I consider it necessary overhead. It’s the highest return on investment step in the entire production schedule for perfect **honey milk bread**!
Share Your Soft Bread Success
You’ve managed the project, followed the flow chart, and now you have this beautiful, towering loaf of **Honey milk bread**. Awesome work! I want to see the results. Do me a favor: rate this recipe below and shoot me pictures of your squishable **soft bread** on social media. Let me know what worked best for you, or if you ran into any snags in the comments so the next baker can learn from your data. Report back on your results!
PrintSoft Honey Milk Bread (Hokkaido Style)

Make incredibly soft and fluffy Japanese-style milk bread using honey for a sweet flavor. This recipe focuses on the tangzhong method for maximum squishiness.
- Prep Time: 30 min
- Cook Time: 35 min
- Total Time: 2 hr 45 min
- Yield: 1 loaf 1x
- Category: Baking
- Method: Baking
- Cuisine: Japanese
- Diet: Vegetarian
Ingredients
- 1 cup milk
- 1/4 cup honey
- 1/4 cup unsalted butter, softened
- 2 large eggs, room temperature
- 3 1/2 cups bread flour
- 1 tablespoon instant dry yeast
- 1 teaspoon salt
- 1/4 cup water, warm (for proofing)
- 1 egg yolk, beaten with 1 teaspoon water (for egg wash)
Instructions
- Prepare the Tangzhong: Whisk 1/4 cup of the bread flour with 1/2 cup of the milk in a small saucepan until smooth. Cook over medium-low heat, stirring constantly, until the mixture thickens to a paste (about 160°F). Remove from heat and let it cool completely.
- Combine Wet Ingredients: In a large bowl or stand mixer, combine the cooled tangzhong, remaining milk, honey, softened butter, and eggs. Mix until just combined.
- Mix Dry Ingredients: In a separate bowl, whisk together the remaining bread flour, yeast, and salt.
- Combine and Knead: Add the dry ingredients to the wet ingredients. Mix on low speed until a shaggy dough forms. Increase speed to medium-low and knead for 8 to 10 minutes until the dough is smooth and elastic. It should pass the windowpane test for this soft bread.
- First Proof: Place the dough in a lightly oiled bowl, turning to coat. Cover and let it rise in a warm place until doubled in size, about 1 to 1.5 hours.
- Shape the Loaves: Gently punch down the dough. Divide it into three equal pieces. Roll each piece into a tight log. Place the three logs side-by-side in a greased 9×5 inch loaf pan.
- Second Proof: Cover the pan loosely and let it rise again in a warm place until the dough has crowned about 1 inch above the rim of the pan, about 45 to 60 minutes.
- Bake: Preheat your oven to 350°F (175°C). Brush the tops of the dough lightly with the egg wash. Bake for 30 to 35 minutes, or until the top is golden brown and the internal temperature reaches 200°F.
- Cool: Immediately remove the bread from the pan and cool completely on a wire rack before slicing. This step is key for maintaining the soft texture of your honey milk bread.
Notes
- For the softest results, use high-protein bread flour.
- If the top browns too quickly, loosely tent the pan with aluminum foil halfway through baking.
- This shokupan is best eaten within 2 days for peak softness.
Nutrition
- Serving Size: 1 slice
- Calories: 220
- Sugar: 8
- Sodium: 250
- Fat: 5
- Saturated Fat: 3
- Unsaturated Fat: 2
- Trans Fat: 0
- Carbohydrates: 38
- Fiber: 1
- Protein: 6
- Cholesterol: 35