
Forget dry, crumbly toast because we are unlocking the secret to truly bakery-quality bread right here in your own kitchen. If you’ve ever dreamed of tearing open a loaf to find the softest, cloud-like interior imaginable, then you need to meet the japanese milk bread. This isn’t just bread; it’s an experience! The key, I’ve found after much testing—just like Leo does here at Dishicious, optimizing every step—is using the ancient but brilliant Yudane method. This technique pushes moisture into the flour, guaranteeing that signature airy texture and keeping your loaf pillowy soft for days. Trust me, once you master this, you won’t go back to ordinary white loaves. This foolproof method makes baking truly achievable, even when you’re short on time. If you are looking for a slightly simpler starting point before tackling this mastery, check out my instructions for easy yeast bread for beginners!
- Why This Japanese Milk Bread Recipe Delivers Ultimate Softness
- Gathering Ingredients for Your Japanese Milk Bread Loaf
- Step-by-Step Instructions: How to Make Japanese Milk Bread
- Tips for Perfect Japanese Milk Bread Every Time
- Serving Suggestions for Your Softest Homemade Bread
- Storing Your Japanese Milk Bread for Maximum Freshness
- Frequently Asked Questions About Shokupan Recipe
- Estimated Nutritional Data for Japanese Milk Bread
- Share Your Cloud-Like Japanese Milk Bread Creations
Why This Japanese Milk Bread Recipe Delivers Ultimate Softness
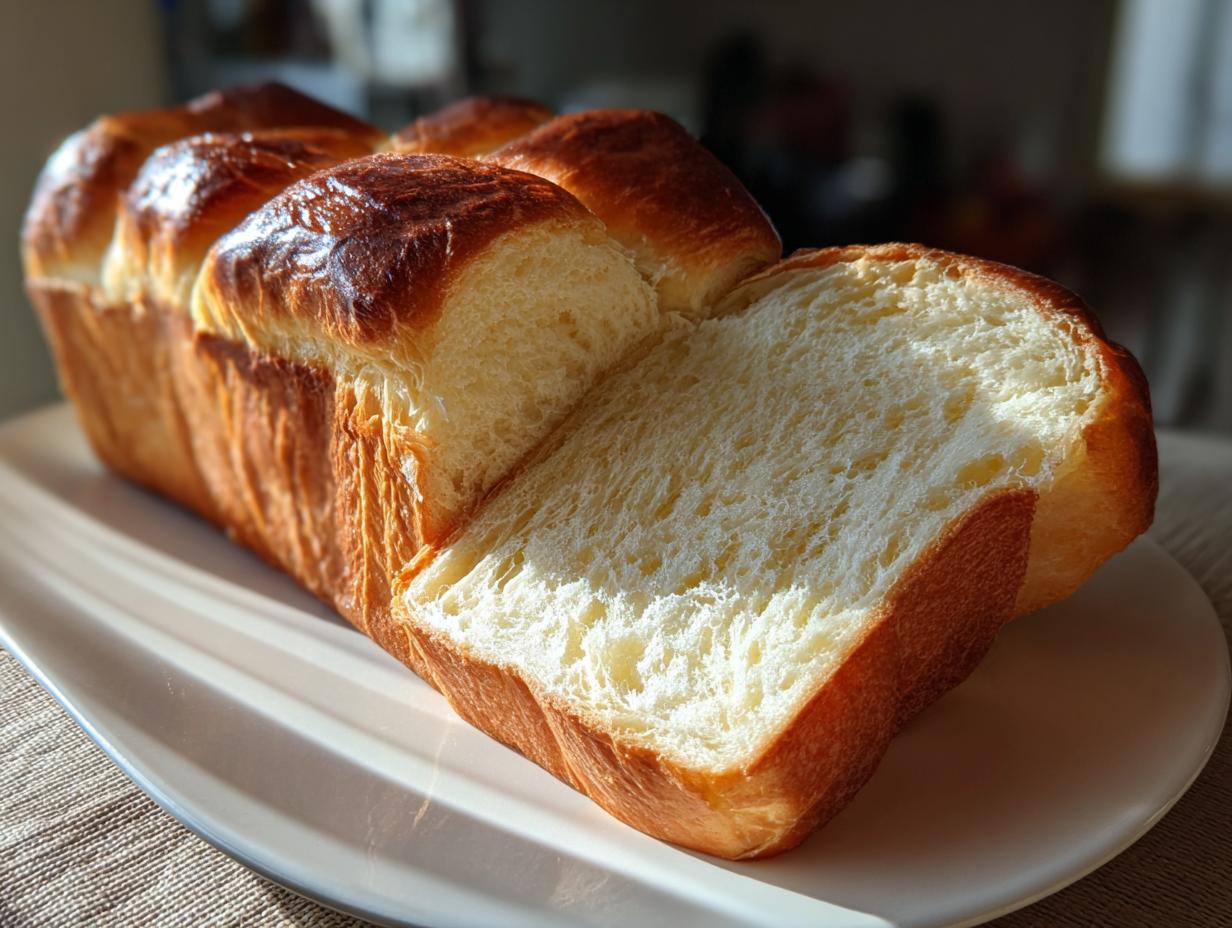
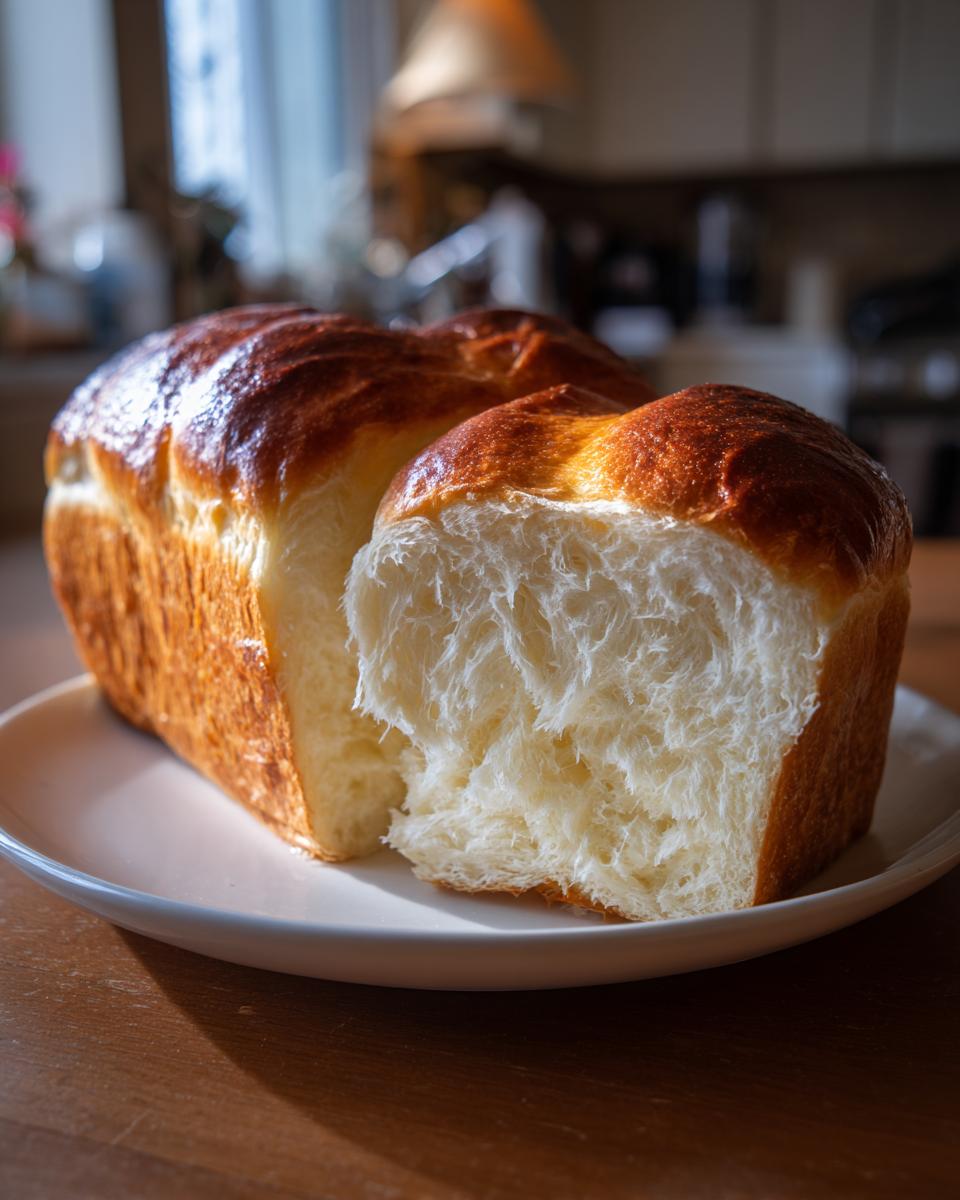
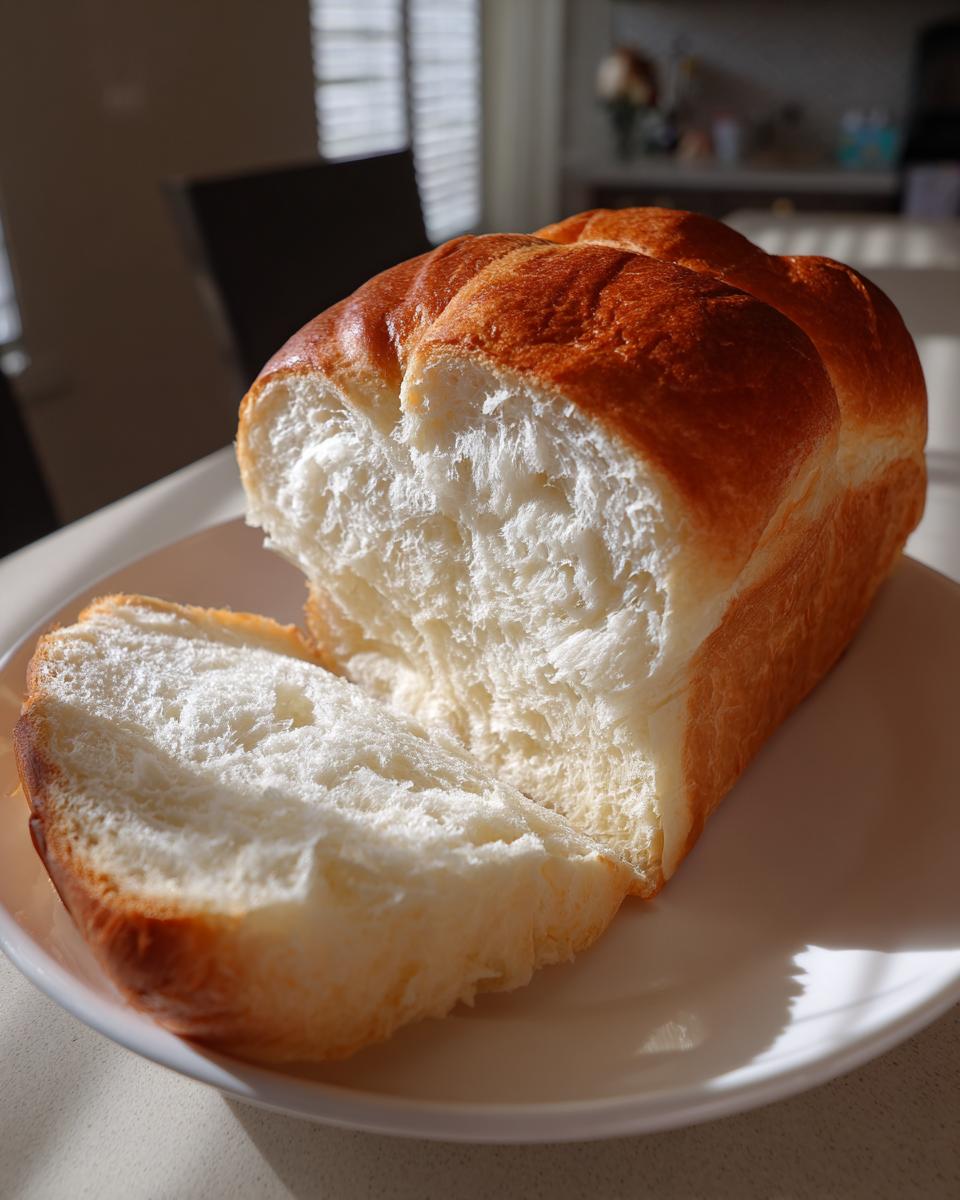
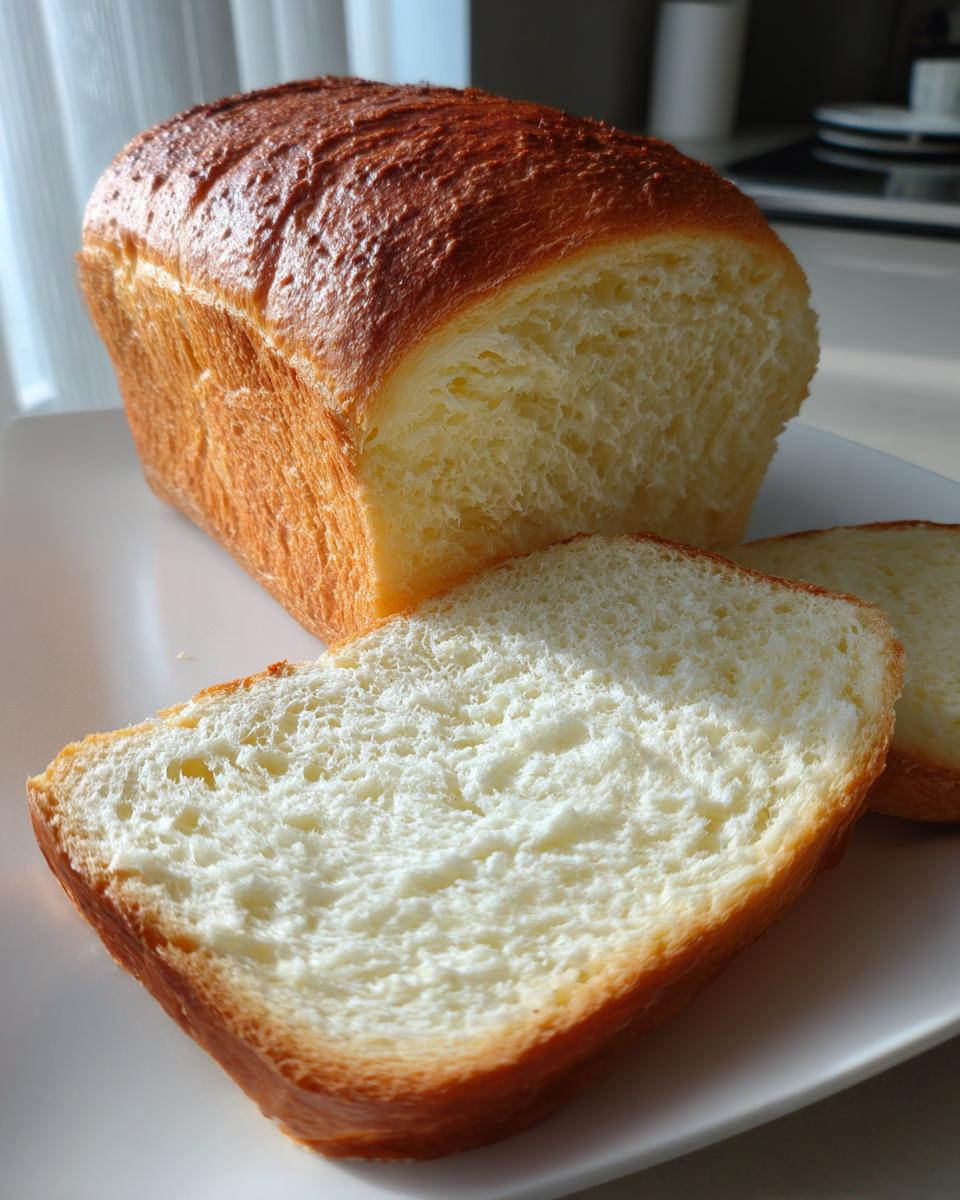
So, why is this Shokupan recipe so different from the standard loaf sitting on the supermarket shelf? It all comes down to texture, friends! We aren’t aiming for merely soft; we are aiming for the elusive, cloud-like, almost mochi texture. This is how you make the softest homemade bread you’ve ever touched, let alone eaten. It truly melts the second it hits your tongue. It’s this dedication to the perfect crumb that makes baking this bread so rewarding. You can see more about achieving that fluffy white bread look over at Chopstick Chronicles, but I promise my method is just as reliable!

Mastering the Yudane Bread Technique for Staying Power
This bread doesn’t dry out on day two—that’s the magic trick! The secret weapon is officially called the Yudane bread technique. Basically, we cook a small amount of flour with hot water first, creating this thick, gelatinized paste. Think of it like building a tiny powerhouse of moisture right into your dough structure before the final mix. Because this starch holds onto water so much better than dry flour, your bread traps that freshness inside. It’s pure moisture engineering, and it’s why this airy white bread stays pillowy soft for days, no preservatives needed!
The Role of High-Quality Ingredients in Japanese Milk Bread
While the Yudane does most of the heavy lifting for texture, the richness comes from seriously good dairy. We use bread flour because we need that high protein content to build the structure for all that fluffiness. Don’t skimp on the milk or the heavy cream either; they give the crumb that luxurious mouthfeel you expect from an actual Japanese bakery. Fat equals tenderness, plain and simple. Using room-temperature eggs helps everything blend smoothly into that elastic dough we are working toward.
Gathering Ingredients for Your Japanese Milk Bread Loaf
Okay, now that we’ve hyped up the amazing texture, let’s get organized! A successful bake always starts with prep, and for this Shokupan recipe, having everything measured out (mise en place, in fancy terms!) makes the whole process smooth. Because the Yudane paste has to cool down, you should definitely start that first. Here’s exactly what you’ll need to pull off this incredible sweet milk loaf.
- For the Yudane Paste: 100g Bread Flour and 150ml Water.
- For the Main Dough: 300g Bread Flour, 50g Granulated Sugar, 1 teaspoon Instant Dry Yeast, 1 teaspoon Salt, 60ml Whole Milk (this needs to be COLD!), 40g Unsalted Butter (make sure this is softened nicely), 1 large Egg (room temperature is best for mixing!), and 30g Heavy Cream.
See? Nothing too complicated, just paying attention to the little details—like making sure that milk is cold when it hits the whisked flour, but the butter is soft enough to cream properly. That’s the project management approach working in the kitchen!
Step-by-Step Instructions: How to Make Japanese Milk Bread
Now for the fun part—turning those ingredients into the most amazing, breathable loaf you’ve ever seen. Because we are using the Yudane method for our japanese milk bread, we have a slightly different start than regular bread recipes. Don’t worry if it seems like a lot of steps; just follow them in order, and you’ll have that pillowy goodness ready before you know it. For related techniques on quick breads, maybe check out my moist quick loaf recipe for an easier afternoon bake!
Preparing the Yudane Paste (The Foundation of Softness)
This is crucial, so pay attention! Whisk your 100g of flour and 150ml of water in a small saucepan until there are absolutely no lumps left. Then, put it over medium-low heat and stir constantly. Seriously, don’t walk away! It will suddenly go from watery to thick. You want it to look exactly like thick mashed potatoes—that’s your cue to pull it off the heat. Transfer it right away to a bowl, press plastic wrap directly onto the surface so it doesn’t skin over, and let it cool completely. If you rush this step, the whole process falls apart!
Mixing and Kneading the Fluffy Asian Bread Dough
Grab your stand mixer because we need some serious kneading time here. Put the main flour, sugar, yeast, and salt in the bowl first and give it a quick spin just to combine. Now, add the cold Yudane paste we made, your cold milk, the egg, and the cream. Mix that on low until it looks like a messy, shaggy ball. Next, add that softened butter. Increase the speed just a bit and let the mixer work for about 10-15 minutes. You are looking for the dough to pull cleanly away from the sides and pass the windowpane test—that means you can stretch a small piece thin enough to see light through it without tearing. That indicates ultimate structure for this fluffy Asian bread.
Proofing and Shaping Your Japanese Milk Bread Dough
Once you hit that windowpane, your dough will feel incredibly soft—almost like handling a damp towel! Put it in an oiled bowl, cover it, and let it happily double in size; usually about an hour, depending on your kitchen temperature. Gently punch it down, divide it into three equal parts, and roll them into tight little balls. Let those rest for 15 minutes. Then, roll each ball out flat into a rectangle and roll that rectangle up *tightly* into a log. Place those three logs seam-side down into your greased loaf pan, lined up next to each other. Cover it again and let it rise a second time until it’s puffy and cresting about an inch over the pan rim (another 45-60 minutes).
Baking and Cooling for Perfect Texture
While that second rise is happening, fire up your oven to 350°F (175°C). Brush the top lightly with milk for a nice color. Bake it for 30 to 35 minutes. You want the internal temperature to hit about 200°F (93°C), which is your sure sign it’s done. Here’s the most important part for that airy white bread structure: As soon as it comes out, pop it out of the pan immediately onto a cooling rack. You must let this bread cool completely before slicing. If you cut it while it’s warm, you’ll squish all that beautiful airy texture we worked so hard to create!
Tips for Perfect Japanese Milk Bread Every Time
Baking bread that mimics a professional Japanese bakery is totally achievable, but sometimes the dough fights back a little! Don’t panic if things don’t look perfect immediately; we are going to troubleshoot this like the problem-solving home cooks we are. Remember to stay methodical about timing—that’s how Leo gets his recipes to work every time!
Troubleshooting Common Japanese Milk Bread Issues
If your dough is way too sticky to handle—I mean, sticking to everything sticky—it usually means you added too much liquid, or perhaps your Yudane didn’t cook down enough. Try adding flour just one tablespoon at a time during the kneading process until it cleans the sides of the bowl. If your baked loaf sinks in the middle, that’s almost always an under-proof issue during the second rise, or you opened the oven door too early! Make sure you let it crest nicely over the pan before baking. For great ideas on pairing bread with something savory, you should check out this easy creamy chicken and rice soup recipe.
Another common issue is a dense crumb. If that happens, it usually points back to not kneading long enough to achieve that windowpane, or maybe you deflated the dough too aggressively after the first rise. Be really gentle with your first punch-down; we want to keep as much of that precious air locked in as possible!
For more detail on the science behind the paste, check out the guide on Tangzhong Milk Bread—it’s nearly the same concept, and it really helps explain why we cook that flour first!
Serving Suggestions for Your Softest Homemade Bread
You worked hard for this gorgeous, pillowy loaf, so how should you eat it? Honestly, plain is fantastic, but this bread is versatile! Because it’s the softest homemade bread, it makes the absolute best bread for toast—crisp edges but still cloud-like inside. It’s also structurally perfect for a genuinely tender sandwich bread; think egg salad or cucumber sandwiches where you need stability without chewiness.
Don’t feel like you need fancy toppings, though. A quick slather of butter that melts right into the fluffy crumb is heaven. If you happen to have leftovers (which you probably won’t!), it’s amazing cubed up for things like bread pudding. If you’re looking for something savory to go alongside your incredible bake, you absolutely need to try this creamy BLT pasta salad!
Seriously, if you’re looking for inspiration on loaf slicing and presentation, take a peek at how they do things over at Family Best Food. Enjoy every soft, gorgeous bite!
Storing Your Japanese Milk Bread for Maximum Freshness
Okay, now that you’ve created this masterpiece—the incredibly soft, preservative-no preservative bread—we need to keep it perfect. The best part about using the Yudane method for this japanese milk bread is that it naturally stays fresh longer than standard recipes, but proper storage is still key if you want that cloud-like texture tomorrow!
If you plan on eating the whole loaf within two days, you can actually just leave it right on the counter. Just make sure you wrap it tightly! I wrap mine securely in plastic wrap first, and then sometimes I even pop that plastic-wrapped loaf into a zip-top bag. This prevents any air circulation that might dry out the crust or the fluffy interior. Don’t store it in the fridge, though! Seriously, never refrigerate this bread. Cold temperatures make bread go stale super fast, and we want tender, not tough.
What if you made too much? That’s almost impossible, but let’s pretend! This bread freezes beautifully. Once the loaf has cooled completely (remember, fully cool first!), slice what you want to keep for later. Wrap the slices super tightly in plastic wrap, then put those wrapped slices into a freezer-safe bag. It keeps its quality for about three months. When you want a slice, just pull it out and let it thaw on the counter for about 30 minutes, or pop it straight into the toaster! It comes back surprisingly soft, which is just a testament to the Yudane power.
Frequently Asked Questions About Shokupan Recipe
I know you’ve got questions running through your head while that dough is resting! It’s totally normal when tackling a new technique like Yudane. Making amazing bakery-style bread at home almost always comes down to clarifying the small details. Here are a few things I hear often about making this unbelievably soft Shokupan recipe.
Can I use the Tangzhong method instead of Yudane for this Japanese Milk Bread?
Yes, absolutely! This is the most common question, and honestly, both methods are fantastic for achieving that light, feathery crumb—the reason people love Hokkaido milk bread so much. The difference is tiny but important: Yudane (which we used) involves cooking the flour/starch slurry with plain water. Tangzhong, on the other, cooks the flour slurry using milk or another liquid from the main dough recipe. Both methods gelatinize the starch, trapping moisture, so go ahead and use Tangzhong bread technique if you prefer! Results will be just as pillowy and soft.
How do I achieve the signature tall, straight sides of Japanese bakery bread?
This is all about control and confidence during shaping and proofing. First, make sure you grease and flour your loaf pan thoroughly—no sticky spots allowed! Second, when you roll those three pieces into logs, roll them as tightly as you possibly can without tearing the surface. Tight rolling means less air inside the log, resulting in a more unified, straighter rise. Finally, watch that second proofing stage like a hawk. You want the dough to rise until it crests maybe an inch over the top edge of the pan, but *not* letting it get over-proofed means it won’t collapse in the oven trying to reach for the stars! If you want to make something savory to dip into, try my recipe for creamy tomato basil pasta, which is fantastic with this bread.
Is this bread overly sweet?
You might think so because it’s so tender, but the sweetness level is actually quite mild! It’s definitely a touch sweeter than an American white bread loaf, but it’s designed that way so it works perfectly for both savory uses (like that amazing tender sandwich bread) and light morning toast. If you want to dial it back even further next time, just reduce the sugar by about 5 grams. It won’t affect the rise at all!
Can I skip the stand mixer?
Honestly? Not really, if you want that perfect texture. Because of the high hydration from the Yudane, this dough requires a very long kneading time—like 10 to 15 minutes *after* the butter is added—to fully develop the gluten structure needed for that airy result. Doing that amount of kneading by hand would take you nearly an hour and create a lot of heat, which breaks down the dough structure. A stand mixer really is essential for this one to ensure you get that beautiful, stretchy crumb time after time.
Estimated Nutritional Data for Japanese Milk Bread
When you’re focusing on that perfect, cloud-like, airy white bread texture achieved through the Yudane method, measuring every single ingredient precisely is part of the process, right? That’s how we optimize for reliability! So, based on the ingredients listed in this recipe for one standard loaf, here is the estimated nutritional breakdown per slice. Since every oven and every ingredient brand is slightly different, please treat these figures as a really helpful guideline rather than guaranteed totals.
- Serving Size: 1 slice
- Calories: 160
- Fat: 4g (with 2g saturated fat)
- Cholesterol: 30mg
- Sodium: 180mg
- Carbohydrates: 26g (with 1g Fiber and 7g Sugar)
- Protein: 4g
There are no trans fats in this wonderfully fresh bread, which is great news! We rely on real butter and cream, so the fat content is natural, giving you that rich, melt-in-your-mouth tenderness. This is truly the best way to enjoy homemade, tender sandwich bread without any artificial stabilizers. Bake a loaf this week, and enjoy knowing exactly what’s going into your incredible, fluffy Asian bread!
Share Your Cloud-Like Japanese Milk Bread Creations
Now that you’ve gone through the entire mastering process—from cooking the Yudane paste to nailing that perfect second proof—it’s time for the payoff! I absolutely love seeing your results. Seriously, nothing makes my day more than seeing someone share their first tall, fluffy loaf of japanese milk bread.
Did it pass the windowpane test beautifully? Did your kitchen smell like a high-end Japanese bakery? I want to hear all about it! Please take a picture of your finished loaf—whether you’re slicing it for toast or stacking it high for sandwiches—and tag me on social media. Seeing your success is the best compliment you can give me.
If you found this process straightforward or if you have a tiny tweak that worked wonders in *your* kitchen, please come back here and drop a rating! It helps other home cooks just getting started feel confident tackling this ultimate milk bread guide. And hey, if you’ve got leftover slices and need a fabulous dip, you should absolutely whip up some easy nacho cheese sauce! Happy, fluffy baking!
PrintUltimate Japanese Milk Bread (Shokupan) with Yudane Method

Make the softest, fluffiest homemade bread using the Yudane method. This Shokupan recipe yields a cloud-like texture that stays moist for days, perfect for toast or sandwiches.
- Prep Time: 45 min
- Cook Time: 35 min
- Total Time: 185 min
- Yield: 1 loaf (approx. 12 slices) 1x
- Category: Baking
- Method: Baking
- Cuisine: Japanese
- Diet: Vegetarian
Ingredients
- 100g Bread Flour (for Yudane)
- 150ml Water (for Yudane)
- 300g Bread Flour (for Dough)
- 50g Granulated Sugar
- 1 teaspoon Instant Dry Yeast
- 1 teaspoon Salt
- 60ml Whole Milk, cold
- 40g Unsalted Butter, softened
- 1 large Egg, room temperature
- 30g Heavy Cream
Instructions
- Prepare the Yudane: Whisk the 100g bread flour and 150ml water in a small saucepan until smooth. Cook over medium-low heat, stirring constantly, until the mixture thickens into a thick paste, resembling mashed potatoes (about 5-7 minutes). Remove from heat, transfer to a small bowl, cover with plastic wrap pressed directly onto the surface, and cool completely to room temperature or chill until cold.
- Mix Dry Ingredients: In the bowl of a stand mixer fitted with the dough hook, combine the 300g bread flour, sugar, yeast, and salt. Mix briefly on low speed.
- Combine Wet Ingredients: Add the cold Yudane paste, cold milk, egg, and heavy cream to the dry ingredients. Mix on low speed until a shaggy dough forms.
- Knead: Increase the speed to medium-low and knead for 5 minutes. Add the softened butter and continue kneading for another 10-15 minutes until the dough is smooth, elastic, and passes the windowpane test. The dough will be very soft.
- First Proof: Place the dough in a lightly oiled bowl, turning to coat. Cover and let it rise in a warm place until doubled in size, about 60-90 minutes.
- Shape the Dough: Gently deflate the dough. Divide it into three equal pieces. Shape each piece into a tight ball. Let the balls rest, covered, for 15 minutes.
- Final Shaping: Roll each ball into a rectangle. Roll each rectangle tightly into a log shape. Place the three logs side-by-side, seam-side down, into a greased 8×4 inch loaf pan.
- Second Proof: Cover the pan loosely and let it rise in a warm place until the dough has nearly doubled and crests about 1 inch over the top of the pan, about 45-60 minutes. Preheat your oven to 350°F (175°C) during the last 15 minutes of proofing.
- Bake: Brush the top of the dough lightly with milk or an egg wash for color. Bake for 30-35 minutes, or until the top is golden brown and the internal temperature reaches 200°F (93°C).
- Cool: Immediately remove the bread from the pan and cool completely on a wire rack before slicing. This bread is best sliced when fully cool to maintain its soft texture.
Notes
- The Yudane method is key to achieving the cloud-like texture and keeping the bread fresh longer.
- A stand mixer is recommended for the extended kneading time required for this soft dough.
- For the softest crust, brush the baked loaf with melted butter immediately after removing it from the oven.
Nutrition
- Serving Size: 1 slice
- Calories: 160
- Sugar: 7
- Sodium: 180
- Fat: 4
- Saturated Fat: 2
- Unsaturated Fat: 2
- Trans Fat: 0
- Carbohydrates: 26
- Fiber: 1
- Protein: 4
- Cholesterol: 30