
Do you ever look at those pastry shop wonders—the ones piled high with jewel-toned fruit—and think, “No way I can make that after work”? I used to think that, too! But here at Dishicious, we engineer efficiency into every recipe. That’s why I’m so thrilled about this **raspberry mango tart**; it looks like it took an entire day, but thanks to my project manager approach, it’s surprisingly straightforward and absolutely perfect for summer entertaining.
I’m Leo Grant, and I specialize in taking complicated recipes and streamlining them into systems that deliver big flavor without the evening stress. This recipe proves you don’t need to be a pastry chef for an impressive result. We focus on reliable, foolproof methods, so you get the elegance of a gourmet tart with the simplicity of a well-organized project. You can find more of these reliable dessert recipes right here!
- Why This Raspberry Mango Tart Recipe Works Every Time
- Gathering Ingredients for Your Raspberry Mango Tart
- How to Prepare the Perfect Raspberry Mango Tart
- Tips for Success with Your Raspberry Mango Tart
- Ingredient Notes and Substitutions for This Raspberry Mango Tart
- Serving Suggestions for Your Fresh Fruit Tart Tutorial
- Storage and Make Ahead Fruit Tarts
- Frequently Asked Questions About the Raspberry Mango Tart
- Estimated Nutrition for This Sweet Tart Recipe
Why This Raspberry Mango Tart Recipe Works Every Time
I developed this tart specifically because I needed a showstopper that didn’t require me to stress out after work. We stripped away all the complicated steps while keeping the payoff huge. It’s about maximizing flavor and appearance with minimal time investment. Trust me, this is how you win at summer baking.
- The perfect balance of sweet and tart between the two fruits.
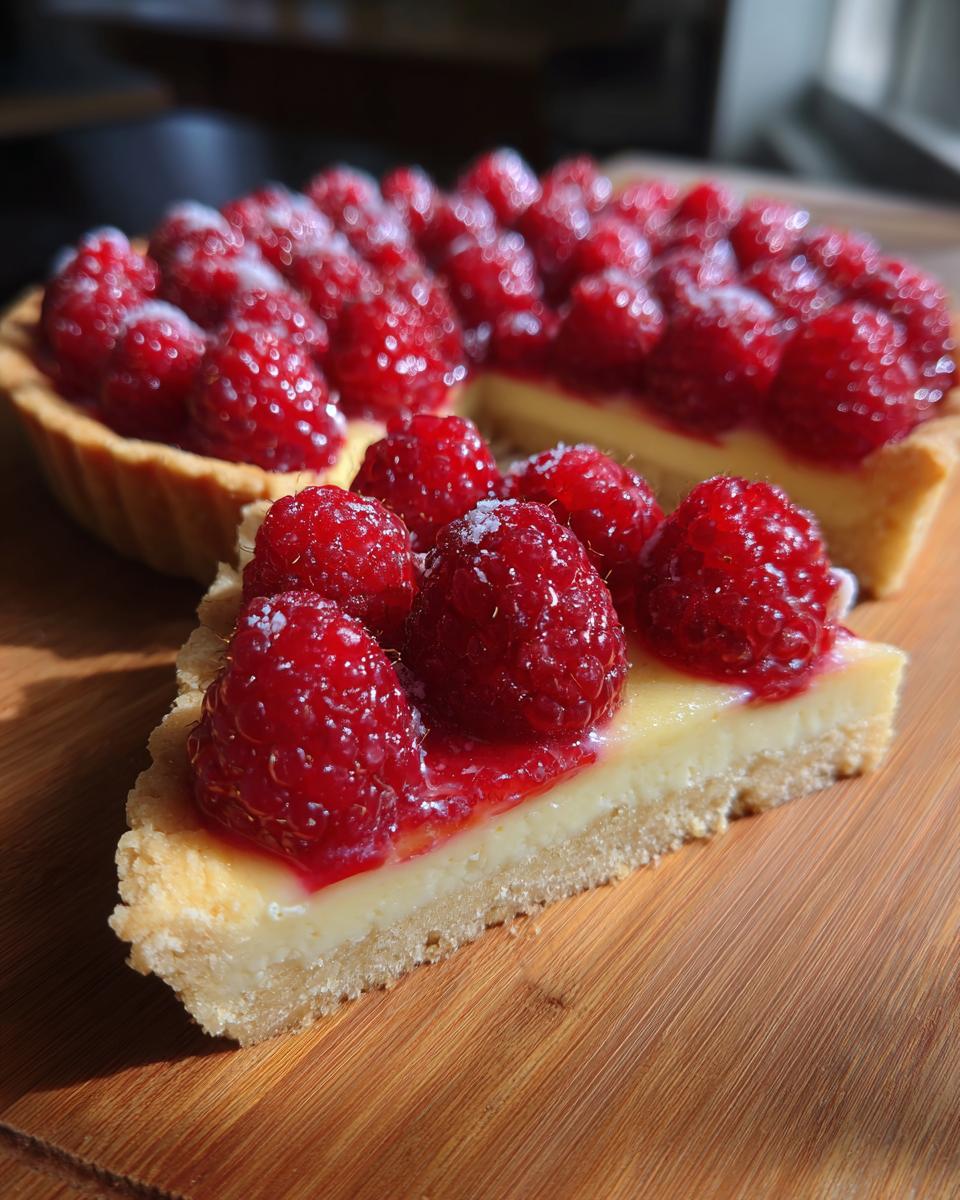
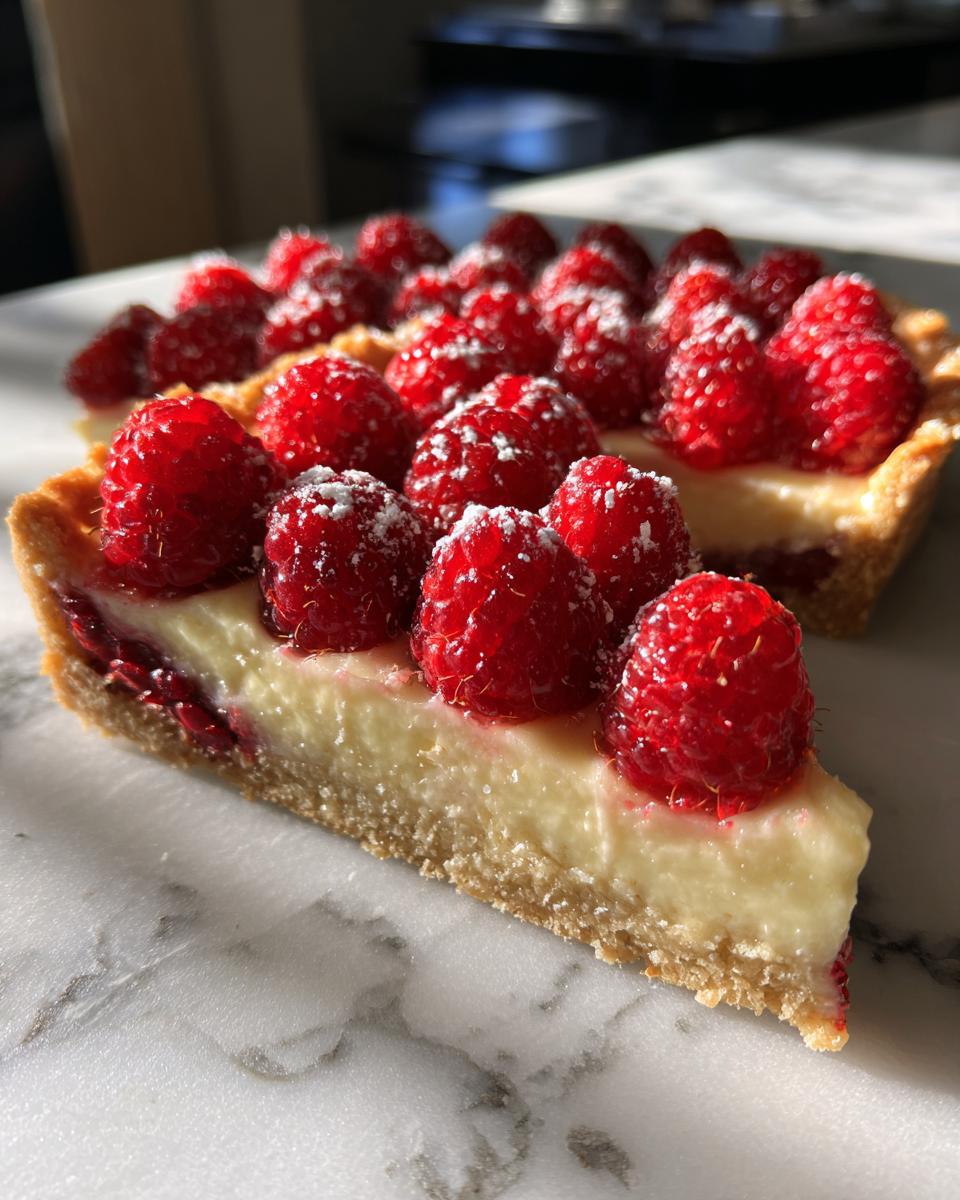
- A sturdy, flavorful shortbread crust that handles the moisture beautifully.
- Maximum visual impact with minimal effort on arranging the fruit.
Bright Raspberry Mango Flavor Combinations
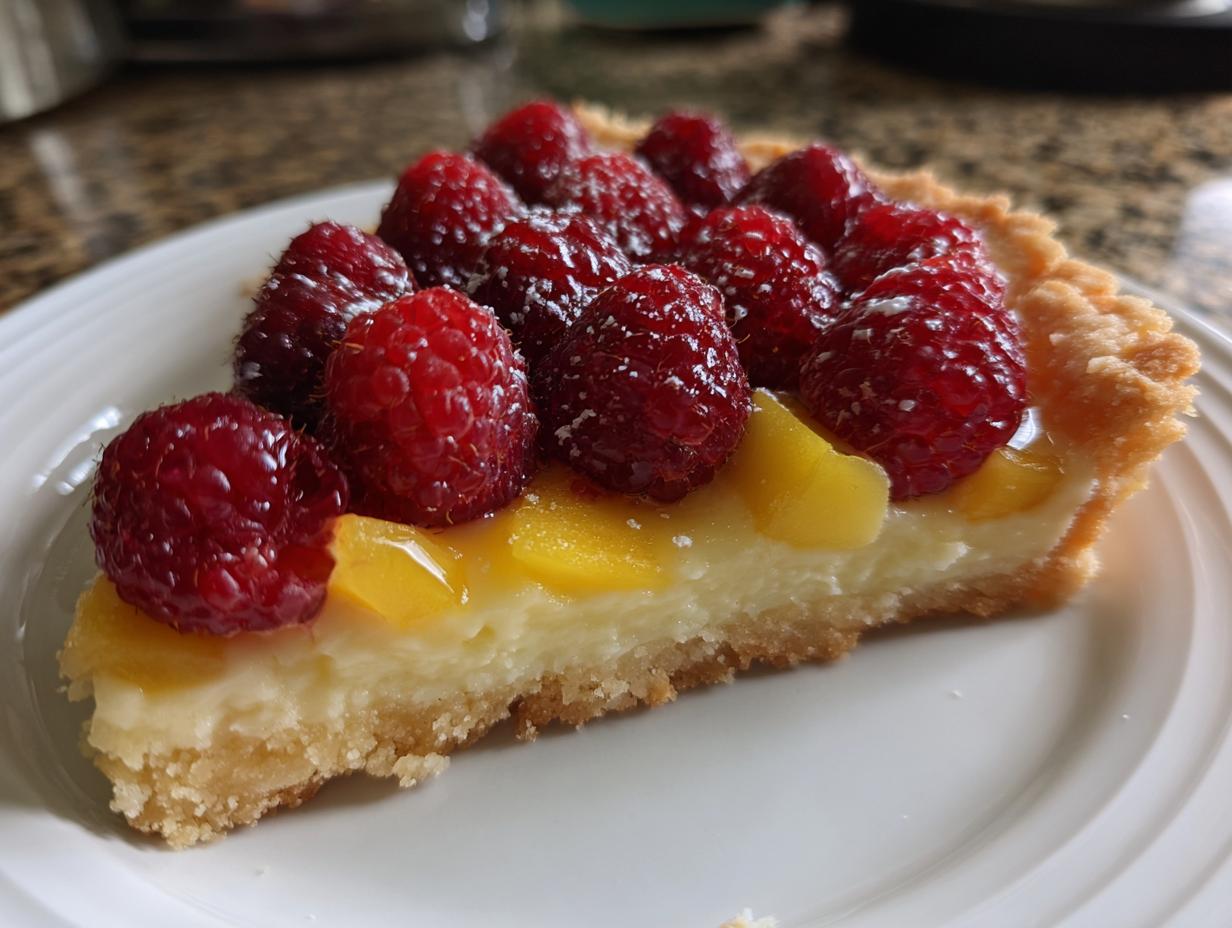
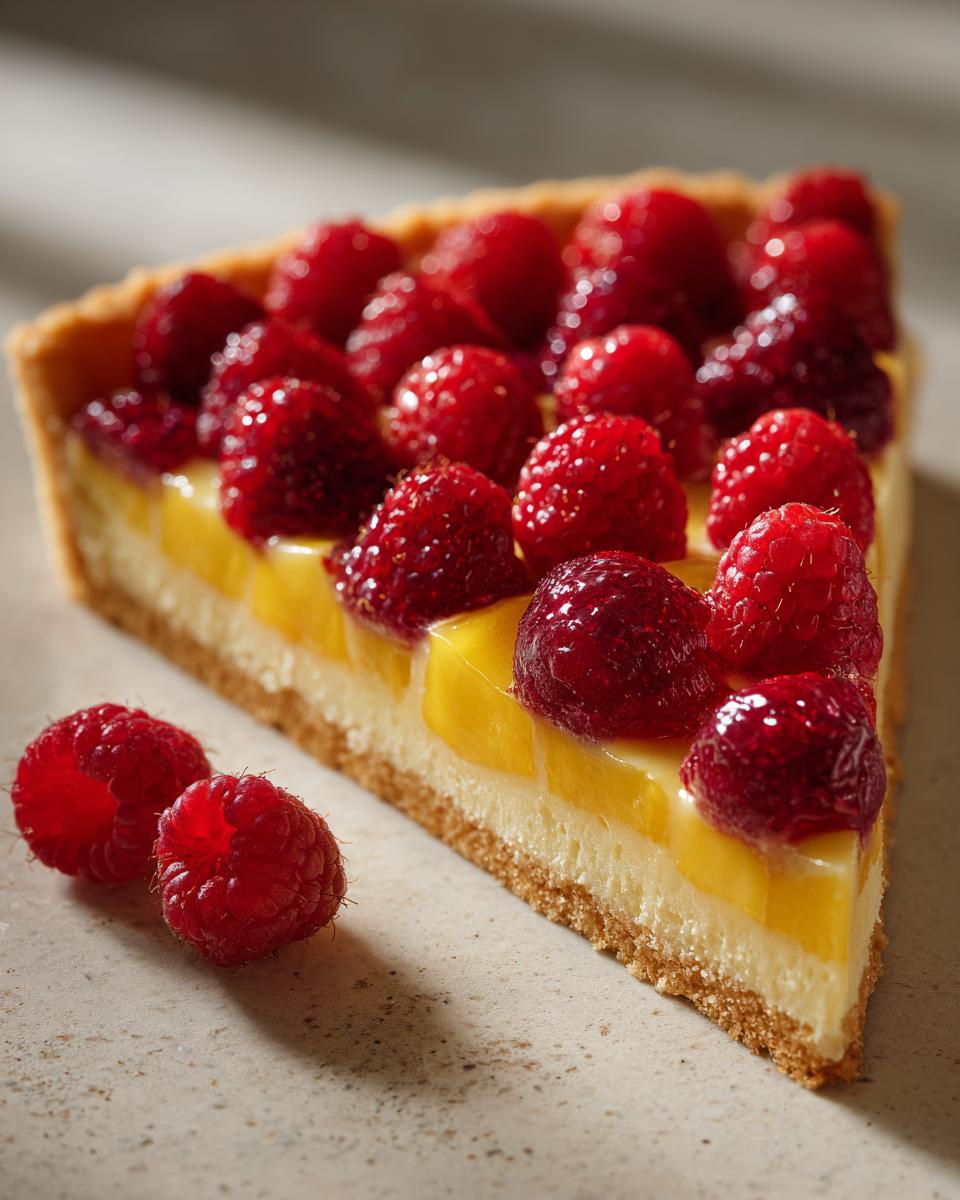
This is where the magic happens! The sharp, bright burst of fresh raspberries cuts through the rich sweetness of the mango slices. The almond-based frangipane filling underneath acts like a warm, creamy hug, supporting the fruit without ever competing with it. It’s incredibly bright on the palate.
Elegant Fruit Tart Presentation Made Simple
You don’t need professional piping bags for elegant fruit tart presentation. I find that overlapping the mango slices in circles and then tucking the raspberries into the gaps creates incredible pattern depth. A quick glaze makes everything shine, turning a simple summer bake into something truly impressive for parties.

Gathering Ingredients for Your Raspberry Mango Tart
Okay, project time! Breaking down the ingredient list is Step Two. When you’re making a **raspberry mango tart**, you need clarity on exactly what’s going into the crust, the filling, and what’s going on top. I’ve laid out exactly what you need below, ensuring nothing is left to guesswork. Good workflow starts with having everything measured out perfectly.
For the glaze, stick with apricot jam—it melts beautifully and gives that high-end shine. If you’re interested in making homemade jam sometime, check out how I make easy raspberry jam without pectin right here.
For the Vanilla Shortbread Crust
Remember, the butter *must* be cold—like, straight-from-the-fridge cold. That’s the secret to avoiding a greasy crust. You’ll need 1 1/2 cups all-purpose flour, 1/2 cup powdered sugar, 1/4 teaspoon salt, 1/2 cup (1 stick) cold unsalted butter, cubed, 1 large egg yolk, and 1 teaspoon vanilla extract.
For the Frangipane Filling
For this rich almond filling, make sure your 1/2 cup (1 stick) of unsalted butter is softened—we’re creaming this, not cutting it in! You’ll use 1/2 cup granulated sugar, 1 large egg plus 1 large egg yolk, 1 teaspoon vanilla extract, 1/2 cup almond flour, 2 tablespoons all-purpose flour, and that crucial 1/4 teaspoon of almond extract.
For the Fruit Topping and Glaze
For the topping you need 1 cup of fresh raspberries and 1 large ripe mango, which you must slice thinly! The glaze is simple: just 1/4 cup of apricot jam and 1 tablespoon of water. Heat them together until they become liquid gold.
How to Prepare the Perfect Raspberry Mango Tart
This is where the project planning pays off! We are moving fast because we prepped our ingredients correctly. Look, I always say the difference between a good tart and a disaster is sticking to the timing. We’re working in phases here—crust, filling, assembly—to make sure everything bakes perfectly and sets up right. You’ll get fantastic results if you don’t rush the chilling or the blind bake.
If you need a deep dive on getting that shell right, I’ve got you covered with a full tart shell baking guide. But for now, let’s get this done!
Step 1: Making and Blind Baking the Tart Shell
Get your food processor ready. Toss in the dry crust ingredients, add the cold butter cubes, and pulse until it looks like coarse sand—we are *not* making mud! Add the yolk and vanilla, and pulse just until the dough clumps together. That’s it. If you overmix here, your crust will be tough, so stop as soon as it binds. Press that dough gently but evenly into your 9-inch tart pan. Now, chill it in the fridge for a solid 30 minutes. Preheat your oven to 375 degrees F (190 degrees C) while it chills. Line the dough with parchment paper, fill it with weights, and bake for 15 minutes (that’s the first blind bake). Pull out the weights and paper and bake for five to seven more minutes until it’s just starting to turn golden brown.
Step 2: Mixing the Gourmet Fruit Tart Filling
While the shell cools a minute, we move to the filling. Grab a medium bowl. Cream that softened butter and granulated sugar until it’s honestly light and fluffy—this aeration is important, don’t skip it! Then beat in the egg, extra yolk, and extracts. Only once that’s smooth do you gently fold in your almond flour and the two tablespoons of AP flour. Mixing the dry into the wet needs to be minimal; only mix until you don’t see streaks of dry flour anymore. Overworking the almond flour makes the frangipane dense, and we want light richness here, not a brick!
Step 3: Assembling and Final Bake of the Raspberry Mango Tart
Spread that lovely frangipane evenly across your partially baked shell. Pop it back into the 375 degrees F oven for 15 minutes. Once the frangipane puffs slightly, pull it out carefully! Now comes the artistic part—arrange your thinly sliced mango and fresh raspberries over the filling. Try to keep them relatively even. Return the tart to the oven for a final 10 to 15 minutes. You are looking for the frangipane edges to be golden and the center to feel set when you tap it lightly.
Step 4: Creating the Glaze and Chilling
This final step guarantees that magazine-worthy shine! In a tiny saucepan, gently heat your apricot jam with that tablespoon of water until it’s completely melted and runny. You absolutely need to strain this through a fine sieve to get rid of any solid bits—this is non-negotiable for an elegant finish. Once the **raspberry mango tart** has cooled completely on the rack, brush that warm glaze lightly over the fruit. Then, cover it gently and chill for a minimum of two hours. Seriously, two hours! If you try to slice it warm, the filling will ooze everywhere.
Tips for Success with Your Raspberry Mango Tart
Even though this is a streamlined recipe, a few key points elevate it from good to truly outstanding. Remember, I approach cooking like a system—if you execute these small steps, the outcome is guaranteed. This ensures your **raspberry mango tart** sets up beautifully and slices cleanly, which is always my top priority for entertaining.
Handling the Dough and Frangipane
The main thing to watch out for, both in the crust and the filling, is overmixing. In the food processor, stop pulsing the dough the second it comes together—no hesitating! For the frangipane, incorporate the flours slowly by hand until barely combined. Overdeveloped gluten means a tough edge, and we want tender shortbread!
Achieving the Best Fruit Arrangement
If your mango slices are all different thicknesses, they’ll bake unevenly, and frankly, it looks messy. Spend an extra minute making sure your mango slices are uniform, maybe a quarter-inch thick at most. This means they all soften at the same rate when the tart goes back in for that final bake. Uniformity equals perfection in presentation, trust me on this one.
Ingredient Notes and Substitutions for This Raspberry Mango Tart
Because I design these recipes for real life, I know sometimes you open the pantry and find you’re missing one tiny thing. That’s okay! The structure of this **raspberry mango tart** is solid, but we can be flexible with certain elements without losing that incredible summer flavor profile we’re aiming for. We need to maintain the balance between the berries and the tropical sweetness, though!
Glaze Alternatives
If you don’t have apricot jam on hand for that high-shine finish, don’t stress. Apple jelly works like a charm as an almost direct substitute. Just melt it down with the water the same way. It offers a nice, neutral sweetness that lets the raspberry and mango flavors really pop in the foreground. It’s a fantastic backup!
Crust Variations: Homemade Fruit Tart Crust Ideas
If you’re looking to cut down on time even further, you can absolutely pivot to a no-bake crust. For a shortcut that fits under my “Easy Raspberry Mango Baking” umbrella, you can blend 1 1/2 cups of graham cracker crumbs with 1/4 cup of sugar and 6 tablespoons of melted butter. Press that into the pan, chill it well, and skip the blind baking entirely. It changes the flavor slightly, but it’s definitely faster!
Serving Suggestions for Your Fresh Fruit Tart Tutorial
This **raspberry mango tart** deserves a beautiful stage when it comes out of the fridge! Since we put so much effort into that arrangement, a simple base works best. If you’re looking for ways to elevate your **tropical fruit pastry ideas**, I suggest serving it on a classic white platter to make those colors really jump. It looks fantastic paired with a tiny bowl of homemade fruit dip on the side—I have a great yogurt-based recipe you can check out over here.
For a truly impressive finish for parties, skip the heavy accompaniments. A light dusting of powdered sugar (only around the edges, not over the glaze!) and maybe a few extra fresh mint leaves scattered on the serving tray is all this beauty needs. The tart is rich enough on its own!
Storage and Make Ahead Fruit Tarts
I know you want to bake this beauty ahead of time for a party, and yes, this absolutely qualifies as a fantastic make ahead fruit tart! The best performance happens when it’s fully set. Chilling is vital because the frangipane needs time to firm up around those fruit slices. You can bake the crust and filling completely a day in advance, glaze it, and keep it chilled—but aim to slice it no more than an hour before serving.
Store leftovers, covered loosely, in the refrigerator for up to three days. Just remember, the crust might soften slightly as it sits, but it will still be delicious. That chilling time is the key structural component for clean slices!
Frequently Asked Questions About the Raspberry Mango Tart
When you’re tackling a **gourmet fruit tart filling**, questions are bound to pop up! I’ve tried to preemptively solve the tricky points right here. My goal is always to make sure your experience results in a fantastic **raspberry mango dessert recipe** that looks professional but was easy to execute.
Can I use frozen raspberries or mangoes in this Raspberry Mango Dessert Recipe?
For the topping, please, stick to fresh fruit. Frozen berries and mangoes release way too much water when they thaw, and that moisture will ruin our beautiful glaze and potentially make the frangipane gummy. It just wrecks the presentation we worked so hard on! However, if you were only using the fruit *inside* the frangipane layer (not the top design), you could thaw and pat them extremely dry before incorporating them into the almond cream.
How do I prevent the crust from getting soggy?
This is the #1 anxiety point for any baker making a **sweet tart recipe with berries and tropical fruit**! The solution is our two-step baking process. We blind bake the shell first until it’s golden—that dries out the dough structure. Then, critically, you must let that shell cool down significantly before pouring in the frangipane. Giving the shortbread shell time to set and cool creates a barrier against the moisture from the filling. Don’t rush that cooling step!
What is frangipane, and is it necessary for this tart?
Ah, frangipane! Think of it as a rich, luxurious almond cream. It’s basically butter, sugar, eggs, and almond flour whipped together. While you *could* try a simple custard, I argue that the frangipane is essential for this specific **raspberry mango tart**. Why? Because it bakes up firm enough to support the weight of the mango slices, and it adds the perfect nutty richness that complements the tropical fruit so well. It’s the backbone of this whole setup!
If you love reliable recipe frameworks, you can see more of my systematic approaches to baking here!
Estimated Nutrition for This Sweet Tart Recipe
Since we’re dealing with butter, sugar, and fruit, I like to keep track of what’s going into these beautiful treats. This information helps me plan the rest of the week’s menu, you know? Remember that this is just an estimation based on the standard ingredients listed—if you swap butter for coconut oil or use a lighter hand with the frangipane, things change!
We’re looking at this data as a guideline, not a hard rule, for enjoying this wonderful **sweet tart recipe**.
- Serving Size: 1 slice
- Calories: 380
- Sugar: 28g
- Fat: 24g (Includes about 14g Saturated Fat)
- Protein: 6g
- Carbohydrates: 38g
- Sodium: 150mg
There you have it! It’s detailed, it’s transparent, and it gives you the full picture of what you’re serving up. Know your ingredients, and you can bake with confidence!
PrintRaspberry Mango Tart with Vanilla Shortbread Crust

Make this impressive Raspberry Mango Tart using a simple vanilla shortbread crust and a smooth frangipane filling. It is a straightforward recipe for a beautiful summer dessert.
- Prep Time: 30 min
- Cook Time: 50 min
- Total Time: 80 min
- Yield: 8 servings 1x
- Category: Dessert
- Method: Baking
- Cuisine: American
- Diet: Vegetarian
Ingredients
- For the Shortbread Crust: 1 1/2 cups all-purpose flour
- 1/2 cup powdered sugar
- 1/4 teaspoon salt
- 1/2 cup (1 stick) cold unsalted butter, cubed
- 1 large egg yolk
- 1 teaspoon vanilla extract
- For the Frangipane Filling: 1/2 cup (1 stick) unsalted butter, softened
- 1/2 cup granulated sugar
- 1 large egg plus 1 large egg yolk
- 1 teaspoon vanilla extract
- 1/2 cup almond flour
- 2 tablespoons all-purpose flour
- 1/4 teaspoon almond extract
- For the Topping: 1 cup fresh raspberries
- 1 large ripe mango, thinly sliced
- 1/4 cup apricot jam (for glaze)
- 1 tablespoon water
Instructions
- Prepare the Crust: In a food processor, pulse the flour, powdered sugar, and salt. Add the cold butter and pulse until the mixture resembles coarse crumbs. Add the egg yolk and vanilla extract. Pulse until the dough just comes together. Do not overmix.
- Press the dough evenly into a 9-inch tart pan with a removable bottom. Prick the bottom all over with a fork. Chill the crust for 30 minutes.
- Preheat your oven to 375 degrees F (190 degrees C). Line the chilled crust with parchment paper and fill with pie weights or dried beans. Bake for 15 minutes (blind bake). Remove the weights and paper and bake for another 5 to 7 minutes until lightly golden. Let cool slightly.
- Prepare the Frangipane: In a medium bowl, cream together the softened butter and granulated sugar until light and fluffy. Beat in the egg, egg yolk, vanilla extract, and almond extract until combined.
- Mix in the almond flour and all-purpose flour until just incorporated. Spread the frangipane evenly into the partially baked tart shell.
- Bake the tart with the frangipane for 15 minutes at 375 degrees F (190 degrees C).
- Remove the tart from the oven. Arrange the sliced mango and fresh raspberries decoratively over the frangipane layer.
- Return the tart to the oven and bake for an additional 10 to 15 minutes, or until the frangipane is set and lightly golden around the edges. Cool completely on a wire rack.
- Make the Glaze: In a small saucepan, heat the apricot jam and water over low heat until melted and smooth. Strain the mixture through a fine-mesh sieve to remove any solids.
- Brush the warm glaze lightly over the fruit topping for shine. Chill the tart for at least 2 hours before slicing and serving.
Notes
- For a cleaner slice, chill the finished tart for at least 4 hours or overnight before removing the outer ring of the tart pan.
- If you do not have apricot jam, use apple jelly as a substitute for the glaze.
- This recipe works well as a make ahead fruit tart for parties.
Nutrition
- Serving Size: 1 slice
- Calories: 380
- Sugar: 28g
- Sodium: 150mg
- Fat: 24g
- Saturated Fat: 14g
- Unsaturated Fat: 10g
- Trans Fat: 0g
- Carbohydrates: 38g
- Fiber: 3g
- Protein: 6g
- Cholesterol: 95mg