
When summer hits and the produce stand overflows with the best zucchini and tomatoes you’ve ever seen, I know exactly how you feel. You want that beautiful, rustic, Mediterranean look without spending hours fussing over a stove. I designed this **roasted ratatouille** recipe specifically for folks like me—people who manage projects all day and need dinner to be efficient, not chaotic. Forget the fussy stirring! This dish is about organization: slicing everything uniformly and letting the oven do the heavy lifting. It’s picture-perfect, healthy, and requires minimal hands-on time. Trust me, this streamlined approach to classic French cooking delivers maximum elegance with minimal fuss.
- Why This Roasted Ratatouille Is Your New Summer Staple
- Gathering Ingredients for Your Roasted Ratatouille
- The Project Plan: Step-by-Step Instructions for Roasted Ratatouille
- Leo Grant's Pro Tips for Mastering Roasted Ratatouille
- Serving Suggestions for Your Roasted Ratatouille
- Storage and Reheating Instructions for Leftover Roasted Ratatouille
- Frequently Asked Questions About this Ratatouille
- Nutritional Estimate for Your Sliced Vegetable Bake
- Share Your Successful Roasted Ratatouille
Why This Roasted Ratatouille Is Your New Summer Staple
When I engineered this recipe, I wasn’t trying to reinvent the wheel of classic French cooking; I was trying to fit it into a busy schedule. This isn’t a stew where everything mashes together. This is streamlined perfection. It proves you can have a stunning presentation without dedicating your whole afternoon to the preparation phase. We’ve cut the complexity, but kept all the fresh flavor of the garden.
- It takes just 20 minutes of prep, and then the oven handles the rest of the work. That’s efficiency I can stand behind!
- The layered look is incredibly impressive on the table, making it feel like a special occasion vegetarian dinner even if it’s Tuesday.
- We use seasonal **summer vegetables** that are naturally low-calorie and packed with goodness. If you’re looking for other healthy recipes you can rely on, this is the gold standard.
Maximum Visual Impact, Minimal Effort
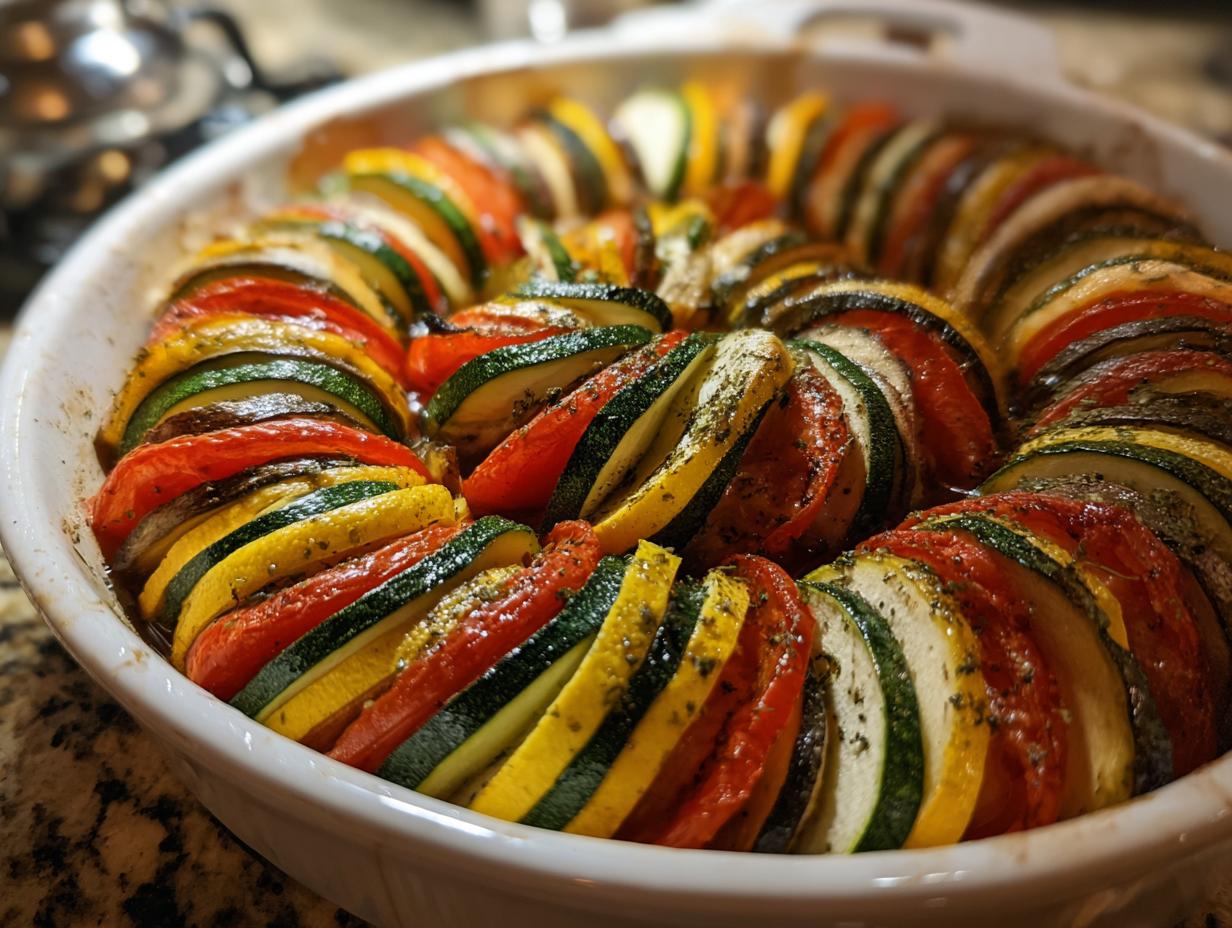
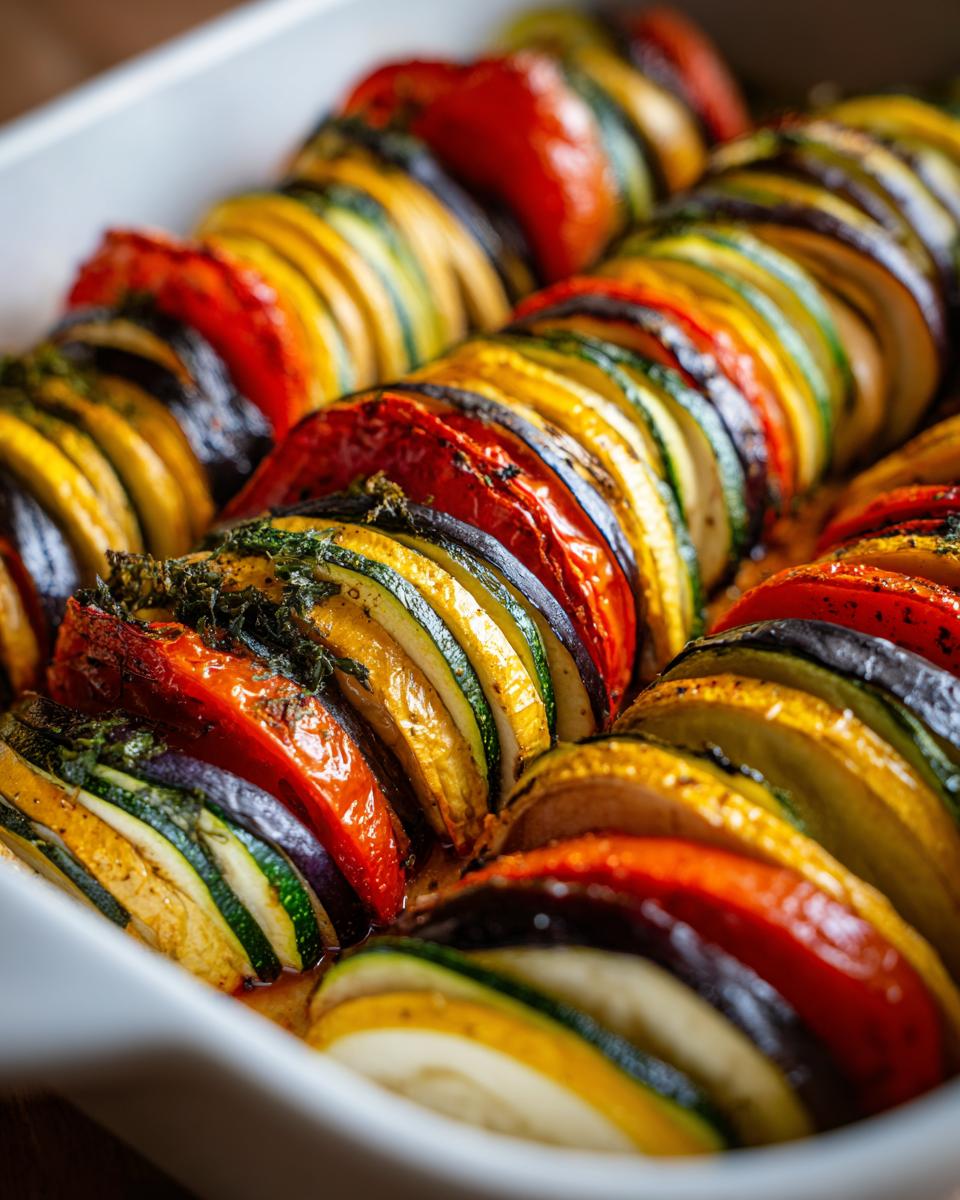
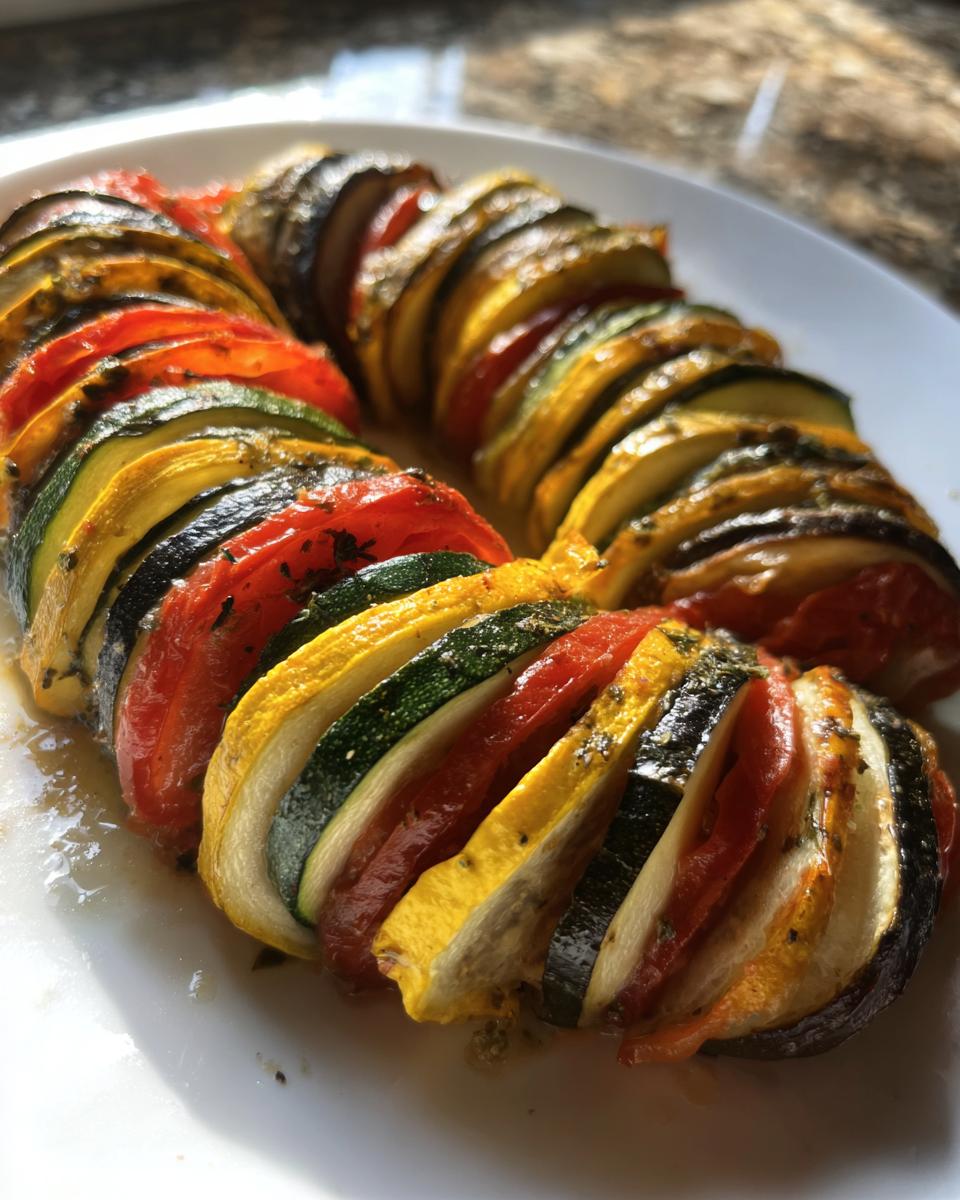
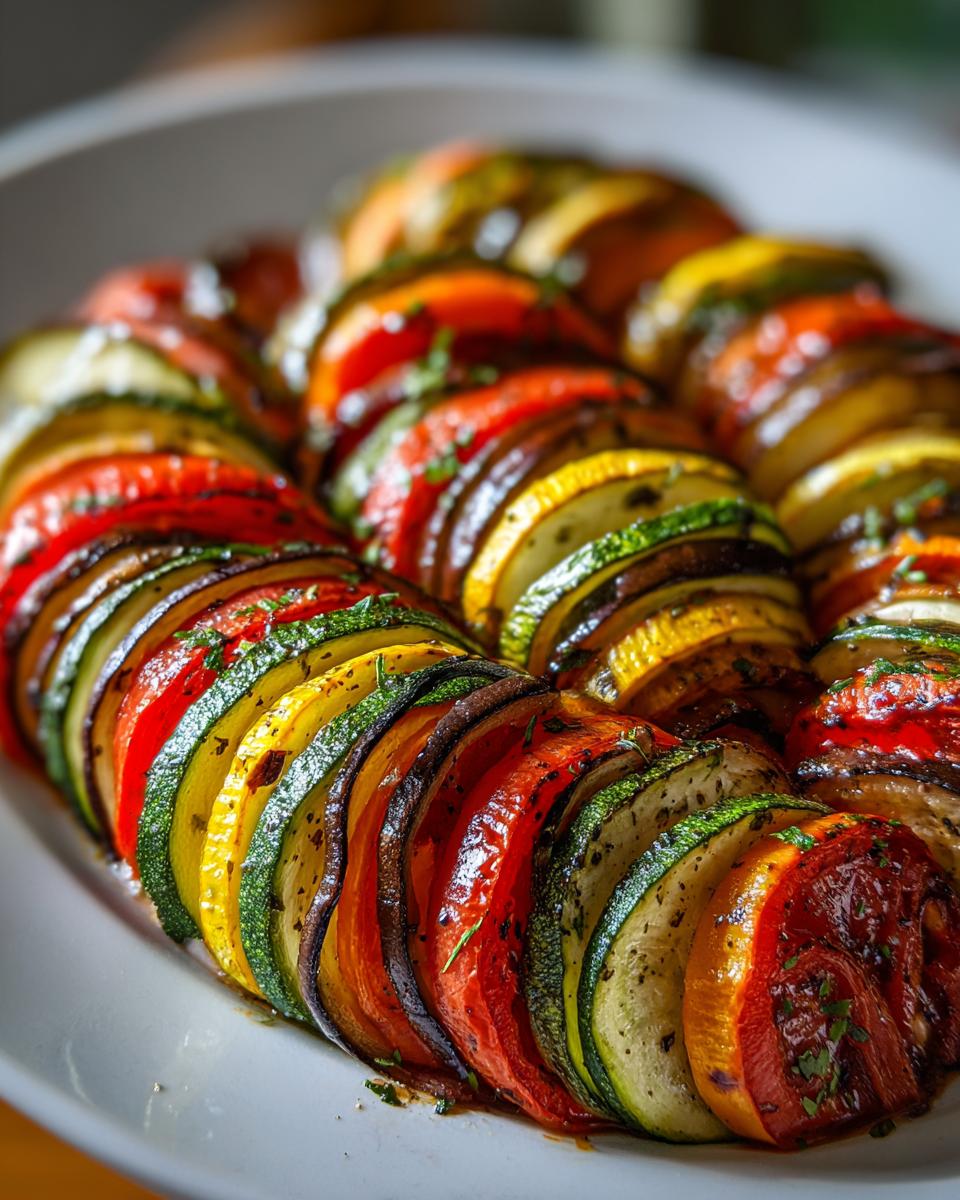
Honestly, the best part of this **ratatouille** is how it looks before it even hits your mouth. Instead of chopping everything randomly, you take the time to slice the zucchini, squash, and tomatoes consistently. When they bake up layered and upright, it looks like you spent hours arranging a beautiful centerpiece. It’s all about that structure!
A Truly Healthy Recipes Main Dish
If your goal is eating clean, this is a winner—it’s naturally based around vegetables, meaning it’s inherently high in fiber and low in unhealthy fats. It stands up beautifully as a primary **vegetarian dinner** without needing any heavy additions. It’s pure Mediterranean flavor brought right into your dinner rotation.
Gathering Ingredients for Your Roasted Ratatouille
Now that we’ve established this is a simple project, let’s talk about what you need to gather. Remember, efficiency means getting everything ready upfront. You’ll need about two medium zucchini and two medium yellow squash, and I need you to slice them all precisely to about a quarter of an inch thick. Don’t eyeball this; consistency in thickness is key for even baking! You’ll also need your eggplant and Roma tomatoes, sliced equally thin. Don’t forget the yellow onion, which acts like the unsung hero holding everything together.
For the flavor punch, mince up four cloves of garlic. The base of this flavor comes from a quarter cup of good olive oil seasoned with dried thyme and oregano—about a teaspoon of each—plus salt and pepper. Finally, for moisture, grab half a cup of vegetable broth. If you want to give it a little kick of acidity, consider swapping half that broth for a dry white wine; it really brightens up the roasted vegetables.
Ingredient Notes and Substitutions for Perfect Roasted Ratatouille
I mentioned the wine swap above, but let’s talk freshness. Since this dish is all about those beautiful **summer vegetables**, use the freshest tomatoes you can find. They break down nicely and create some of the sauce as they bake. Also, look closely at the eggplant; sometimes they can be a little bitter. If you have time, you can dust the slices with salt for 15 minutes, then blot them dry before arranging. This draws out any excess moisture and bitterness—a little extra step that pays off big time in the final flavor profile.
When you’re shopping, remember we’re trying to mimic that classic **French cooking** presentation, so try to find vegetables that are similar in diameter so your alternating pattern looks neat. This uniformity is crucial for that stunning presentation we’re aiming for.
The Project Plan: Step-by-Step Instructions for Roasted Ratatouille
Okay, every good project needs a solid timeline, right? We’re treating this **roasted ratatouille** like a mission briefing. First things first: get your oven preheated to 375°F (190°C). You need that heat ready to go, so lightly grease that 9×13 inch dish right away. We need efficiency here; no waiting around! If you’re looking for more simple, quick easy dinners, this methodology works every time.
Preparation and Flavor Base Assembly
While the oven warms up, make your flavor concentrate. In a small bowl, you need to whisk together that olive oil, your minced garlic, oregano, thyme, salt, and pepper. I mean *really* whisk it. You want that garlic fully suspended in the oil so every single slice gets a perfect coating. Don’t rush this step; a good base sets you up for success.
Arranging the Slices for Optimal Roasted Ratatouille
This is where the magic visual happens. You’re going to alternate those slices—zucchini, squash, eggplant, tomato—in a tight, overlapping row, kind of like dominoes set up for a show. It should completely fill the dish. Once they are all nestled in nicely, drizzle that seasoned oil mixture evenly over the top. Now, here’s a key move for moistness: pour the vegetable broth around the edges of the dish, not directly on top of the neat rows. We want steam, not soakage!
Baking Schedule and Tenderizing the Summer Vegetables
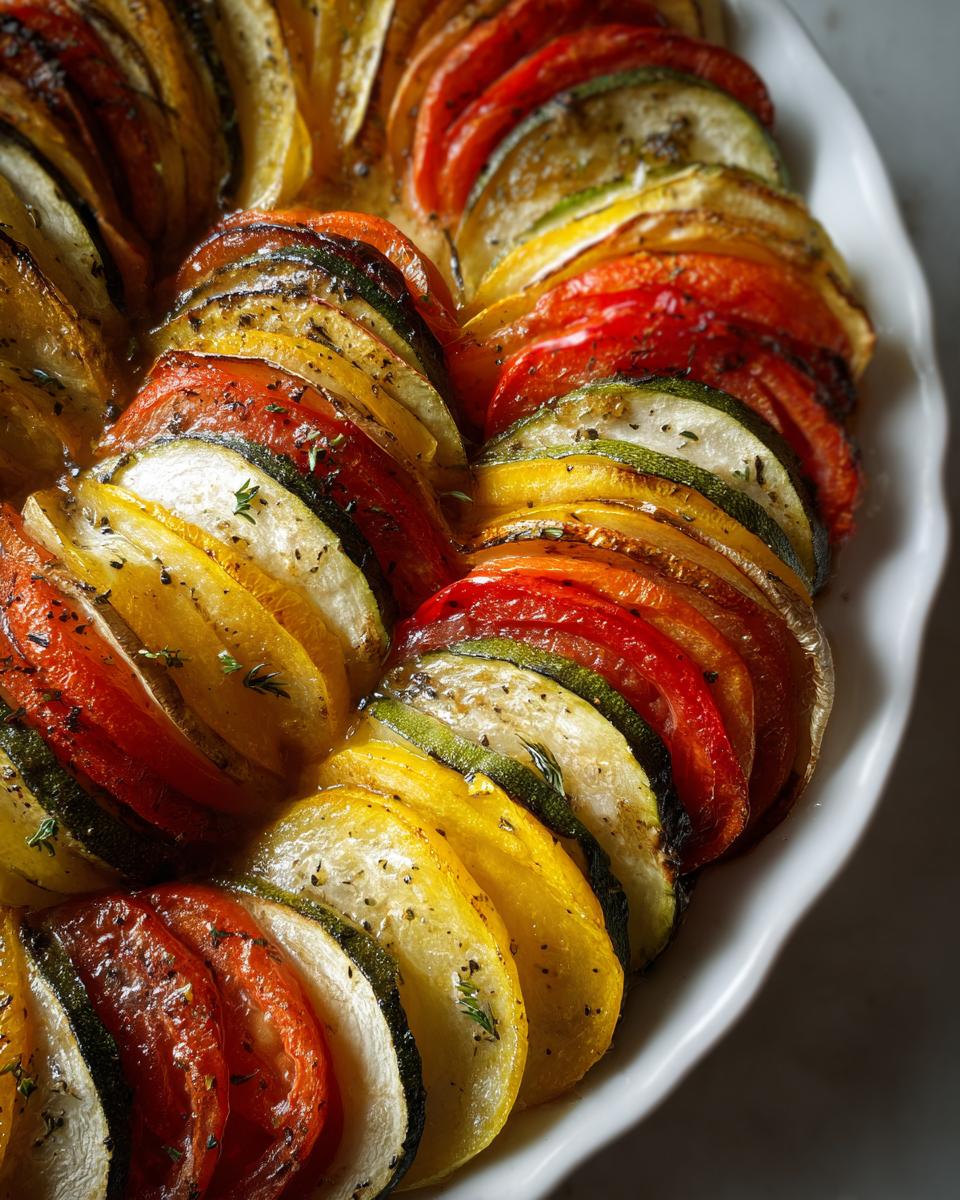
Cover that dish tightly with foil—that traps the steam needed to tenderize those firm **summer vegetables**. Bake it like that for exactly 45 minutes. After that timer goes off, pull the foil off and you’ll let it bake uncovered for another 15 to 20 minutes until the tops look slightly browned and absolutely gorgeous. The final project step is crucial: let it rest for 10 minutes before you even think about cutting into it. This lets all those beautiful juices settle back into the vegetables.
Leo Grant’s Pro Tips for Mastering Roasted Ratatouille
Even with a streamlined process, every recipe has those little insider tricks that take it from good to truly reliable. Since I approach cooking like managing a tight timeline, I learned quickly how to add huge flavor payoffs with minimal extra input. These little nudges guarantee your **roasted ratatouille** comes out spectacular, even if you’re totally new to this style of **French cooking**.
First, don’t settle for bland tops. When you take that foil off for the final bake, if things aren’t browning as quickly as you’d like, just crank the heat up to 400°F for the last five minutes. That quick blast of heat gives those edges a slight caramelization that you just can’t get otherwise. It adds complexity to the flavor profile, which is essential when you’re dealing with just simple **summer vegetables**.
My favorite way to finish? Fresh herbs. I almost always have fresh basil on hand. Once the dish rests for those critical ten minutes, just rip up a handful of fresh basil leaves and scatter them over the top. The fragrance hits you immediately, and that pop of green against the red and yellow vegetables makes it look utterly professional. Parsley works great too, if you prefer something sharper. It’s the simplest way to elevate this into an impressive **vegetarian dinner** without adding any extra cooking time.
And one final thought on the broth: if you notice your vegetables looking a little dry during the uncovered phase, don’t panic. Just add another tiny splash of broth around the edges right away. It prevents the bottom from scorching while the tops finish cooking down. Remember, we’re aiming for tender, not burnt!
Serving Suggestions for Your Roasted Ratatouille
So, you’ve pulled your **roasted ratatouille** out of the oven—it looks gorgeous, smells like the South of France, and now what? This is where we turn this beautiful arrangement of **summer vegetables** into a complete meal. Since this dish is already so rich in flavor and texture, the best pairings are usually something simple that soaks up those olive oil and herb juices.
As a main course for a satisfying **vegetarian dinner**, this dish begs for a hearty base underneath it. My go-to is always a simple grain. Quinoa is fantastic because it’s quick, healthy, and keeps the meal light. Couscous is another excellent, fast option. You just spoon your roasted ratatouille right over the top, letting those softened tomatoes and juices mingle with the grain.
If you’re serving it up with some simple bread, you absolutely need something crusty for dipping! Forget flimsy sandwich bread; you need something that can handle the oil and broth left in the pan. You could make a loaf yourself, or grab a nice baguette. If you’re feeling ambitious, perhaps you could try making some homemade bread bowls—imagine spooning this ratatouille right into a crispy bread bowl! That’s an impressive presentation with very little extra effort on your part.
Honestly, this dish is versatile enough that it shines as a side, too. Pair it alongside some grilled chicken or fish if you’re doing meat, but for me, the clean taste of the **ratatouille** served over polenta is peak summer dining. It’s simple, elegant, and hits that deep, savory Mediterranean note we’re after.
Storage and Reheating Instructions for Leftover Roasted Ratatouille
I’ve got good news: even though this dish looks like it required a professional kitchen, it actually gets even better the next day! That’s one of the big wins of choosing an efficient, project-managed meal. Since we know you might have leftovers from testing out this **roasted ratatouille**, let’s talk about keeping it perfect.
The most important rule for storage? Everything needs to cool down *before* it goes into the fridge. You don’t want to trap steam or introduce warm food into a cold environment; that’s inviting trouble (and speeding up spoilage). Once those beautiful slices are room temperature, transfer the **ratatouille** into a shallow, airtight container. A wider, shallower container is always better than a deep one for leftovers, especially something this moist, because it cools faster.
It keeps beautifully in the fridge for three to four days. Seriously, those herbs and spices just meld into the vegetables overnight, deepening the flavor profile beautifully. Talk about making your weeknight prep easier!
Now, reheating is where we really protect our texture. I know the microwave is fast, but it tends to make the eggplant mushy, and we want to preserve that lovely, tender structure we worked so hard for by overlapping those slices. Always aim for the oven or toaster oven if you can. Heat it back up low and slow—maybe 325°F (160°C)—covered loosely with foil again, for about 10 to 15 minutes. This warms everything through gently, keeping the vegetables soft but intact. If you’re just reheating a small portion, a quick warm-up in a skillet over medium-low heat works too, but give it a gentle stir only once or twice.
Frequently Asked Questions About this Ratatouille
I know when I’m trying a new streamlined recipe, I always have a few nagging technical questions pop up before I dive in. That’s totally normal! We designed this **roasted ratatouille** to be robust, but here are the quick answers to the things I get asked most often about this method.
Can I make this Roasted Ratatouille ahead of time?
Yes, absolutely! In fact, I often think the flavors of this **ratatouille** are even better on day two after the herbs have fully infused everything overnight in the fridge. Just remember what I said about storage: cool it completely before sealing it up tight. This is a huge time saver if you’re planning a big **vegetarian dinner**!
Is this recipe truly authentic French cooking?
That’s a great question! If you look up truly authentic **French cooking** methods, you might find recipes that call for sweating or frying each vegetable separately before layering them. We skipped all that! This baked, layered method gives you the spirit and the visual appeal of a beautiful Provence vegetable bake, but it uses my project manager’s approach: big flavor payoff for super low effort. It’s my modern, efficiency-driven take on the classic.
What if I don’t have eggplant?
Eggplant can be tricky sometimes, so if you find yours is a little soft or you just don’t have any on hand, you can substitute it out with another firm summer vegetable. Zucchini or yellow squash—just slice them to the same quarter-inch thickness. You might need to check for doneness a little earlier since you’re using a vegetable that cooks down a bit faster than eggplant, but it works out just fine.
If you want to check out another efficient French-inspired dish that handles timing well, take a look at my French Onion Chicken Bake recipe. It uses the same philosophy: layer the flavor, trust the oven!
Nutritional Estimate for Your Sliced Vegetable Bake
I always want to be upfront about what we’re eating, even when we’re focusing on flavor and simplicity. Since this **roasted ratatouille** is essentially just vegetables, olive oil, and herbs, it keeps things wonderfully light. As a project manager, I love that we can look at the data right up front and see exactly what’s coming in!
Based on the way we formulate this **sliced vegetable bake**, here is the estimated nutritional breakdown per serving (based on 6 servings total). Remember, these figures are a standard estimate, so they can shift slightly based on the size of your specific **summer vegetables**.
- Serving Size: 1 serving
- Calories: 180
- Total Fat: 10g (This comes mostly from that essential healthy olive oil!)
- Saturated Fat: 1.5g
- Carbohydrates: 22g
- Fiber: 6g (Great for digestion!)
- Sugar: 9g (All-natural sugar from the tomatoes and squash.)
- Protein: 4g
- Cholesterol: 0mg
The beauty of this **healthy recipes** option is the high fiber content countering the carbs. It keeps you satisfied, which is key when you’re trying to make a **vegetarian dinner** that sticks with you. So there you have it—delicious, beautiful, and transparent!
Share Your Successful Roasted Ratatouille
I genuinely love hearing from everyone who tries one of these streamlined, efficient recipes. Getting your feedback, especially on something as visually stunning as this **roasted ratatouille**, is the proof that this process works for real life outside my Chicago kitchen. When you conquer a new dish, that confidence spills over into everything else you cook!
Did you manage to get those slices perfectly alternating? Did the broth placement really make a difference in the bottom layer’s tenderness? I want to see those beautiful, vibrant colors! Please take a picture of your finished **sliced vegetable bake** and tag us or upload it right here. Seeing your interpretation of this classic **French cooking** technique makes my whole week.
And since this site is all about building reliability, please take a moment to rate the recipe using the stars below. Your experience helps others feel confident trying this great **vegetarian dinner** option. If you’re interested in more about how I approach efficient cooking projects, you can always check out the story behind Dishicious right here. Happy cooking, and I can’t wait to see your gorgeous summer vegetable creations!
PrintRoasted Ratatouille: Simple Sliced Vegetable Bake
This recipe presents a visually appealing, layered arrangement of summer vegetables baked until tender. It is a healthy, straightforward vegetarian main dish.
- Prep Time: 20 min
- Cook Time: 65 min
- Total Time: 85 min
- Yield: 6 servings 1x
- Category: Main Dish
- Method: Baking
- Cuisine: French
- Diet: Vegetarian
Ingredients
- 2 medium zucchini, sliced 1/4 inch thick
- 2 medium yellow squash, sliced 1/4 inch thick
- 2 medium eggplant, sliced 1/4 inch thick
- 3 large Roma tomatoes, sliced 1/4 inch thick
- 1 large yellow onion, sliced 1/4 inch thick
- 4 cloves garlic, minced
- 1/4 cup olive oil
- 1 teaspoon dried thyme
- 1 teaspoon dried oregano
- 1/2 teaspoon salt
- 1/4 teaspoon black pepper
- 1/2 cup vegetable broth
Instructions
- Preheat your oven to 375°F (190°C). Lightly grease a 9×13 inch baking dish.
- In a small bowl, mix the olive oil, minced garlic, thyme, oregano, salt, and pepper. This is your flavor base.
- Arrange the sliced vegetables in the prepared baking dish, alternating the zucchini, yellow squash, eggplant, and tomato slices in a tight, overlapping pattern. Start and end with the onion slices if you have them.
- Drizzle the prepared olive oil mixture evenly over the arranged vegetables.
- Pour the vegetable broth into the bottom of the baking dish, avoiding pouring directly over the top layer of vegetables.
- Cover the baking dish tightly with aluminum foil.
- Bake for 45 minutes.
- Remove the foil and continue baking for another 15 to 20 minutes, or until the vegetables are tender and slightly browned on top.
- Let the roasted ratatouille rest for 10 minutes before serving.
Notes
- For an extra layer of flavor, you can sprinkle fresh basil or parsley over the dish after it comes out of the oven.
- If you want a richer flavor, substitute half of the vegetable broth with dry white wine.
- This dish works well as a side or as a main course for a healthy vegetarian dinner.
Nutrition
- Serving Size: 1 serving
- Calories: 180
- Sugar: 9
- Sodium: 350
- Fat: 10
- Saturated Fat: 1.5
- Unsaturated Fat: 8.5
- Trans Fat: 0
- Carbohydrates: 22
- Fiber: 6
- Protein: 4
- Cholesterol: 0