

I don’t know about you, but the smell of the boardwalk in July—that mix of hot sand and overly sweet candy—instantly takes me back to vacation. If you miss those days, I have the perfect project for you: making classic, chewy salt water taffy right in your own kitchen! Forget those complicated candy tutorials; here at Dishicious, we treat recipes like streamlined projects. As the founder, Leo Grant, I apply my project management background to everything, which means making this complex-sounding homemade candy is surprisingly reliable and simple. You deserve that chewy, colorful beach snack without the drive to the coast.
- Why You Need This Easy Salt Water Taffy Recipe
- Gathering Your Ingredients for Homemade Salt Water Taffy
- The Project Plan: How to Make Salt Water Taffy
- Tips for Success Making Salt Water Taffy
- Serving Suggestions for Your Chewy Candy
- Storage and Keeping Salt Water Taffy Fresh
- Frequently Asked Questions About This Taffy Recipe
- Estimated Nutritional Data for Salt Water Taffy
- Share Your Homemade Candy Creations
Why You Need This Easy Salt Water Taffy Recipe
This isn’t just candy; it’s your next fun weekend project. Here’s why you should start pulling this batch right now:
- You capture that perfect, nostalgic boardwalk taste.
- The process results in a fantastic, unmistakably chewy candy texture.
- It’s a reliable taffy recipe that yields about a pound of pure joy.
- Perfect for making instant summer treats or fun beach snacks.
Check out all our other dessert ideas here: our dessert recipes.
Gathering Your Ingredients for Homemade Salt Water Taffy
When you approach candy making like a project, laying out everything first—what we call mise en place—is essential. Temperature control is key here, so having all your components ready means you won’t be scrambling while the sugar is dangerously hot. Trust me, the reliability of this taffy recipe rests on having the right stuff measured out beforehand. This process results in about a pound of incredible homemade candy.
Don’t stress too much about the color! Food coloring is purely optional, but adding a few drops really brings out that classic, vibrant look associated with good salt water taffy.
Essential Components for Chewy Candy
- 2 cups granulated sugar
- 1 cup light corn syrup
- 1 cup water
- 1 teaspoon vanilla extract
- 1/2 teaspoon salt
- 1 tablespoon butter, softened (This is crucial for greasing your hands later!)
- Food coloring (optional)
The Project Plan: How to Make Salt Water Taffy
Okay, now that we have all our components assembled, let’s execute this plan. Making candy might sound intimidating, especially something as technical as achieving that perfect chewy candy stage, but we’re breaking it down. Think of this like breaking down a complicated work deliverable into simple, achievable micro-tasks. The total active time here is low—only about 15 minutes of real cooking, plus 20 minutes of prep. If you’re looking for recipes that save time for later in the week, you can check out some quick, easy dinners we’ve optimized too: our quick and easy dinners.
Step 1: Preparing the Cooking Surface
First things first: safety and preparation. Lightly grease a large baking sheet. If you want true peace of mind, line it with parchment paper—that’s my standard move for anything sticky. Also, make sure that tablespoon of butter you measured out earlier is handy; you’ll need it softened for greasing your hands way down the line, so don’t use it all up in the pan!
Step 2: Cooking the Syrup to Firm Ball Stage
Grab your heavy-bottomed pan. Combine the sugar, corn syrup, and water. Heat this over medium heat, stirring gently until that sugar dissolves completely. Now, here is the rule: STOP STIRRING once it starts boiling! From this point on, you just let the thermometer do the work. You must cook the syrup undisturbed until your candy thermometer hits exactly 250 degrees Fahrenheit. That is your Firm Ball Stage—it’s the bedrock of this taffy recipe.
Step 3: Flavoring and Initial Cooling
Once you hit 250°F, yank that pan right off the heat immediately. Carefully stir in your salt and the vanilla extract. If you decided to go wild with food coloring for multi-colored salt water taffy, drop the color in now. Pour this entire hot mixture right onto that prepared baking sheet. You have to let it cool completely. Seriously, walk away. It needs about 15 to 20 minutes until it’s cool enough that you don’t instantly burn your hands handling the pliable mass.
Step 4: The Pulling Process for Perfect Salt Water Taffy
Time to get physical! Generously grease both hands with that softened butter you set aside. Lift the cooled candy mass off the sheet. Now comes the fun chaos! You fold the candy over itself and pull. Fold, pull, fold, pull. You need to keep doing this for a good 10 to 15 minutes. This pulling action is what incorporates the air necessary to transform the sticky syrup into that signature, opaque, stiff homemade candy texture. I remember the first time I did this—it felt like I was wrestling a giant, bright pink gummy bear! When it finally went from translucent goo to stiff and opaque white, I knew I’d nailed the process.
Step 5: Finishing and Wrapping Your Homemade Candy
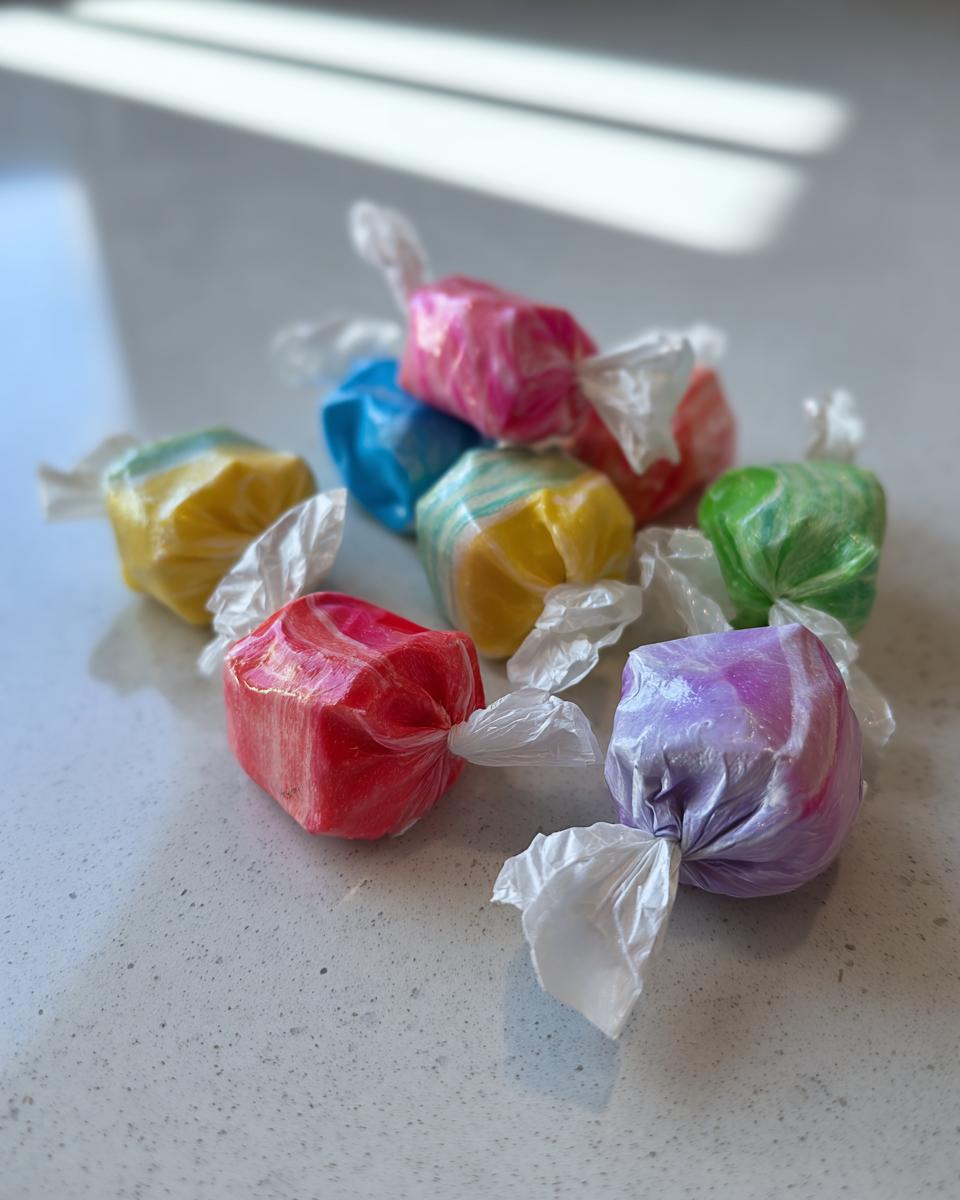
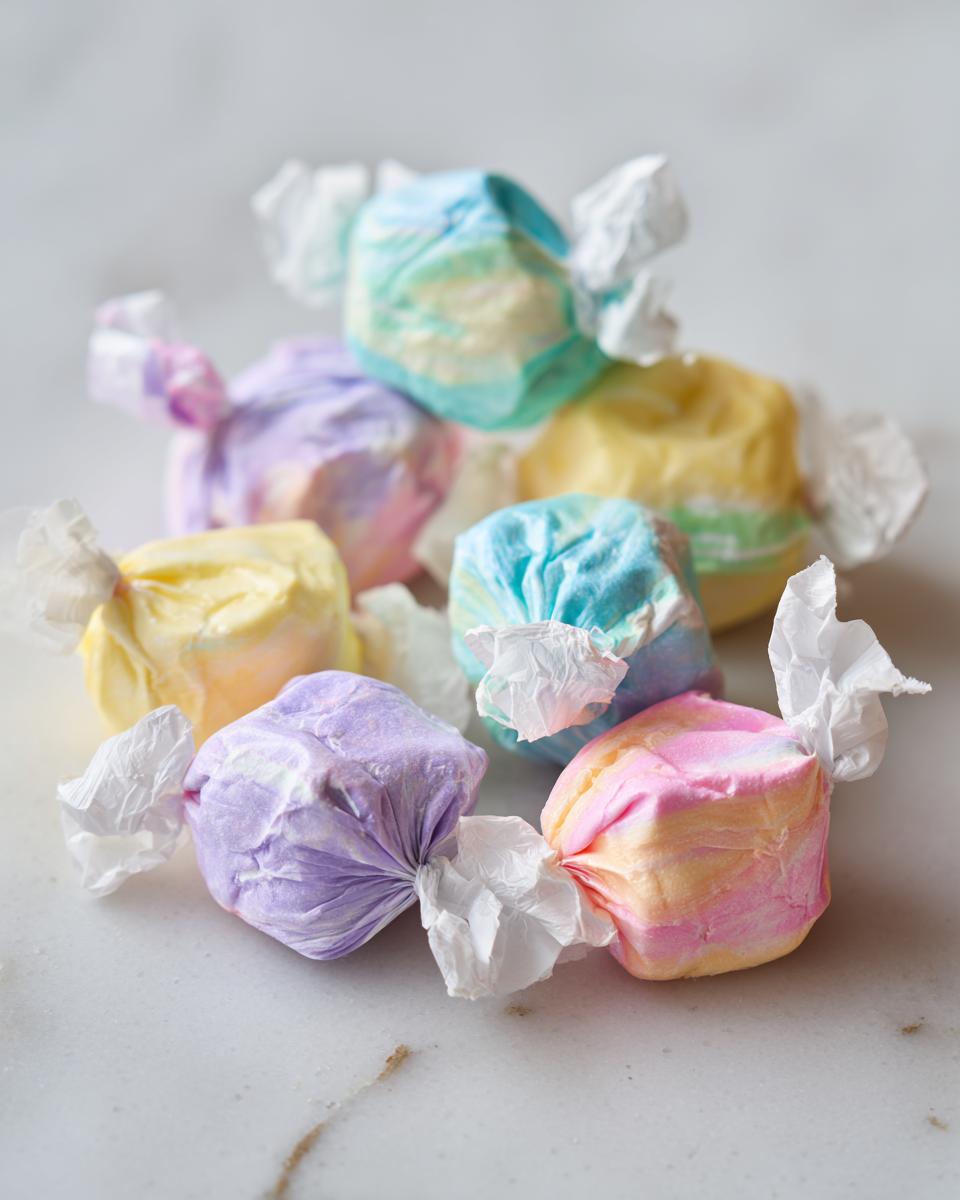
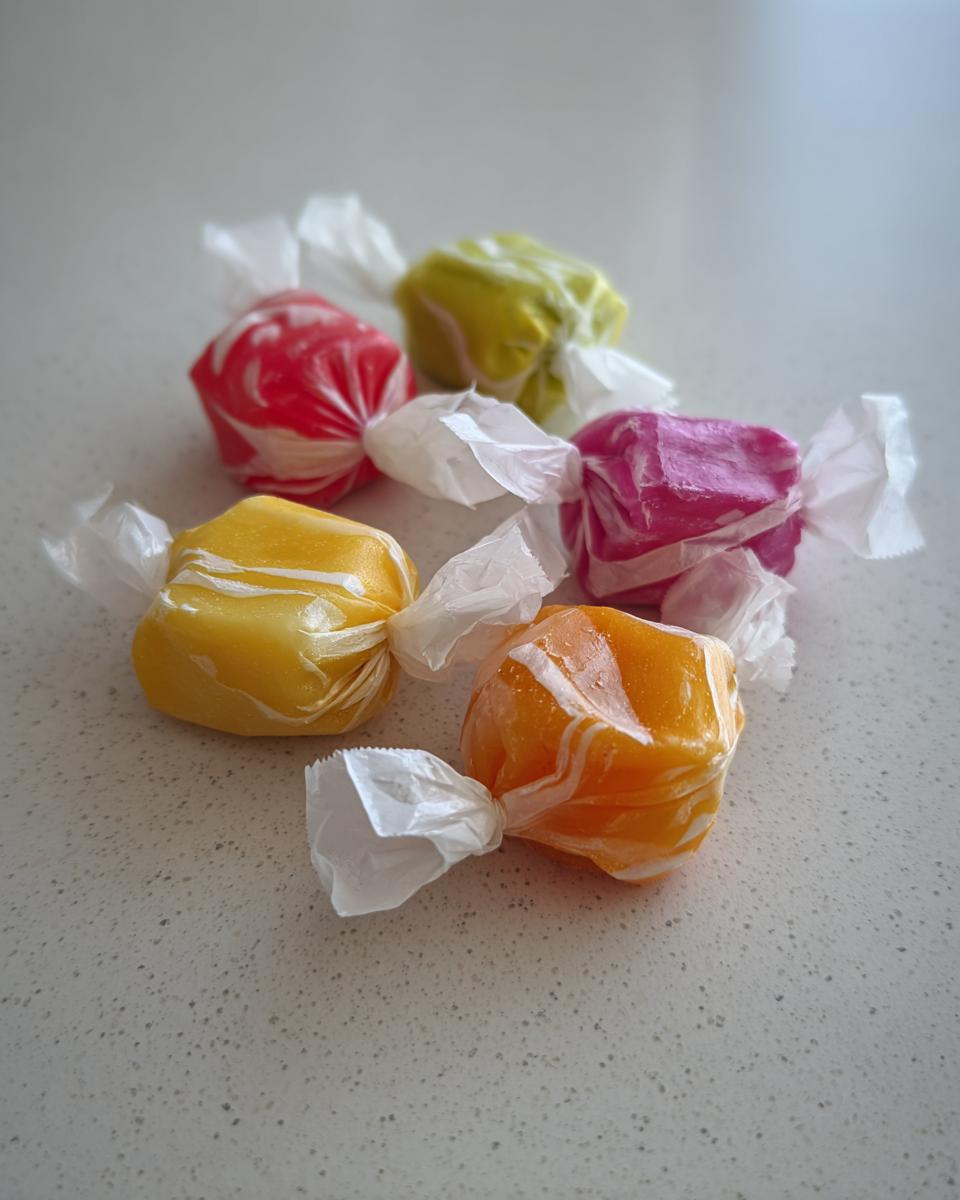
When you can’t pull it anymore because it’s stiff, quickly roll that whole gorgeous rope into something about an inch thick. Use sharp kitchen shears to cut it into those smaller, bite-sized chunks you remember from the boardwalk. The final, critical move for long-term success: wrap every single piece individually in wax paper. This stops them from fusing back together overnight.
Tips for Success Making Salt Water Taffy
Making candy is all about controlling variables, which is where my project management instinct kicks in. If you run into trouble during the pulling stage, don’t panic! That’s why this taffy recipe includes some built-in flexibility. If you find the mixture stiffens up too fast and you can barely fold it, it’s salvageable. Just pop it under a *very* low heat source for just a moment to soften it up enough to continue working it. Briefly, not melting!
Also, I know not everyone is built to pull taffy for fifteen minutes straight. If your arms aren’t up for serious heavy lifting, there are alternatives! You can lightly grease a sturdy stand mixer hook and let the machine do the hard work of incorporating air for you. That way, you still get the amazing texture of true homemade candy without risking a nasty cramp.
Remember, the goal is air incorporation, not just stretching. Keep folding and pulling until that stiff taffy goes from shiny and clear to dull and opaque. That’s the visual sign that you’ve successfully created your perfect chewy candy.
For more ideas, especially if you’re looking for something savory to balance out the sugar rush, take a look at our selection of appetizers and snacks.
Serving Suggestions for Your Chewy Candy
You’ve done the work, you managed the project, and now you have a pound of glossy, colorful salt water taffy! The best part about this homemade candy is recreating that vacation feeling whenever you want. Since we tagged these as perfect summer treats, think about packaging them up. I often put a few wrapped pieces in a small, sand-colored tin—instant beach snacks ready to go!
If you are having friends over once it cools down, serving them unwrapped on a simple white platter makes them look incredibly professional. They look like they just came off the boardwalk line. The vibrant colors really pop against a neutral background. If you need other quick ideas for feeding a crowd—maybe something less sugary—we’ve optimized some lighter fare over at our healthy lunch ideas section.
Honestly, I find the best suggestion is just sitting on the porch on a warm evening, enjoying the slightly salty, sweet chewiness. It’s my favorite way to unwind after a long week. You earned this simple pleasure!
Storage and Keeping Salt Water Taffy Fresh
You’ve poured your effort into making this perfect batch of salt water taffy, so protecting your investment is key! Since this is homemade candy, it won’t have the industrial stabilizers of the store-bought stuff, but that’s why it tastes so much better. The most important rule for keeping this chewy candy fresh is wrapping it immediately after cutting, as mentioned in the final step.
Once wrapped in wax paper, you need an airtight container. A simple cookie tin works perfectly, provided you place the wrapped pieces snugly inside. You’re aiming to keep the air out, otherwise, that beautiful chewy texture starts hardening up and losing its appeal. Don’t try to store this in the fridge, either; the humidity tends to make the sugar pull moisture from the air and get sticky all over the wrapper.
If you successfully wrapped everything and sealed it tight, this classic taffy recipe holds up really well for about two weeks at room temperature. That’s plenty of time to enjoy your batch of summer treats before you start planning your next candy-making project!
Frequently Asked Questions About This Taffy Recipe
When you’re diving into something as technical as candy making, you usually end up with a few questions. That’s normal! My goal with this optimization project was to make this homemade candy foolproof, but sometimes things need a little roadside assistance. Here are the common snags I hear about when people try this taffy recipe.
Can I make this salt water taffy without a candy thermometer?
Look, I’m all about simplifying, but for this, you really shouldn’t skip the thermometer. Achieving that specific 250°F Firm Ball Stage is non-negotiable for getting that perfect, satisfyingly chewy candy texture. If you undercook it, you get sticky goo that never sets. If you overcook it, it turns hard as a rock. The thermometer is the one tool that guarantees the chemistry is correct for salt water taffy.
How do I get the vibrant colors seen in store-bought salt water taffy?
That vibrant, striped look is the best part! You add the liquid or gel food coloring right after you take the syrup off the heat, just before you pour it out to cool. For multiple colors, you have to work fast: pour the hot base mixture onto your sheet, then use a spatula to scrape off sections of the cooling candy mass into separate, small bowls. Color each bowl separately, then you can carefully layer and twist them together before you start the main pulling process. It adds a step, but it’s worth it for the visual payoff!

Why is my homemade candy sticky even after wrapping?
If your homemade candy is sticky *despite* wrapping it, I can usually trace that back to one thing: not enough pulling. The step where you fold and stretch the taffy for 10 to 15 minutes is vital! That process folds air into the sugar structure, making it opaque and firm. If you skip that air incorporation, the sugar molecules stay too close together, and the taffy remains gummy and sticky, no matter how much wax paper you use. Remember, pull until it’s dull white, not shiny!
If you are looking for something totally different than super-sweet summer treats, maybe check out my streamlined ideas for easy breakfast and brunch!
Estimated Nutritional Data for Salt Water Taffy
As a project manager, I always like to have all the data compiled neatly before signing off on the final deliverable, right? That includes understanding what’s in the final product! Just keep this in mind: since we are making everything from scratch, these figures are solid estimates based on the ingredients list provided. They aren’t analyzed in a lab, but they give you a great benchmark for this batch of homemade candy. For reference, this recipe yields about one pound of salt water taffy.
- Serving Size: 1 piece
- Calories: 80
- Sugar: 18g
- Sodium: 25mg (That little bit of salt really makes a difference!)
- Fat: 0.5g
- Carbohydrates: 18g
- Protein: 0g
It’s worth noting that most of the calories here are coming directly from the sugar, which is exactly what we expect from a classic chewy candy. If you’re portioning this out exactly as I do, you’ll find that these summer treats pack a sweet punch without being overly heavy.
Share Your Homemade Candy Creations
So there you have it! You’ve successfully managed the project of turning simple sugar, corn syrup, and salt into beautiful, authentic salt water taffy. Now that you have your supply of chewy candy—perfect beach snacks for the next sunny day—I genuinely want to know how it went for you. Did you manage to get that perfect opaque pull? What colors did you choose for your batch?
Don’t keep all that colorful success to yourself! Head over and leave a rating for this taffy recipe. Better yet, snap a picture of your finished, individually wrapped homemade candy and share your results. I love seeing how everyone customizes Leo Grant’s optimized method. It helps me refine things even further for the next person looking to recreate those wonderful vacation memories. If you want to see more efficient recipes designed for real life, browse the main page here: the Dishicious homepage. Happy pulling!
PrintHomemade Salt Water Taffy: A Chewy Boardwalk Classic

Recreate the classic beach vacation experience by making this colorful, chewy salt water taffy at home. This recipe breaks down the process into manageable steps for a fun project.
- Prep Time: 20 min
- Cook Time: 15 min
- Total Time: 35 min
- Yield: About 1 pound 1x
- Category: Dessert
- Method: Stovetop Cooking
- Cuisine: American
- Diet: Vegetarian
Ingredients
- 2 cups granulated sugar
- 1 cup light corn syrup
- 1 cup water
- 1 teaspoon vanilla extract
- 1/2 teaspoon salt
- 1 tablespoon butter, softened
- Food coloring (optional)
Instructions
- Lightly grease a large baking sheet or line it with parchment paper. Have the softened butter ready for greasing your hands later.
- Combine the sugar, corn syrup, and water in a heavy-bottomed saucepan. Stir over medium heat until the sugar dissolves.
- Stop stirring once the mixture boils. Insert a candy thermometer. Cook the syrup without stirring until it reaches 250 degrees Fahrenheit (Firm Ball Stage).
- Remove the pan from the heat. Carefully stir in the salt and vanilla extract. If using food coloring, add a few drops now.
- Pour the hot mixture onto the prepared baking sheet. Let it cool completely until you can handle it without burning your hands, about 15 to 20 minutes.
- Grease your hands generously with the softened butter. Lift the cooled candy mass from the sheet.
- Begin pulling the candy. Fold the mass over itself and pull repeatedly. This incorporates air, which gives the taffy its final texture. Continue pulling for 10 to 15 minutes until the candy becomes opaque and stiff.
- Once the taffy is stiff, roll it into a long rope, about 1 inch thick. Cut the rope into small, bite-sized pieces using kitchen shears.
- Wrap each piece individually in wax paper to prevent sticking. Store your homemade candy in an airtight container.
Notes
- For easier handling, you can lightly grease a metal hook or stand mixer attachment to help with the pulling process if you prefer not to use your hands extensively.
- If the taffy becomes too hard to pull, briefly place it back over very low heat to soften slightly, then continue pulling.
- This recipe makes excellent summer treats perfect for beach snacks.
Nutrition
- Serving Size: 1 piece
- Calories: 80
- Sugar: 18g
- Sodium: 25mg
- Fat: 0.5g
- Saturated Fat: 0.3g
- Unsaturated Fat: 0.2g
- Trans Fat: 0g
- Carbohydrates: 18g
- Fiber: 0g
- Protein: 0g
- Cholesterol: 0mg