
Let’s face it, dealing with the constant demand for portable, clean-label snacks for the kids is a true project management nightmare. You need something easy to pack, something they’ll actually eat, and something that doesn’t require me spending hours hovering over a stove. That’s exactly why I engineered this recipe for Homemade fruit leather. When I was stuck in that busy Chicago grind, finding sugar-free alternatives that passed my inspection felt impossible. This method strips everything unnecessary away, giving you pure, vibrant fruit goodness locked into a chewable strip. It solves the afternoon snack dilemma beautifully, and trust me, you’ll feel like a genius when you pull those colorful, naturally sweet rolls out of the oven.
- Why This Homemade Fruit Leather is the Ultimate Healthy Snack
- Ingredients Needed for Homemade Fruit Leather
- Equipment Required for Making Homemade Fruit Leather
- Step-by-Step Instructions for Homemade Fruit Leather
- Tips for Perfect Homemade Fruit Leather Every Time
- Variations for Homemade Fruit Leather and Dried Fruit
- Storage and Serving Suggestions for Kid Friendly Food
- Frequently Asked Questions About Homemade Fruit Leather
- Estimated Nutrition for This Fruit Leather Recipe
Why This Homemade Fruit Leather is the Ultimate Healthy Snack
When you’re optimizing your kitchen routine, the focus has to be on efficiency and clean ingredients. These homemade fruit leather strips are perfect because we skip all the junk found in the store-bought ones. They score major points with me because they are completely sugar-free.
- Total portability for lunch boxes.
- Only uses fruit and, optionally, lemon juice—that’s it!
- They look so vibrant, which is a huge win for getting kids excited about healthy snacks.
Achieving Perfect Homemade Fruit Rollups Texture
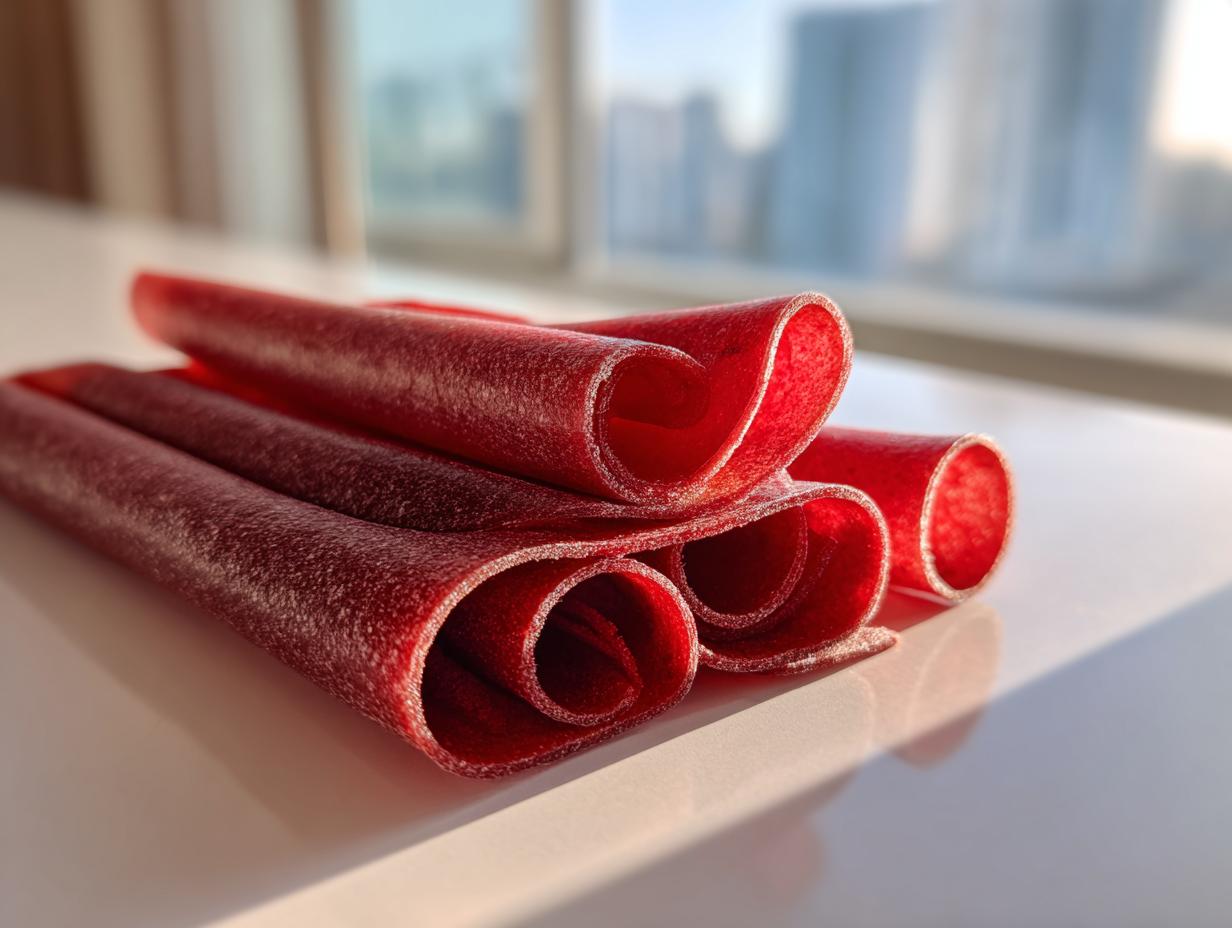
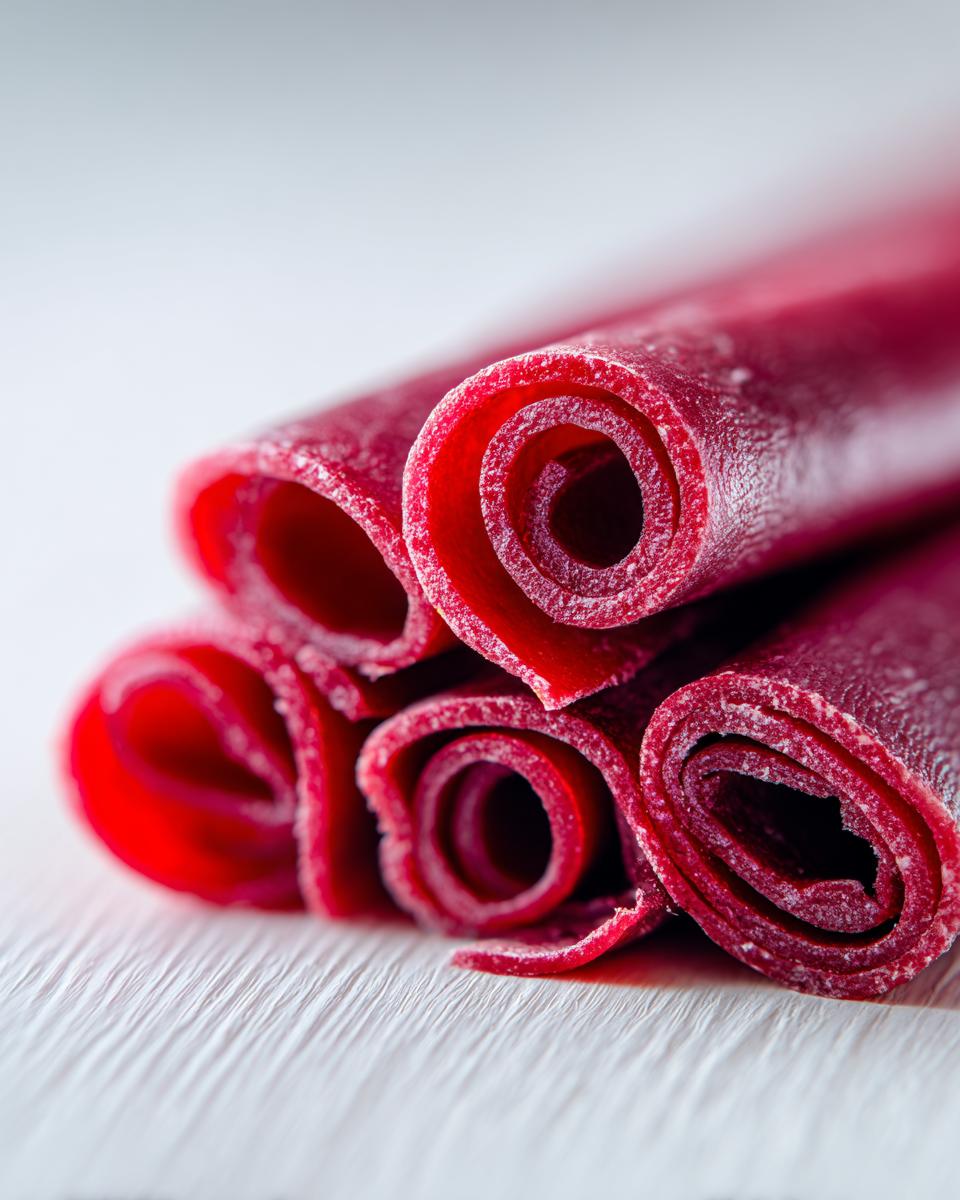
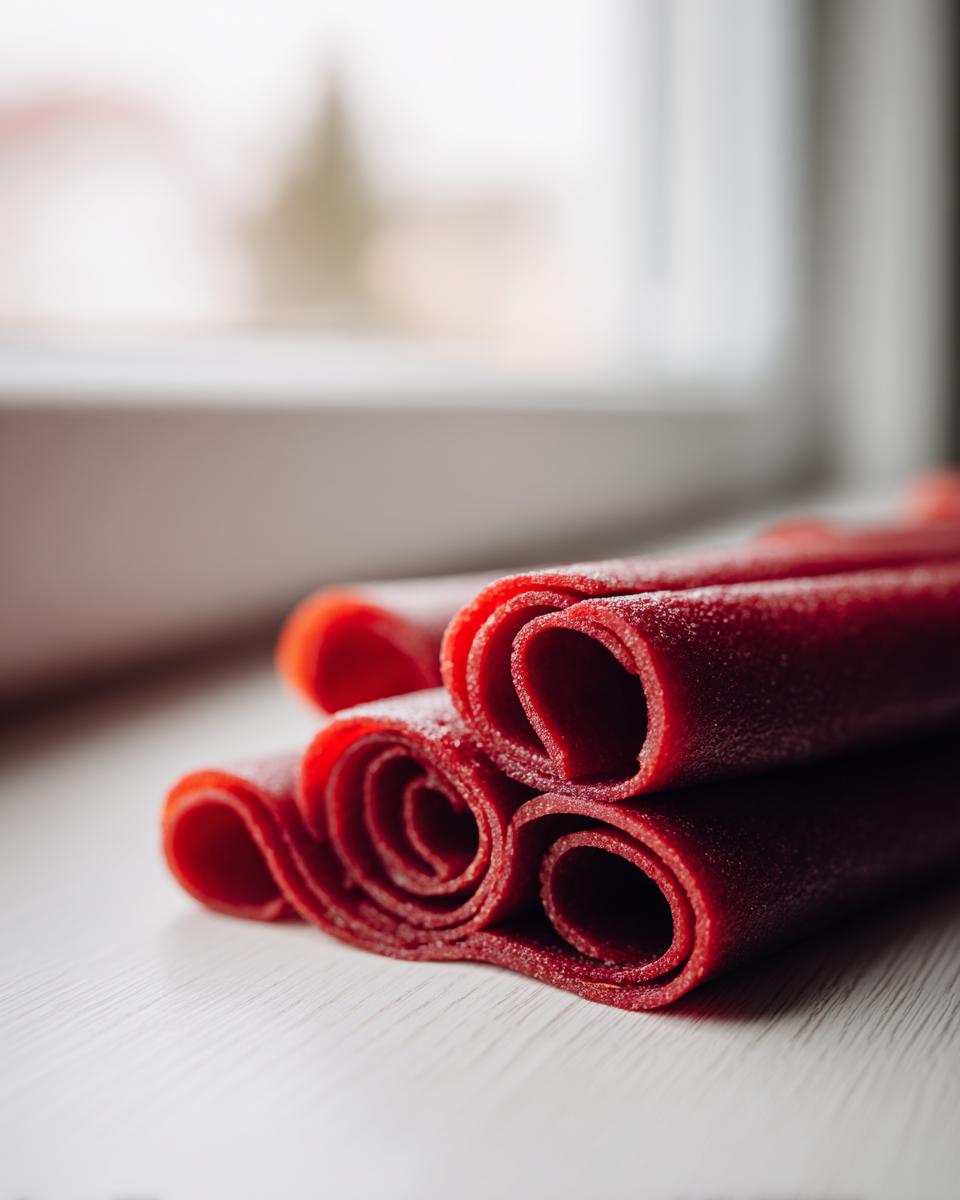
The goal here isn’t a crackery dried fruit; we want that beautiful, pliable texture. Success with your homemade fruit rollups comes down to achieving a surface that feels dry, but still bends easily. If it’s sticky, the roll won’t hold, I’ve learned that the hard way!
My tip from managing this process? Don’t trust the clock alone. Check the sheet every hour after the fourth hour. Pulling it out just shy of fully dry is better than over-baking it into jerky. That little bit of remaining moisture keeps it flexible.
Ingredients Needed for Homemade Fruit Leather
When I streamline a recipe, I keep the ingredient list short and to the point. For this fruit leather, you only need two things unless you’re worried about color turning brown. You’ll need about four cups of your favorite fruit—strawberries or even mango slices work great. If you want to keep the color super bright, add one tablespoon of fresh lemon juice. It’s completely optional, though; fruit is the star here.
Equipment Required for Making Homemade Fruit Leather
Since eliminating complexity is my entire goal here, you don’t need a fancy dehydrator, although that’s ideal. Grab a standard blender or food processor to get that puree smooth. You definitely need a sturdy baking sheet—actually, maybe two, depending on how much you make. And critically, you must have either a silicone baking mat or good parchment paper for the base.
Step-by-Step Instructions for Homemade Fruit Leather
Okay, let’s map out the process. I treat this like any project: set up the station correctly, and the execution is simple. First, we need to get the temperature right. If you’re using a dehydrator, set it to 135°F. If you’re using your regular oven—which totally works, by the way—you need to crank it down to the absolute lowest setting, usually 170°F to 200°F. You are essentially trying to bake these things without actually baking them, if that makes sense. Once your temperature’s locked in, prepare your baking sheet by lining it with parchment or a silicone mat, and give that liner a quick spray of non-stick oil. This step is non-negotiable; it prevents frustration later when you try to peel that beautiful layer off!

Check out these simple next steps for great dried fruit.
Pureeing Fruit for Smooth Homemade Fruit Leather
This is where you turn your fruit into a blank canvas. Thaw any frozen fruit first, and dump it all into your blender or food processor. Blend until it’s aggressively smooth—I mean completely silky. You don’t want any chunks hanging around, because those lumps will stay wet forever and ruin the whole sheet when you try to dry your homemade fruit leather.
Drying Time and Temperature for Fruit Leather
Pour that smooth puree onto your prepared sheet. Spread it out evenly; about an eighth of an inch thick is the sweet spot for fast drying. Now, slide it into the low-temp oven or dehydrator. This is the long part—plan for anywhere from four to eight hours. I always tell people to check manually after four hours. If you are using an oven, you have to watch it like a hawk after that mark so the edges don’t burn while the center is still getting that perfect firmness.
Tips for Perfect Homemade Fruit Leather Every Time
You know I love optimizing processes, and making this fruit leather is no different! Before you even slide that sheet into the oven, do yourself a favor: grab a ruler or even just a flat spatula and check your thickness. I’ve found that if the puree is consistently 1/8 of an inch everywhere—no thick blobs allowed—the drying time is much more predictable. It’s all about starting with a uniform project base.
If you get to the end and your gorgeous, dried fruit sheet is just a little too sticky to roll without sticking to your fingers—oops! Don’t panic. We scrap the plain wax paper and lay the sheet directly onto a fresh sheet of wax paper before you roll. It acts like a buffer layer, letting you get those tight seals required for good homemade fruit rollups. Trust me, this small adjustment makes rolling clean and easy, keeping your hard work intact. Check out my guide for when you need quick easy dinners for backup!
Variations for Homemade Fruit Leather and Dried Fruit
Once you master the process, you can really start customizing these! Since we are keeping it sugar-free, the best way to change the flavor profile is by mixing up the fruit itself. Think about using ripe peaches in the summer or tart apples in the fall. I love sneaking in things like a pinch of cinnamon or a few fresh mint leaves while pureeing; they blend right in and make awesome additions to your collection of dried fruit.

A little sprinkle of ginger powder with mango puree is fantastic, too. It keeps that clean label intact but gives the kids a surprising little flavor kick. It’s all about smart flavor engineering!
Storage and Serving Suggestions for Kid Friendly Food
Finishing this project means you need to secure your investment! After you cut your strips, you absolutely must wrap each one individually in wax paper before you roll it. If you skip that step, they will fuse overnight, and you’ll be back to scraping sticky goo off your counter. That’s the key to successful kid friendly food storage!
Store them in an airtight container. They hold up great for a week at room temperature, but if you made a huge batch, pop them in the fridge for even longer shelf life. They are fantastic additions to lunch boxes!
Frequently Asked Questions About Homemade Fruit Leather
I know when you’re optimizing a process, you end up with a few logistical questions left over. That’s normal! I’ve gathered the most common ones I get about turning summer fruit into perfect healthy snacks.
Can I make fruit leather without a dehydrator?
Absolutely, don’t sweat it if you don’t own one of those specialty gadgets. I designed this so you can use your regular oven. The key is knowing that low and slow is the rule. Keep that oven temp as low as it goes, but you *must* keep an eye on it, much more so than with a dehydrator, just to make absolutely sure you don’t just end up with baked fruit instead of leather.
How do I ensure my fruit leather isn’t sticky?
If yours is sticky, it simply means the drying process isn’t fully complete. It needs more time in the low heat. The leather is done when the surface is completely dry to the touch—it shouldn’t leave any residue on your finger, even if you press down a bit. If it’s still leaving goo, put it back in for another hour. That’s the efficiency tip: impatience leads to sticky messes!
Estimated Nutrition for This Fruit Leather Recipe
Since we’re sticking strictly to fruit, these are fantastic for clean eating, but remember, the nutrition changes based on what you blend up. These numbers are averages per roll. If you use less sugary fruit, your sugar count will drop, which is a win! You can check out my thoughts on keeping personal data safe while browsing here: privacy policy.
PrintHomemade Fruit Leather: Sugar-Free Kid Snacks

Make your own fruit leather using seasonal fruit for a healthy, portable snack alternative to store-bought options.
- Prep Time: 15 min
- Cook Time: 6 hours
- Total Time: 6 hours 15 min
- Yield: About 12 rolls 1x
- Category: Snack
- Method: Dehydrating/Low-Temperature Baking
- Cuisine: American
- Diet: Vegan
Ingredients
- 4 cups fresh or frozen fruit (strawberries, mango, or apples work well)
- 1 tablespoon lemon juice (optional, for color preservation)
Instructions
- Preheat your oven to its lowest setting, usually between 170°F and 200°F. If you have a dehydrator, set it to 135°F.
- Prepare your fruit. If using frozen fruit, thaw it completely. Remove any seeds or large cores.
- Puree the fruit in a blender or food processor until completely smooth. Add the lemon juice now if you are using it.
- Line a baking sheet with a silicone baking mat or parchment paper. Lightly spray the mat or paper with non-stick cooking spray.
- Pour the fruit puree onto the prepared sheet. Spread it evenly into a thin layer, about 1/8 inch thick.
- Place the baking sheet in the preheated oven or dehydrator.
- Bake or dehydrate for 4 to 8 hours. The time depends on your oven temperature and the moisture content of the fruit. You want the surface to be dry to the touch and not sticky.
- Once dry, carefully peel the fruit leather off the mat or paper.
- Cut the leather into strips using kitchen scissors or a pizza cutter.
- Roll up each strip tightly. If the leather is too sticky to roll, place it on a sheet of wax paper before rolling. Store the rolled fruit leather in wax paper or plastic wrap.
Notes
- For a cleaner label, avoid adding any sugar; the fruit’s natural sweetness is usually enough.
- If you want a slightly firmer texture, dry the leather for an extra hour.
- This recipe makes excellent healthy snacks for lunch boxes.
Nutrition
- Serving Size: 1 roll
- Calories: 50
- Sugar: 10g
- Sodium: 1mg
- Fat: 0g
- Saturated Fat: 0g
- Unsaturated Fat: 0g
- Trans Fat: 0g
- Carbohydrates: 13g
- Fiber: 2g
- Protein: 0.5g
- Cholesterol: 0mg