

I totally get it—you want that incredible, deeply satisfying walnut sourdough bread, but the whole process seems like something only seasoned bakers can nail. Forget those complicated, multi-day projects. My approach here is simple optimization: we’re treating this like a manageable project to guarantee success. We focus only on the steps that give you huge payoffs, like achieving that gorgeous, dark crust and that fantastic, high-contrast ‘ear’ everyone talks about. If you’re new to this, make sure you check out my guide on building your sourdough starter from scratch first!
This particular loaf delivers exactly what you need for summer: a hearty, substantial, nutty texture perfect for loading up with your favorite toppings for an open-faced sandwich. We are using foundational sourdough science, but I’ve streamlined the input points so you get maximum payoff without the kitchen stress. You deserve great bread, and this recipe is engineered to deliver it, every time.
- Why This Walnut Sourdough Bread Recipe Works for You
- Ingredients for Your Walnut Sourdough Bread Loaf
- Equipment Needed for Artisanal Walnut Bread
- Step-by-Step Instructions for the Perfect Walnut Sourdough Bread
- Pro Tips for the Best Walnut Sourdough Bread Texture
- Making This Healthy Bread Ahead of Time
- Serving Suggestions for Your Artisanal Sourdough
- Frequently Asked Questions About Baking Walnut Bread
- Estimated Nutritional Data for This **Walnut Sourdough Bread**
- Share Your Walnut Sourdough Bread Results
Why This Walnut Sourdough Bread Recipe Works for You
When I engineer a recipe, I need clear deliverables, and this loaf hits all three targets perfectly. You don’t need to sacrifice an entire weekend to get this result. Here’s the baseline data on why this specific workflow is optimized for you:
- Hearty Texture Guaranteed: The whole walnuts provide chew and substance, making this the perfect loaf for stacking high.
- Baked-In Health: Using whole ingredients like quality flour and nuts keeps this a meaningfully healthy bread option.
- Visual Payoff: The cold proofing and specific baking routine ensures you get that dramatic, dark crust and a beautiful oven ‘ear.’
For more ideas on how to use this fantastic bread, check out my favorite healthy lunch ideas.
Ingredients for Your Walnut Sourdough Bread Loaf
Let’s look at the exact components needed. I keep the ingredient list lean because when you nail the process, you don’t need filler items. Trust the structure we are building here. You’ll want 100g of active starter, 350g warm water, 500g great bread flour, 10g of fine sea salt, and 150g of whole walnuts, which you need to roughly chop before you start.
Equipment Needed for Artisanal Walnut Bread
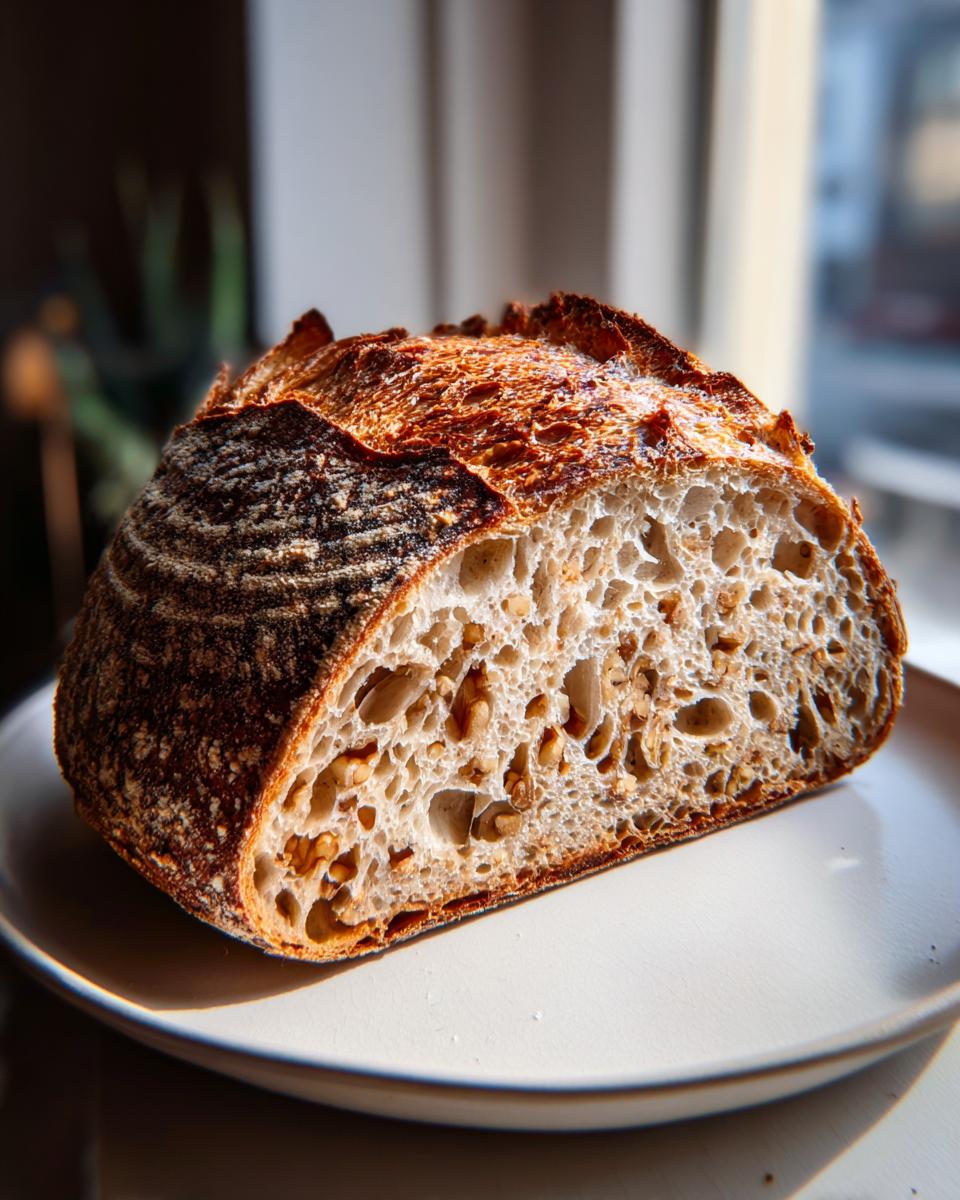
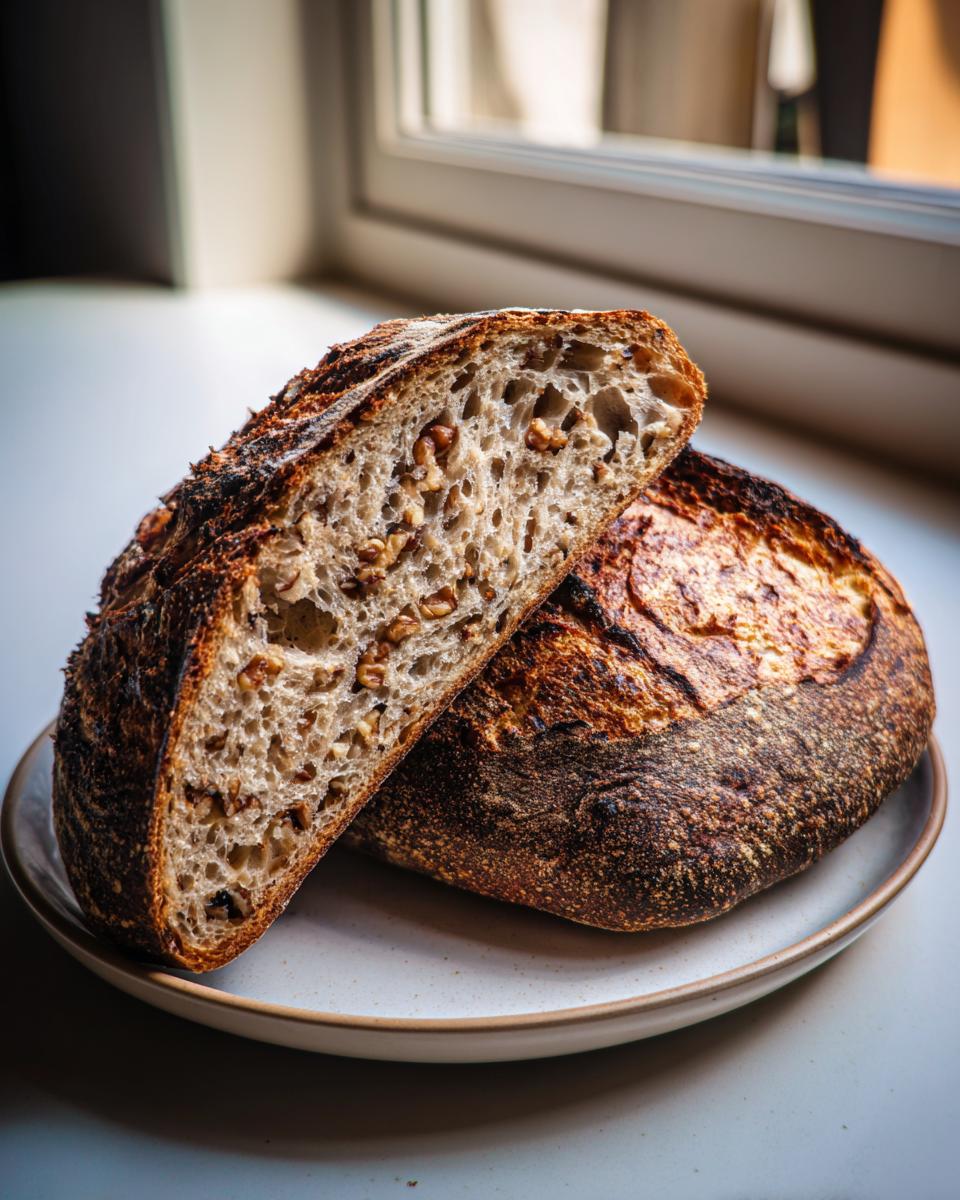
You need the right tools to manage this project successfully. For this specific walnut sourdough bread, don’t try to skip the essentials. You absolutely need a digital scale—baking without one is just guessing! You also need a banneton basket for shaping and proofing. Most importantly, you MUST use a Dutch oven. That heavy pot traps the steam needed during the first bake phase. That steam is what locks in moisture and guarantees that gorgeous expansion and shatteringly crisp crust, which gives you that perfect ear!
Step-by-Step Instructions for the Perfect Walnut Sourdough Bread
This is where we execute the project plan. Every stage here is designed for efficiency and maximum structural integrity for your artisanal sourdough loaf. If you need ideas for creative uses later, I have a fun post on easy homemade bread bowls that might inspire you!
Mixing and Autolyse: Setting Up the Sourdough Loaf
First, mix your active starter, warm water, and the bread flour in a large bowl until everything is just shaggy. Cover it up and walk away for about 30 minutes. This rest period is called the autolyse, and it’s non-negotiable! It allows the flour to fully hydrate before we introduce salt. Think of it as pre-staging your ingredients—it’s fundamental for an open, airy crumb later on.
Bulk Fermentation and Incorporating the Nutty Bread
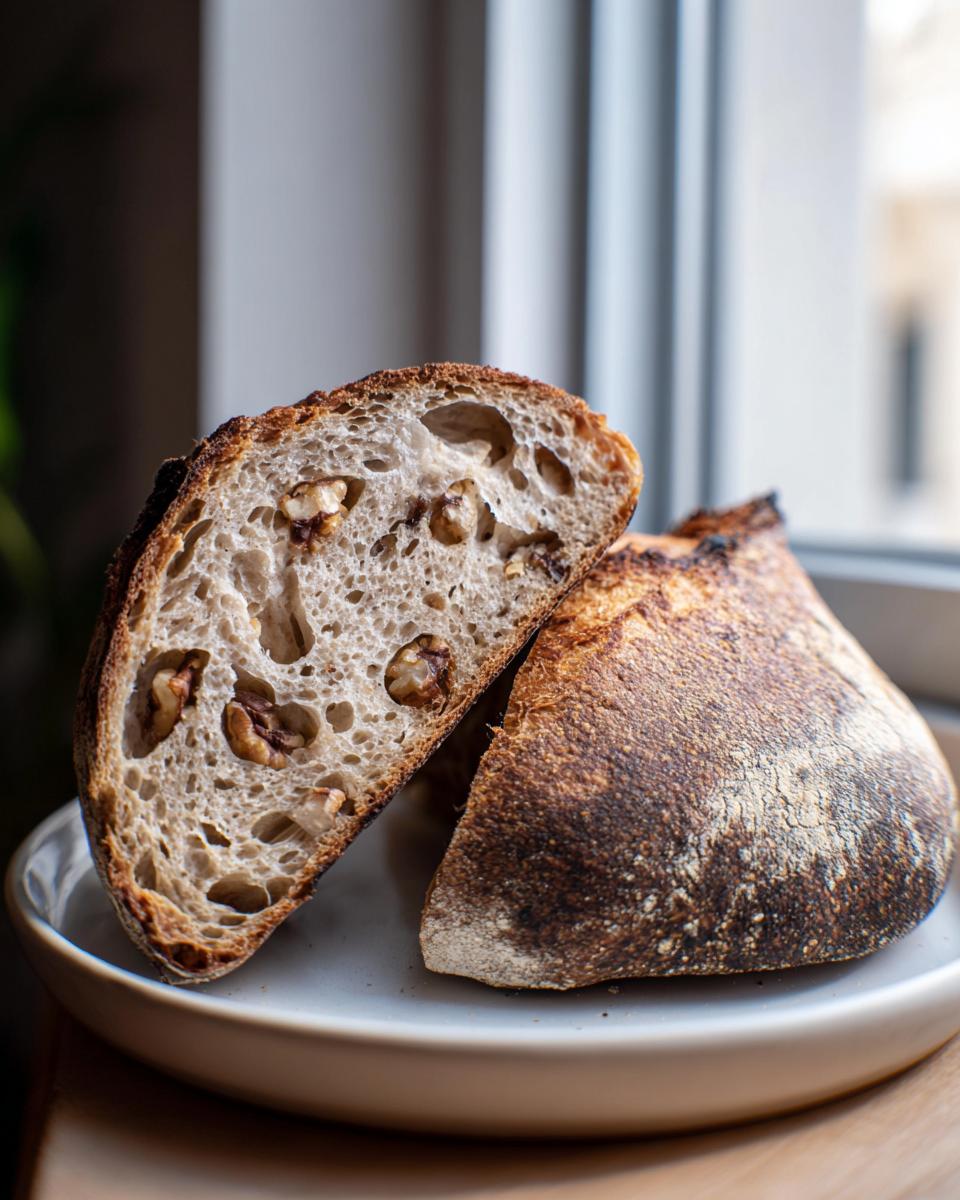
Now, add the salt and mix it in well. We need four sets of stretch and folds, spaced 30 minutes apart over the first two hours of bulk fermentation. This develops all the strength we need. Here’s the critical modification: gently fold in your roughly chopped walnuts during the *third* set of stretch and folds. Don’t mix them in too early, or you’ll tear the gluten strands you’re building! Let the dough finish bulk fermenting until it looks noticeably puffy—I aim for about 30 to 40% volume increase overall.
Shaping and Cold Proofing for Better Artisanal Sourdough
Time to introduce tension. Shape the dough gently but firmly into a tight boule or batard, depending on your basket. Place it seam-side up in your heavily floured banneton. Then, we let the magic happen slowly in the fridge—a cold proof for 12 to 18 hours. This long, cool rest is where the flavor complexity develops, and it firms up the dough so you can score it beautifully.
Baking the Walnut Sourdough Bread for Maximum Oven Spring
Preheat your oven to 500°F (260°C) with the Dutch oven inside for a full hour; that pan needs to be screaming hot. Carefully flip the cold dough onto parchment paper. Now, score it *deeply* right across the top—this is how we control where the steam vents and achieve that crisp, high-contrast ‘ear’!
Lower the dough into the hot pot, cover it, and bake for 20 minutes. After that, ditch the lid, drop the heat to 450°F (232°C), and bake another 20 to 25 minutes until you get that dark, gorgeous crust you want.
Pro Tips for the Best Walnut Sourdough Bread Texture
Getting that perfect blend of hearty chew and an open crumb takes a little insider knowledge. The secret to keeping those gorgeous walnuts suspended in your loaf and not sinking to the bottom? Soak them! Seriously, run hot water over the chopped nuts for about 10 minutes before you fold them in during the stretch and fold. It plumps them up just enough so they don’t steal moisture from your dough structure.

Also, we are aiming for dark. I remember my first few loaves were always pale and looked sad. Now, I always finish the bake with the lid off at a higher temperature—try 475°F for the last 10 minutes—to really pull out that deep mahogany color. That contrast against the flour dusting is what makes an artisanal sourdough look truly professional. For more general baking confidence, my main site has tons of great info right here.
Making This Healthy Bread Ahead of Time
The beauty of this walnut sourdough bread is that it’s practically designed to be made ahead! The best time to pause the project is during that long cold proof in the fridge—it can go 18 hours easily. This develops amazing depth of flavor in your healthy bread. Once it’s fully baked, you *must* let it cool completely on a wire rack for at least two hours. Slicing it warm locks in steam and ruins that hard-earned crust. For storage later, keep it cut-side down in a paper bag until you’re ready to make those amazing sandwiches. You can find my favorite recipe for a sourdough sandwich bread if you need an alternative structure!
Serving Suggestions for Your Artisanal Sourdough
This hearty nutty bread begs to be shown off, especially when you nail that dark crust. Since we engineered this loaf for substance, load ’em up! It’s amazing toasted for open-faced summer sandwiches—think creamy goat cheese and a drizzle of honey, or maybe just smashed avocado with some quality flaky salt. Don’t forget to check out my 10 different ways to make avocado toast for some serious inspiration!
Frequently Asked Questions About Baking Walnut Bread
Sometimes, even with a solid project plan, you run into little snags. That’s totally fine! Baking is iterative. When I perfected this walnut sourdough bread, I ran into a few issues myself. Let’s nail down these common questions so you can ensure your sourdough loaf is a success.
Why is my crust coming out pale instead of dark brown?
This usually means your oven wasn’t hot enough, or you didn’t remove the lid long enough. Remember, that initial burst of steam keeps the crust soft so the dough springs up—but to get that beautiful, deep color that contrasts with the flour dust, you need dry heat at the end. Don’t be afraid to crank the heat back up to 475°F for the last 10 minutes uncovered, as I mentioned in the tips!
Can I swap the walnuts for other nuts in this healthy bread?
Absolutely, you can swap them out for pecans or hazelnuts if you prefer! Just treat them the same way—soaking them slightly before incorporating them during the stretch and folds keeps them from sinking to the bottom. This recipe is adaptable, which is what I love about great artisanal sourdough.
What if my starter isn’t quite active enough for a good rise?
If your starter is weak, your fermentation schedule gets thrown off, which impacts the rise and the crumb structure of your nutty bread. If you’re unsure, feed your starter twice in 12 hours before you begin the recipe. If you’re still nervous about going all-sourdough right now, I have a reliable easy yeast bread recipe that uses rapid rise methods to get you baking fast!
Estimated Nutritional Data for This **Walnut Sourdough Bread**
Okay, let’s talk numbers for a second. Since we are focused on making this a genuinely wonderful, healthy bread addition to your diet, I always list out the basic nutrition estimates. Remember, because the exact flour hydration, starter activity, and how much you trim off the crust can change things slightly, these are solid averages based on the ingredients list provided.
We baked this up to be satisfying and substantial, not a light snack. Here are the rough figures per slice, assuming you get 16 standard slices out of the final loaf:
- Serving Size: 1 slice
- Calories: 280
- Fat: 7g (with only 1g Saturated Fat—that’s good news!)
- Carbohydrates: 48g
- Protein: 10g
- Fiber: 3g
The fiber and protein content really confirm why this walnut sourdough bread is perfect for those large, open-faced summer sandwiches we talked about. It actually keeps you full!
Share Your Walnut Sourdough Bread Results
We built this project step-by-step using the most efficient methods, and honestly, I’m excited to see what you’ve created! Did you crush that high-contrast ‘ear’ we were aiming for? I really want to know how the texture holds up when you slice into it. That hearty, substantial crumb is the whole point of this walnut sourdough bread.
Take a picture of your finished loaf—especially showing off that dark crust against the light dusting—and tag me on social media. I love seeing these results because it proves you don’t need professional skills; you just need an optimized plan. If you want to know more about my process for simplifying the kitchen, you can read about my journey over on the About Page.
Rate the recipe when you get a chance, and let’s keep refining these dependable classics together. Happy baking!
PrintArtisanal Walnut Sourdough Loaf
Bake a hearty, nutty sourdough bread with a strong crust and open crumb, perfect for substantial open-faced sandwiches.
- Prep Time: 20 min
- Cook Time: 45 min
- Total Time: 13 hours 5 min
- Yield: 1 loaf 1x
- Category: Baking
- Method: Baking
- Cuisine: American
- Diet: Vegetarian
Ingredients
- 100g active sourdough starter
- 350g warm water
- 500g bread flour
- 10g fine sea salt
- 150g whole walnuts, roughly chopped
Instructions
- Mix the active starter, warm water, and flour in a large bowl until just combined. Cover and let rest for 30 minutes (autolyse).
- Add the salt to the dough and mix thoroughly until incorporated.
- Perform four sets of stretch and folds every 30 minutes during the first two hours of bulk fermentation.
- Gently fold in the chopped walnuts during the third set of stretch and folds.
- Allow the dough to bulk ferment at room temperature until it has increased in volume by about 30-40% and shows signs of activity.
- Shape the dough into a tight boule or batard and place it seam-side up in a floured banneton basket.
- Cold proof the dough in the refrigerator for 12 to 18 hours.
- Preheat your oven to 500°F (260°C) with a Dutch oven inside for one hour.
- Carefully turn the cold dough out onto parchment paper. Score the top surface deeply to encourage oven spring and a good ear.
- Carefully lower the dough (using the parchment paper) into the hot Dutch oven. Cover and bake for 20 minutes.
- Remove the lid, reduce the oven temperature to 450°F (232°C), and continue baking for another 20-25 minutes until the crust is dark brown.
- Cool the loaf completely on a wire rack before slicing.
Notes
- For a darker crust and better contrast, bake the final 10 minutes without the lid at 475°F.
- Soaking the walnuts in hot water for 10 minutes before chopping can help prevent them from sinking during the bake.
- Use a high-protein bread flour for the best structure in this healthy bread recipe.
Nutrition
- Serving Size: 1 slice
- Calories: 280
- Sugar: 1.5
- Sodium: 350
- Fat: 7
- Saturated Fat: 1
- Unsaturated Fat: 6
- Trans Fat: 0
- Carbohydrates: 48
- Fiber: 3
- Protein: 10
- Cholesterol: 0