
When that intense sweet craving hits, you need a solution that delivers maximum impact without dragging you into a messy, hours-long cooking project. That’s where my project management approach to the kitchen really shines. What I’ve engineered here is The Best Ever No-Bake Classic Banoffee Pie recipe. It takes the traditional indulgence of this famous banoffee pie and strips away all the unnecessary steps, leaving you with an impressive but simple dessert. If you loved that streamlined method for sticky toffee pudding, you’ll appreciate how I simplify complex desserts using efficiency—that’s the Dishicious promise.
- Why This No Bake Banoffee Pie Recipe Works Every Time
- Ingredients for Your Classic Banoffee Pie
- How to Prepare The Best Ever No-Bake Banoffee Pie
- Tips for the Perfect Banoffee Pie Success
- Making Individual Banoffee Cups: A Variation
- Storage and Make-Ahead Tips for Your Banoffee Pie
- Frequently Asked Questions About Banoffee Pie
- Estimated Nutritional Breakdown for This Banoffee Pie
- Share Your Dishicious Banoffee Pie Creations
Why This No Bake Banoffee Pie Recipe Works Every Time
I build every Dishicious recipe around reliability and low effort. This banoffee pie isn’t just another dessert; it’s a perfectly managed timeline that guarantees success. You get all the rich flavor without having to use your oven! That’s the core of our philosophy, and it’s why this recipe shines.
- No-Bake Ease: We skip the oven entirely, meaning less stress and cleaner counters.
- Foolproof Caramel: We offer two paths to that gorgeous toffee layer—one is hands-off boiling, the other is instant store-bought ease.
- Classic Flavor Profile: It hits all the required notes: buttery crunch, sweet caramel, soft banana, and fluffy cream.
If you are looking for reliable desserts, check out our full collection of dessert recipes.
Impressive But Simple Dessert
This is exactly the kind of dish you want when company shows up unexpectedly, or you need an amazing finish for a dinner party. It looks like you spent hours fussing over it, but honestly, the hardest part is waiting for it to chill! Because it requires zero oven time, it’s incredibly fast to assemble, even if you cook the homemade toffee first.
The Creamy Pie Recipe Advantage
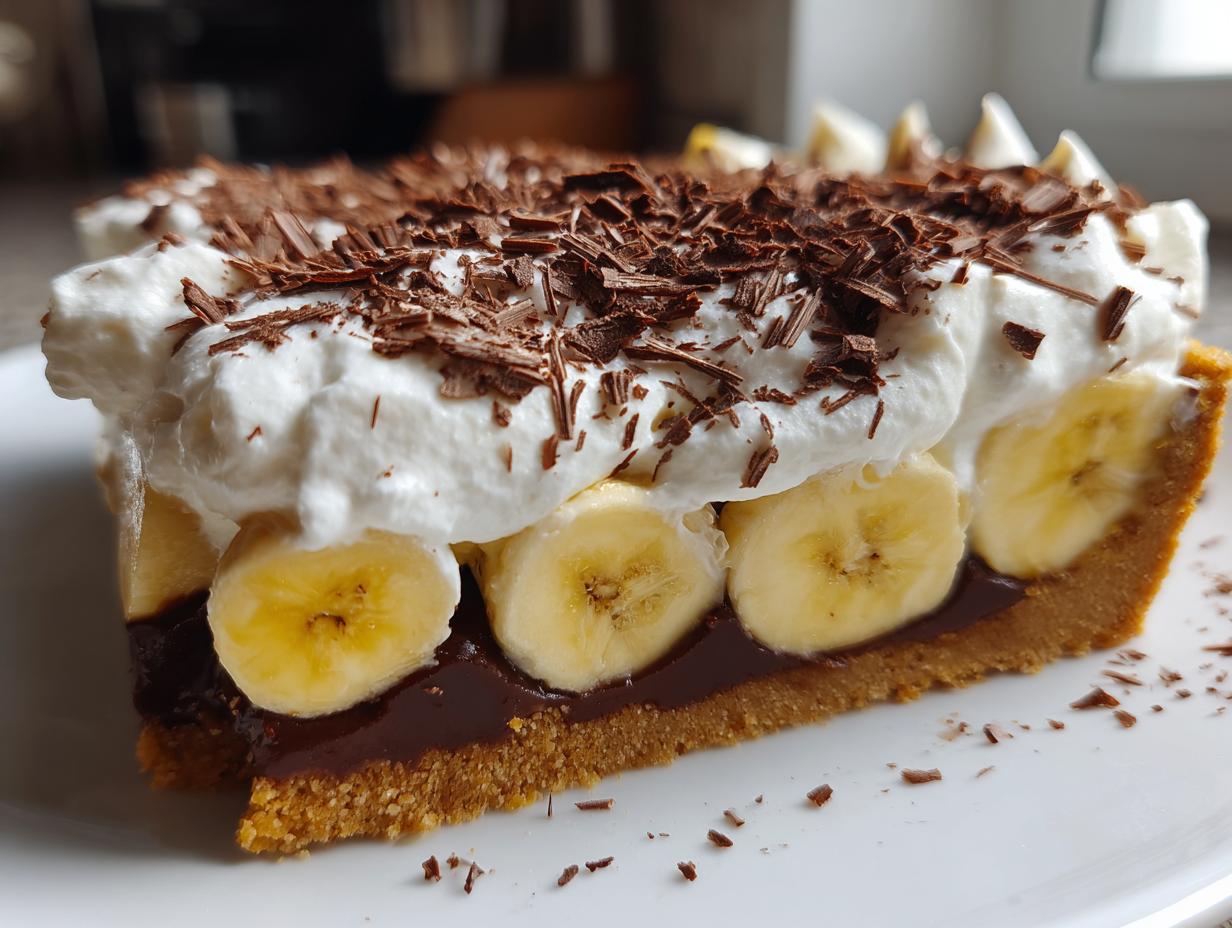
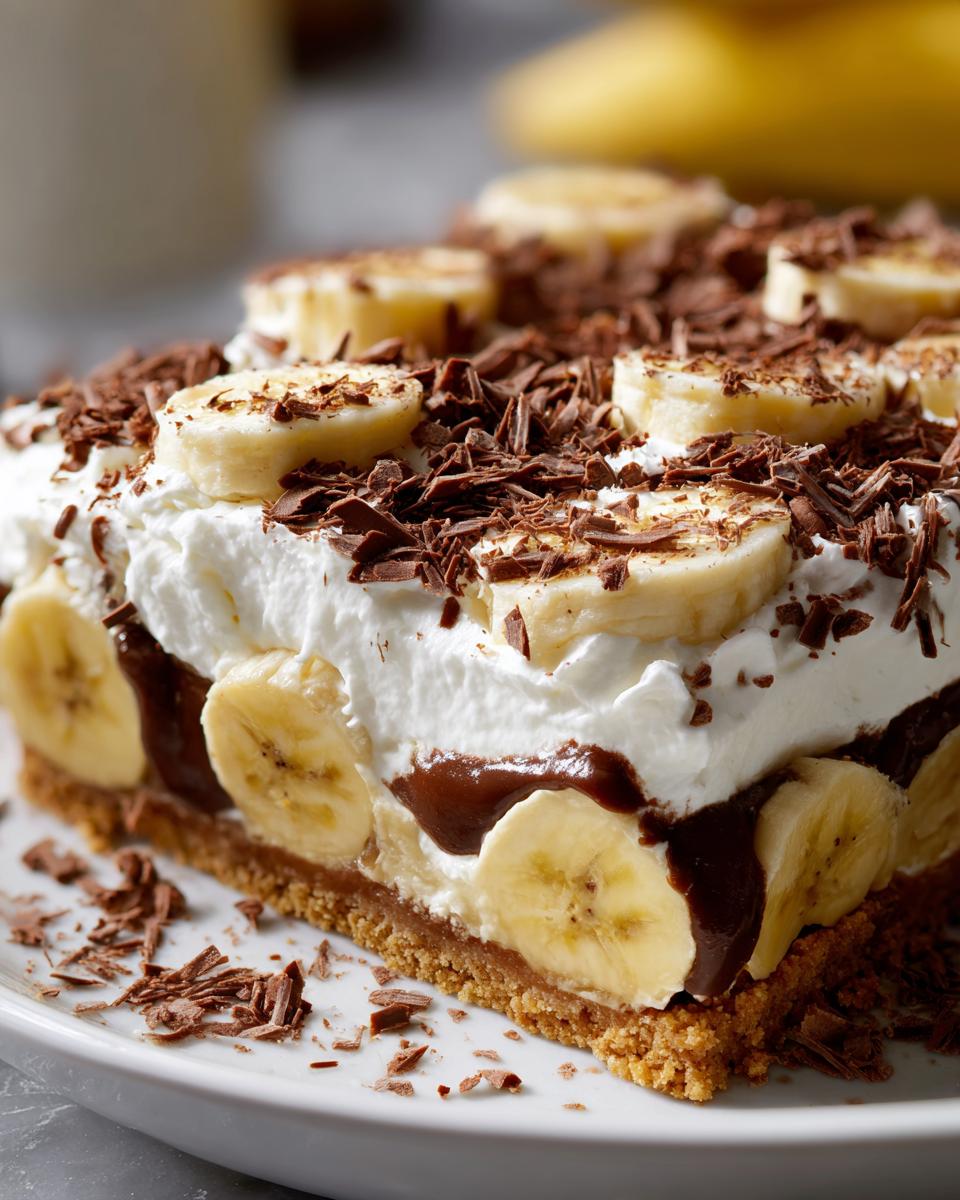
Texture is everything in a great slice. This is truly a creamy pie recipe because of the sharp contrast we achieve. You get the slightly gritty, buttery snap from the chilled biscuit base, immediately followed by that silky, smooth layer of dulce de leche, and then the cloud-like collapse of the whipped topping. It’s layered perfection, guaranteed.
Ingredients for Your Classic Banoffee Pie
When we list ingredients here at Dishicious, we keep things crystal clear. We are minimizing guesswork, which is key to making this banoffee pie an easy banoffee pie. Keeping the list tight means we maximize flavor output for the time invested. You’ll notice we have two options for the rich toffee layer; choosing the store-bought route instantly makes this a quicker dessert project.
- 1 1/2 cups graham cracker crumbs
- 6 tablespoons unsalted butter, melted (make sure it’s fully melted!)
- 1 (14 ounce) can sweetened condensed milk (for boiling the toffee—or skip this if using store-bought!)
- 3 large ripe bananas, sliced only when you are ready to assemble
- 2 cups heavy whipping cream
- 1/4 cup powdered sugar
- 1 teaspoon vanilla extract
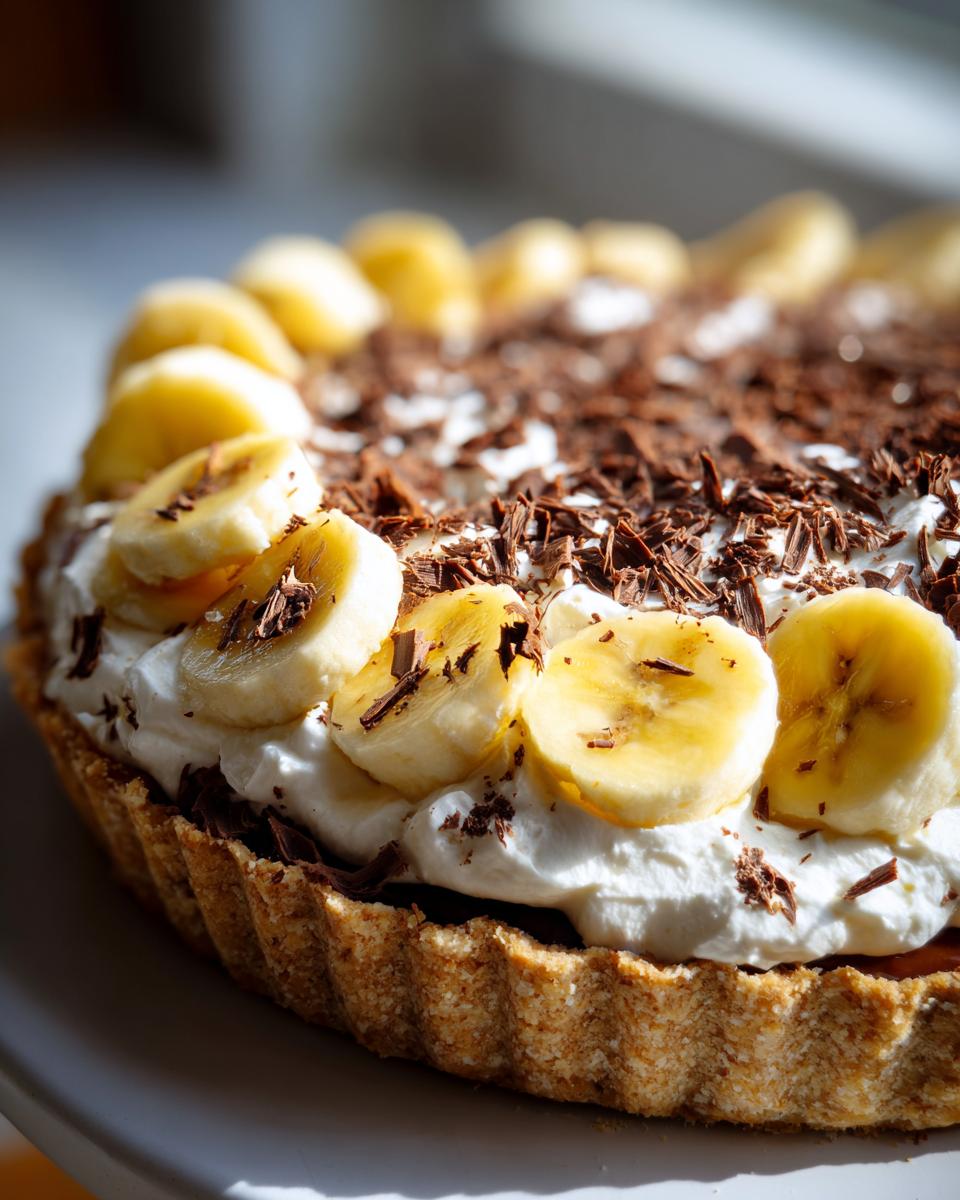
- Chocolate shavings, for topping (don’t skip this garnish!)
Ingredient Notes and Substitutions for Banoffee Pie
Okay, let’s talk tweaks on these core components. If you want that authentic British dessert vibe, swap out the graham cracker crumbs for crushed shortbread or ginger biscuits. The gingery snap is awesome against the sweet caramel. For the bananas, they need to be ripe enough to taste sweet, but still firm enough to hold their slice shape—no mush allowed! And seriously, if you are strapped for time, grabbing pre-made dulce de leche is totally acceptable; it just cuts out the 3-hour boil time. Check out these tips for other no-bake peanut butter bars if you need more quick fixes!
How to Prepare The Best Ever No-Bake Banoffee Pie
Okay, this is where the project moves into execution mode. Since we aren’t baking, half the battle is setting up our layers correctly so that the final banoffee pie holds up beautifully. Follow these precise stages; they are your roadmap to success, making sure we get that essential contrast in textures.
Step 1: Building the Graham Cracker Crust Pie Base
First thing: get that crust ready! Combine your graham cracker crumbs and the melted butter. You really need to press this mixture down firmly—use the bottom of a glass or a measuring cup to compact it right into the bottom and up the sides of your 9-inch dish. Don’t be shy here; a solid base keeps this graham cracker crust pie stable when slicing. Once it’s packed tight, slide it into the fridge for at least 30 minutes. That chill time is non-negotiable; it’s essential for setting up a sturdy foundation.
Step 2: Creating the Homemade Toffee (Dulce de Leche Dessert)
Now, for the toffee. If you want genuine, kitchen-tested results, you boil the sealed can of condensed milk, submerged in water, for 3 to 3.5 hours. Watch the water level, always keeping that can covered! Listen, this is an all-day commitment, but the result is an incredible dulce de leche dessert. HOWEVER, if you are looking for that easy dessert to make ahead, ditch the boiling! Grab a can of pre-made dulce de leche. It’s so much faster, and honestly, it delivers a fantastic caramel flavor for this banana toffee pie.
Step 3: Assembling Your Banana Toffee Pie Layers
Once your toffee (homemade or store-bought) is cool, immediately spread it evenly over that chilled crust. Next layer: the bananas. Slice them about 1/4 inch thick and lay them right over the toffee. Pro tip for keeping things looking fresh: brush the banana slices lightly with lemon juice before you layer them on. This stops them from oxidizing and turning unsightly grey on you overnight.
Step 4: Whipping Cream Dessert Topping and Finishing
Time for the clouds! In a clean bowl, whip your heavy cream with the powdered sugar and vanilla until you reach stiff peaks. You want definition when you lift the whisk—nothing runny at all! Dollop or pipe this fluffy topping generously over the bananas. For the absolute best presentation of your finished banoffee pie, this entire construction needs to chill for a minimum of two hours before serving. Right before you slice it, shower the top with chocolate shavings. This is the final touch that makes people gasp!

If you want faster assembly, check out this guide on no-bake banoffee pie assembly. And don’t forget to save this guide on no-bake peanut butter bars for your next sweet fix!
Tips for the Perfect Banoffee Pie Success
We’re optimizing this recipe for success, which means troubleshooting pitfalls before they even happen! A great banoffee pie depends on fresh-looking fruit and perfectly set layers. My little hacks help turn a good pie into the best banoffee pie possible, ensuring you get those compliments every time you serve it.
If you’re looking for other shortcuts that don’t compromise on flavor, take a look at my recipe for easy homemade gravy—it’s all about making big flavor with minimum fuss.
Preventing Banana Browning in Your Banoffee Pie
This is crucial for a beautiful presentation, especially if you’re making this creamy pie recipe ahead of time! Bananas oxidize shockingly fast once sliced. The trick is simple: after slicing your bananas, lightly toss them in a small amount of lemon juice before layering them over the toffee. The acid in the citrus acts immediately to slow down that browning process. I learned this trick years ago, and honestly, it keeps the fruit bright yellow until serving time. For more classic British inspiration, check out this post on homemade toffee pie assembly!
Making Individual Banoffee Cups: A Variation
Not every dessert needs to be a giant, towering pie, right? Sometimes, portion control—or just wanting something super easy to serve at a big party—calls for smaller bites. If you want to change up this classic banoffee pie, making individual banoffee cups is a fantastic project adjustment. This takes our simple layering technique and puts it into perfect, ready-to-grab servings. Imagine these little treats lined up on a platter!
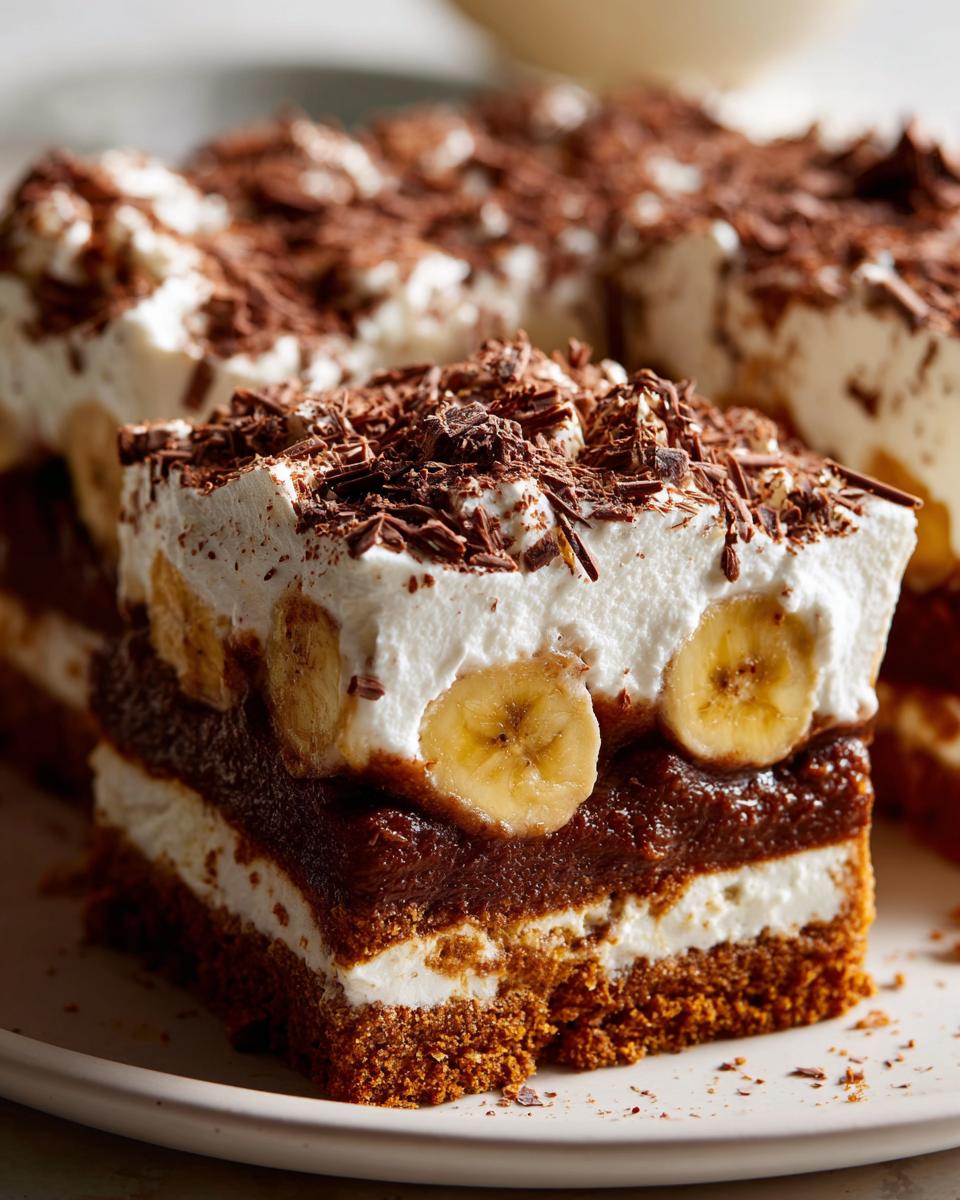
You have a couple of ways you can tackle this. The first, and my preferred method for a true crust experience, is using a standard muffin tin. Line those cups with paper liners—it makes liftoff a breeze later. Press a smaller amount of the buttery base mixture into the bottom of each liner. You don’t need to go up the sides like you would with a full pie shell; just a firm base is good enough for these individual banoffee cups.
Next, you just layer exactly as we did before: a spoonful of your cooled toffee, a couple of nice banana slices, and then top it with that gorgeous whipped cream, maybe finish it with a tiny dusting of cocoa powder instead of big chocolate shavings.
Alternatively, if you want something even faster and spoonable, skip the tin altogether and layer everything directly into small clear glasses or ramekins. This gives it a really elegant, layered look. For inspiration on other single-serving treats, check out this guide on single-serve dessert cups. Remember, even though these are smaller, they still need that mandatory chill time so that the toffee layer firms up slightly. If you are looking for other easy assembly recipes, these cheese straws are another great make-ahead snack!
Storage and Make-Ahead Tips for Your Banoffee Pie
This is one of the best parts about this banoffee pie recipe: it’s designed to be made ahead! Since we aren’t dealing with a baked crust or delicate eggs setting, we have a lot of flexibility. The beauty of this plan is breaking the project into smaller, manageable components. If you’re planning for a party, you can get most of the heavy lifting done the day before, which means less stress when the guests arrive. This is prime territory for an easy dessert to make ahead.
You can absolutely prepare components separately. The crust—the biscuit base pie—is the sturdiest part. Make that crust, press it in, and store the whole thing, uncovered, in the fridge. It holds up perfectly for about two days. If you’re making the toffee homemade by boiling the can, you can make that two days out too. Just make sure that caramel is completely cool before you stick it anywhere!
Now, here’s the critical optimization point, and this is where we protect the aesthetic appeal of our final product: the bananas and the whipped cream topping. Bananas, bless their hearts, are drama queens. Even with my little lemon juice trick, they start to look a bit dull after about 6 to 8 hours layered in the pie.
My strategy is simple: I assemble the crust and the toffee layer the day before. Then, about 4 hours before serving, I slice the bananas and layer them on top, followed immediately by the whipped cream dessert topping. Covering the whole pie loosely with plastic wrap and chilling it for at least two hours lets everything settle perfectly. If you absolutely must do everything the night before, just cover the top layer of whipped cream gently so it doesn’t develop that weird skin, but know the bananas are your time clock!
If you need more guidance on managing your timeline, I’ve got some great tips on how to manage a busy weeknight schedule you might want to check out, like these easy creamy chicken tortilla soup instructions. For more classic British dessert timeline advice, see what they’re doing over at House of Nash Eats!
Frequently Asked Questions About Banoffee Pie
When you run into friction points, that’s when confidence drops. I always try to preempt those little bumps so this banoffee pie recipe stays in the “easy” category, no matter what. Here are the questions I get most often about making sure this dessert toffee pie turns out just right for you.
Can I make this banoffee pie recipe without boiling the condensed milk?
Absolutely, yes! Honestly, if you’re aiming for a super quick dessert idea, boiling the can adds hours to your project time. If you skip that step, you just buy pre-made dulce de leche. That’s our favorite trick for streamlining things quickly. It works perfectly as a substitute for the homemade caramel we make. It’s the same rich flavor, just zero monitoring required on the stovetop!
What is the best type of biscuit for a traditional banoffee pie base?
In America, everybody defaults to graham crackers, and that makes a perfectly fine graham cracker crust pie base. But if you want to get authentic with this British dessert, you should really hunt down digestive biscuits or, even better, ginger nuts. The ginger nuts give a lovely little spicy kick that cuts through the richness of the caramel and banana perfectly. It adds another layer of complexity to the flavor.
How far in advance can I assemble the banoffee pie?
This is all about timeline management for the best results. The crust and the toffee layer? Those are your make-ahead champions. You can easily prep those components a full day ahead of time, which is perfect for planning. However, you need to hold off on the two soft layers. I recommend only adding your banana slices and the final whipped cream topping within about four hours of serving. That way, we keep the bananas looking bright and the cream peaks nice and firm. You want this to look as fresh as possible!
If you are looking into other ways to manage your food prep, check out my guide on quick, easy dinners for weeknight planning inspiration!
Estimated Nutritional Breakdown for This Banoffee Pie
When optimizing a recipe, we have to talk about the final product’s profile, right? Just like I track time and ingredient lists, tracking calories helps keep things balanced. Please remember that these numbers are an estimate based on the ingredients listed above. Because we’re dealing with rich toffee and heavy cream, this banoffee pie definitely leans into indulgence, but it’s worth every single bite!
For an 8-serving slice of this masterpiece, here is what you can generally expect:
- Serving Size: 1 slice
- Calories: 450
- Fat: 25g (This comes mainly from the butter in the crust and the heavy cream topping)
- Saturated Fat: 15g
- Carbohydrates: 55g
- Sugar: 45g (This is high because of the nature of the condensed milk toffee!)
- Protein: 6g
We keep the sodium pretty low here, which is often a win when you’re making things from scratch. If you’re trying to balance out big desserts, I always recommend pairing a rich dish like this with something lighter later in the week. You can look at my recipe for cottage cheese ice cream if you need a high-protein, lower-sugar option for another day. We aim for deliciousness first, but a little awareness goes a long way in smart cooking!
Share Your Dishicious Banoffee Pie Creations
Alright, team, we’ve gone from raw ingredients to a spectacular, layered banoffee pie masterpiece. I trust my streamlined process for this no bake banoffee pie has made this one of the most satisfying, non-stressful desserts you’ve ever tackled. Now, I want to see what you created! Cooking isn’t a solo sport here at Dishicious; it’s about proving that smart strategy leads to delicious results we can all share.
If you followed these steps and this turned out to be the best banoffee pie you’ve ever made, please drop a rating for me below! Five stars is always the goal when we nail the project plan, right?
I absolutely love seeing your results. Whether you went with the slow-simmered homemade toffee, or you went instantly for the shortcut dulce de leche, snap a photo and tag us—or just leave a comment telling me how you adjusted the base! Did you go for ginger nuts or stick to the classic graham cracker crust pie?
Don’t let this amazing recipe disappear into the digital ether! Make sure you save this banoffee pie recipe right now so it’s ready the next time that craving for salted caramel and banana hits hard. We build the playbook so you can cook with confidence, and that means keeping the winning strategies close at hand. If you ever run into trouble or have suggestions, you can always reach out via our contact page. Happy, efficient baking!
PrintThe Best Ever No-Bake Classic Banoffee Pie

This no-bake Banoffee Pie delivers the classic British dessert experience using simple steps. You get layers of buttery biscuit crust, rich homemade toffee (dulce de leche), fresh bananas, and fluffy whipped cream. It is an impressive but simple dessert that works for any gathering.
- Prep Time: 25 min
- Cook Time: 180 min (for homemade toffee)
- Total Time: 205 min
- Yield: 8 servings 1x
- Category: Dessert
- Method: No-Bake
- Cuisine: British
- Diet: Vegetarian
Ingredients
- 1 1/2 cups graham cracker crumbs
- 6 tablespoons unsalted butter, melted
- 1 (14 ounce) can sweetened condensed milk (for toffee/dulce de leche)
- 3 large ripe bananas, sliced
- 2 cups heavy whipping cream
- 1/4 cup powdered sugar
- 1 teaspoon vanilla extract
- Chocolate shavings, for topping
Instructions
- Prepare the crust: Combine graham cracker crumbs and melted butter in a bowl. Press the mixture firmly and evenly into the bottom and up the sides of a 9-inch pie dish. Chill the crust in the refrigerator for at least 30 minutes while you prepare the filling.
- Make the toffee (dulce de leche): Place the sealed can of sweetened condensed milk in a large saucepan and cover it completely with water. Bring the water to a boil, then reduce heat to maintain a steady simmer. Boil the can for 3 to 3.5 hours, checking occasionally to ensure the can remains submerged. Carefully remove the can from the water and let it cool completely before opening. Alternatively, use store-bought dulce de leche.
- Assemble the pie: Once the toffee is cool, spread the entire contents evenly over the chilled crust. Arrange the sliced bananas over the toffee layer.
- Prepare the whipped cream: In a separate bowl, beat the heavy whipping cream, powdered sugar, and vanilla extract until stiff peaks form. Do not overbeat.
- Top the pie: Spoon or pipe the whipped cream over the banana layer, covering it completely.
- Chill and serve: Refrigerate the Banoffee Pie for at least 2 hours before serving. Before slicing, sprinkle the top generously with chocolate shavings.
Notes
- For a quicker toffee, use store-bought dulce de leche. This saves significant cook time.
- If you want an extra layer of flavor, use ginger biscuits instead of graham crackers for the crust.
- To prevent bananas from browning, lightly brush the slices with lemon juice before layering them over the toffee.
Nutrition
- Serving Size: 1 slice
- Calories: 450
- Sugar: 45g
- Sodium: 210mg
- Fat: 25g
- Saturated Fat: 15g
- Unsaturated Fat: 10g
- Trans Fat: 0g
- Carbohydrates: 55g
- Fiber: 2g
- Protein: 6g
- Cholesterol: 75mg