

If you’ve ever looked at two perfect desserts and thought, “Why can’t I have both?”—then I have the answer for you! Fusion desserts are my absolute favorite projects because they take the best parts of two classics and combine them into something truly special. Forget complicated baking; this Classic Apple Pie Cheesecake with Salted Caramel Drizzle is exactly what you need for your next holiday baking project or big gathering. Leo, our founder, approaches baking like a project manager, meaning we cut through all the fussy, unnecessary steps to deliver maximum flavor—and that’s exactly how we nail this impressive apple pie cheesecake every single time. Get ready for the creamiest, most visually stunning dessert you’ve ever made!
- Why This Classic Apple Pie Cheesecake Recipe Works (EEAT Focus)
- Ingredients for Your Show Stopping Apple Pie Cheesecake
- Step-by-Step Instructions for the Apple Pie Cheesecake Recipe
- Tips for Success When Making Apple Pie Cheesecake
- Serving Suggestions for This Layered Cheesecake Dessert
- Storage and Reheating Instructions for Apple Pie Cheesecake
- Frequently Asked Questions About Apple Pie Cheesecake
- Estimated Nutritional Data for This Creamy Apple Dessert
- Share Your Apple Pie Cheesecake Creations
Why This Classic Apple Pie Cheesecake Recipe Works (EEAT Focus)
I get why people worry about making cheesecake—they crack, they sink, they end up watery! But this version is engineered for success, giving you that perfect marriage of flavor without any stress. We nail the texture because we focus on high-quality basics and smart technique, creating an apple pie cheesecake that looks incredible and tastes even better. Knowing how to manage the heat guarantees creamy, smooth results every time, which is what we really want in a dessert fusion like this.
Flavor Fusion: Apple Pie Cheesecake Balance
The magic here isn’t just sweetness; it’s balance. You get the slight, gorgeous tang from the cream cheese that cuts through the brown sugar. Then you hit those pockets of warm, cinnamon-spiced apple filling—it’s like the soul of apple pie is living inside a rich cheesecake! That firm, buttery graham cracker crust holds it all together. Honestly, this is such a stellar Thanksgiving Cheesecake Option because it covers all the comforting holiday bases.
The Role of the Water Bath in Perfecting Your Apple Pie Cheesecake
Okay, here’s the project management secret that eliminates cracking: the water bath, also called a *bain-marie*. It sounds fancy, but I promise it’s simple. Wrapping the pan tightly and placing it in a larger pan filled halfway with hot water creates a moist, gentle oven environment. This cooks the apple pie cheesecake evenly without burning the outside edges before the center sets. It stops moisture loss cold, which is key to keeping everything ultra-creamy!
Ingredients for Your Show Stopping Apple Pie Cheesecake
You know I love a recipe where everything is organized! When you see all these components laid out, it stops feeling like one giant scary project and starts feeling like three simple, manageable ones. Since we are layering flavors here, keeping your ingredients separate makes the assembly process so much smoother. You’ll want everything ready to go before your oven even starts warming up, especially that cream cheese!
Buttery Graham Cracker Crust Components
The crust is our foundation, and it needs to be sturdy because we are stacking a lot of creamy goodness on top of it. We use simple stuff here, but don’t skimp on pressing it down tightly—that’s your insurance against a soggy bottom!
- 1 1/2 cups graham cracker crumbs
- 1/4 cup granulated sugar (just a little pop of sweetness for the base)
- 6 tablespoons unsalted butter, melted (this is what binds everything together!)
Creamy Cheesecake Filling Ingredients
Listen, if you want that truly luxurious texture, the temperature of these ingredients matters! Don’t try to rush warming the cream cheese in the microwave; it just gets weird and oily underneath. Let things sit out for at least an hour. This helps the filling mix up beautifully without any lumps.
- 3 (8 ounce) packages cream cheese, softened (must be room temperature!)
- 1 1/2 cups granulated sugar (for that creamy sweetness)
- 1 teaspoon vanilla extract
- 1/4 cup sour cream (this adds a necessary little tang)
- 3 large eggs (also cold eggs are a no-go, room temp only, please!)
Apple Layer and Salted Caramel Cheesecake Topping
This is where the apple pie magic happens! We are using a flavorful prepared apple pie filling so we can focus on getting that cheesecake perfectly smooth. And of course, that caramel drizzle is non-negotiable for that deluxe finish—it really elevates this from just good to absolutely unforgettable.
- 2 cups prepared apple pie filling
- 1/2 cup salted caramel sauce (for drizzling later)
- 1/4 cup chopped pecans (optional, but I love the crunch!)
Step-by-Step Instructions for the Apple Pie Cheesecake Recipe
This is the part where we bring everything together, and honestly, this layering process is super fun! It’s like building a dessert skyscraper, but instead of concrete, we’re using perfectly smooth batter and spiced apples. Because this is a baked item, the timing is important, so preheating the oven first is your critical first step. Wrap that springform pan like you mean it—we don’t want any water sneaking in to ruin our buttery crust, trust me!
Preparing the Buttery Graham Cracker Crust
First things first, get that oven heating up to 325°F (160°C). Now, in a bowl, combine those graham cracker crumbs, the crust sugar, and the melted butter. Mix it around until it looks like wet sand, you know? Press that mixture firmly into the bottom of your foil-wrapped springform pan. We bake this just for 10 minutes to set it nice and solid before pouring the filling on top. Let it cool down a touch while you whip up the creamy stuff.
Mixing the Creamy Cheesecake Filling
This is where patience pays off! Beat your softened cream cheese and sugar until it is completely uniform and fluffy—zero lumps allowed. Stir in the vanilla and the sour cream to smooth it out even more. Now, listen closely: Eggs go in one by one, and you only mix until they disappear into the batter after each addition. Seriously, stop mixing! Overmixing here is what traps air and causes cracks in your beautiful apple pie cheesecake.
Layering and Baking the Apple Pie Cheesecake
Pour half of your dreamy batter over that crust. Spoon exactly 1 cup of your prepared apple filling right over the top of that layer, spreading it gently. Then, pour the rest of the batter, and finally, dollop the last cup of apple filling on the very top. Now for the water bath: Nestle your foil-wrapped pan into a larger roasting pan, and carefully pour hot water into the roasting pan until it swims halfway up the side of your springform. Bake it for about 60 to 75 minutes. You want the edges firm, but the middle should still have a little, tiny wiggle.
Cooling and Chilling for the Best Apple Pie Cheesecake
This next part is crucial for a crack-free finish! Turn the oven off, crack the door open—and just leave the cheesecake inside for a full hour while it slowly comes down in temperature. Rushing the temperature drop is how you get cracks! After that hour, take it out of the water bath and let it cool completely on the counter. The real test of patience comes now: cover it and chill it in the fridge for a minimum of 6 hours, though I always aim for overnight. This resting time is essential for the perfect sliceable apple pie cheesecake!
Tips for Success When Making Apple Pie Cheesecake
Even when we simplify things, baking still requires a little attention to detail! These tips are pulled straight from the experience of testing this recipe over and over—they are the fine-tuning adjustments that take your apple pie cheesecake from good to absolutely flawless. If you follow these three points, you’re guaranteed a show-stopper every time you tackle this hybrid dessert.
Ingredient Temperature and Texture Control
I can’t stress this enough: your cream cheese and those three large eggs absolutely must be at room temperature before you even think about mixing the filling. When they are cold, you end up with pockets of unmelted cheese, and that ruins the incredibly smooth texture we worked so hard to achieve with the water bath. Warm them up slowly!
Creating the Apple Crumble Cheesecake Variation
If you want to ditch the simple apple layer and go for maximum texture, you have to try the crumble variation! Mix 1/2 cup of flour, 1/4 cup of brown sugar, 1/4 cup of cold, cubed butter, and 1/4 cup of rolled oats. Sprinkle this fantastic, buttery oat mix right over the apple layer before it goes into the oven. It bakes up golden and crunchy, turning your dessert into the ultimate Apple Crumble Cheesecake sensation!
Serving Suggestions for This Layered Cheesecake Dessert
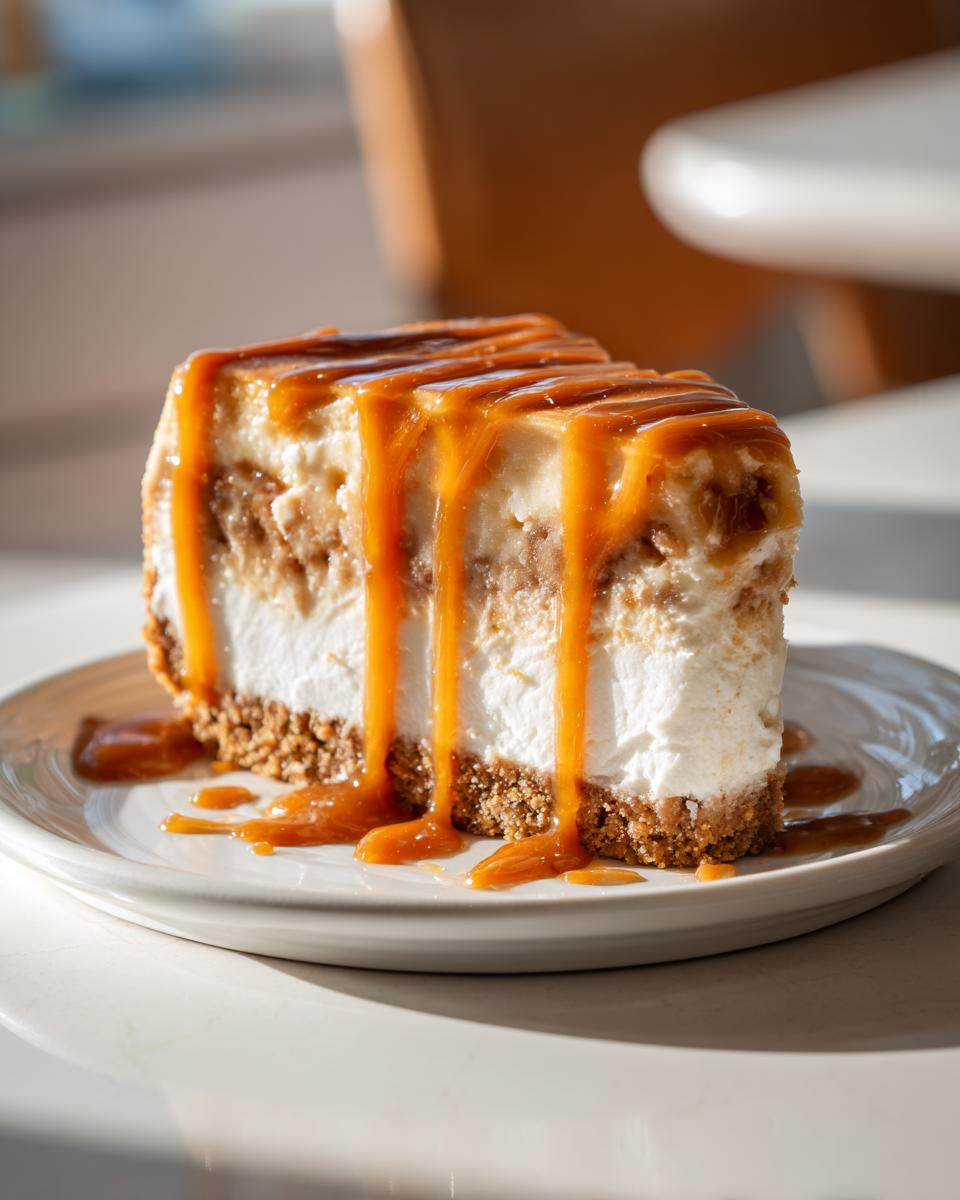
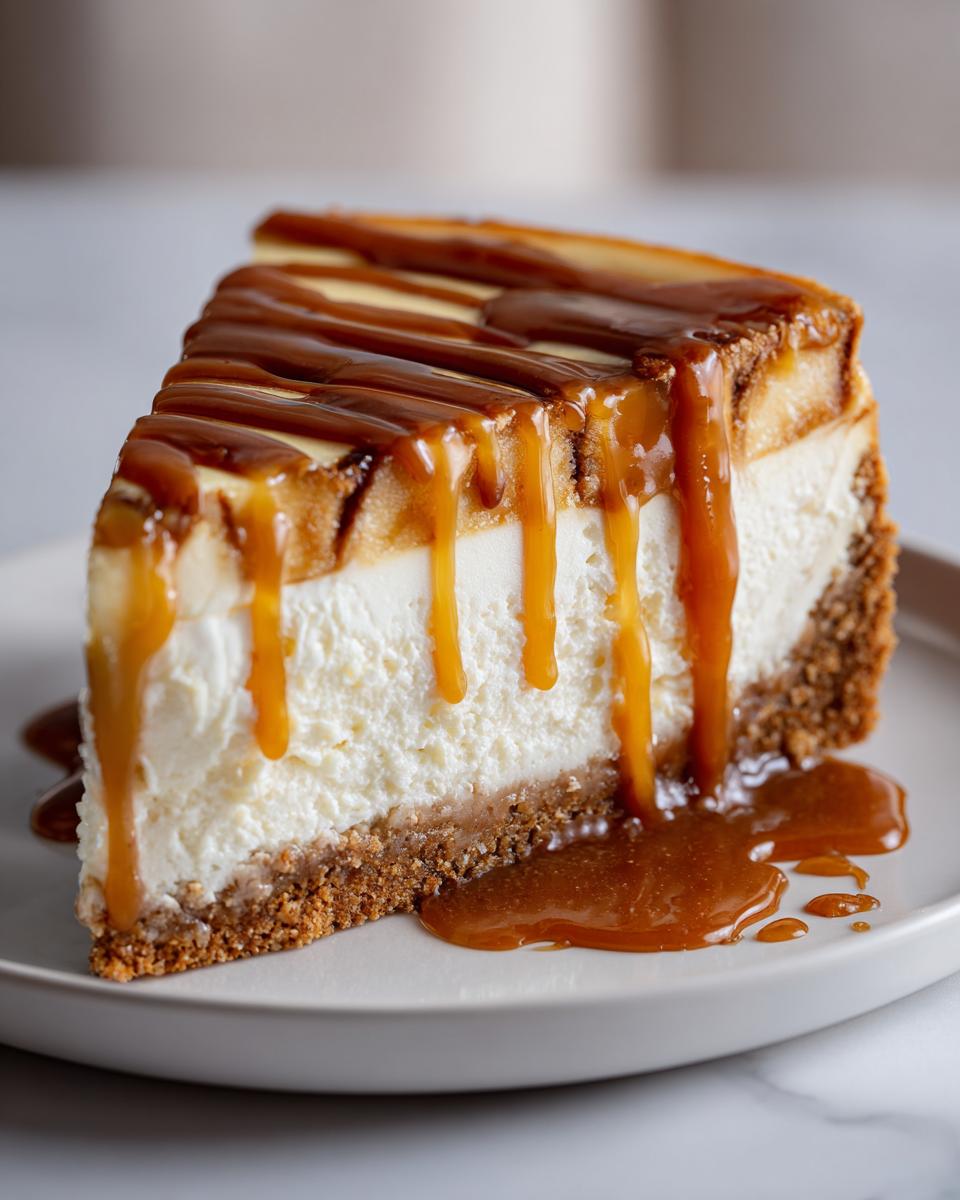
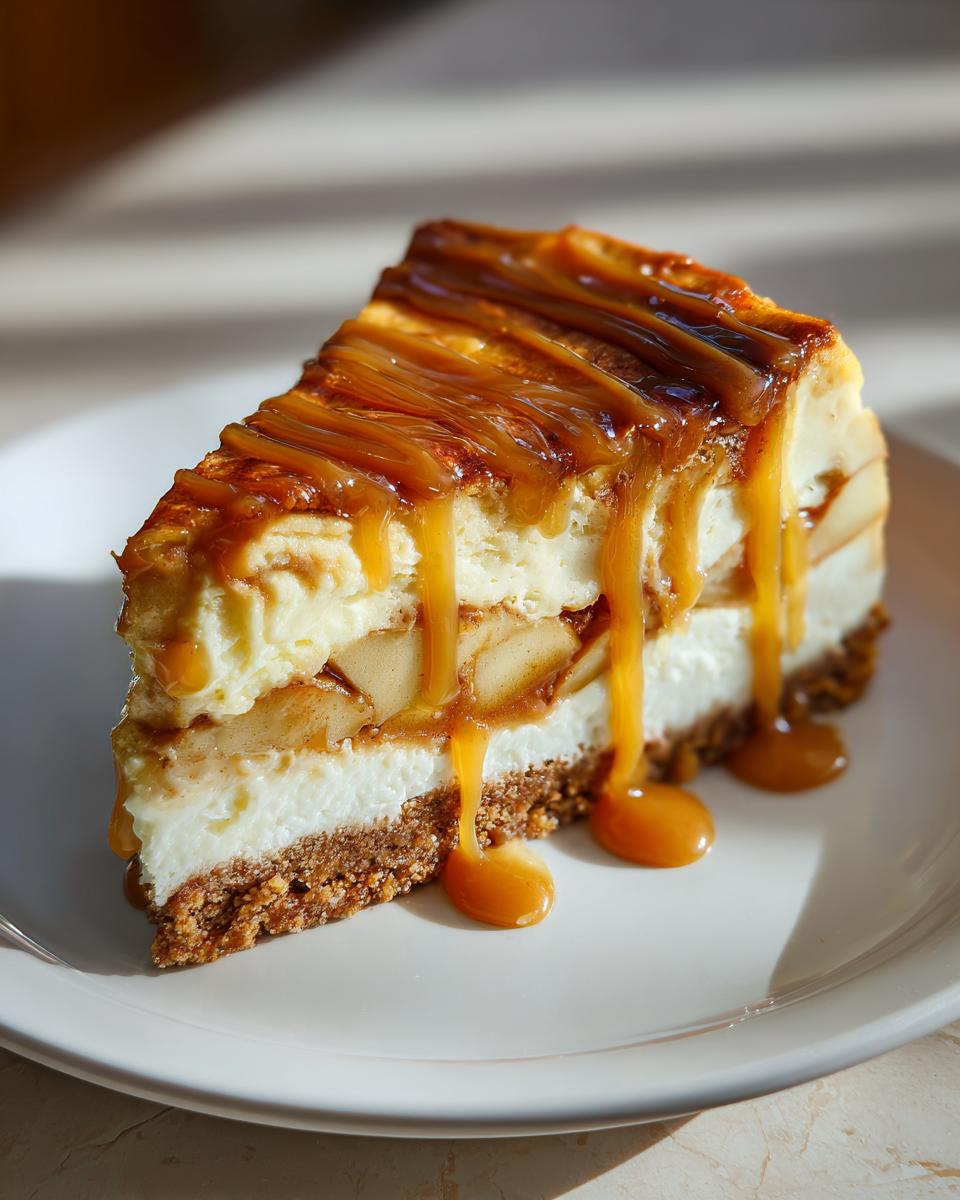
Now that you’ve successfully navigated the baking and chilling marathon, it’s time for the grand finale! Once the sides of the springform pan are gently removed, you’ll see those beautiful layers—the buttery crust, the creamy white filling, and the golden apple swirl peeking through. This is truly a show stopping dessert, so it deserves a beautiful presentation.
Don’t just slice it plain! Take that luscious salted caramel sauce and let it pool luxuriously over the top. If you made the optional pecan topping earlier, sprinkle them around the edges for crunch and visual appeal. Serve this amazing layered cheesecake dessert slightly cool—it slices cleaner that way, but let it sit on the plate for about 15 minutes before eating so the creaminess really shines through.
Storage and Reheating Instructions for Apple Pie Cheesecake
Because this is a true, glorious baked cheesecake with those lovely warm apple layers, storing it correctly is super important to keep that texture perfect. You absolutely must keep your leftover apple pie cheesecake covered tightly and chilled in the refrigerator. Seriously, treat it like royalty! It holds up wonderfully for about four or five days.
Now here is the big rule: we don’t reheat cheesecake! If you try warming it up, you lose all that beautiful, firm structure we worked so hard for with the water bath. Just pull your slice out of the fridge about 20 minutes before you plan to eat it. That little bit of time at room temperature softens the cream cheese just perfectly so you get that amazing melt-in-your-mouth sensation with every bite.
Frequently Asked Questions About Apple Pie Cheesecake
I always get questions about adapting these big, impressive desserts, especially when holidays roll around! It’s smart, too—planning ahead is half the battle when you’re trying to serve a show-stopper like this apple pie cheesecake.
Can I make a No Bake Apple Cheesecake instead?
This specific recipe relies on the oven and that water bath to get that wonderfully dense, creamy structure we love. So, no, you can’t skip the baking step here! If you absolutely need a No Bake Apple Cheesecake, you’ll need to find a recipe specifically designed for that, usually involving gelatin or whipped stabilizers instead of eggs and baking time.
How far ahead can I prepare this apple pie cheesecake?
This is a champion of make-ahead desserts, which is fantastic for Holiday Cheesecake Baking! We recommend chilling it for a minimum of six hours, but honestly, it tastes better the next day. The flavors meld, and it sets up perfectly. You can easily bake it completely the day before your big event!
What is the best way to slice a chilled cheesecake?
If you try to cut it straight from the fridge, you risk dragging and tearing that beautiful top layer—don’t do it! The trick is simple: grab a sharp, long knife and dip it into a glass of very hot water. Wipe the blade clean and dry, then make your cut. Dip, wipe, cut new slice, repeat. It keeps those layers looking pristine!
Estimated Nutritional Data for This Creamy Apple Dessert
I always include the nutritional breakdown because, well, we want to know what we are getting into, right? But remember, since this is a rich, layered dessert made with real butter and cream cheese, these numbers are just a friendly estimate based on the ingredients listed. This is definitely a treat after a big holiday meal!
This data reflects one generous slice of our creamy apple dessert:
- Serving Size: 1 slice
- Calories: 450
- Sugar: 45g
- Fat: 28g
- Protein: 7g
Don’t fret too much over the sugar content, though; think of it as the necessary magic that holds together the best parts of pie and cheesecake!
Share Your Apple Pie Cheesecake Creations
Well, that’s it! You’ve successfully tackled one of the most impressive desserts out there. I truly believe this apple pie cheesecake is something special, and now it’s sitting in your fridge, ready to wow everyone. I want to see what you created! Did you go heavy on the salted caramel drizzle? Did you try that apple crumble variation I mentioned?
The best part of cooking is sharing the results, right? Please hop over and leave a rating below—a five-star review really helps other busy cooks find this reliable recipe. And if you snapped a picture of your stunning layered dessert, tag me on social media! I always love seeing my projects out in the real world. If you have any questions about technique or substitutions, my inbox is always open over at the contact page. Happy baking!
PrintClassic Apple Pie Cheesecake with Salted Caramel Drizzle

Make this layered dessert combining creamy cheesecake, spiced apple pie filling, and a buttery graham cracker crust. Finish it with a salted caramel drizzle for a show-stopping treat.
- Prep Time: 30 min
- Cook Time: 75 min
- Total Time: 8 hours 45 min
- Yield: 12 servings 1x
- Category: Dessert
- Method: Baking
- Cuisine: American
- Diet: Vegetarian
Ingredients
- 1 1/2 cups graham cracker crumbs
- 1/4 cup granulated sugar (for crust)
- 6 tablespoons unsalted butter, melted
- 3 (8 ounce) packages cream cheese, softened
- 1 1/2 cups granulated sugar (for filling)
- 1 teaspoon vanilla extract
- 1/4 cup sour cream
- 3 large eggs
- 2 cups prepared apple pie filling
- 1/2 cup salted caramel sauce (for topping)
- 1/4 cup chopped pecans (optional topping)
Instructions
- Preheat your oven to 325°F (160°C). Wrap the outside of a 9-inch springform pan tightly with heavy-duty aluminum foil.
- Prepare the crust: Mix graham cracker crumbs, 1/4 cup sugar, and melted butter until combined. Press the mixture firmly into the bottom of the prepared springform pan. Bake for 10 minutes. Let cool slightly.
- Prepare the cheesecake filling: In a large bowl, beat the softened cream cheese and 1 1/2 cups sugar with an electric mixer until smooth. Beat in the vanilla extract and sour cream. Add the eggs one at a time, mixing just until combined after each addition. Do not overmix.
- Pour half of the cheesecake batter over the cooled crust. Spoon 1 cup of the apple pie filling evenly over the batter layer. Pour the remaining cheesecake batter on top.
- Gently spoon the remaining 1 cup of apple pie filling over the top layer of batter. You can swirl it slightly with a knife if desired.
- Bake the cheesecake in a water bath: Place the foil-wrapped springform pan into a larger roasting pan. Carefully pour hot water into the roasting pan until it reaches halfway up the sides of the springform pan.
- Bake for 60 to 75 minutes, or until the edges are set but the center still has a slight jiggle.
- Turn off the oven, crack the door open slightly, and let the cheesecake cool inside the oven for 1 hour. This prevents cracking.
- Remove the cheesecake from the water bath and let it cool completely on a wire rack. Once cool, cover and refrigerate for at least 6 hours, or preferably overnight.
- Before serving, carefully remove the sides of the springform pan. Drizzle generously with salted caramel sauce and sprinkle with chopped pecans, if using.
Notes
- For the best texture, make sure your cream cheese and eggs are at room temperature before starting the filling.
- If you want a crisp topping, mix 1/2 cup flour, 1/4 cup brown sugar, 1/4 cup cold butter (cubed), and 1/4 cup rolled oats. Sprinkle this mixture over the apple layer before baking and bake until golden brown.
- Chill time is essential for a firm, sliceable cheesecake. Do not rush this step.
Nutrition
- Serving Size: 1 slice
- Calories: 450
- Sugar: 45g
- Sodium: 300mg
- Fat: 28g
- Saturated Fat: 17g
- Unsaturated Fat: 11g
- Trans Fat: 0.5g
- Carbohydrates: 48g
- Fiber: 1g
- Protein: 7g
- Cholesterol: 105mg