
There are days when you just need something incredibly decadent, something that tastes like pure processed sugar joy, but you absolutely cannot stand the thought of turning on the oven. We’ve all been there! That’s exactly the kind of culinary shortcut Leo champions here at Dishicious. Forget complicated layers; this No-Bake Creamy Butterfinger Pie is the answer to every sweet craving you have this week. It brings together that wonderful peanut butter creaminess with that signature crispy crunch of the candy bar. Seriously, making a proper Butterfinger Pie this easily feels like cheating, but trust me, it’s pure efficiency!
- Why This No Bake Butterfinger Pie is Your New Favorite Easy Candy Bar Dessert
- Gathering Ingredients for Your Creamy Peanut Butter Pie
- Preparing the Chocolate Crumb Crust Pie Assembly
- Making the Creamy Filling for Your Butterfinger Pie
- Assembling and Chilling the Best Butterfinger Pie Recipe
- Tips for Success with Your No Bake Butterfinger Pie
- Serving Suggestions for this Indulgent No Bake Treat
- Storing Your Leftover Butterfinger Pie
- Frequently Asked Questions About This Dessert with Butterfinger Candy
- Share Your Easy No Bake Butterfinger Pie Experience
Why This No Bake Butterfinger Pie is Your New Favorite Easy Candy Bar Dessert
If you’re looking for a dessert that screams maximum indulgence with minimum kitchen time, this is it. Seriously, why bother with the oven when you can have a spectacular, cold, creamy dessert ready for the fridge in under 25 minutes? This recipe fits right into Leo’s philosophy—delicious results without sacrificing your whole evening. It’s the ultimate easy candy bar dessert for when you need a showstopper.
- No oven required! Perfect for hot days or when your oven is already full of dinner.
- Active prep time is a breeze—we’re talking 20 minutes flat.
- It’s an instant crowd-pleaser. Everyone loves a classic peanut butter and candy combination.
- It’s the perfect make-ahead treat for potlucks or unexpected guests.
Key Details for Your Quick Butterfinger Pie
Knowing the time commitment upfront is everything when you’re planning a busy week. This whole process is designed to use simple timers, not complicated science!
- Prep Time: 20 minutes
- Total Time: 4 hours 20 minutes (mostly chilling!)
- Yield: 8 satisfying slices
Gathering Ingredients for Your Creamy Peanut Butter Pie
When you are going no-bake, your ingredients have to do all the heavy lifting for flavor and texture, so don’t skip a single thing here! Since this is a project in efficiency, I’ve stuck exactly to what works best for that rich, decadent filling. You want all of this ready to go before you even start mixing.
- One (9 inch) pre-made chocolate cookie crust—this is key! Don’t mess with baking today.
- One cup of creamy peanut butter. Trust me, stick with creamy for that smooth texture we are aiming for.
- Eight ounces of cream cheese. Make sure it’s completely softened, or you’ll end up with lumps, and we don’t do lumps around here!
- One cup of powdered sugar, sifted if you have time, but just dumped in works fine too.
- One teaspoon of vanilla extract—the good stuff helps!
- One cup of cold heavy whipping cream. This is what gives us that lovely lift later on.
- One cup of crushed Butterfinger candy bars. These are going right into the filling!
- One cup of whipped topping (like Cool Whip), thawed, reserved for the very top layer.
- One quarter cup of crushed Butterfinger candy bars saved just for sprinkling on top.
Ingredient Notes and Substitution Options
Even though this is simple, a couple of little tricks make sure the texture is spot-on. If you hate the idea of a graham cracker crust, the chocolate cookie crust is the way to go—it mimics an Oreo crust perfectly and makes the whole thing feel richer.
If you absolutely must skip the heavy whipping cream—maybe you ran out—you can use an entire large tub of that frozen whipped topping instead. But keep in mind, the heavy cream gives you a far superior texture. Omit steps 2 and 3 in the main instructions and just fold that whipped topping right into your peanut butter and cream cheese mixture.
Now, for crushing those delicious candy bars! Don’t bother with a food processor; it turns them into powder too fast. The best method, hands down, is the rolling pin technique. Put those bars into a heavy-duty zip-top bag, seal it tightly (maybe double-bag it just in case!), and whack them gently on the counter or roll over them firmly. You want lovely little chunks, not dust. Save about a quarter cup of those crunchy bits for the very last step!
Preparing the Chocolate Crumb Crust Pie Assembly
Okay, this is where we really lean into the “no-bake” magic! Because we are using that fantastic pre-made crust—honestly, it saves so much time and worry—this step is lightning fast. I always keep a few of those generic, frozen chocolate cookie crusts in my freezer for emergencies like this. They are sturdy and just the right amount of crisp!
Before you even think about mixing that creamy filling, give your crust a gentle look-over. Since they travel sometimes awkwardly, I make sure there are no cracks near the edges or bottom. If you see a minor fissure, don’t stress! Just take a tiny bit of the softened cream cheese (before you mix the main filling) on a knife and press it gently into the crack. It acts like glue as the pie chills and sets.
Also, make sure the crust isn’t rock hard straight out of the freezer cabinet if you’re using a frozen one. Let it sit on the counter for about five to ten minutes while you set out your other ingredients. You don’t want it breaking when you pour in the filling. This quick five-minute timeout is one of those crucial efficiency hacks Leo always talks about—prepare your vessel first!
Making the Creamy Filling for Your Butterfinger Pie
Now for the fun part—building that incredible, thick, creamy base for our Butterfinger Pie! This section is all about texture, so we need to follow the order or you end up fighting lumps the whole time. First things first: grab that softened cream cheese. You absolutely must beat this until it is perfectly smooth and silky, like velvet. If you have an electric mixer, this takes about a minute, but I’ve done it by hand with a sturdy wooden spoon when my mixer was dirty. Just keep working it until there isn’t a single bump left. That smooth start is what makes the whole filling feel upscale.
Once the cream cheese is happy, we move on to the peanut butter, powdered sugar, and vanilla. Dump them right in and mix it up until everything is beautifully combined. It will get really thick at this stage, almost like stiff frosting. That’s exactly what we want!
Next, we tackle the air lift. In a separate, clean bowl—and this is important, it needs to be clean and cold—whip up that cold heavy whipping cream until you reach stiff peaks. Think beautiful, defined mountains on the end of your whisk. This whipped cream is what’s giving our pie that light, fluffy volume without needing any gelatin or setting agents.
Here’s the most delicate operation: folding. You can’t just dump the whipped cream into the peanut butter mix and whisk it, or you’ll deflate all that precious air! Use a large spatula and gently, I mean gently, fold about a third of the whipped cream into the peanut butter base. Once that’s mostly incorporated, fold in the remaining cream until you have one uniform, pale, airy filling. Slow and steady wins the race here!
Folding in the Butterfinger Candy for Texture
We are so close, just two more additions before this goes into the crust. Take that cup of crushed Butterfinger candy bars you thoughtfully smashed earlier and sprinkle them in. Follow that immediately by folding in your thawed whipped topping. Remember what I said about folding? It applies doubly here! We want those crunchy candy pieces suspended throughout the creamy filling, not smashed into gritty dust.
Use a light hand, cutting down the middle and scooping up from the bottom and turning. Stop mixing the second you see no more white streaks of whipped topping. Overmixing at this stage is what makes the filling dense and heavy, and we are striving for the ultimate light and airy texture for our butterfinger pie. Once that’s done, grab that chocolate crust and get ready to fill it!
Assembling and Chilling the Best Butterfinger Pie Recipe
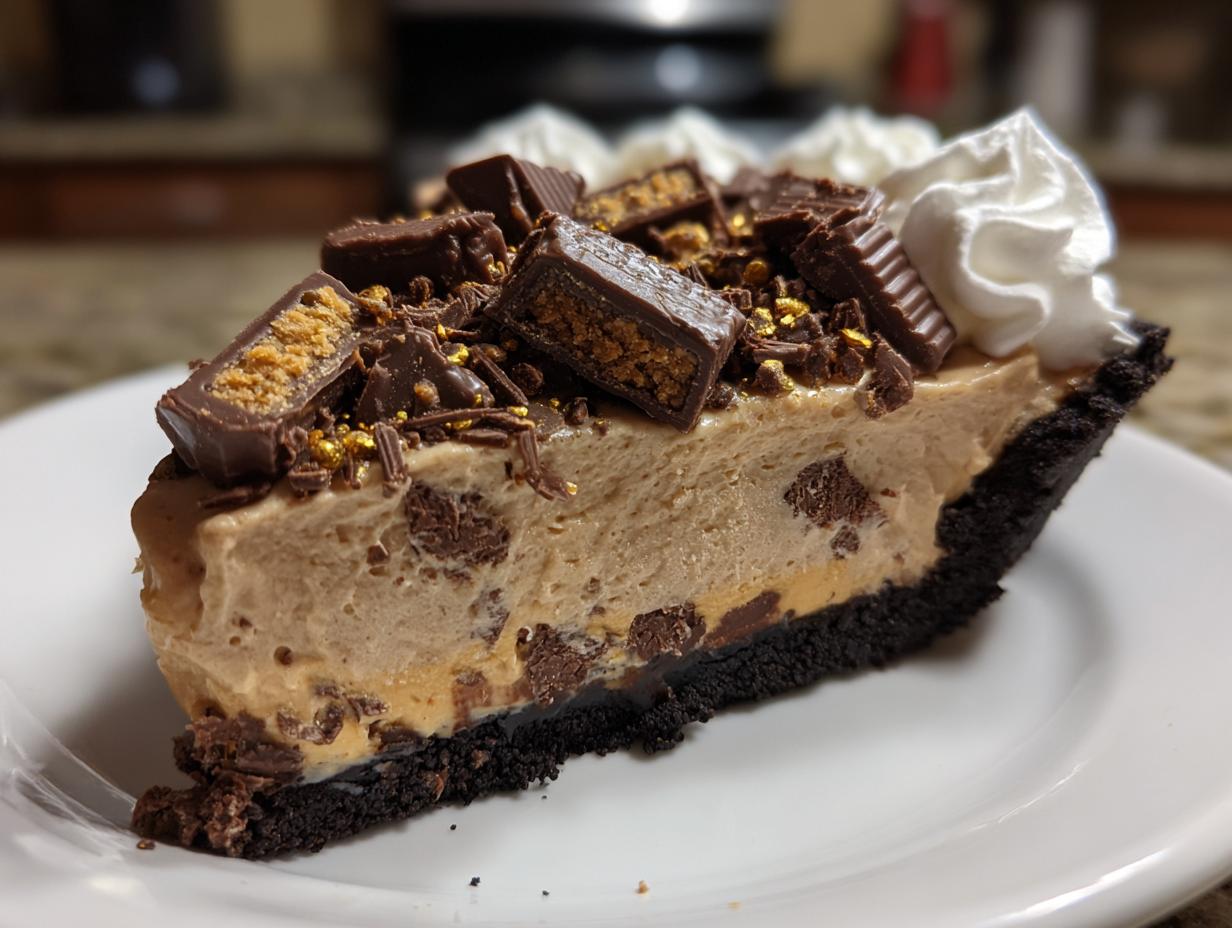
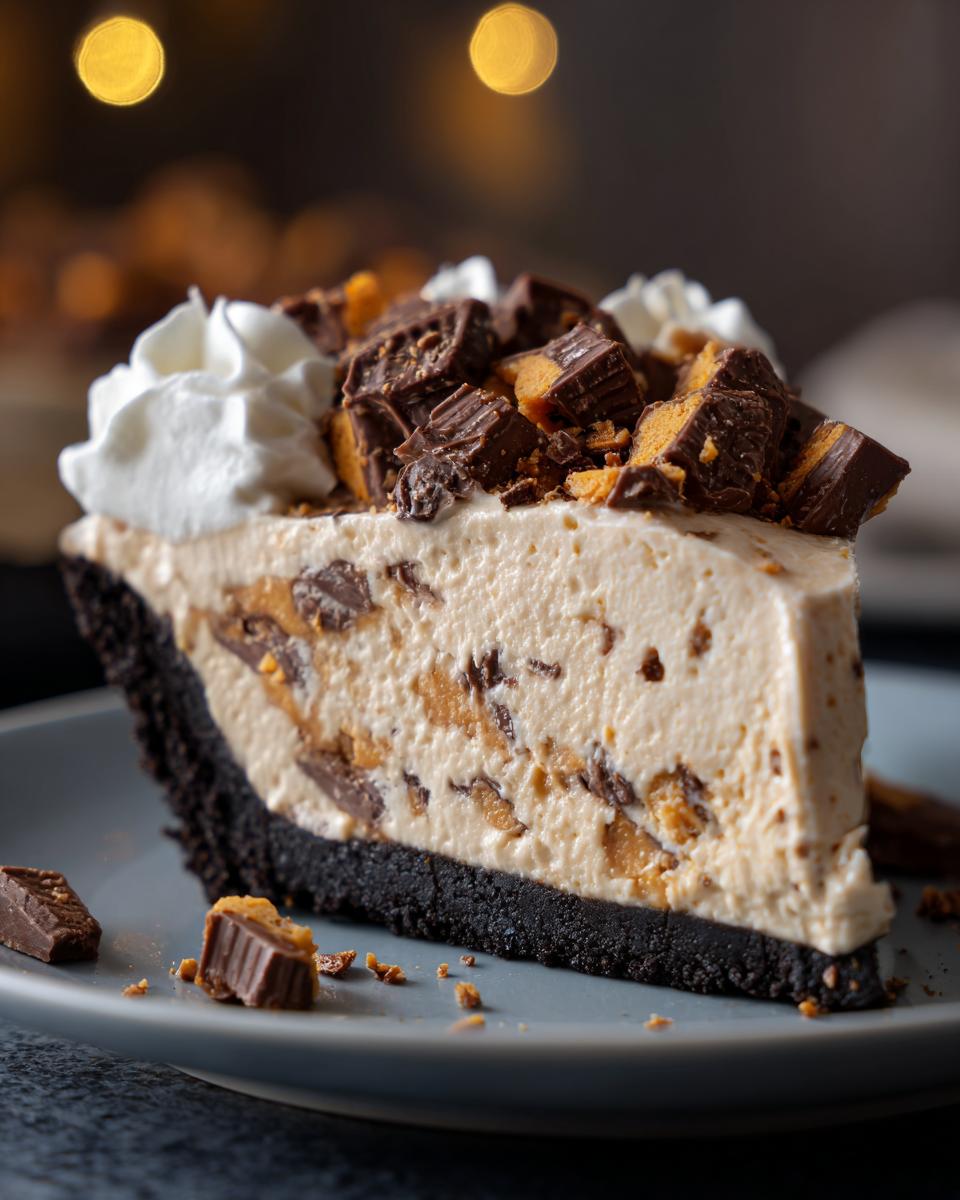
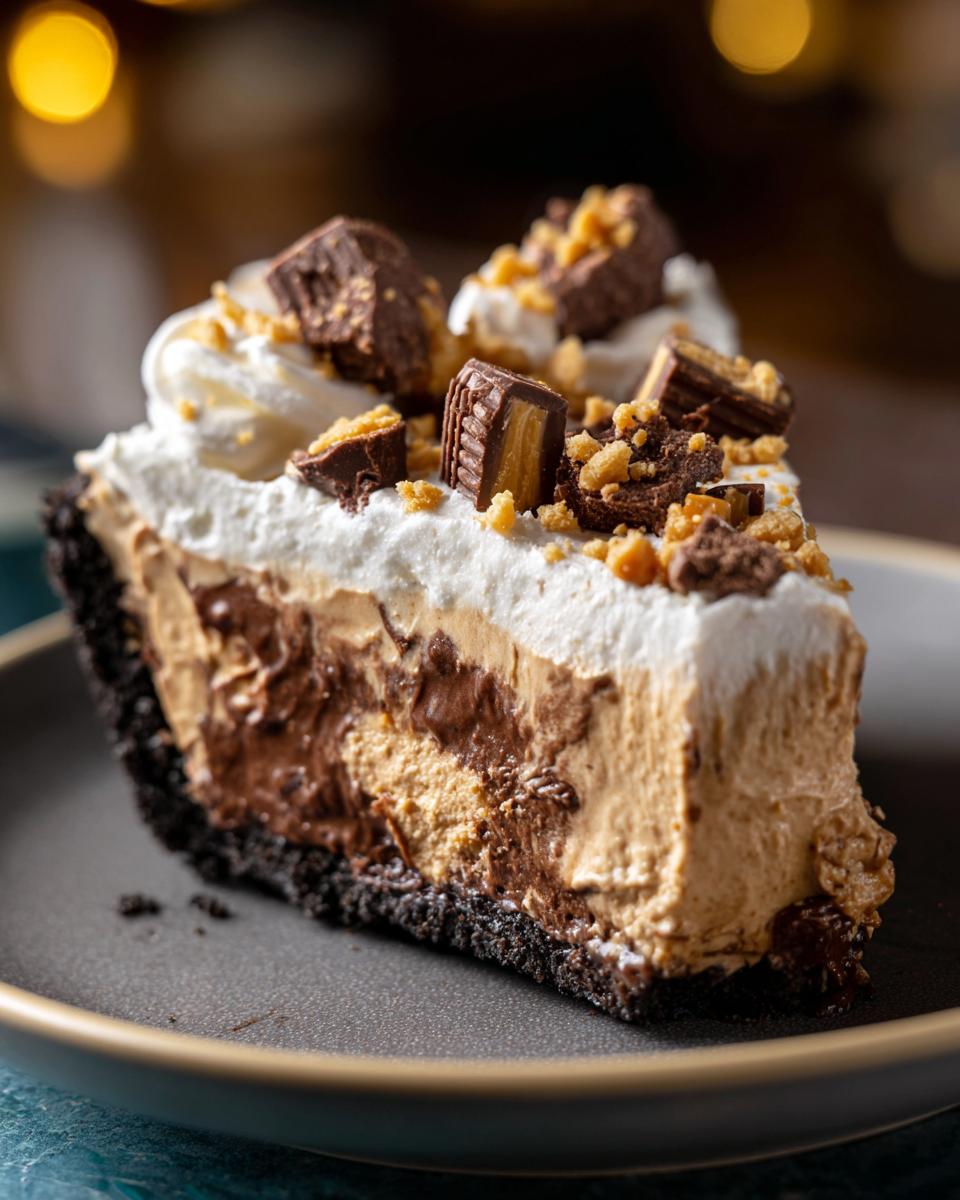
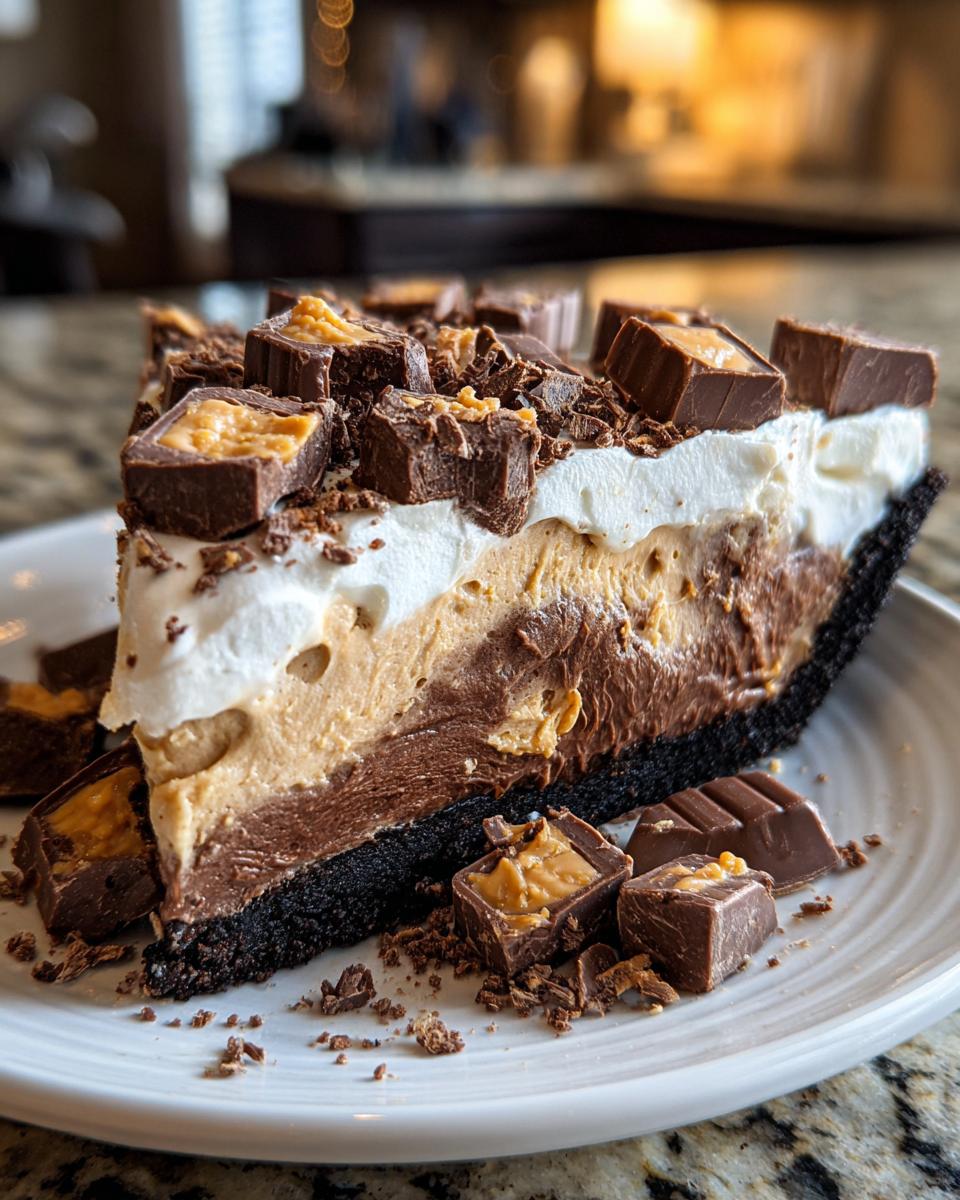
Alright, we’ve made the magic happen in the mixing bowls; now it’s time for the final presentation! Grab that chocolate cookie crust we made sure was sturdy earlier. Gently spoon all of that glorious, chunky peanut butter filling right into the crust. I usually use an offset spatula for this part, just to make sure you get a nice, even layer across the entire base. You don’t want one side sagging when you go to slice it!
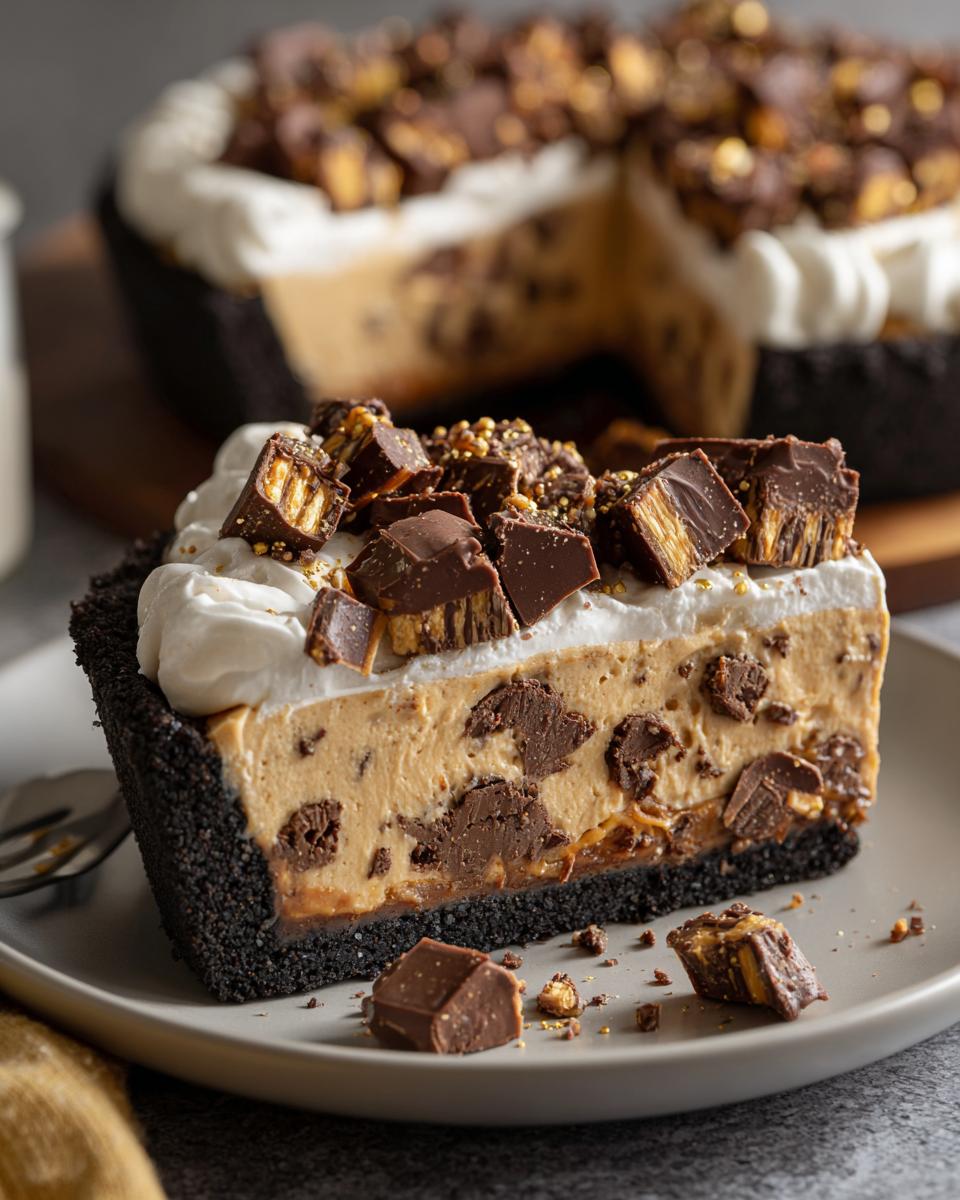
Once the main filling is settled in, it’s time for the crowning layer. Take that cup of thawed whipped topping and spread it carefully over the top of the peanut butter layer. Try to make the surface as smooth as possible, because this is the canvas for our final crunch!
Now, remember those reserved crushed Butterfinger bits? Sprinkle them evenly over the whipped topping. This is the visual cue that tells everyone, “Yes, this is intensely candy-loaded!” Scatter them right to the edges so every slice gets that final satisfying sparkle of peanut butter crunch. It looks just as good as the famous recipes you see online, like the one over at The Gracious Wife!
Here’s the part that requires the most discipline—the chilling. People always ask me if they can rush this, but for the Best Butterfinger Pie Recipe, you absolutely cannot. The filling, which relies on the cold to stabilize its creamy texture, needs time to truly set up. I demand a minimum of four hours in the refrigerator. If you try to slice this after just an hour or two, you’ll have a soupy plate of deliciousness, not a clean slice. Trust me on this one; patience results in perfect presentation for your easy make-ahead dessert.
This is where the no-bake part really pays off for parties, though. You can whip this entire thing up the morning before your gathering, or even the night before, and completely forget about it until dessert time. It just sits there, getting colder and firmer, waiting to be the star!
Tips for Success with Your No Bake Butterfinger Pie
Even though this is a no-bake recipe, that doesn’t mean you can skip precision! Leo’s whole thing is about making things efficient, and the fastest way to fix a ruined dessert is by avoiding mistakes in the first place. These little tweaks are the shortcuts that make sure your Butterfinger Pie turns out perfect every single time you make it.
First, let’s talk about temperature, because this is where most people go wrong with creamy fillings. Your cream cheese? It needs to be truly room temperature—soft enough that if you poke it hard, your finger leaves a deep dent without any resistance. If it’s even slightly firm, it won’t blend into the peanut butter smoothly, and you’ll end up beating it too long trying to fix it. And fighting lumps is never efficient!
Second, when you whip that heavy cream, stop the second you hit those stiff peaks. If you keep going, you’ll start making butter, which is great for toast but terrible for pie filling! Those stiff peaks are what keeps the whole filling light and airy. Keep that mixer moving, but watch it like a hawk.
My third big tip for this No Bake Butterfinger Pie involves the folding step. When you combine the whipped cream with the peanut butter base, you need to treat it delicately. Use a large, flexible spatula, and don’t stir vigorously. You are trying to *incorporate* air, not *remove* it! A few visible streaks when you add the Butterfingers are okay, because those last few folds will finish the job without deflating everything.
Finally, don’t ever skip the chilling time listed in the instructions. Four hours minimum! If you need it faster, you can transfer the *entire* pie (filled and ready to go) into the freezer for about 90 minutes, but watch carefully. It needs to be firm, not frozen solid, for that perfect bite of creamy heaven.
Serving Suggestions for this Indulgent No Bake Treat
Wow, this pie is rich, right? It’s loaded with peanut butter, chocolate, and candy, which is fantastic, but that means you need something refreshing on the side to cut through all that indulgence. When I bring this out for a family gathering, I never just slap it on the table by itself. It deserves some proper company!
Since this recipe is designed for ease, we want side dishes that require zero fuss. My absolute favorite pairing is a really strong, hot cup of black coffee or maybe an iced espresso. The bitterness of the coffee is the perfect counterpoint to the serious sweetness of the candy filling. It just brightens everything up!
If you’re serving it during a big meal, especially if you have heavier items like barbecue or casseroles earlier, you need brightness. I often put together a giant bowl of simple, lightly dressed mixed berries—maybe raspberries, blueberries, and just a tiny squeeze of fresh lemon juice. It looks vibrant on the table and offers a palate cleanser between bites of chocolate and peanut butter. You can find some great ideas over on our brunch and light fare page, even though this is technically a dessert!
For something a little different, try serving a small slice alongside a scoop of vanilla bean ice cream that’s just starting to melt. The contrast between the cold, slightly melting ice cream and the chilled, firm pie slice is heavenly. It feels fancy, but it takes zero extra effort. Seriously, this pie is the main event, so keep the extras simple and let that creamy candy filling shine on its own!
Storing Your Leftover Butterfinger Pie
So, the unthinkable happened—you actually have leftovers of this amazing Butterfinger Pie! That’s rare in my house, but when it happens, you want to make sure you protect that creamy texture until you can enjoy it again. Since this is a no-bake wonder, storage is super simple, but you do need to be mindful of keeping it covered.
The absolute best place for any remaining slices is the refrigerator. You need to keep it cold to maintain that perfect set; if you leave it out on the counter for too long, that cream cheese and whipped cream base will definitely start to weep and get sloppy. I highly recommend covering the pie dish tightly with plastic wrap. If the pie is already cut, sometimes the plastic wrap sticks to the exposed filling, so I often place toothpicks strategically around the cut edges before covering it—think of it as supporting scaffolding!
How long does it last? Because of those dairy components, you really want to finish it within three to four days max. After that, the chocolate crust can start absorbing moisture and getting a little softer than you’d like, and nobody wants a spongy crust under their perfect peanut butter filling!
When you want to serve those leftovers, don’t even think about warming it up! This is a chilled dessert through and through. Just pull your slice out of the fridge about ten minutes before you plan to eat it. That gives it just the slightest bit of give so it’s not rock-hard, but it keeps that signature cool, creamy mouthfeel. Enjoying that leftover Butterfinger Pie the next day is almost as good as the first slice, I swear!
Frequently Asked Questions About This Dessert with Butterfinger Candy
It’s smart to check in on the details before you dive in, especially when adapting an easy recipe. People often tweak things, and I want to make sure you know what will keep this pie perfect and what might cause it to turn into a puddle! Here are the questions I get asked most often about this no-bake favorite.
Can I use a different crust besides the chocolate cookie one?
You certainly can, but you have to be intentional about it! Since this filling is so creamy and heavy, you need a crust that can handle the weight and the cold. If you don’t have the chocolate cookie crust, stick to a classic Oreo crust—it has the same flavor profile and density. For something lighter, a graham cracker crust works okay, but it might become a little soft at the edges after chilling for several hours. Avoid anything too crumbly, because a loose base means a sloppy serving later on!
What if I absolutely need to save time and freeze the whole pie?
Freezing is an option, but remember, this isn’t designed as a frozen dessert initially. If you freeze it solid, the texture of the peanut butter filling changes slightly—it gets much firmer and icier. If you choose to freeze, wrap it tightly after it’s cooled for at least two hours in the fridge (to let the air set), and take it out to thaw in the refrigerator for about four to five hours before you plan to serve it. If you freeze it for too long, the whipped topping on top can get a little grainy. It’s better left to chill! Check out some of our other make-ahead snacks for tips on setting things overnight.
I’m allergic to peanut butter! Can I still make a version of this?
That’s a common concern, but this recipe is built entirely around the peanut butter flavor interacting with the cream cheese and the Butterfinger candy. Swapping out standard peanut butter for a sunflower seed butter or almond butter will drastically change the flavor profile. If you need a peanut-free version, you might be better off searching for a totally different recipe, maybe one focused on a chocolate mousse filling or a plain cream cheese filling, because removing the main flavor note here won’t deliver the classic experience.
Do I need to use heavy whipping cream, or can I just use two tubs of Cool Whip?
You *can* substitute, as I mentioned in the notes, but you definitely sacrifice texture. Heavy whipping cream, when beaten correctly, traps so much air which keeps the filling light and fluffy when you fold everything together. Using straight whipped topping for the whole base just makes the final result much denser and heavier, almost like a thick mousse rather than a light, creamy pie. Stick to the heavy cream if you want that airy texture that makes this an amazing Easy Candy Bar Dessert!
Can I make a baked version of this butterfinger pie?
This particular recipe is **optimized for no-bake** conditions. The structure relies on the cream cheese and the cold temperature to firm up the whole slice. If you put this mixture in the oven, the heavy cream would likely separate, the cream cheese would break, and you’d just end up with a very sweet, runny mess. For a baked option, you’d need a completely different recipe that uses eggs and flour or cornstarch to cook and set the filling!
Share Your Easy No Bake Butterfinger Pie Experience
Phew! We made it through the whole process, and now you have what might just be the easiest, most satisfying dessert in your recipe arsenal: the Butterfinger Pie! I’ve shared all my little secrets Leo taught me about efficiency and keeping things simple, but the real fun is seeing how it turns out in YOUR kitchen.
I truly hope this recipe brings some easy smiles to your table, whether it’s a quiet Tuesday night craving or a big family gathering. If you loved how quickly this came together, please let me know!
Seriously, stop back by and leave a rating—that little star rating helps other busy cooks find this amazing, no-bake treat. And if you snap a picture of your beautiful, chilly, crunchy pie, tag us! I absolutely live for seeing your creations. There’s nothing better than knowing this Butterfinger Pie recipe is out there making weeknights easier and Fridays sweeter. Happy baking (or, well, happy chilling!).
PrintEasy No-Bake Butterfinger Pie with Chocolate Crust
Make this cool, creamy, no-bake Butterfinger Pie. It features a rich peanut butter filling mixed with crushed candy bars, set in a simple chocolate crumb crust. This is a quick dessert perfect for gatherings.
- Prep Time: 20 min
- Cook Time: 0 min
- Total Time: 4 hr 20 min
- Yield: 8 servings 1x
- Category: Dessert
- Method: No Bake
- Cuisine: American
- Diet: Vegetarian
Ingredients
- 1 (9 inch) pre-made chocolate cookie crust (or Oreo crust)
- 1 cup creamy peanut butter
- 8 ounces cream cheese, softened
- 1 cup powdered sugar
- 1 teaspoon vanilla extract
- 1 cup cold heavy whipping cream
- 1 cup crushed Butterfinger candy bars
- 1 cup whipped topping (like Cool Whip), thawed, for topping
- 1/4 cup crushed Butterfinger candy bars for garnish
Instructions
- In a large bowl, beat the softened cream cheese until smooth.
- Add the creamy peanut butter, powdered sugar, and vanilla extract to the cream cheese. Beat until the mixture is fully combined and creamy.
- In a separate bowl, whip the heavy whipping cream until stiff peaks form.
- Gently fold the whipped cream into the peanut butter mixture until just combined. Do not overmix.
- Fold in 1 cup of the crushed Butterfinger candy bars into the filling.
- Spoon the filling evenly into the pre-made chocolate cookie crust.
- Spread the thawed whipped topping over the filling layer.
- Sprinkle the remaining 1/4 cup of crushed Butterfingers over the top layer for garnish.
- Chill the pie in the refrigerator for at least 4 hours, or until firm, before slicing and serving.
Notes
- For a faster setup, you can use a frozen, pre-made pie crust.
- If you do not have heavy cream, you can substitute with 1 large tub of frozen whipped topping for the filling base, omitting step 2 and 3.
- Crush the Butterfinger bars by placing them in a zip-top bag and crushing them with a rolling pin.
Nutrition
- Serving Size: 1 slice
- Calories: 450
- Sugar: 35g
- Sodium: 350mg
- Fat: 30g
- Saturated Fat: 10g
- Unsaturated Fat: 20g
- Trans Fat: 0g
- Carbohydrates: 40g
- Fiber: 1g
- Protein: 7g
- Cholesterol: 35mg