
Let’s be real: those jars of store-bought chocolate sauce are fine, but they’re full of stuff we don’t need, and frankly, they just don’t taste *right*. As the kitchen strategist behind Dishicious, I engineered this recipe to solve that problem immediately. We’re ditching the fillers and getting straight to pure flavor. This is, without a doubt, the best homemade chocolate sauce you will ever make, delivering a rich, velvety finish that tastes intensely chocolatey. The best part? I’ve optimized the process so you can go from pantry staples to decadent drizzle in under 15 minutes. No culinary degree required, just smart, efficient cooking.
- Why This Homemade Chocolate Sauce Beats Store-Bought Versions
- Pantry Staple Ingredients for Your Easy Chocolate Sauce Recipe
- Step-by-Step Instructions for Quick Chocolate Topping
- Variations: Turning Your Chocolate Sauce into Hot Fudge Sauce or Syrup
- Tips for Success with Your Rich Chocolate Topping
- Storage and Reheating Your Homemade Chocolate Sauce
- Serving Suggestions for This Ultimate Chocolate Topping
- Frequently Asked Questions About Making Chocolate Sauce
- Nutritional Estimate for This Simple Sauce Recipe
Why This Homemade Chocolate Sauce Beats Store-Bought Versions
Look, I ran the data. You simply cannot replicate this depth of flavor with something sitting on a shelf for six months. We’re talking no more store-bought sauce regrets! When you make it yourself, you control the cocoa quality and the sugar content. This results in a genuinely rich chocolate topping that tastes fresh, vibrant, and intensely chocolatey. It’s about efficiency; we hit maximum flavor payoff in minutes, which is exactly what the Dishicious method is all about. If you want to see how other folks are ditching the jars, you can check out some proven methods over here: Homemade Chocolate Sauce Tastes Better Than Store-Bought.
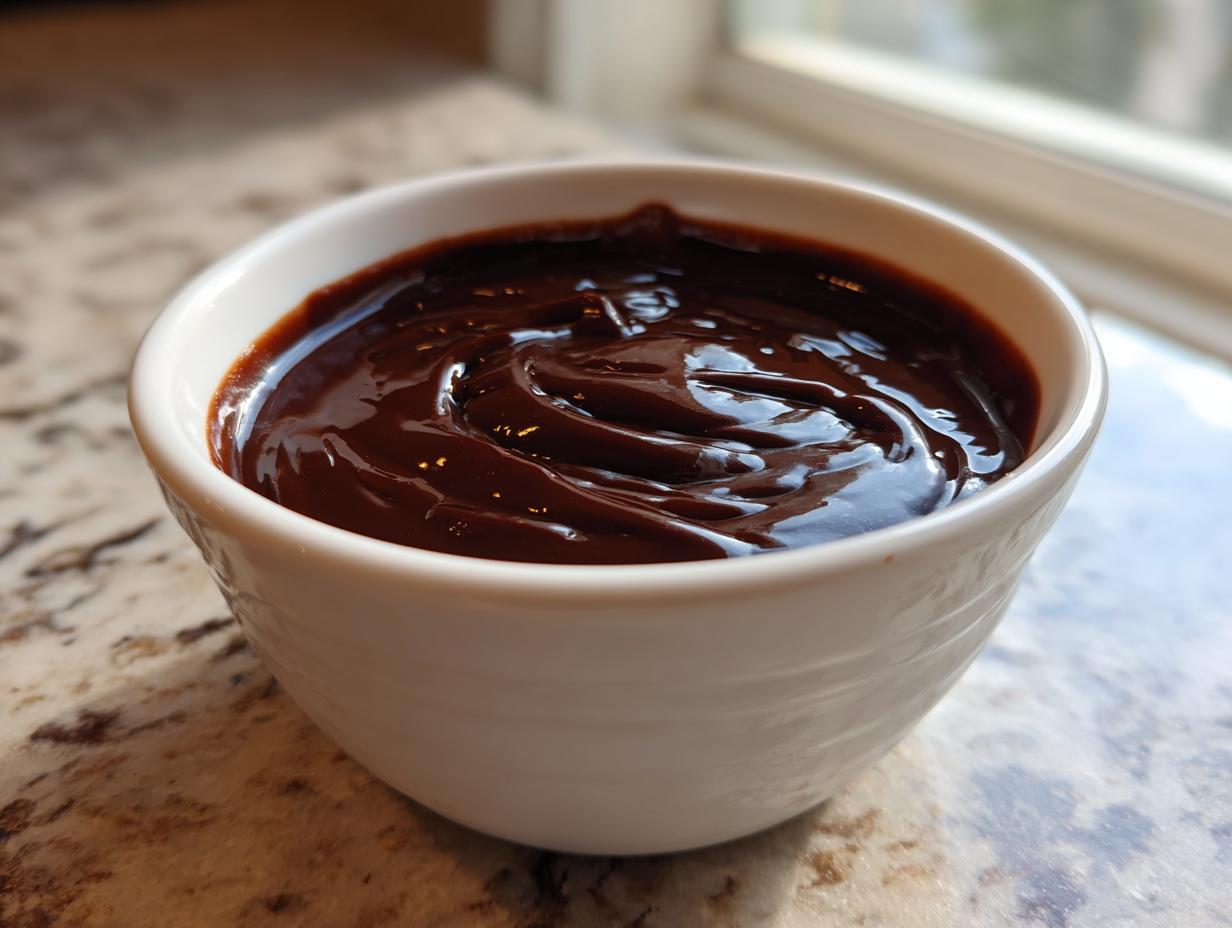
Achieving That Velvety Chocolate Sauce Texture
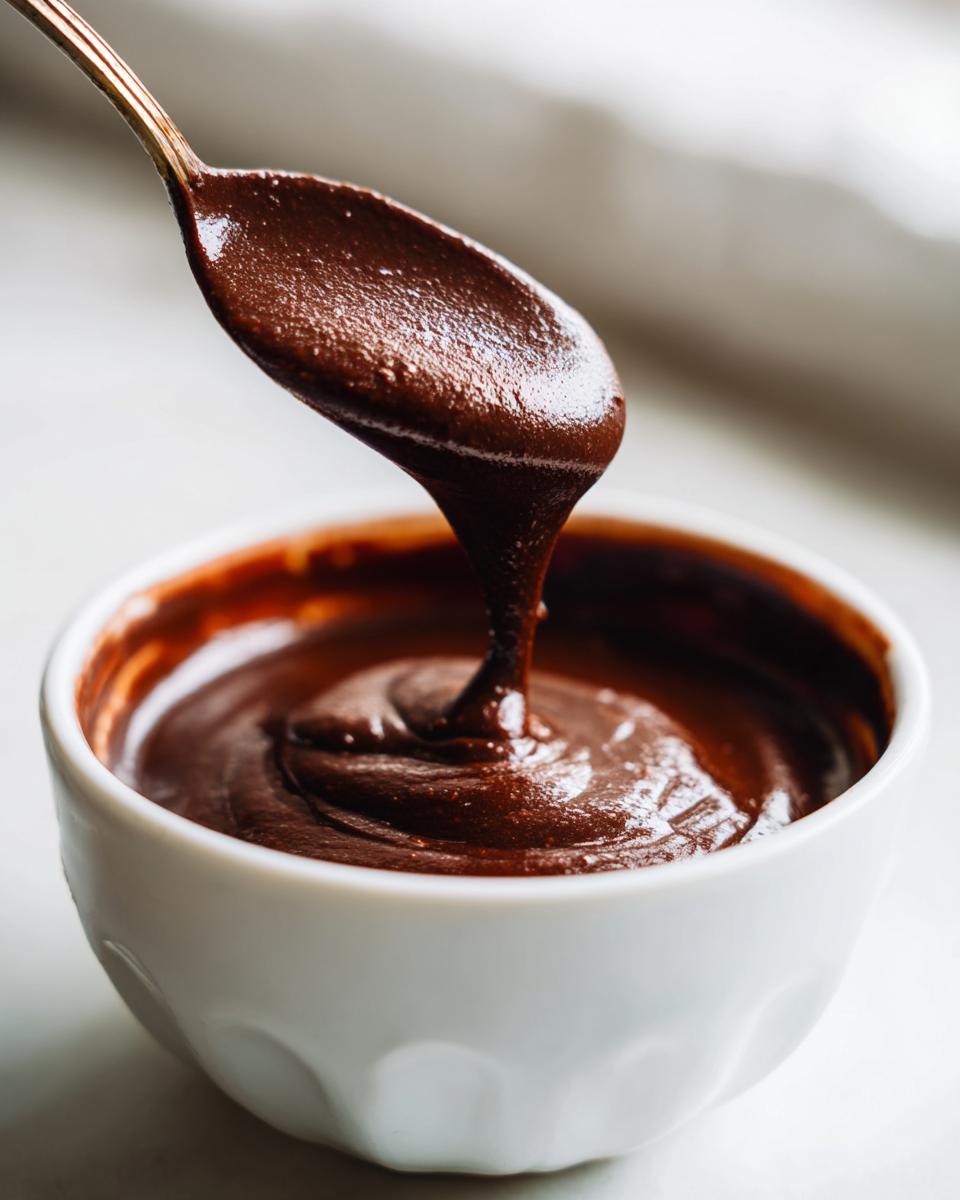
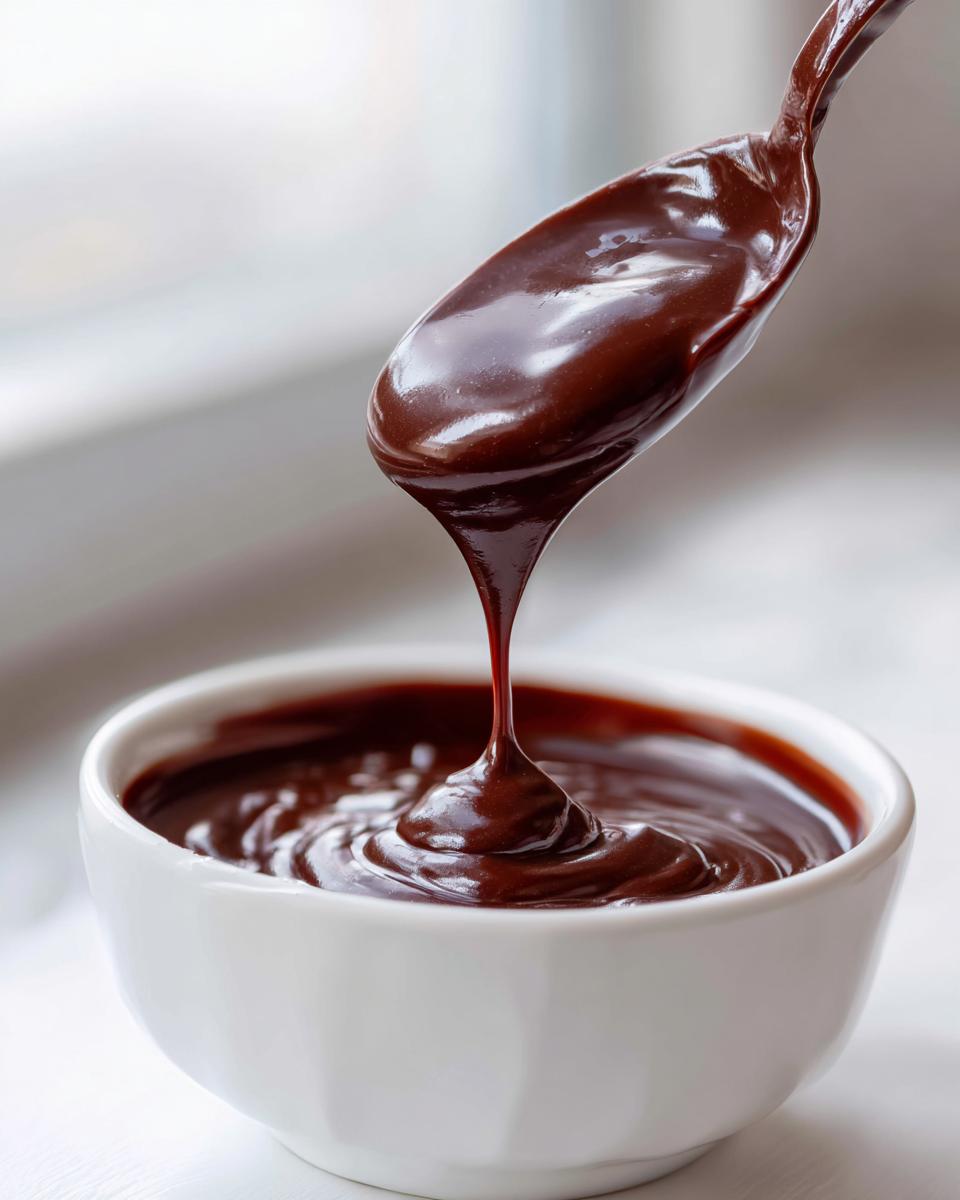
The secret weapon for that perfect velvety chocolate sauce texture isn’t some crazy technique—it’s the cream and butter. Store-bought syrups are often thin because they rely on gums and fillers. We use heavy cream, which adds necessary fat, and then we polish it off with a final tablespoon of butter right at the end. That butter creates a gorgeous, glossy sheen and ensures a smooth mouthfeel. Trust me, it moves across ice cream like silk.
Pantry Staple Ingredients for Your Easy Chocolate Sauce Recipe
I love recipes that leverage what I already have on hand. That’s why this chocolate sauce recipe is so reliable; it’s built on basics. You won’t need a trip to a specialty store, just your standard kitchen cabinet. We are aiming for simplicity and speed, so check your cupboards for these necessities before you start:
- 1 cup granulated sugar
- 1/2 cup unsweetened cocoa powder
- 1/4 teaspoon salt
- 1/2 cup heavy cream
- 1/2 cup water (or brewed coffee for deeper flavor)
- 1 teaspoon vanilla extract
- 1 tablespoon unsalted butter
See? All very straightforward. This streamlined list is key to keeping our prep time under five minutes, setting us up for the next step with zero fuss. For the official breakdown of quantities, you can always see the recipe card here: chocolate sauce recipe.
Step-by-Step Instructions for Quick Chocolate Topping
This whole process is designed to be quick—we are looking at total time under 15 minutes, so stay sharp! Once your ingredients are measured out, the cooking part is impressively fast. You are basically building layers of flavor on the stovetop, and we want maximum smoothness, so pay attention to the details here. If you want to see this process in action or grab a printable version, I keep the best one saved over here: Easy Homemade Chocolate Sauce Recipe for Desserts.
Prep Work: Mixing the Dry Ingredients for Chocolate Sauce
This is where we ensure zero grit. Before anything hits the heat, you need to grab your saucepan and whisk together every single dry item: the sugar, the cocoa powder, and that tiny bit of salt. You have to whisk this really well—like you mean it! If you skip this step, you are gambling with little pockets of dry cocoa powder floating around, and nobody wants lumpy chocolate sauce, right? We are aiming for a perfectly homogenous mix before we even think about adding liquid.
Bringing the Chocolate Sauce to a Gentle Simmer
Next up, you’ll pour in the heavy cream and the water (or coffee, if you went that route). Get your pan over medium heat. The key here, and I mean the absolute key, is to stir constantly. If you walk away even for a second, the sugar will scorch on the bottom, and that flavor is bitter and permanent. Bring it just to a gentle simmer—we aren’t making candy here, no rapid bubbling! Once it’s simmering softly, keep it going for just two or three minutes until you notice it has thickened up just a hair.
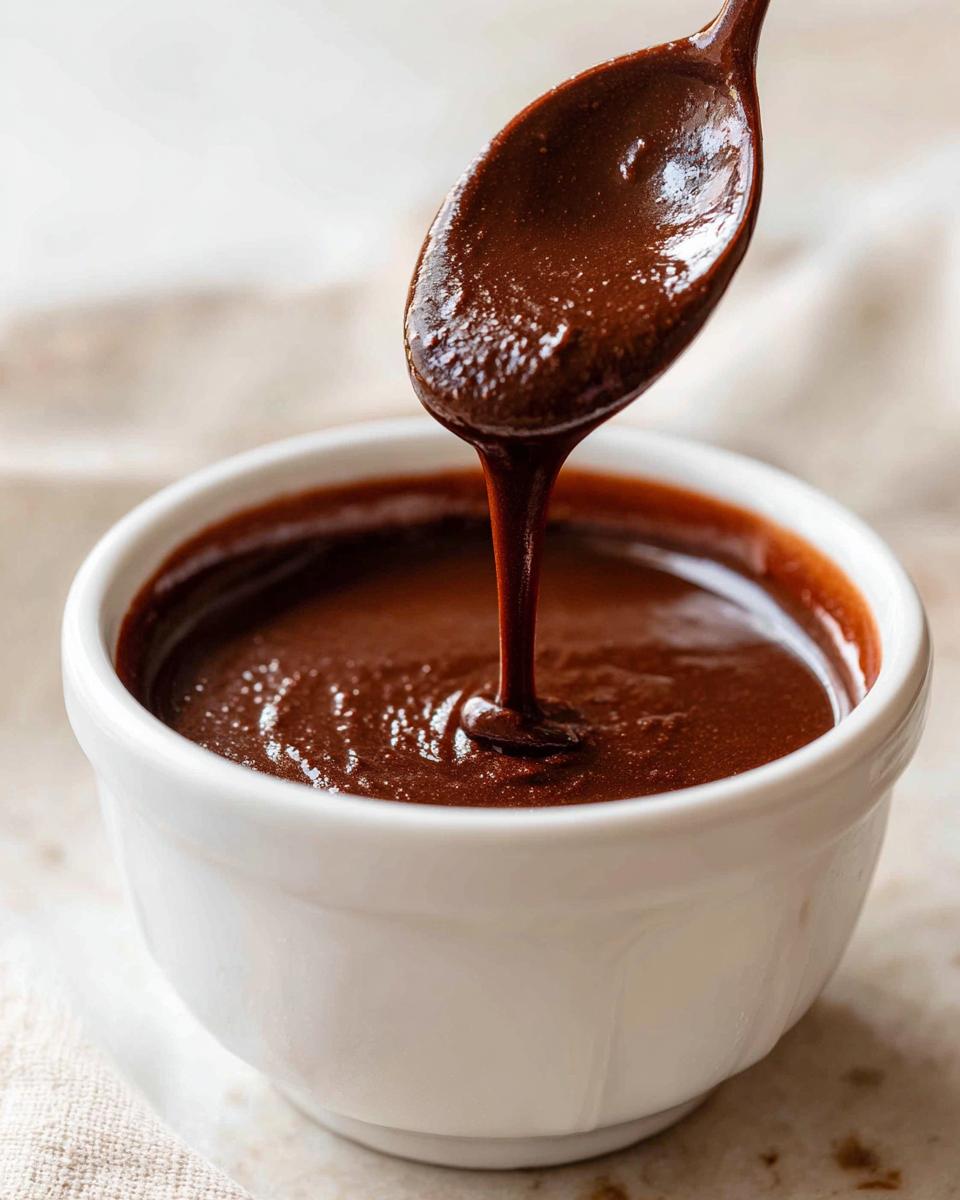
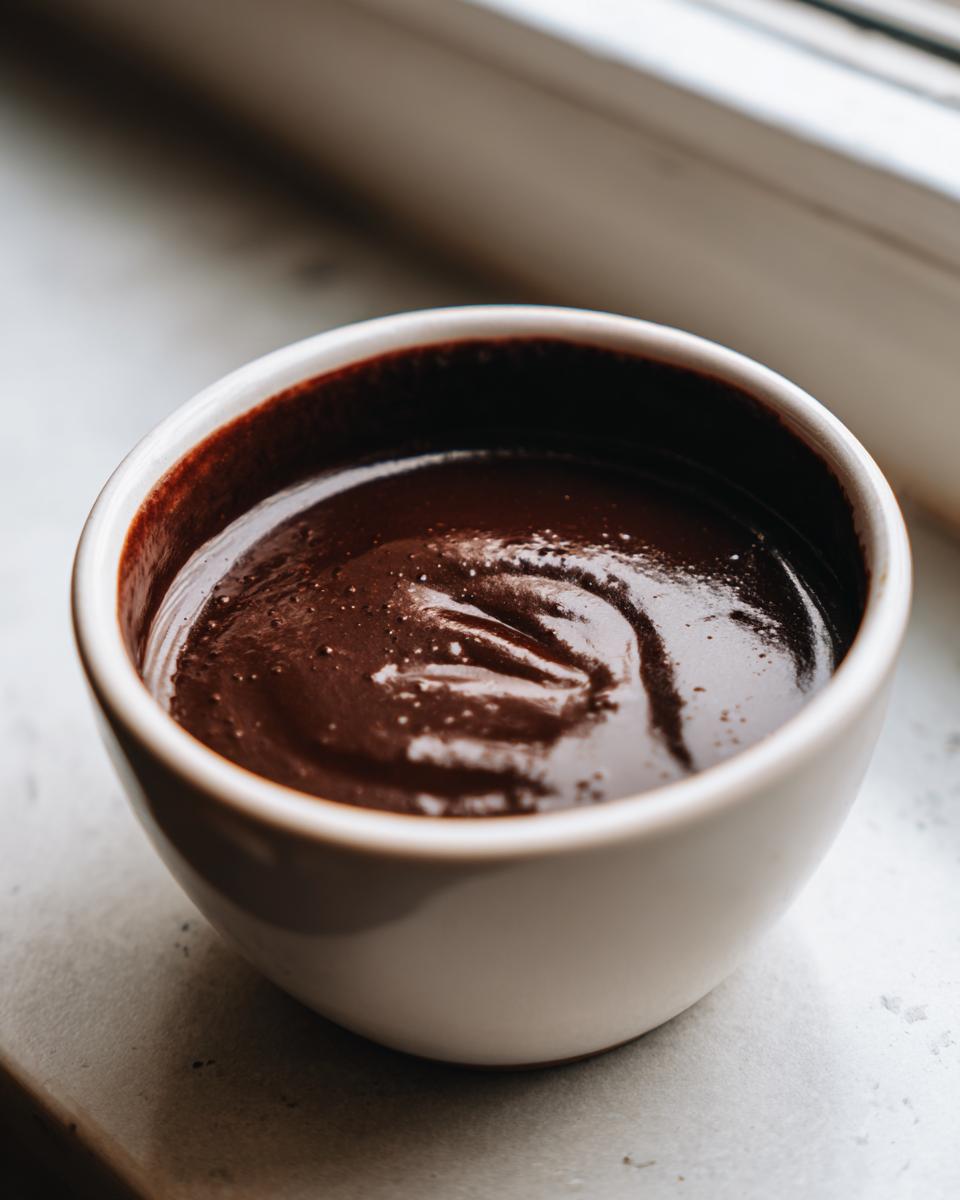
Take it off the heat immediately after that short cooking time. Now is when we melt in that vanilla and the butter. Stir until it becomes that gorgeous, glossy, dark pool we are looking for. Let it stand for about five to ten minutes before you drizzle it anywhere; it settles and thickens perfectly as it cools off the burner.
Variations: Turning Your Chocolate Sauce into Hot Fudge Sauce or Syrup
One thing I love about engineering reliable recipes is seeing how flexible they are. This base chocolate sauce recipe is a chameleon! If you are looking for something a little richer and fudgier—perfect for topping brownies or a deep chocolate experience—you just need a tiny tweak to create a dynamite hot fudge sauce recipe. Simply reduce the water (or coffee) by only about two tablespoons when you cook the sauce. Less liquid means a thicker, denser final product when it cools down.
Now, maybe you’re craving something thinner—something that mixes easily into milk or really cascades down pancakes like a classic chocolate syrup recipe. That’s easy too! You just reverse the process. Add an extra quarter cup of water during the simmering phase. It speeds up the process even more, keeping things simple. For a perfect copycat syrup recipe that’s better than what you buy, check out this inspiration: Homemade Chocolate Syrup. See? We’ve got options for every chocolate craving, all built on the same simple stovetop method. When you need that warm, gooey goodness for ice cream, try the specific variations outlined here for the Hot Fudge Sauce Recipe.
Tips for Success with Your Rich Chocolate Topping
When you’re making this rich chocolate topping, a little knowledge goes a long way toward getting that professional, glossy look. First off, don’t skimp on the cocoa powder. If you want real depth in your chocolate sauce, use a high-quality, dark, unsweetened cocoa. That’s the difference between a good drizzle and a phenomenal one.
Remember that coffee trick I mentioned? If you swap the water for strong, brewed coffee, it doesn’t make it taste overtly like coffee, I promise. It just amplifies the chocolate notes wonderfully! That chemical reaction is pure kitchen magic. Also, be patient during the final step: it will look slightly thin when you pull it off the heat because the butter is totally melted in. As it cools for that initial 5 to 10 minutes, the texture will set beautifully into that perfect thickness you’re aiming for. If you want to see how others infuse that coffee element perfectly, check this technique out: Homemade Chocolate Sauce with Coffee.
Storage and Reheating Your Homemade Chocolate Sauce
I know you probably won’t have any leftovers of this amazing chocolate sauce, but just in case you manage to save some (maybe you’re more disciplined than I am!), storing it is simple. You need an airtight container, and the fridge is its home. It keeps really nicely in there for about a week, max. Don’t panic when you pull it out; it will look much thicker than when it was warm—that’s normal!
When you’re ready to use your stored sauce, you just need to warm it up again. You can zap it in the microwave in short 15-second bursts, stirring in between each one. Or, if you’re feeling fancy, just heat it gently on the stovetop over low heat. It returns to that perfect, pourable consistency in no time. Simple, right? That’s what I call an efficient system for your dessert toppings.
Serving Suggestions for This Ultimate Chocolate Topping
What’s the point of having the best homemade chocolate sauce if you don’t use it immediately and generously? Obviously, it’s incredible poured warm over vanilla ice cream—that’s non-negotiable comfort food. But don’t stop there! This works perfectly as a quick drizzle for weekend pancakes or crepes to elevate your brunch game.
If you love coffee drinks at home, this is your secret weapon for making incredible mochas instantly. Just stir a spoonful into your hot coffee or blend it into a milkshake. For those times when you’re going all out on dessert, try spooning this over some rich baked goods, like our Turtle Cheesecake, or use it to finish off a batch of gooey Chocolate Cinnamon Rolls. This dessert topping sauce makes everything feel special without adding any extra work!
Frequently Asked Questions About Making Chocolate Sauce
I pulled together answers for the most common sticking points people run into when moving away from the jarred stuff. Don’t stress about minor issues; nearly everything is fixable with a tiny adjustment! We want you to have success making this homemade chocolate sauce every single time.
Can I make this chocolate sauce recipe vegan?
Yes, absolutely! That’s the beauty of simple ingredients. To keep this recipe fully plant-based, you just need smart swaps. You can substitute the heavy cream with full-fat canned coconut cream—just scrape the thick part off the top of the can. For the butter, use your favorite 1:1 vegan butter stick. If you want to check out a fully developed vegan option, I recommend looking at the approach found here: Vegan Chocolate Sauce. It’s super creamy despite being dairy-free!
How do I thicken this chocolate topping if it seems too thin?
If you pull your sauce off the heat and it looks a little too much like a thin chocolate syrup rather than a thick drizzle, don’t panic! The easiest fix is what I built into the recipe notes: simply put it back on low heat and let it simmer, stirring carefully, for another minute or two without the lid. The evaporation will tighten it up. If you want an immediate, thick boost without much more simmering, make a tiny slurry with one teaspoon of cornstarch mixed with one teaspoon of cold water, whisk it in while simmering, and it’ll grab on quickly.
Either way, remember that it thickens considerably once it cools down. If it’s runny right off the stove, let it rest for 10 minutes before deciding it needs more work. That resting time is crucial for texture development in this easy chocolate sauce recipe.
Nutritional Estimate for This Simple Sauce Recipe
Now, I know most of us aren’t whipping up chocolate sauce for health reasons, but it’s smart to know what you’re working with! Remember, this information is based on an estimate for a two-tablespoon serving size according to the ingredients we used. Since this is homemade, you can adjust those amounts up or down based on your specific needs. Here’s the ballpark data on this quick topping:
- Calories: Around 150
- Total Fat: 8g
- Total Carbohydrates: 20g
- Sugar: 18g
- Protein: 1g
It’s definitely a treat, but knowing exactly where that sugar comes from—real granulated sugar, not stabilizers—gives you complete control over your indulgence! Enjoy it!
PrintThe Best Homemade Chocolate Sauce: Rich, Velvety, and Better Than Store-Bought
Stop buying processed jars. This easy homemade chocolate sauce recipe delivers a rich, velvety texture and deep chocolate flavor in under 10 minutes, making it the ultimate dessert topping.
- Prep Time: 5 min
- Cook Time: 7 min
- Total Time: 12 min
- Yield: About 1 1/2 cups 1x
- Category: Dessert Topping
- Method: Stovetop Cooking
- Cuisine: American
- Diet: Vegetarian
Ingredients
- 1 cup granulated sugar
- 1/2 cup unsweetened cocoa powder
- 1/4 teaspoon salt
- 1/2 cup heavy cream
- 1/2 cup water (or brewed coffee for deeper flavor)
- 1 teaspoon vanilla extract
- 1 tablespoon unsalted butter
Instructions
- Combine the sugar, cocoa powder, and salt in a small saucepan. Whisk these dry ingredients together until no lumps remain.
- Add the heavy cream and water (or coffee) to the saucepan. Whisk until the mixture is smooth.
- Place the saucepan over medium heat. Bring the mixture to a gentle simmer, stirring constantly to prevent scorching. Do not let it boil rapidly.
- Once simmering, continue to cook for 2 to 3 minutes. The sauce will thicken slightly as it heats.
- Remove the saucepan from the heat. Immediately stir in the vanilla extract and the butter until the butter is completely melted and incorporated, creating a glossy finish.
- Let the chocolate sauce cool for about 5 to 10 minutes before using it as a warm topping. The sauce will thicken more as it cools.
- Store leftover chocolate sauce in an airtight container in the refrigerator for up to one week. Reheat gently on the stovetop or in the microwave before serving warm.
Notes
- For a thicker hot fudge sauce, reduce the water/coffee amount by 2 tablespoons.
- Using brewed coffee instead of water deepens the chocolate flavor without making the sauce taste like coffee.
- This recipe works well as a base for a quick chocolate syrup; simply add 1/4 cup more water while cooking.
Nutrition
- Serving Size: 2 tablespoons
- Calories: 150
- Sugar: 18g
- Sodium: 45mg
- Fat: 8g
- Saturated Fat: 5g
- Unsaturated Fat: 3g
- Trans Fat: 0g
- Carbohydrates: 20g
- Fiber: 1g
- Protein: 1g
- Cholesterol: 20mg