

Let’s be honest: planning a party or even just a casual game day gathering can feel like managing a small construction project. You’re juggling snacks, drinks, seating, and keeping the energy up. Before you start stressing about overly complicated appetizers, I want to introduce you to the secret weapon everyone raves about: the Ultimate Seven Layer Taco Dip. This isn’t just another dip; it’s an efficient, flavor-packed solution. As someone who approaches cooking like a project manager—we need maximum impact with minimum fuss—this recipe embodies everything Dishicious stands for. It gives you that massive, crowd-pleasing result without ever turning on the oven or spending hours chopping. This classic layer dip is structurally sound, vibrant, and unbelievably easy. If you’re looking for reliable options for your next big spread, check out all our ideas for great appetizers and snacks.
- Why This Ultimate Seven Layer Taco Dip is the Best Layer Dip
- Ingredients for Your Classic Layer Dip Recipe
- Step-by-Step Instructions for the Perfect Layer Dip
- Tips for the Ultimate Layer Dip Success
- Variations on the Classic Layer Dip
- Serving Suggestions for Your Game Day Dip
- Storage and Reheating for This Layer Dip
- Frequently Asked Questions About Layer Dip
- Nutritional Estimate for This Cold Appetizer Dip
Why This Ultimate Seven Layer Taco Dip is the Best Layer Dip
When I look at a recipe, I see efficiency. This Ultimate Seven Layer Taco Dip is superior because it’s designed for real life—meaning you get huge flavor payoff with almost zero active work. It ticks every box for a busy host.
- It’s the definition of an Easy Layer Dip; you are literally just spreading ingredients.
- It’s the ultimate Party Dip Appetizer because everyone digs in immediately.
- The brilliant Make Ahead Dip capability means you prep it the night before and forget about it until the party starts.
It’s just so reliable. If you’re looking for other straightforward crowd-winners, you should check out my fried pickles recipe sometime!
Simple Assembly for a Crowd Pleasing Dip
Seriously, the prep time is only about 20 minutes. Since this is completely no-bake, you pull ingredients out, mix the creamy layer, and stack. That’s it—no oven time, no standing guard over a bubbling casserole. It’s pure layering magic that looks impressive but takes minutes.
Make Ahead Dip Capabilities
This is my favorite part! You can assemble the entire layer dip up to 24 hours ahead of time. I cover it tightly with plastic wrap and it chills perfectly in the fridge. This means when your guests arrive, you aren’t stuck in the kitchen frantically mixing things. You are relaxed, pouring drinks, and enjoying the party right alongside everyone else.
Ingredients for Your Classic Layer Dip Recipe
When I streamline a recipe, I make sure the ingredients list is simple, too. We are relying on quality store-bought components here because speed is key for this layer dip. Make sure you grab the full-fat refried beans—trust me on this, the fat-free ones tend to be a bit watery and compromise the structure. Also, draining your salsa is non-negotiable; excess liquid is the enemy of defined layers!
You don’t need to run all over town for these items. If you need amazing guacamole inspiration while you’re at the store, check out my guide on how to make homemade guacamole, though starting with a good store-bought one is totally fine for this dip!
- 1 (16 ounce) package cream cheese, softened
- 1 cup sour cream
- 1 packet (1 ounce) taco seasoning mix
- 1 (16 ounce) can refried beans, not the fat-free kind
- 1 cup prepared guacamole
- 1 cup salsa, drained well
- 1 cup shredded Mexican blend cheese
- 1/2 cup chopped black olives, optional
- 1/4 cup chopped fresh cilantro, optional
Step-by-Step Instructions for the Perfect Layer Dip
This is where the project management comes in handy—we need a clear sequence to ensure our layers don’t blend into one messy blob of beige. Don’t worry, it moves fast! If you’re looking for a related component to make from scratch sometime, I have a recipe for easy homemade mayonnaise, but for this layer dip, we stick to assembly.
Creating the Creamy Base Layer
First up is the foundation of the flavor bomb. In a medium bowl, you need to combine your softened cream cheese, sour cream, and the entire packet of taco seasoning. I use a hand mixer on low speed for about 30 seconds until it’s totally smooth and uniform in color. You don’t want any streaks of white cream cheese left hanging around. This seasoned mixture needs to be perfectly blended.
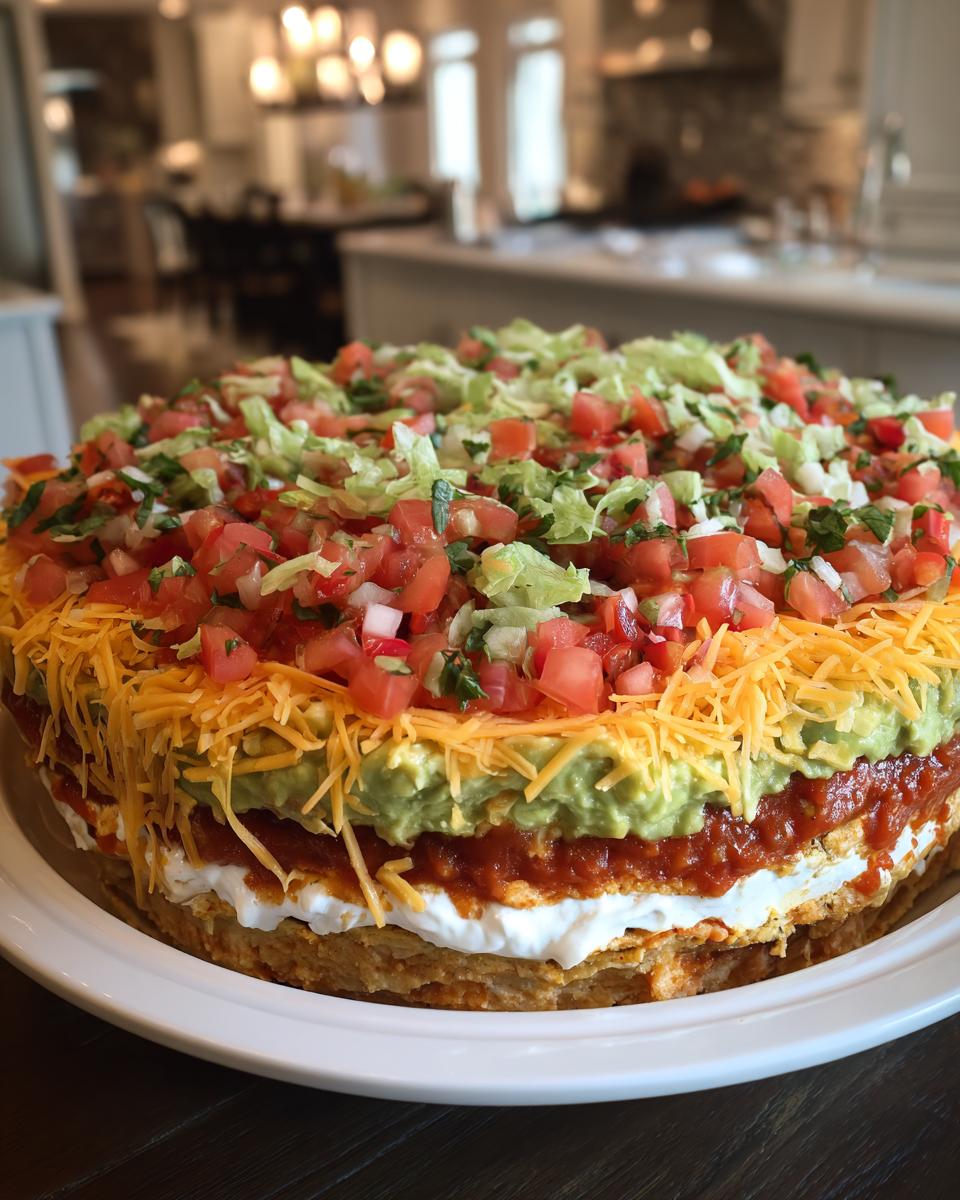
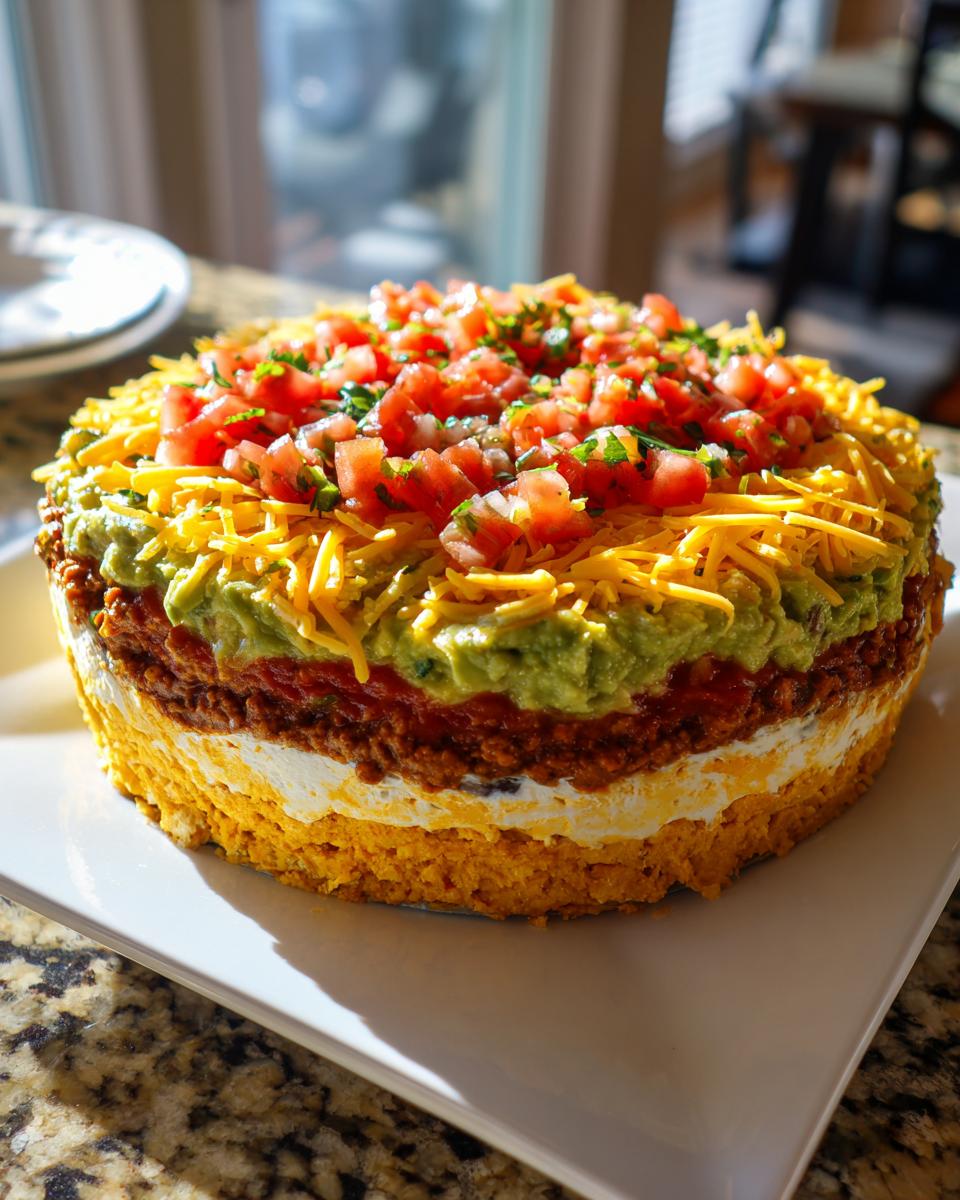
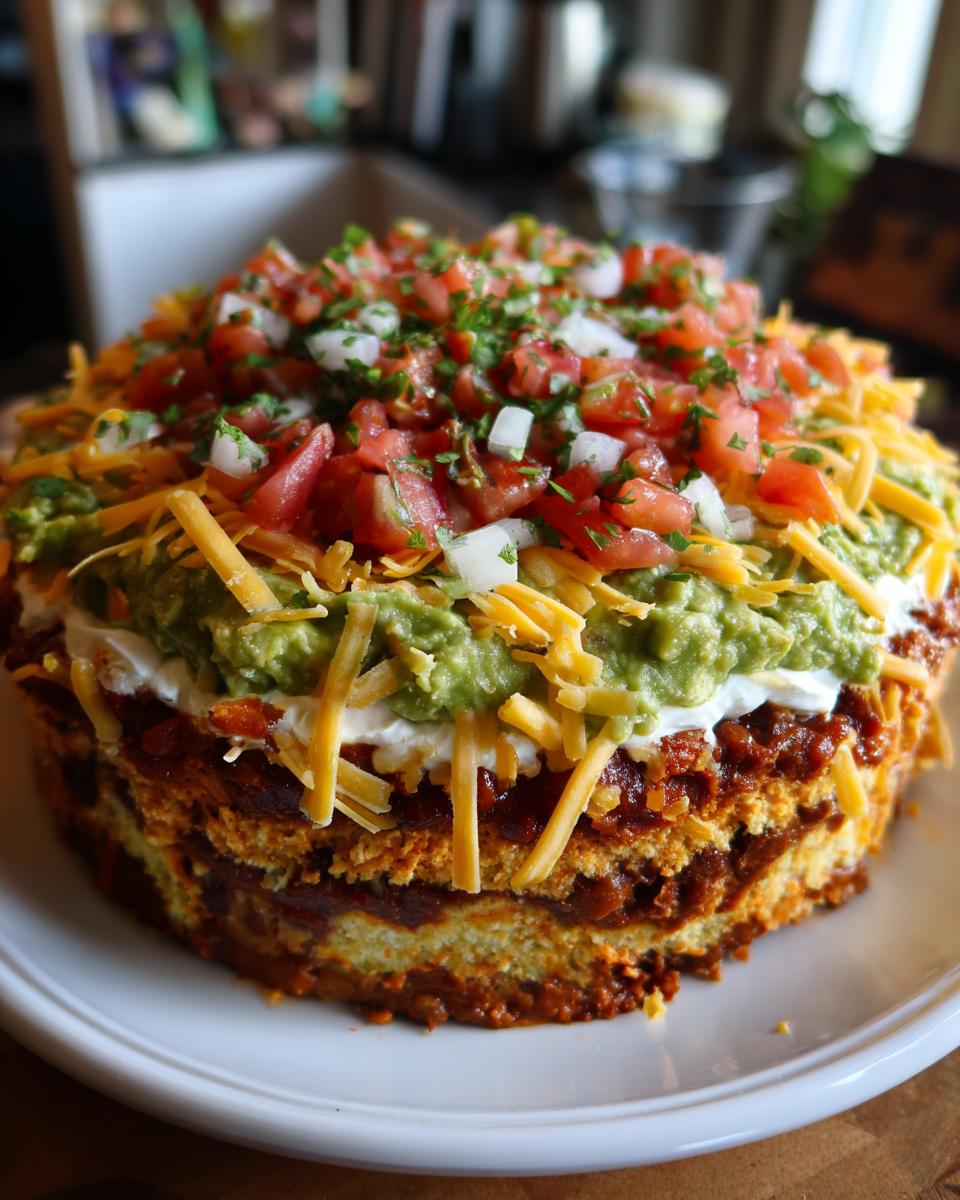
Assembling the Seven Layers of Your Layered Taco Dip
Now we stack! Spread those refried beans out first, making a smooth, even base across the bottom of your 9×13 dish. Next, gently ease that seasoned cream cheese mixture right on top. Then comes the guacamole. After that, spoon your salsa on top of the guac layer. Remember what I said? Make sure that salsa is well-drained here, or you’ll end up with a soupy mess at the bottom of your beautiful layer dip. Finish the stack with your shredded cheese and any optional toppings like olives or cilantro.
Setting and Chilling the Layer Dip
This is the hardest part, honestly, because it smells so good! Cover the dish securely. You absolutely must refrigerate this for a minimum of two hours. This chilling time isn’t optional; it lets the ingredients talk to each other and firms up the creamy layers so they hold their shape perfectly when people start scooping. Trust me, chilling it makes all the difference for a truly structured layer dip.
Tips for the Ultimate Layer Dip Success
Having a great outline for this Tex Mex Dip is one thing; executing it flawlessly is another. Since I think of recipes like projects, optimization is key! Here are the small details that turn this simple layered appetizer into a showstopper, not a sloppy mess.
Ingredient Selection for Flavor
Okay, I already mentioned the refried beans, but it bears repeating: use the quality, full-fat style. They hold their structure so much better than the low-fat versions. Also, when you drain your salsa, I like to pour it into a fine-mesh sieve and gently press down on it—don’t stir it—to get out every bit of excess watery juice. Soggy layers equal failure, and we are aiming for success here.
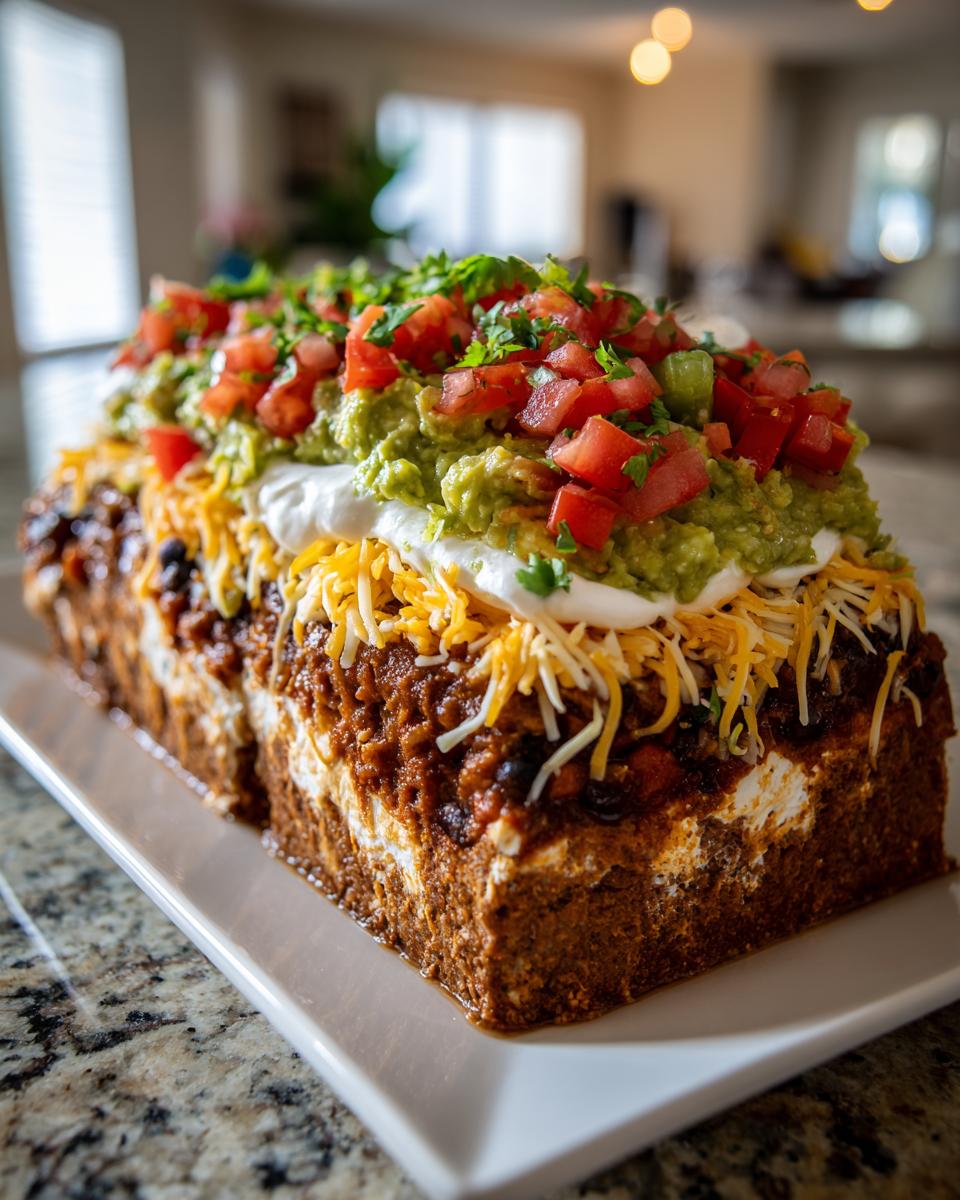
Adding Meat to Your Layer Dip
If you want to amp this up for a serious Game Day Dip or potluck, feel free to brown about a pound of ground beef. Make sure you drain off all the grease really well, and then mix it with about half a packet of taco seasoning *before* you spread it on top of the bean layer. It adds great depth, but remember, if you add meat, it needs a little more chilling time to firm up the layer beneath it.
For a guaranteed gorgeous side salad, check out my copycat Olive Garden salad dressing!
Variations on the Classic Layer Dip
Part of optimizing a recipe is knowing when to deviate, especially for a structure as flexible as a layer dip. While the classic seven layers work perfectly, sometimes you need to switch things up for variety! If you have a group that isn’t huge on avocado, you can easily swap out the guacamole layer for a layer of black bean dip—just make sure the dip is fairly thick so it doesn’t soak into the creamy layer beneath it.
Another easy tweak is at the top. Instead of the standard cheese blend, try crumbled cotija cheese. Or, if you are feeling fancy, make a whipped goat cheese mixture and swirl it right into the sour cream/cream cheese base! It adds a lovely tang that cuts through the richness. For even more inspiration on fresh, flavorful dips, take a look at my guide to whipped goat cheese; it’s surprisingly simple!
Serving Suggestions for Your Game Day Dip
Once your layer dip has set up perfectly, the final step in the project is deployment! Since this is a Cold Appetizer Dip, it pairs beautifully with anything that offers a good crunch. Obviously, you need sturdy tortilla chips—the scoops are great, but flat chips work well for balancing out the different layers. Don’t forget veggies, either! Sliced bell peppers, celery sticks, and carrot sticks are fantastic for anyone looking for a bit of freshness alongside that Tex-Mex flavor.
For a full experience, serve this alongside some of my easy homemade breadsticks or maybe even some simple chicken tacos. It really pulls together any Game Day Dip spread!
Storage and Reheating for This Layer Dip
Because this Ultimate Seven Layer Taco Dip is intentionally a No Bake Dip, reheating it is definitely not on the agenda! If you try to heat it up, you’ll just get a soup of melted cheese and warm sour cream, and we definitely don’t want that mess.
Leftovers store really well, though! Once you realize, sometime around halftime, that you simply can’t finish it all, just cover that serving dish tightly—plastic wrap pressed right onto the surface works best—and pop it back into the fridge. Everything stays good for about three to four days, but trust me, a quality layer dip rarely lasts that long once the crowd gets going!
Frequently Asked Questions About Layer Dip
I know you might have a few structural questions when tackling a build like this—it’s basically civil engineering for appetizers! I always try to anticipate what might trip someone up with a multi-component recipe like this layer dip. Getting these little details right ensures your food looks as good when it’s served as it did when you pulled it out of the fridge.
Can I make this Seven Layer Dip Recipe with meat?
Absolutely! If you want to turn this into a real centerpiece for your next big event, you can totally add ground beef. Just make sure you brown about a pound until it’s fully cooked, drain off every bit of grease, and then mix it with half a packet of taco seasoning. You spread that seasoned beef right over the refried beans, before you get to the cream cheese layer. It makes it a fantastic, meaty Potluck Dip Idea!
What is the best chip for this Easy Layer Dip?
You need something with backbone! You’re scooping through dense beans, creamy cheese, and guacamole, so flimsy chips are just going to snap off, leaving you with a sad chip fragment half-buried in the dip. I highly recommend sturdy, restaurant-style tortilla chips—the thicker ones work best. Corn chips with a salty flavor are great, or even some sturdy baked pita chips if you want a slightly different texture.
How long does this Party Dip Appetizer last in the fridge?
Because we used so many canned and dairy ingredients, my official recommendation is that this Seven Layer Dip Recipe tastes absolutely perfect within the first 24 hours. If you need to keep enjoying those vibrant layers, it’s safe to eat for three to four days if it’s kept tightly covered in the fridge. After day four, the layers start looking a little sad and merging together, so definitely aim to eat it soon after the party wraps up!
If you happen to have leftovers that you just can’t finish, don’t worry about storage—just make sure it’s covered tight! For other simple make-ahead snacks, I sometimes whip up a big batch of my cranberry sauce just because it’s so handy to have around, even when it isn’t Thanksgiving!
Nutritional Estimate for This Cold Appetizer Dip
When I put together a project plan, I always include a section on final metrics, and that means looking at the nutrition for this Cold Appetizer Dip. Just remember, since we rely on delicious, easy store-bought components, the numbers change depending on what brand of sour cream or refried beans you grab. These values are just estimates per serving (based on 1/10th of the batch) to give you a reference point. If you are ever looking for a slightly lighter main course afterward, my easy chicken alfredo is a great option!
- Serving Size: 1/10 of dip
- Calories: 250
- Fat: 18g
- Carbohydrates: 15g
- Protein: 8g
Ultimate Seven Layer Taco Dip

Make this easy, crowd-pleasing Tex-Mex layer dip for your next party or game day. It features distinct, flavorful layers that assemble quickly and taste best when chilled.
- Prep Time: 20 min
- Cook Time: 0 min
- Total Time: 20 min
- Yield: 10 servings 1x
- Category: Appetizer
- Method: No Bake
- Cuisine: Tex-Mex
- Diet: Vegetarian
Ingredients
- 1 (16 ounce) package cream cheese, softened
- 1 cup sour cream
- 1 packet (1 ounce) taco seasoning mix
- 1 (16 ounce) can refried beans, not the fat-free kind
- 1 cup prepared guacamole
- 1 cup salsa, drained well
- 1 cup shredded Mexican blend cheese
- 1/2 cup chopped black olives, optional
- 1/4 cup chopped fresh cilantro, optional
Instructions
- In a medium bowl, combine the softened cream cheese, sour cream, and taco seasoning mix. Mix until smooth and fully combined. This is your creamy base layer.
- Spread the refried beans evenly over the bottom of a 9×13 inch serving dish or a similar sized platter.
- Carefully spread the seasoned cream cheese mixture over the bean layer.
- Spread the prepared guacamole evenly over the cream cheese layer.
- Spoon the drained salsa over the guacamole layer.
- Sprinkle the shredded cheese evenly over the salsa layer.
- If using, sprinkle the chopped black olives and fresh cilantro over the top cheese layer.
- Cover the dish and refrigerate for at least 2 hours before serving. This allows the layers to set and the flavors to blend.
- Serve cold with tortilla chips or your preferred dippers.
Notes
- You can prepare this layer dip up to 24 hours in advance. Keep it covered tightly in the refrigerator.
- For a meatier dip, brown 1 pound of ground beef with half a packet of taco seasoning and spread it as the second layer, over the beans.
- Drain your salsa thoroughly; excess liquid will make the lower layers watery.
- Use store-bought ingredients for maximum speed and ease.
Nutrition
- Serving Size: 1/10 of dip
- Calories: 250
- Sugar: 4
- Sodium: 550
- Fat: 18
- Saturated Fat: 10
- Unsaturated Fat: 8
- Trans Fat: 0.5
- Carbohydrates: 15
- Fiber: 3
- Protein: 8
- Cholesterol: 45