
If you are anything like me, you love the classics, especially when they involve a big, gooey caramel topping. There is just something about those retro desserts that takes you right back to Sunday dinners or summer picnics when life felt a little simpler. Today, we’re tackling a true icon: the pineapple upside down cake. Now, normally, these cakes can get sticky, dry, or just plain messy when you flip them. That drives my project manager brain nuts! So, I took this classic and streamlined the entire process, ensuring you get that essential moist crumb and that gorgeously caramelized pineapple every single time. We’re ditching the culinary complexity and focusing only on the steps that truly matter for foolproof flavor. If you’re looking for other simple, reliable bakes, my easy blueberry protein muffins are another great place to start building kitchen confidence!
- Why This Moist Pineapple Upside Down Cake Recipe Works
- Gathering Ingredients for Your Pineapple Upside Down Cake
- Step-by-Step Instructions for the Classic Pineapple Upside Down Cake
- Variations on the Pineapple Upside Down Cake Recipe
- Tips for Success When Making Pineapple Upside Down Cake
- Serving Suggestions for Your Retro Pineapple Dessert
- Storage and Reheating Instructions for Pineapple Upside Down Cake
- Frequently Asked Questions About Pineapple Upside Down Cake
- Bake Your Next Nostalgic Dessert
Why This Moist Pineapple Upside Down Cake Recipe Works
Look, I approach baking like I approach a big work sprint—streamline the bottlenecks and double down on the high-yield areas. This isn’t just another recipe; it’s engineered for reliability. We guarantee that beautiful, gooey top layer and a cake that stays wonderfully moist, even after it cools down. When you’re looking for the ultra-moist lemon cake texture, the same principles apply here. Here’s why this method keeps delivering perfection:
- It ensures maximum moisture absorption in the crumb.
- We build a quick, intense caramel base that doesn’t need fussy monitoring.
- The cake mixing process is fast, reducing the risk of toughness or gluten development.
Achieving the Best Caramelized Pineapple Cake Topping
That gorgeous, glossy topping comes from treating the butter and brown sugar exactly right. We melt the butter first, then stir the brown sugar into that melted pool. This ensures the sugar dissolves properly into a buttery syrup right in the pan. It gets super hot and bubbly, which is exactly what you want for deep caramelization. Plus, we reserve just a tiny splash of that canned pineapple juice to mix directly into the batter. That sounds simple, but that fruit acid helps keep the cake incredibly tender underneath all that sweetness!
Tips for a Fluffy Pineapple Cake Crumb
No one wants a dense brick masquerading as a dessert, right? The secret to a fluffy pineapple cake crumb is all about managing air. You absolutely must cream the softened butter and the white sugar until it’s genuinely light and pale before you even think about adding eggs. That process forces air in! Then, once the flour comes out, you mix until ‘just combined.’ If you see streaks of flour, stop mixing. Seriously. Overmixing is the fastest way to turn your beautiful cake into something chewy. Trust me on this; patience during the creaming pays off massively in texture.
Gathering Ingredients for Your Pineapple Upside Down Cake
When you’re optimizing a recipe, ingredients are your primary variables, and we need to treat them precisely. I always get these items prepped before I even turn on the stove. Remember, this isn’t guesswork; this is engineering a beautiful tropical dessert! You’ll notice we need butter two ways—once melted for the base and once softened for the batter. Do not try to substitute the softened one; we need that structure for creaming. Also, make sure those pineapple slices are fully drained, but hold onto 3 tablespoons of that juice! That tiny bit of liquid is crucial for our moist cake layer, just like when I make my easy homemade brown gravy; every component plays a critical role.
Here is exactly what you’ll need:
- For the Topping: 1/2 cup unsalted butter; 3/4 cup packed light brown sugar.
- The Fruit Layer: One 20 ounce can of pineapple slices packed in juice (drained, but save 3 tablespoons of that juice!); 10 maraschino cherries, drained completely.
- For the Cake Batter: 1 1/2 cups all-purpose flour; 1 1/2 teaspoons baking powder; 1/2 teaspoon salt; 1/2 cup granulated sugar; 1/2 cup unsalted butter, softened just right; 2 large eggs; 1 teaspoon vanilla extract; 1/2 cup whole milk mixed with the reserved 3 tablespoons of pineapple juice.
Step-by-Step Instructions for the Classic Pineapple Upside Down Cake
This is where the project management really pays off! We tackle this in three distinct phases, making sure every element sets up the next perfectly. We are baking this in a standard 9-inch round cake pan, which gives us the perfect surface area for that beautiful, uniform topping. Remember, timing is everything, especially when that cake is upside down!
If you’re ready to see some magic happen, grab your mixer and let’s go. These steps will guide you right through to serving a spectacular, fuss-free dessert.
Preparing the Caramelized Fruit Layer
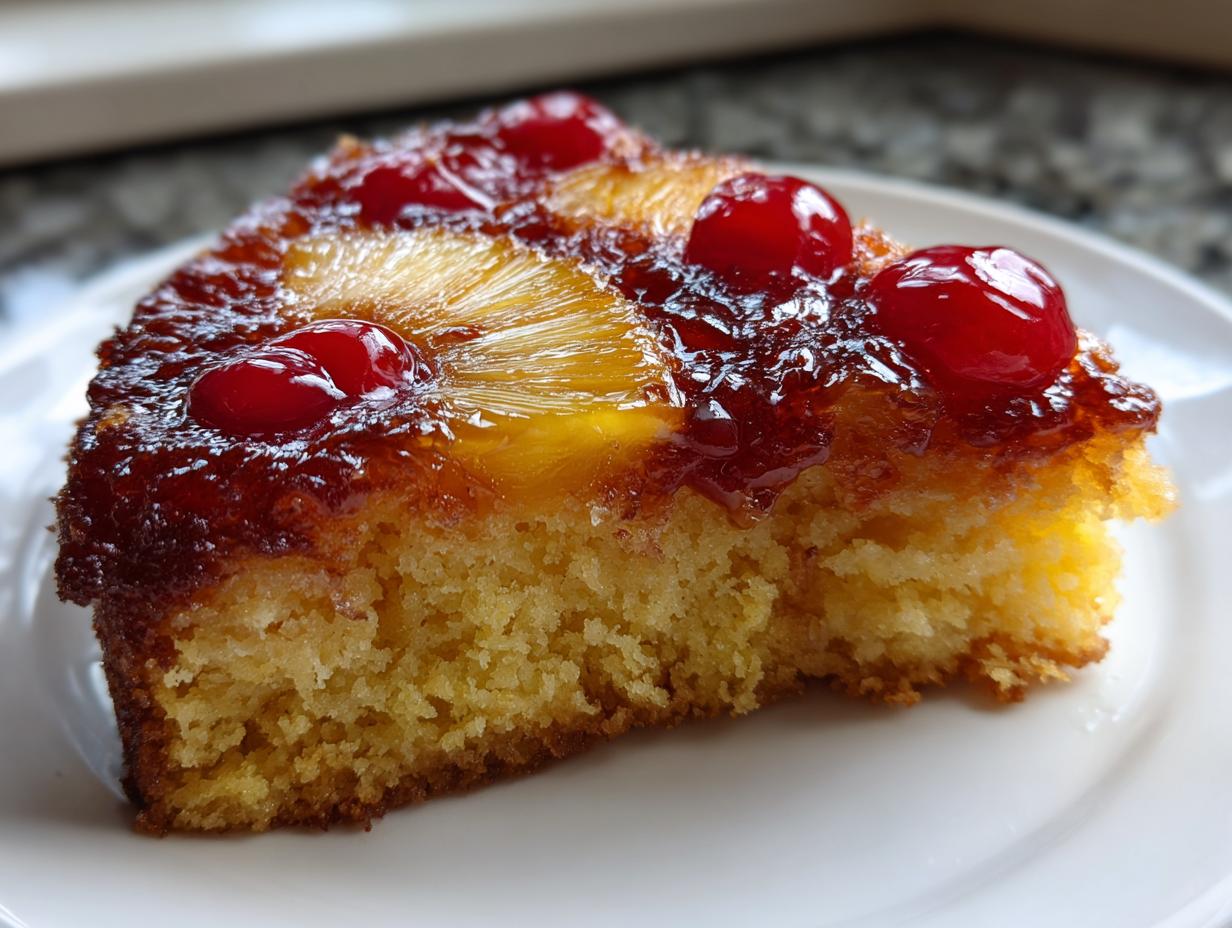
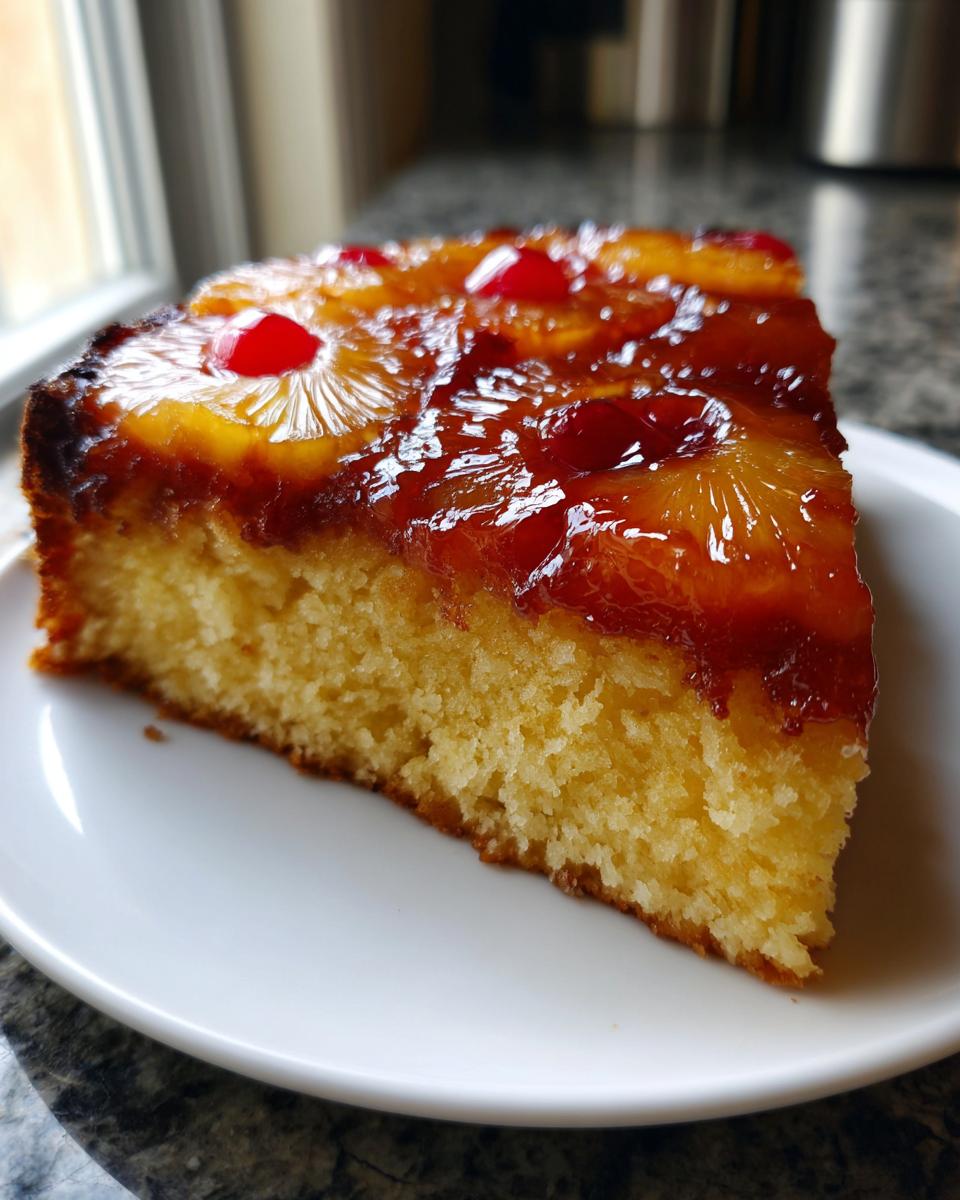
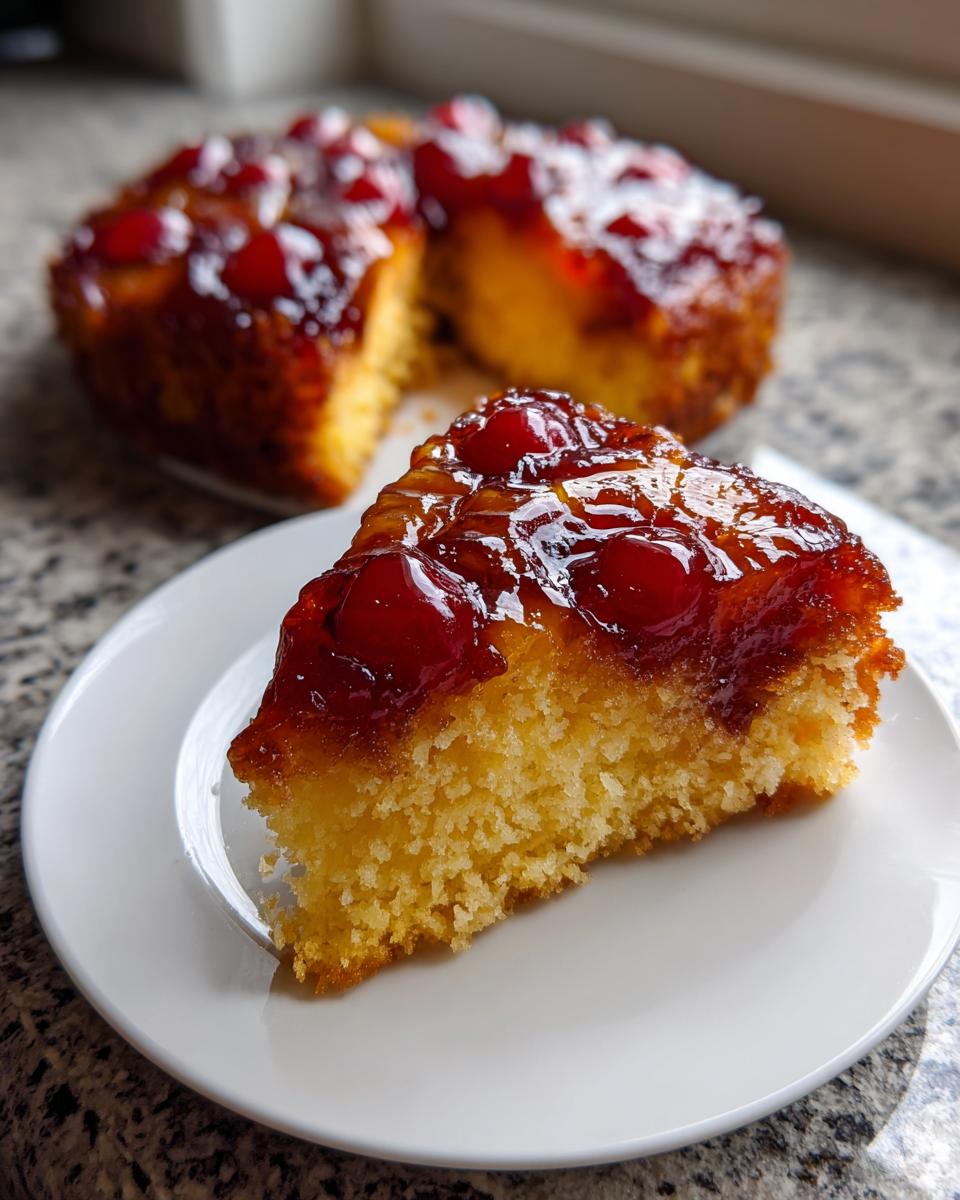
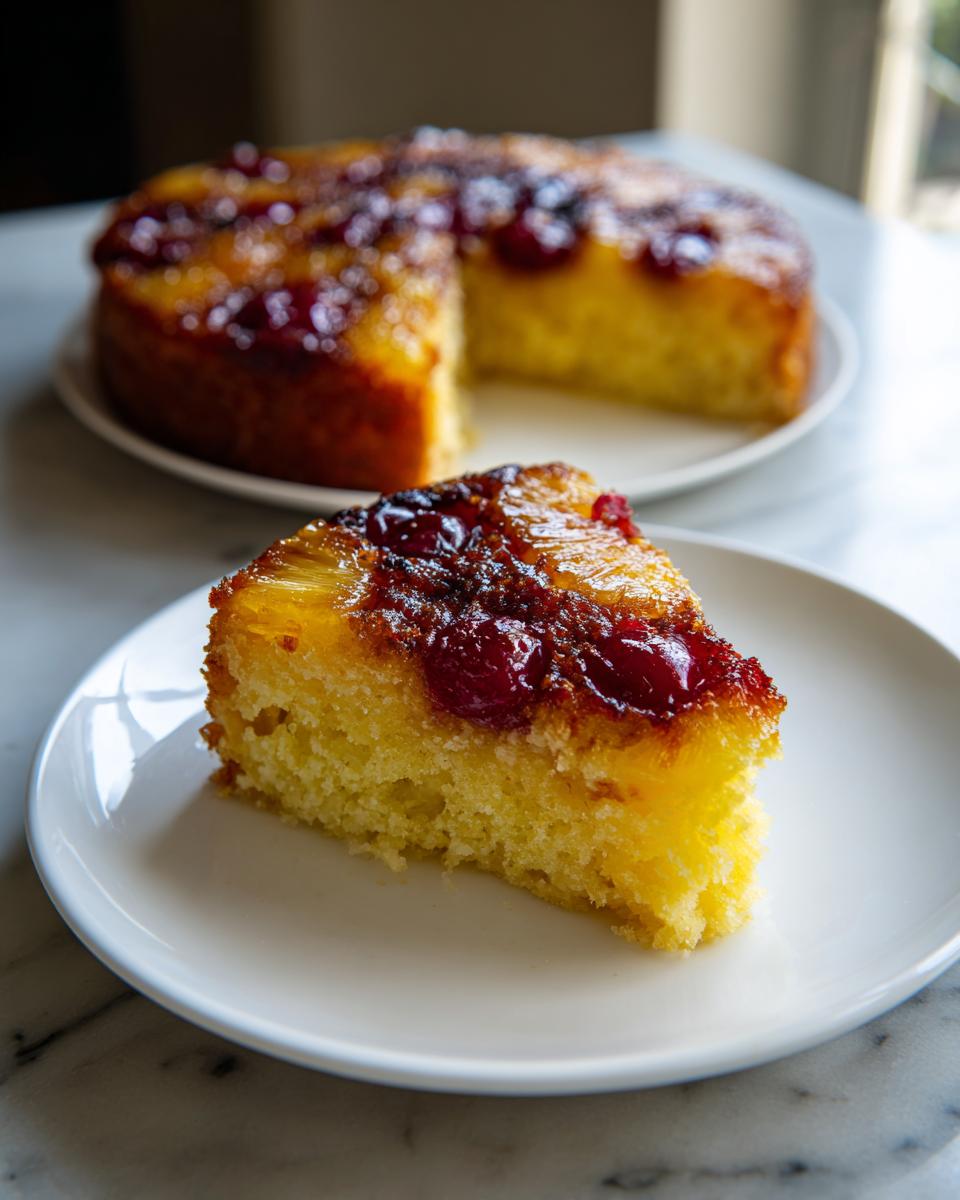
First things first: fire up the oven to 350°F (175°C). Get your 9-inch round pan ready—this shape is critical for the classic look. In a small saucepan over medium heat, combine that 1/2 cup of butter until it’s completely melted. Whisk in your packed light brown sugar until it’s dissolved and looks syrupy. Pour that rich mixture right into the bottom of your cake pan and spread it around evenly. Now for the showpiece: arrange your drained pineapple slices beautifully over that brown sugar base. Pop one drained maraschino cherry right into the center of every single pineapple ring. That’s your stunning upside-down canvas!
Mixing and Assembling the Pineapple Upside Down Cake Batter
Next, we build the cake structure. In one bowl, whisk together your flour, baking powder, and salt—that’s your dry team. In your big mixing bowl, cream the 1/2 cup of softened butter with the granulated sugar. You need to mix this for about 3 solid minutes until it looks genuinely pale and fluffy. This traps the air! Beat in the two eggs one by one, then stir in the vanilla. Now, the alternation begins: add a bit of the dry mix, then some of your milk/pineapple juice combo, ending with the dry ingredients again. Mix only until those last streaks disappear. I mean it—stop right there so you keep that light texture. Gently spoon this fluffy cake batter right over the fruit layer without squishing it down.

Baking and the Critical Inversion of the Pineapple Upside Down Cake
Slide that beautiful pan into the preheated oven and let it bake for 35 to 40 minutes. You are done when a toothpick inserted in the center comes out clean—no wet batter, just moist crumbs sticking to it. This timing is vital: Once it’s out, place the whole thing on a wire rack and let it cool for exactly 10 minutes. Don’t rush this part! If you wait too long, the caramel sets hard. If you flip it too soon, it collapses. After 10 minutes, bring out your serving platter, place it upside down over the cake pan, and with confidence, flip both together quickly. Lift that pan off gently. If any fruit decided to stick to the pan, just coax it back into place with a spatula. That’s how you guarantee a perfect presentation!
Variations on the Pineapple Upside Down Cake Recipe
Just because we’ve engineered the perfect Classic Pineapple Upside Down Cake doesn’t mean we can’t have options! As a home cook, I know life gets busy. Sometimes you need the from-scratch flavor but with half the prep time, or maybe you want to bake it in a fun shape. This recipe is sturdy enough to handle a few little hacks without sacrificing that moist result we’ve worked so hard for. It’s all about finding the right efficiency level for whatever evening you’re having. If you’re looking for another great option for a different kind of loaf, check out my recipe for cranberry walnut bread; it’s another great centerpiece.
Easy Pineapple Upside Down Cake with Cake Mix Shortcut
Okay, let’s talk about the shortcut for those nights when you just need dessert on the table fast. You can absolutely lean on a box for this! The topping—that rich caramel layer—is honestly the heart of this dessert, so we never change that part. However, for the cake itself, you can swap out all the dry ingredients (flour, baking powder, salt, and granulated sugar) for one box of yellow cake mix. You’ll follow the box directions for the liquid but make sure you still use the milk/pineapple juice combo we developed!
This delivers a super easy pineapple upside down cake that still tastes homemade because that caramelized fruit layer is entirely from scratch. It cuts the mixing time down to almost nothing. It’s perfect for an impromptu gathering!
Baking Your Pineapple Upside Down Cake in a Cast Iron Skillet
If you have a 10-inch cast iron skillet, you absolutely have to try baking the pineapple upside down cake in it. Seriously, it looks amazing when you serve it right in the skillet, all rustic and golden. The heavy cast iron conducts heat so evenly, which helps create a beautiful, even crust, almost like a giant cookie edge.
The only thing you need to watch is the heat penetration. Since the bottom heats up faster, monitor it closely. You might find it needs just 2 or 3 minutes less baking time than in a standard cake pan. The key is still that 10-minute cooling window before the flip. Don’t let that skillet get ice cold!
Making Individual Mini Pineapple Cakes
Who doesn’t love a single-serving dessert? These are perfect for parties where you want everyone to grab their own without needing a knife. To turn this into individual mini pineapple cakes (cupcakes, basically), you’ll want to use a standard 12-cup muffin tin. You’ll need to melt the butter/brown sugar mixture and drizzle a little into the bottom of each cup before laying out your smaller pineapple/cherry pieces.
Fill the muffin cups about two-thirds full with batter. Since they are much thinner, they bake faster—check them around the 18 to 20-minute mark. You want that toothpick test to be totally clean. They invert easily, and they honestly look so cute on a platter!
Tips for Success When Making Pineapple Upside Down Cake
Even with a streamlined process, baking still requires attention to detail, especially when inversion is involved. I’ve learned through constant testing that the difference between a gorgeous, glossy dessert and a sticky, ripped mess comes down to just a few small, yet critical, checks. Since we want this to be the ultimate classic experience, let’s nail down the troubleshooting elements right now so you aren’t surprised later.
The main points of failure are always sticking or a cake that ends up a little dull instead of deeply caramelized. Here are the non-negotiable checks I perform every single time I make this Caramelized Pineapple Cake.
- Never Skip the Melt and Stir: When creating the topping, don’t just melt the butter and dump the sugar in. You must keep stirring the sugar into the melted butter until it dissolves. If the sugar grains remain slightly gritty, they won’t form that deep, cohesive syrup needed for perfect caramel coating.
- Know Your Pineapple Juice: We saved 3 tablespoons of juice for the batter—that’s fantastic for moisture. However, make sure your main can of pineapple slices is well drained before placing them on the caramel. Too much liquid sitting on the bottom will essentially boil that caramel instead of having it bake into a thick glaze.
- The 10-Minute Rule: I am firm on this timing for the flip. 10 minutes is the sweet spot for that 9-inch round pan. If you wait much longer, the caramel hardens like cement and rips the cake layer when you invert it. If you flip before 8 minutes, the cake batter is too hot and liquid, leading to a messy structural collapse. Set a timer, trust the timer.
- Pan Prep Matters: While the butter/sugar mixture seals most of the bottom, do not use a greasy, heavily used, or scratched pan. A nonstick pan works well, but if you are using a seasoned cast iron skillet, make sure the base layer of caramel butter and sugar completely covers every inch of the bottom surface.
Follow these guardrails, and you’ll consistently achieve that tender, moist crumb married perfectly to that shining, tropical top layer. It’s all about controlling the variables!
Serving Suggestions for Your Retro Pineapple Dessert
Once you manage that glorious flip and reveal that shiny, perfect layer, the next step is figuring out how to serve this stunning Retro Pineapple Dessert. Since the cake is rich with that buttery caramel, you don’t need a lot of fuss, but a few simple additions can really take it over the top. I always like to serve it slightly warm because that caramel gets soft and almost liquid again.
Honestly, a scoop of good vanilla bean ice cream is the absolute winner here; the cold creaminess melts right into that warm pineapple topping. If you prefer something lighter, a dollop of freshly whipped cream works wonderfully. If you happen to be making my super stable vanilla buttercream for another project, a tiny rosette on top of a cooled slice is also divine. It’s all about balancing that tropical sweetness!
Storage and Reheating Instructions for Pineapple Upside Down Cake
Okay, so you managed to pull off the perfect flip, and maybe (just maybe) you even have a slice or two left over. Don’t stress about storage! This cake holds up really well, which is why it’s such a fantastic option for potlucks or making ahead of time. Unlike some delicate cakes, the high sugar content in that caramel layer actually acts as a bit of a shield, keeping things fresh.
If you’re keeping it at room temperature—say, for serving the next day after baking—store it tightly covered on the counter. Make sure it’s in an airtight container or well-wrapped in plastic wrap. It should be great for about two days, especially since this is already such a moist pineapple upside down cake recipe!
If you plan on keeping those glorious tropical leftovers longer than two days, or if your kitchen is super warm, you should definitely move it to the refrigerator. Store it in an airtight container there. It will firm up a bit because of the butter, but don’t worry; we can fix that!
How to Reheat Slices for Maximum Moisture
The trick to reheating is gentle warmth. We want to soften that caramel again without turning the cake soggy, which is a delicate balance. Microwaving is usually the fastest way, but you have to be careful. If you are just reheating one slice, wrap it loosely in a damp paper towel first. This creates a little steam pocket while it warms. Set the microwave to about 50% power and zap it for just 15 to 20 seconds.
If you’re looking to serve a few slices together, or if you’re using that cast iron skillet version, the oven is better. Place slices on a baking sheet and warm them in a low oven—say, 300°F—for about 5 to 7 minutes until you can feel that warmth all the way through. It revives the buttery flavor perfectly. Remember, reheating brings back that “just flipped” gooey texture!
Frequently Asked Questions About Pineapple Upside Down Cake
Even with a highly engineered recipe, sometimes questions pop up once you get into the execution phase. That’s totally normal! Getting the inversion right is the biggest hurdle for many people when making this pineapple upside down cake, so let’s tackle the common snags right here so you can bake with total confidence. We want this to be your go-to dessert, not a source of kitchen anxiety!
How do I prevent my pineapple upside down cake from sticking?
This is the big one! Sticking almost always happens for one of two reasons. First, you didn’t give that crucial 10-minute cool-down window before flipping. If you wait too long, the caramel hardens like glue against the pan metal. If you flip it immediately, the cake structure hasn’t set up enough and it splatters everywhere. Ten minutes is the sweet spot where the caramel is still molten enough, but the cake structure is firm enough to hold its shape.
Second, you have to make absolutely sure that brown sugar mixture completely coats the bottom of the pan *before* you put the pineapple down. You don’t need cake release goop here because the butter/sugar caramel acts as your barrier, but if there’s a bare spot, the batter will stick right there.
Can I use fresh pineapple instead of canned for this pineapple upside down cake recipe?
You absolutely can, but you have to treat fresh pineapple like a small science experiment first! Canned pineapple comes packed in syrup, which is why we reserve a bit of that liquid for our batter, but fresh pineapple is much wetter. If you just chop it up and throw it on the caramel, you’ll end up with a soupy mess on the bottom and a dry cake on top.
If you use fresh slices, you need to peel them, core them, and then let them sit on a stack of paper towels for at least an hour, pressing gently to draw out a lot of that excess moisture. You might even want to sauté them briefly in a little butter until they firm up slightly. This extra step means you skip reserving the can juice, but you gain incredible fresh flavor!
What makes this a ‘Moist Pineapple Upside Down Cake Recipe’?
I designed this entire thing around moisture retention! We aren’t just using pineapple for looks; we are using it for science. The main reason this consistently turns out as a moist pineapple upside down cake recipe is twofold. First, the caramel topping releases steam back into the cake as it cools, keeping that bottom layer super tender. Second, remember we reserved those 3 tablespoons of juice from the can? Mixing that acidic juice right into the milk you add to the batter tenderizes the gluten strands while mixing. It’s a small addition, but it makes a huge difference in the final texture of the fluffier cake crumb.
If you’re looking for more reliable recipes that always produce great results, you have to check out my easy sugar cookie bars recipe next. They are ridiculously simple!
Bake Your Next Nostalgic Dessert
So there you have it: the engineered, optimized, and completely foolproof method for making an absolutely stunning pineapple upside down cake. We took this classic recipe, applied a little project management logic to streamline the sticky parts, and ended up with a dessert that shines every single time—beautiful caramel, moist cake, and that perfect tropical tropical flavor.
The beauty of a retro dessert like this is that it forces you to slow down just a little bit for that crucial flip, but the prep itself is so quick! I really hope this recipe helps bring some joy and confidence into your kitchen rotation. When you pull that pan out after the inversion and see those sunny pineapples staring back at you, I promise you are going to feel like a rockstar baker.
Don’t keep this magic to yourself! Once you try it, please head back here and give this recipe a rating—it helps us know we’ve delivered on our promise of simpler, delicious meals. And if you happen to experiment with the cast iron skillet or the mini cake versions, tag me on social media! I love seeing how you adapt these strategies. If you enjoyed making this, you might also love my quick strawberry cake mix cookies for another simple sweet fix!
PrintClassic Moist Pineapple Upside Down Cake

Make this classic pineapple upside down cake for a show-stopping, nostalgic dessert. This recipe focuses on achieving a moist cake and a perfect caramelized pineapple topping.
- Prep Time: 15 min
- Cook Time: 40 min
- Total Time: 55 min
- Yield: 8 servings 1x
- Category: Dessert
- Method: Baking
- Cuisine: American
- Diet: Vegetarian
Ingredients
- 1/2 cup unsalted butter
- 3/4 cup packed light brown sugar
- 1 (20 ounce) can pineapple slices in juice, drained (reserve 3 tablespoons juice)
- 10 maraschino cherries, drained
- 1 1/2 cups all-purpose flour
- 1 1/2 teaspoons baking powder
- 1/2 teaspoon salt
- 1/2 cup granulated sugar
- 1/2 cup unsalted butter, softened
- 2 large eggs
- 1 teaspoon vanilla extract
- 1/2 cup whole milk
- 3 tablespoons reserved pineapple juice
Instructions
- Preheat your oven to 350°F (175°C). You will use a 9-inch round cake pan for this recipe.
- In a small saucepan, melt 1/2 cup of butter over medium heat. Stir in the brown sugar until it dissolves and creates a thick syrup. Pour this mixture evenly into the bottom of your cake pan.
- Arrange the drained pineapple slices over the brown sugar mixture in the pan. Place one maraschino cherry in the center of each pineapple ring.
- In a medium bowl, whisk together the flour, baking powder, and salt. Set this aside.
- In a large bowl, cream together the 1/2 cup softened butter and 1/2 cup granulated sugar until the mixture is light and fluffy. This takes about 3 minutes with an electric mixer.
- Beat in the eggs one at a time, mixing well after each addition. Stir in the vanilla extract.
- In a separate small bowl, whisk together the milk and the 3 tablespoons of reserved pineapple juice.
- Gradually add the dry ingredients to the wet ingredients, alternating with the milk mixture. Begin and end with the dry ingredients. Mix until just combined; do not overmix the batter.
- Gently spoon the cake batter over the pineapple and cherries in the pan, spreading it evenly without disturbing the fruit layer underneath.
- Bake for 35 to 40 minutes, or until a toothpick inserted into the center comes out clean.
- Remove the cake from the oven and let it cool in the pan on a wire rack for exactly 10 minutes.
- Place a serving plate or platter upside down over the cake pan. Carefully invert the pan and plate together. Lift the pan off the cake. If any fruit sticks, gently place it back onto the cake top.
- Let the cake cool slightly before slicing and serving.
Notes
- For an easier version, substitute the dry ingredients with one box of yellow cake mix, following the box directions for liquid amounts, but still use the homemade caramel topping.
- If you prefer baking in a cast iron skillet, use a 10-inch skillet and adjust baking time by a few minutes as needed.
- Serve warm with vanilla ice cream for the best flavor experience.
Nutrition
- Serving Size: 1 slice
- Calories: 350
- Sugar: 30g
- Sodium: 250mg
- Fat: 17g
- Saturated Fat: 10g
- Unsaturated Fat: 7g
- Trans Fat: 0g
- Carbohydrates: 48g
- Fiber: 1g
- Protein: 4g
- Cholesterol: 65mg