
Nothing beats the smell of spicy, fruity bread filling the kitchen when the weather turns chilly. That’s why I developed this ultimate no-knead cranberry walnut bread recipe. Forget the endless kneading and complicated steps; this is baking optimized for real life. I, Leo Grant, approach recipes like a project manager—we strip away anything that doesn’t add maximum impact. This artisan loaf gives you that incredible rustic crust and tender crumb, but with almost zero effort from you overnight. It’s the perfect holiday breakfast bread solution for busy folks who still want that homemade quality.
- Why This No-Knead Cranberry Walnut Bread Recipe Works (The Dishicious Method)
- Essential Ingredients for Your Cranberry Walnut Bread Recipe
- Step-by-Step Instructions for Making Cranberry Walnut Bread
- Tips for the Best Cranberry Walnut Bread Every Time
- Variations on Your Cranberry Cinnamon Loaf
- Serving Suggestions for This Holiday Breakfast Bread
- Storage and Reheating Instructions for Homemade Cranberry Loaf
- Frequently Asked Questions About Cranberry Walnut Bread
- Estimated Nutritional Data for Cranberry Walnut Bread
Why This No-Knead Cranberry Walnut Bread Recipe Works (The Dishicious Method)
When I designed this recipe, my goal was simple: deliver a show-stopping cranberry walnut bread without the time commitment. The magic here is the time itself. Unlike standard yeast recipes that demand vigorous kneading to build gluten structure, we let time do the heavy lifting during the long, slow fermentation. This develops unparalleled flavor deep within the dough. It’s incredibly easy, which is why it’s one of my most reliable homemade bread recipes.
You get all the complexity of a slow-proofed loaf—that subtle tang and depth—but you just mix and walk away for 18 hours. The result is a beautifully moist cranberry bread that tastes like you slaved over it all day.
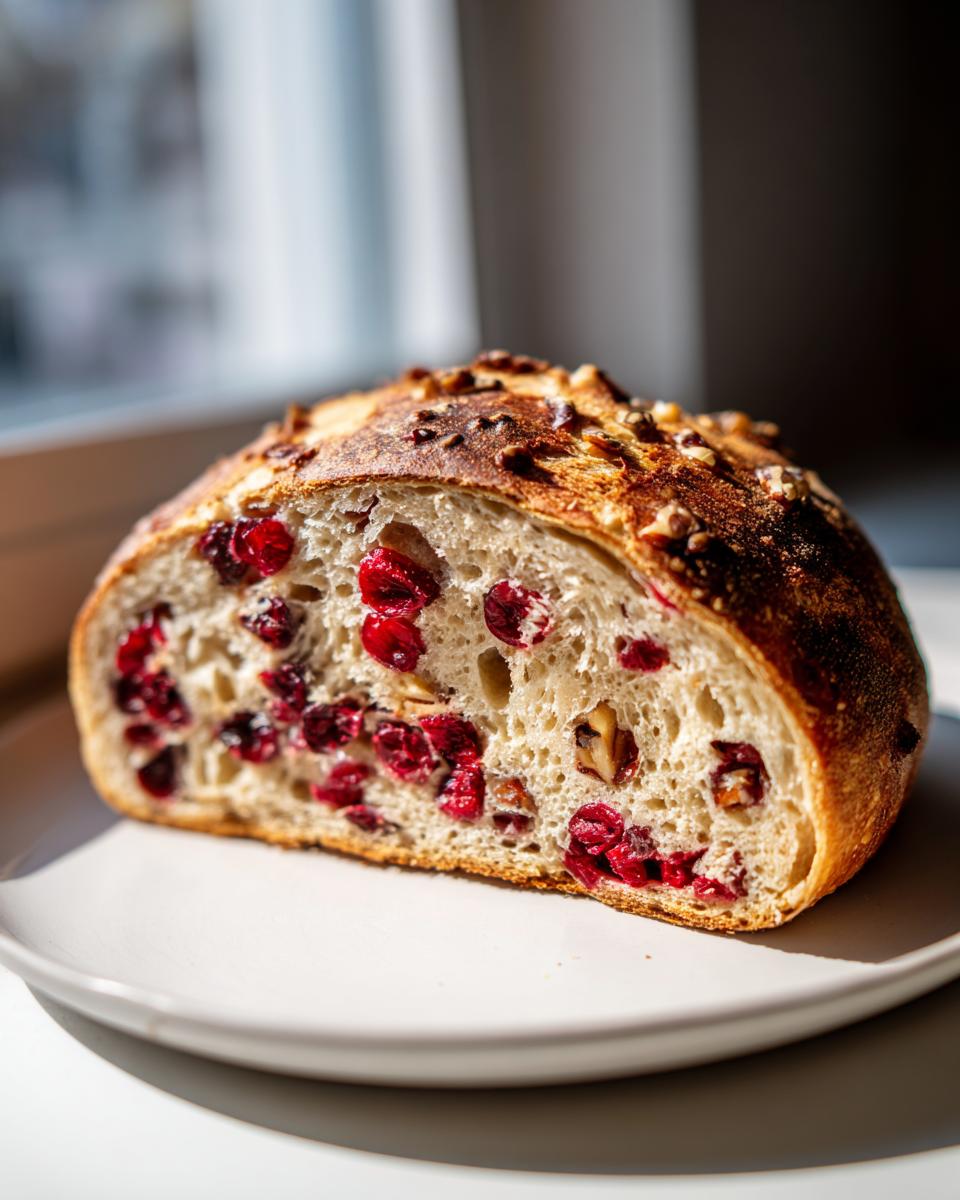
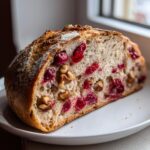
Achieving the Perfect Artisan Cranberry Walnut Bread Texture
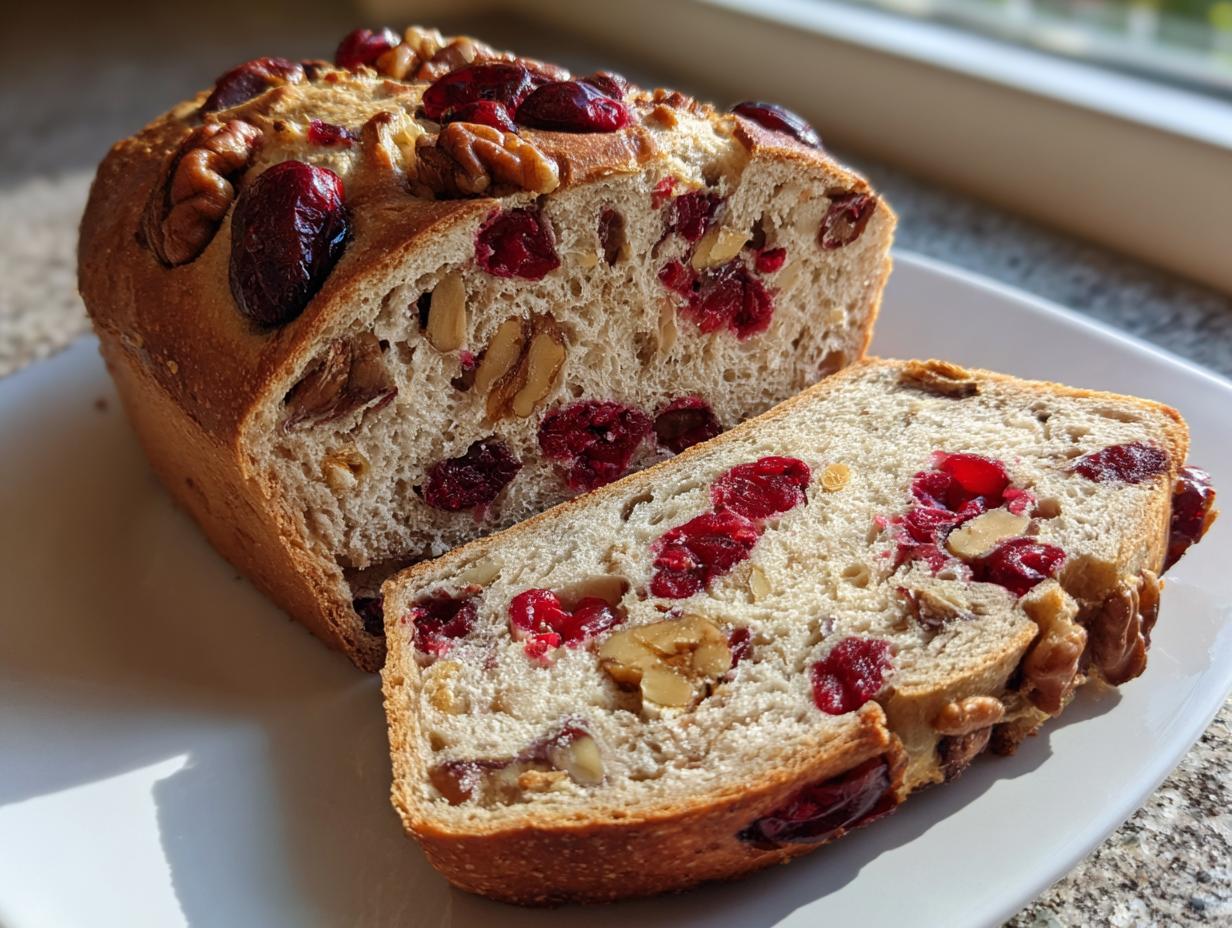
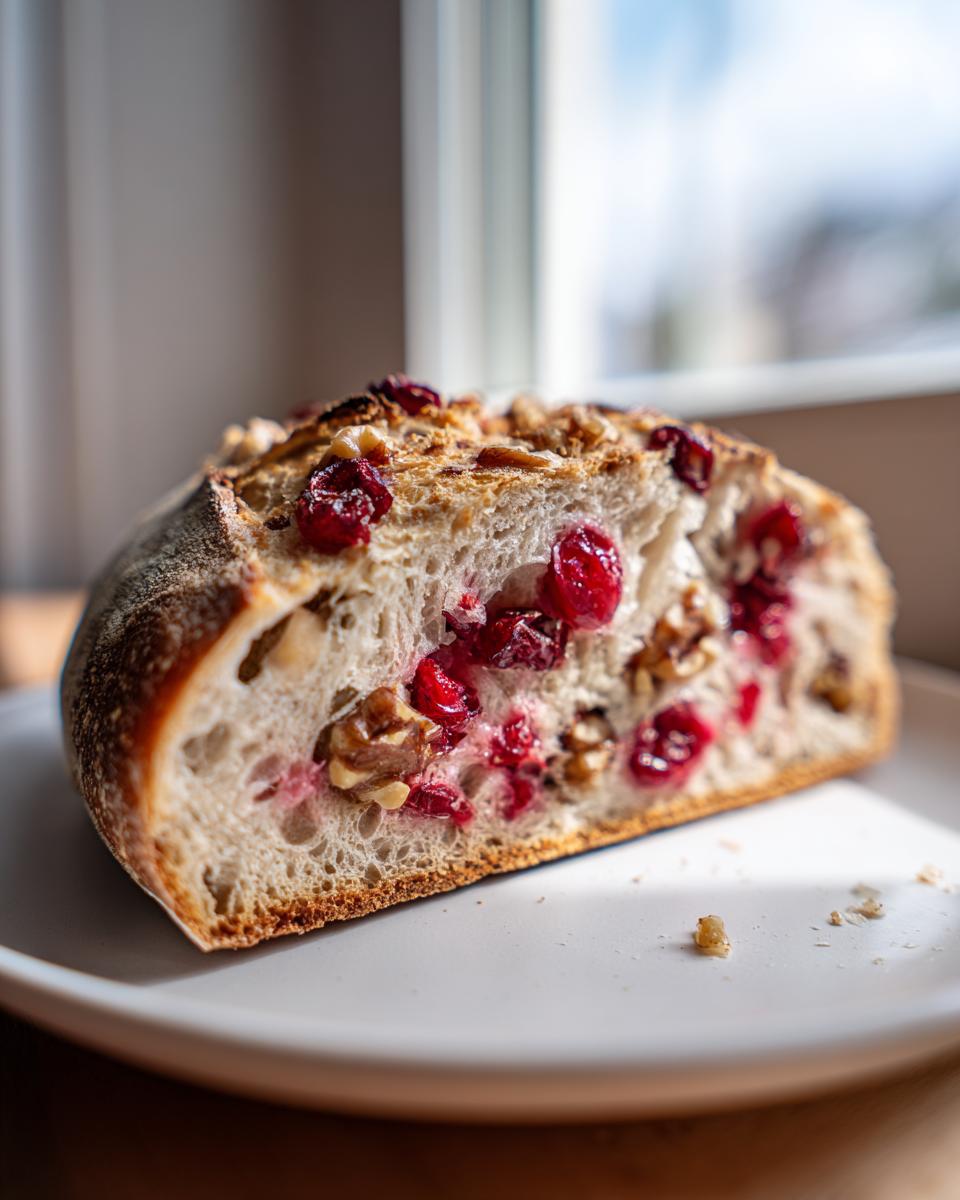
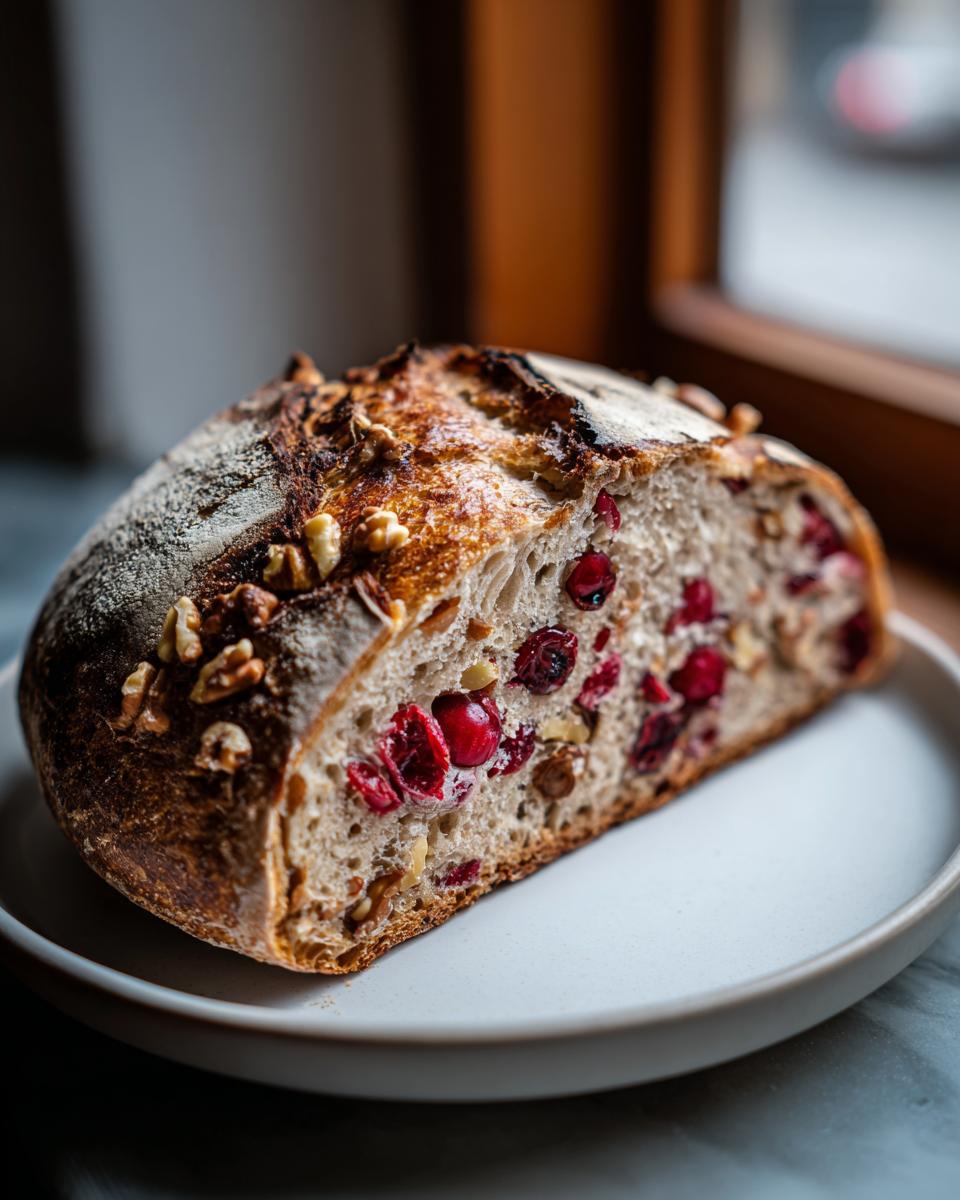
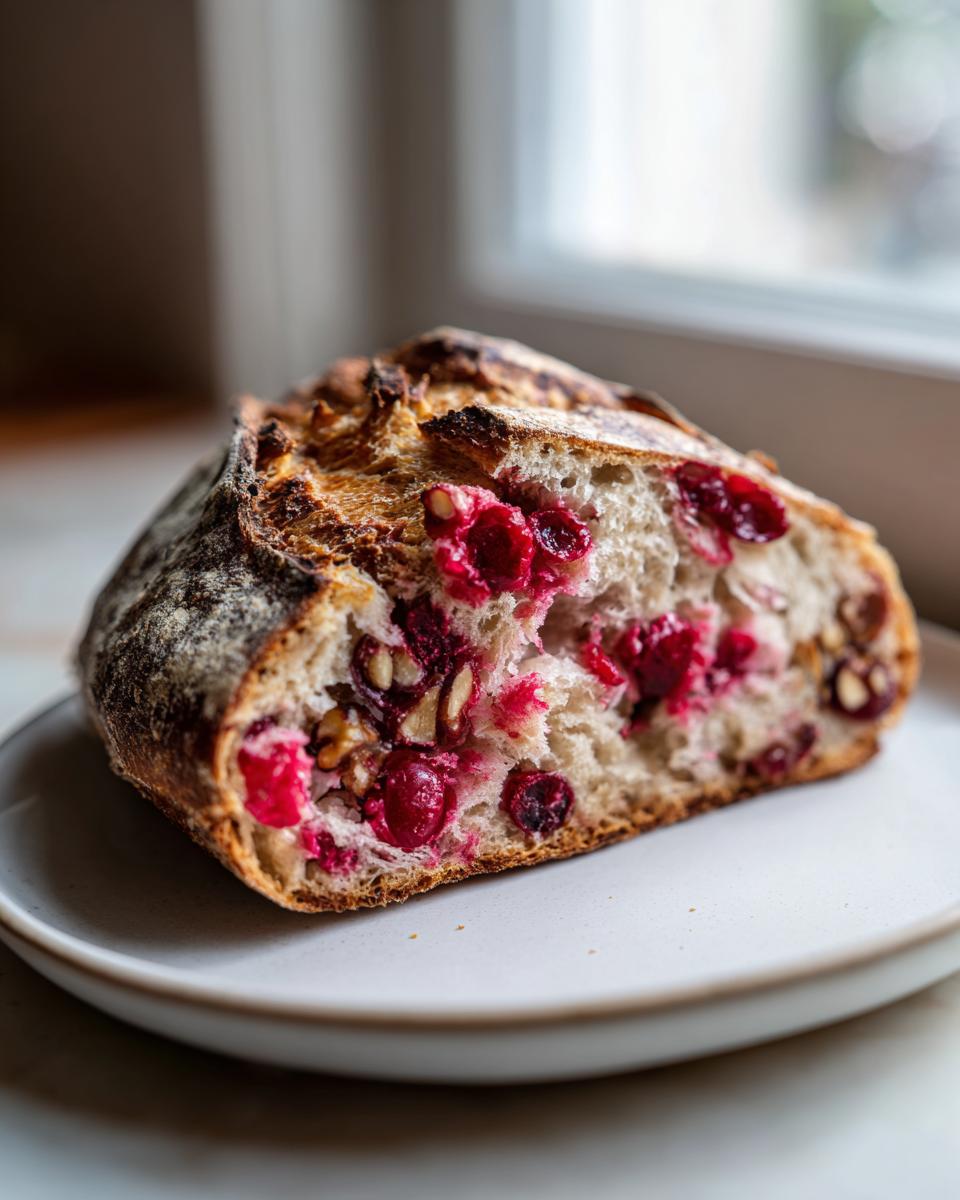
The texture is where this shines brightest. We are chasing that perfect contrast: a crackly, rustic crust on the outside and a soft, airy crumb inside, packed with fruit and nuts. The no-knead method creates those irregular air pockets that make every slice look like a true artisan bread loaf. But the real secret weapon for that bakery finish is the Dutch oven. Baking the dough covered traps steam, which prevents the crust from setting too early, allowing the bread to expand fully before the crust crisps up perfectly in the final 15 minutes uncovered.
Essential Ingredients for Your Cranberry Walnut Bread Recipe
When we talk about efficiency, we only use ingredients that pull their weight. For this loaf, we keep the list short and focused so you aren’t running to three different stores. Trust me, the flavor comes from the slow fermentation, not from adding seven different spices!
- 1.5 cups room-temperature water (It needs to be lukewarm for the yeast to wake up properly.)
- 2 tablespoons honey (For that hint of sweetness and color.)
- 1 teaspoon active dry yeast (Standard stuff, nothing fancy needed here.)
- 3 cups bread flour or all-purpose flour (See my notes below—either works fine for this method!)
- 1.5 teaspoons salt (Crucial for flavor development, don’t skip it.)
- 1 teaspoon ground cinnamon (This is our warming backbone.)
- 1 cup dried cranberries (Make sure they are plump, not rock hard.)
- 1 cup chopped walnuts (Toast them lightly first if you have an extra 5 minutes!)
- 1 tablespoon all-purpose flour (Just for dusting the surface later.)
Ingredient Notes and Smart Substitutions
Since this is a no-knead recipe, the flour choice is surprisingly flexible. Bread flour gives a slightly chewier crumb, which pairs well with the structure we get from the Dutch oven. However, standard all-purpose flour is perfectly acceptable if that’s what you have on hand—it just results in a slightly softer interior. Some folks ask about swapping the walnuts; pecans are a fantastic sub if you prefer. If you don’t have honey, maple syrup works great in the same quantity, but it will slightly change the final color.
A quick note on those cranberries: if yours are super dry, soak them in a bit of hot water for ten minutes before adding them to the dough. This stops them from sucking moisture out of your beautiful, slow-fermented dough.
Step-by-Step Instructions for Making Cranberry Walnut Bread
Okay, here’s the action plan. Because this is a no-knead design, the hardest part is waiting! Once you stir everything together, you can stop thinking about this gorgeous cranberry walnut bread until the next day. Remember, we treat this like a low-maintenance project; we set it up for success early on.
- In a big bowl, mix your room-temperature water, the honey, and the yeast. Just stir it up gently and let it sit on the counter for about five minutes. You are looking for a little bit of foam on top—that means your yeast is alive and ready to go to work!
- Now, dump in your flour, salt, and cinnamon. Grab a wooden spoon, and stir until everything is just combined into a messy, shaggy ball. Seriously, stop stirring when you can’t see any dry flour streaks anymore. Do not knead, I mean it!
- Cover that bowl up tight with plastic wrap and forget about it. Slide it onto the counter and let it rest for 12 to 18 hours. This long rest is the key to developing that signature flavor.
- After that long nap, gently turn the whole sticky mass out onto a surface dusted with that tablespoon of extra flour. Sprinkle your gorgeous cranberries and walnuts right over the top. Now, gently fold the dough over itself maybe four or five times just to tuck the fruit and nuts in. We don’t want to punch out all the air we just built up.
- Shape it into a rough little ball—it won’t look perfect, and that’s the point of an artisan loaf! Place it on a piece of parchment paper and cover it loosely again for a quick 30-minute rest.
- While it rests, you need to get your oven ready. About 20 minutes into that final half-hour proof, put your Dutch oven—lid and all—into the cold oven and crank the heat up to 450°F (232°C). It needs to get smoking hot.
- When that timer dings, breathe deep and carefully pull out that scorching hot Dutch oven. Use the parchment paper as a sling to lower your dough ball right into the pot. If you’re feeling fancy, score the top with a razor blade or a sharp knife.
- Lid goes back on, and bake for 30 minutes.
- Finally, take the lid off. Let it bake for another 10 to 15 minutes uncovered until the crust turns that deep, beautiful mahogany color. Pull it out and let it cool completely so the crumb sets up right!
The Long Fermentation: Developing Flavor in Your Cranberry Walnut Bread
This is the part where I pretend to be a scientist. Step three, that 12 to 18-hour soak, is non-negotiable for getting that incredible flavor profile. You aren’t just letting the yeast grow; you are letting beneficial bacteria develop acids that make the flavor so much richer than a quick bread. When you uncover it after that long rest, you want to see big bubbles pushing up underneath the plastic wrap. If it looks flat and sleepy, you might need a warmer spot next time, but usually, it looks alive and ready to bake. This activity is what guarantees a moist cranberry bread!
Baking the Artisan Loaf with the Dutch Oven Method
Getting that rustic, chewy crust—the one that feels like it came from a proper bakery—is all about steam. That’s why we preheat the Dutch oven with the oven since it needs to be screaming hot, 450°F is the sweet spot. The first 30 minutes, you keep the lid on. This traps the moisture leaving the dough, artificially creating a steamy environment that lets the dough swell up completely before the crust hardens. Then, pop the lid off for the final 10 to 15 minutes. This lets the exterior dry out and develop that deep, burnished color that signals the perfect bake.
Tips for the Best Cranberry Walnut Bread Every Time
Even with an easy cranberry walnut bread recipe, small refinements make the difference between good and absolutely fantastic. Since we rely on time rather than muscle, paying attention to these few details really locks in that artisan quality. We want every slice to be just as impressive as the last one.
First, that golden, crackly crust we talked about? If you want that extra layer of richness and that famous store-bought look, brush the hot loaf immediately after you pull it out of the Dutch oven with a little melted butter. This is our secret move to nail that Costco bread copycat experience right at home. It soaks in beautifully and smells amazing.
Also, remember that honey? If you want to lean into a slightly sweeter profile overall, feel free to swap out one tablespoon of that honey for pure maple syrup. It adds a lovely autumn depth to the overall flavor of your homemade cranberry loaf. Don’t try to substitute the salt, though; skipping it ruins the flavor balance we worked so hard to build overnight!
Variations on Your Cranberry Cinnamon Loaf
While the core recipe delivers that perfectly balanced sweet/tart profile, I know we home cooks love to tinker! This no-knead base is so reliable that it begs for easy customizations. If you’re looking to swap things up for a different holiday brunch, I have two favorite ways to tweak it without messing up that beautiful rise.
First, let’s talk raisins. A lot of search data shows people love that chewiness when you mix dried fruit types. If you have some plump raisins lying around, try adding about a quarter cup along with your cranberries and walnuts. Just make sure they are soft enough; if they are hard, soak them for a minute in hot water first, then drain them really well before folding them into the dough.
Second, let’s jazz up the spice profile. If you want to move away from just cinnamon and make this a truly cozy cranberry cinnamon loaf, try this trick: use three-quarters of a teaspoon of cinnamon, and add a quarter teaspoon of nutmeg, and just a whisper—maybe an eighth of a teaspoon—of ground cardamom. Cardamom is potent, but it pairs unbelievably well with cranberries. It instantly elevates this loaf from ‘great breakfast bread’ to ‘special occasion centerpiece.’ It’s a little flavor upgrade that takes zero extra time in the mixing process!
Serving Suggestions for This Holiday Breakfast Bread
Once this gorgeous loaf is totally cool—and I know that’s the hardest part—you need to know the best ways to serve it up. This bread is stellar on its own, especially thinly sliced because the crust cracks perfectly, but letting it shine with a few simple pairings elevates it for any brunch event.
For a classic winter morning treat, you absolutely need some good quality, softened salted butter spread lightly across a warm slice. If you’re serving this for a big gathering, I highly recommend setting out a bowl of plain cream cheese whipped with just a tiny bit of orange zest. That little bit of extra citrus pairs beautifully with the cranberries. It instantly makes this humble loaf instantly worthy of any formal holiday breakfast bread spread. Grab your coffee, maybe a spiced cider, or even some of those lovely cinnamon sugar snowball cookies I shared earlier, and enjoy the results of your low-effort baking!
Storage and Reheating Instructions for Homemade Cranberry Loaf
Since this is a yeast-based, rustic loaf—not a quick bread—we need to treat the leftovers right to keep that artisan texture. The best thing you can do is wrap the completely cooled loaf tightly in plastic wrap, and then maybe aluminum foil, and keep it at room temperature for up to three days. Honestly, I avoid the fridge if I can, because the cold tends to dry out yeast bread quickly.
If you end up with a loaf that’s gone a little stiff on day four, don’t panic! Slice off what you need and just lightly toast it. A quick toast brings back that wonderful crust texture, and it’s perfect for butter. If you want to revive the whole loaf slightly, wrap it loosely in foil and warm it in a 300°F oven for about ten minutes. That gentle heat softens the crumb right back up!
Frequently Asked Questions About Cranberry Walnut Bread
Can I skip the 12 to 18-hour rest period?
Oh, I wish you could! But honestly, skipping that long rest is skipping the whole point of this recipe. That long, slow fermentation is what develops the incredible complexity and depth of flavor that makes this cranberry walnut bread taste like it came from a European bakery. If you need bread faster, this isn’t the recipe for you. You’d need to follow a traditional quick bread or a standard rapid-yeast recipe instead.
Can I use fresh cranberries instead of dried ones?
You absolutely can use fresh cranberries, which gives you a great sweet and tart bread experience, but you need to adjust slightly. Fresh cranberries are wetter and tend to sink to the bottom during baking. I recommend tossing them with about a teaspoon of flour before folding them into the dough. This little bit of extra coating helps them stay suspended in the batter better. Keep in mind, though, the tartness will be stronger!
What kind of yeast is required for this no-knead bread recipe?
I specify active dry yeast because it’s the most common you’ll find, and it wakes up nicely with the honey and warm water in step one. If you happen to only have instant yeast (or rapid rise), you can use it interchangeably! Just skip the 5-minute foaming step—you can mix the instant yeast right in with the dry ingredients.
How do I get that perfect Costco bread copycat look?
That shiny, slightly sticky-looking top is a signature touch! Right after you pull the finished loaf out of the hot Dutch oven, take a tablespoon of melted butter and use a pastry brush to quickly coat the entire top surface. It absorbs immediately, adds richness, and gives you that glossy, slightly sweet exterior that everyone associates with that big warehouse store loaf. It’s a super simple upgrade for your homemade cranberry loaf.
Estimated Nutritional Data for Cranberry Walnut Bread
Because I approach cooking like a project manager, I always include a data breakdown! Understanding what goes into your food helps build confidence, even with this easy no-knead recipe. Please look at these numbers as a solid starting point. Since we all measure things slightly differently—and whether you use bread flour or AP flour makes a small difference—these figures are estimates based on the ingredients listed above.
This table reflects the nutrition per single slice of the finished loaf. It’s meant to give you a general idea of the macros when enjoying this festive baking!
- Serving Size: 1 slice
- Calories: 280
- Fat: 8g (with only 1g Saturated Fat)
- Carbohydrates: 48g
- Protein: 7g
- Sugar: 10g
- Sodium: 350mg
- Fiber: 2g
Just a quick disclaimer here: Because this artisan bread loaf relies on a long fermentation process, the actual micronutrient profile can shift slightly from a typical quick bread. This is just the best estimate I can provide based on the standard ingredient breakdown for this specific batch of cranberry walnut bread. Enjoy it knowing it’s a wholesome addition to your brunch lineup!
PrintNo-Knead Artisan Cranberry Walnut Bread with Cinnamon
Make this easy, no-knead cranberry walnut bread for a tender, slightly sweet artisan loaf perfect for holiday breakfasts or brunch. This recipe delivers big flavor with minimal effort.
- Prep Time: 15 min
- Cook Time: 45 min
- Total Time: 13 hours 45 min
- Yield: 1 loaf 1x
- Category: Breakfast
- Method: Baking
- Cuisine: American
- Diet: Vegetarian
Ingredients
- 1.5 cups room-temperature water
- 2 tablespoons honey
- 1 teaspoon active dry yeast
- 3 cups bread flour or all-purpose flour
- 1.5 teaspoons salt
- 1 teaspoon ground cinnamon
- 1 cup dried cranberries
- 1 cup chopped walnuts
- 1 tablespoon all-purpose flour (for dusting)
Instructions
- In a large bowl, mix the water, honey, and yeast. Let it stand for 5 minutes until slightly foamy.
- Add the flour, salt, and cinnamon to the yeast mixture. Stir with a wooden spoon until a shaggy dough forms. Do not knead.
- Cover the bowl tightly with plastic wrap and let the dough rest at room temperature for 12 to 18 hours. The dough will become bubbly and increase in volume.
- After the long rest, gently fold the dough onto a lightly floured surface. Sprinkle the cranberries and walnuts over the dough. Gently fold the dough over itself a few times to incorporate the fruit and nuts without overmixing.
- Shape the dough into a rough ball. Place the dough ball onto a piece of parchment paper.
- Cover the dough loosely with plastic wrap or a clean kitchen towel and let it rest for a second proof for 30 minutes.
- About 20 minutes before the second proof ends, place a Dutch oven (with the lid on) into your oven and preheat the oven to 450°F (232°C).
- Carefully remove the hot Dutch oven from the oven. Use the parchment paper to lower the dough into the hot pot. Score the top of the loaf with a sharp knife if desired.
- Cover the Dutch oven and bake for 30 minutes.
- Remove the lid and continue baking for another 10 to 15 minutes, until the crust is deep golden brown.
- Carefully remove the bread from the Dutch oven and let it cool completely on a wire rack before slicing.
Notes
- To achieve a rustic, crisp crust, baking in a preheated Dutch oven is essential.
- For a Costco bread copycat flavor, lightly brush the top of the loaf with melted butter immediately after removing it from the oven.
- If you prefer a sweeter loaf, substitute 1 tablespoon of the honey with 1 tablespoon of maple syrup.
Nutrition
- Serving Size: 1 slice
- Calories: 280
- Sugar: 10g
- Sodium: 350mg
- Fat: 8g
- Saturated Fat: 1g
- Unsaturated Fat: 7g
- Trans Fat: 0g
- Carbohydrates: 48g
- Fiber: 2g
- Protein: 7g
- Cholesterol: 0mg