
When that first cool day hits, you know exactly what you’re craving—that bakery-style magic loaded with apples and cinnamon. Forget those pale, soggy versions you sometimes find! My goal with this recipe for the ultimate classic deep-fried apple fritter is simple: max flavor, minimal fuss. After years of optimizing comfort food in my Chicago kitchen, I cracked the code for that perfect bite—an unbelievably crisp exterior that shatters just right, giving way to a pillowy, tender center bursting with fruit. This isn’t just a recipe; it’s my streamlined approach to achieving the best apple fritter you’ve ever made at home, trust me on this.
- Why This Classic Deep-Fried apple fritter Recipe Works (The Dishicious Method)
- Ingredients for Ultimate apple fritter Batter and Glaze
- Step-by-Step Instructions for Perfect apple fritter Dough
- Frying Technique for Crispy apple fritters Every Time
- The Simple Vanilla Glaze for your apple fritter with glaze
- Tips for Success Making Soft apple fritters
- Alternative Cooking Methods for apple fritters
- Storage and Reheating Homemade apple fritters
- Frequently Asked Questions about apple fritters
Why This Classic Deep-Fried apple fritter Recipe Works (The Dishicious Method)
Look, I approach cooking like project management. When I tested batch after batch to nail this best apple fritter recipe, I focused on the variables that mattered most. We aren’t relying on luck; we are relying on tested science to get you those incredible old fashioned apple fritters. The structure has to be solid enough to hold the apples but light enough to cook through evenly. The secrets aren’t hidden; they are in the details of temperature and mixing.
If you follow these steps exactly, you skip the greasy outcome and land straight in the zone of perfectly crisp and soft. Unlike some complicated bakery methods, this setup gets you amazing results without needing any special equipment other than a candy thermometer.
Achieving Crispy apple fritters Texture: Oil Temperature is Key
This is non-negotiable, folks. You absolutely must keep that oil locked in at 350 degrees Fahrenheit (175 Celsius). I stress this because if the temperature dips even 20 degrees too low, you end up frying your apples in oily batter instead of cooking them quickly. Slow cooking = oil absorption = soggy, greasy failures. Too hot, and the outside burns before the inside cooks. That 350°F sweet spot is where the magic happens, creating that instantaneous crust.
If you want to see how I apply that same streamlined approach to fall baking, check out my guide on the easy pear crisp. It’s all about efficiency!
Ingredients for Ultimate apple fritter Batter and Glaze
When you’re aiming for the homemade apple fritters that taste just like they rolled out of an old-fashioned bakery, you can’t skimp on the core components. I’ve broken this down into three simple groups. Stick to these measurements, and you’re already halfway to success. Remember, we’re keeping things simple here; no weird pantry trips required!
For the Apple Fritter Batter:
- 2 cups all-purpose flour
- 1/4 cup granulated sugar
- 2 teaspoons baking powder
- 1 teaspoon ground cinnamon (this is essential for that warm spice!)
- 1/2 teaspoon salt
- 2 large eggs
- 1 cup milk
- 1 teaspoon vanilla extract
- 2 cups peeled, cored, and finely diced apples (about 2 medium apples)
For Frying:
- Vegetable oil, for deep frying (you’ll need about 2 inches deep in your pot)
For the Perfect Vanilla Glaze:
- 1 1/2 cups powdered sugar
- 3 tablespoons milk
- 1/2 teaspoon vanilla extract
Ingredient Notes and Substitutions for your apple fritter
Okay, let’s talk apples. I always use Granny Smith or Honeycrisp. You need a tart apple that keeps its shape when it hits that hot oil; soft, mushy apples just vanish into the batter. Don’t use the bagged pre-sliced stuff—we need the apples finely diced so they cook perfectly alongside the dough. If you like a slightly tangier fritter dough recipe, you can swap the regular milk for buttermilk. It adds great tenderness!
And that vanilla extract in the batter and glaze? Use the real stuff if you can swing it. It makes such a huge difference compared to imitation flavoring, especially since we rely on so few steps for the overall flavor profile of these cinnamon apple fritters.
Step-by-Step Instructions for Perfect apple fritter Dough
This is where we build the structure for our ultimate apple fritter. Because these are fried, the biggest mistake people make when mixing the fritter dough recipe is going too aggressive with the mixer. We want tender, not tough! Start by taking your dry ingredients—flour, sugar, baking powder, cinnamon, and salt—and whisking them together really well in a large bowl. You need that leavening agent distributed evenly.
Next, lightly whisk the wet ingredients separately: the eggs, milk, and that teaspoon of vanilla. Pour the wet mixture into the dry ingredients all at once. Now, listen closely: mix just until they combine. I mean it! If you see a few streaks of dry flour still hanging around, stop mixing. Overworking the gluten turns these treats dense and heavy, and we are strictly aiming for light and fluffy inside.
Preparing the Apples for the apple fritter Batter
The way you prep your apples directly impacts the final texture, so don’t rush this part. You need them peeled, cored, and finely diced. When I say finely diced, I mean small cubes, smaller than a pinky nail if possible. Why so small? Because the batter cooks really fast in the hot oil. If your apple chunks are too big, the outside will be perfectly golden brown, but you’ll bite into a hard, undercooked chunk of raw apple in the middle.
Once diced, gently fold those little fruit pieces right into your batter. Take care when folding them in; we are preserving all those precious air bubbles we just worked so hard to keep by *not* overmixing the dough!
Frying Technique for Crispy apple fritters Every Time
This is where we earn that crispy crust we talked about. Getting the technique right elevates these from just okay to truly spectacular homemade treats. Remember, maintaining the oil temperature is the main project here—it’s the number one barrier between you and greasy, sad fritters. We are aiming for that perfect 350 degrees Fahrenheit (175 Celsius). I use a deep, heavy-bottomed Dutch oven because it holds heat so reliably.
Make sure you have about two inches of vegetable oil in there to start. When you drop the batter, use a pair of heaping tablespoons. Don’t try to make them perfect little donuts; the rustic, irregular shape is part of what makes a fantastic apple fritter! Drop them gently, one by one, and listen for that happy, loud sizzle. If it’s quiet, your oil is too cold, and you need to crank the heat up a bit before adding more.
Don’t overcrowd the pot! This is my biggest operational failure point when I get excited. Frying only 3 or 4 at a time keeps the oil temp stable. We want them deeply golden brown on each side, which takes about 2 to 3 minutes per turn. This quick fry ensures the outside gets that beautiful glazed fried dough exterior while the inside stays moist.

Draining and Cooling the apple fritters
Once they are perfectly golden, use your slotted spoon or a spider strainer to get them out immediately. Don’t set them directly on paper towels on a plate; that traps steam underneath, and steam kills crispness! You need them on a wire rack set over a baking sheet lined with a sheet of paper towels underneath the rack. This allows air to circulate all around the fritter, letting the excess oil drip away cleanly and keeping that bottom side from going soggy.
We don’t want them piping hot for glazing, but they should still be quite warm when you dip them. A warm fritter sucks up just the right amount of glaze without the glaze immediately melting and running off completely. This is the perfect transition moment before serving your amazing apple fritters!
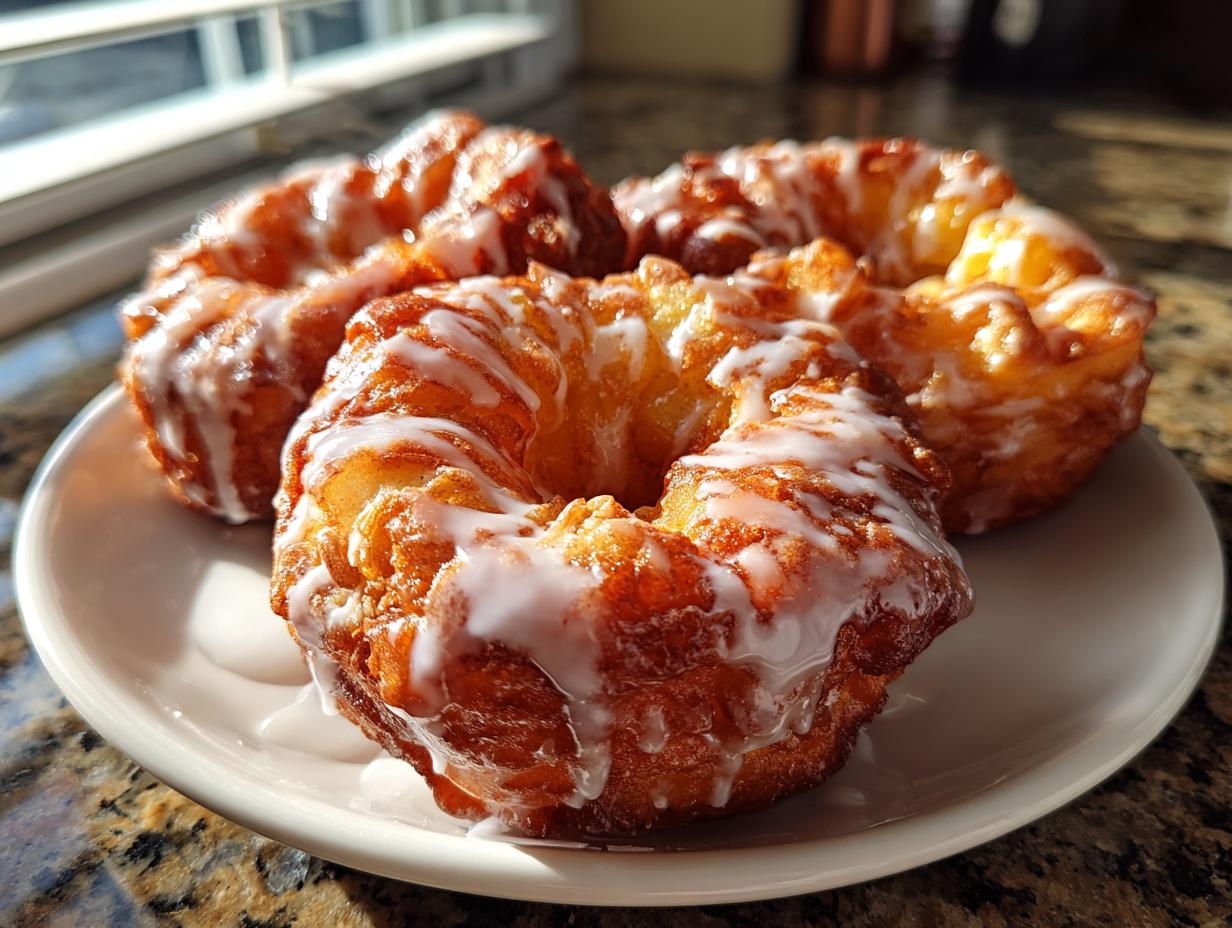
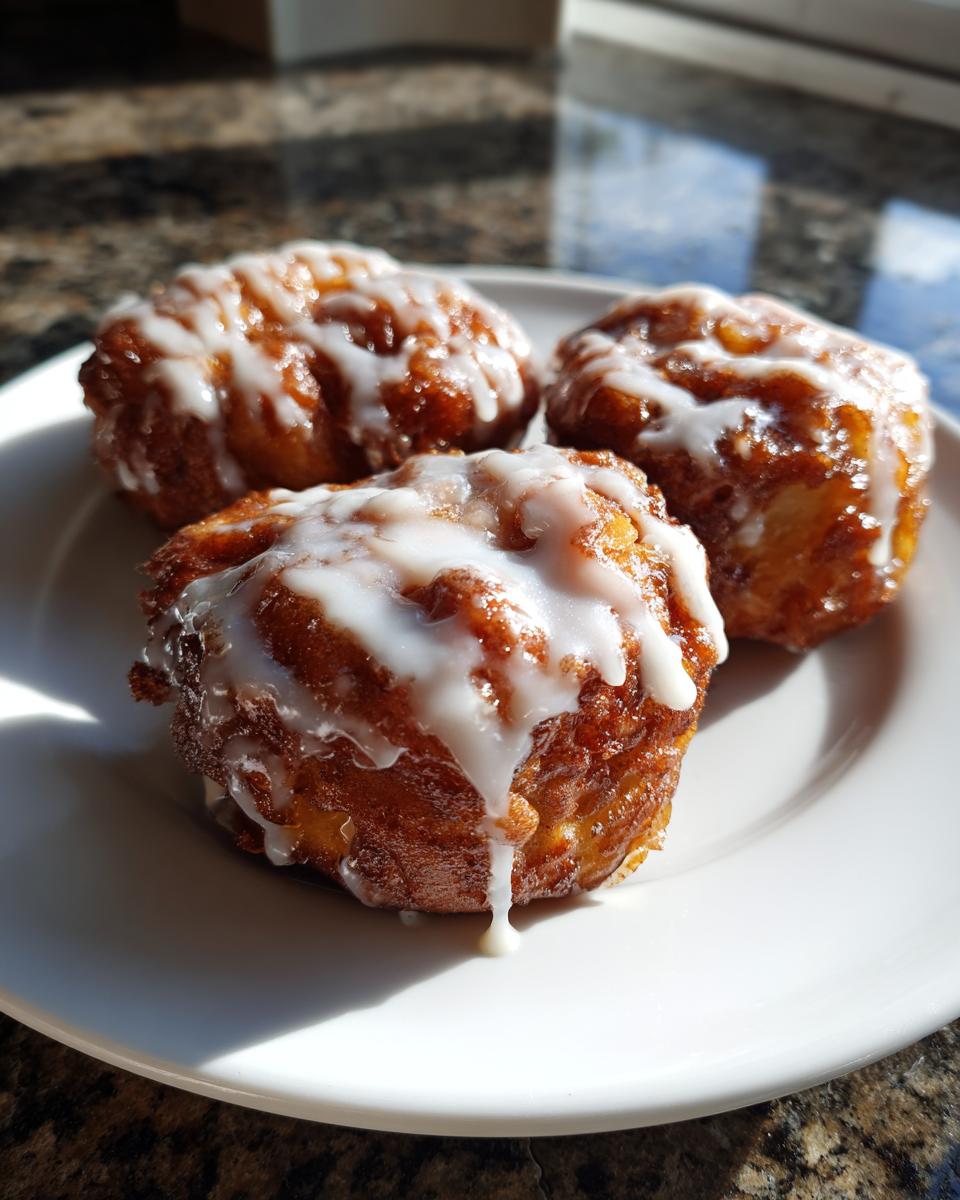
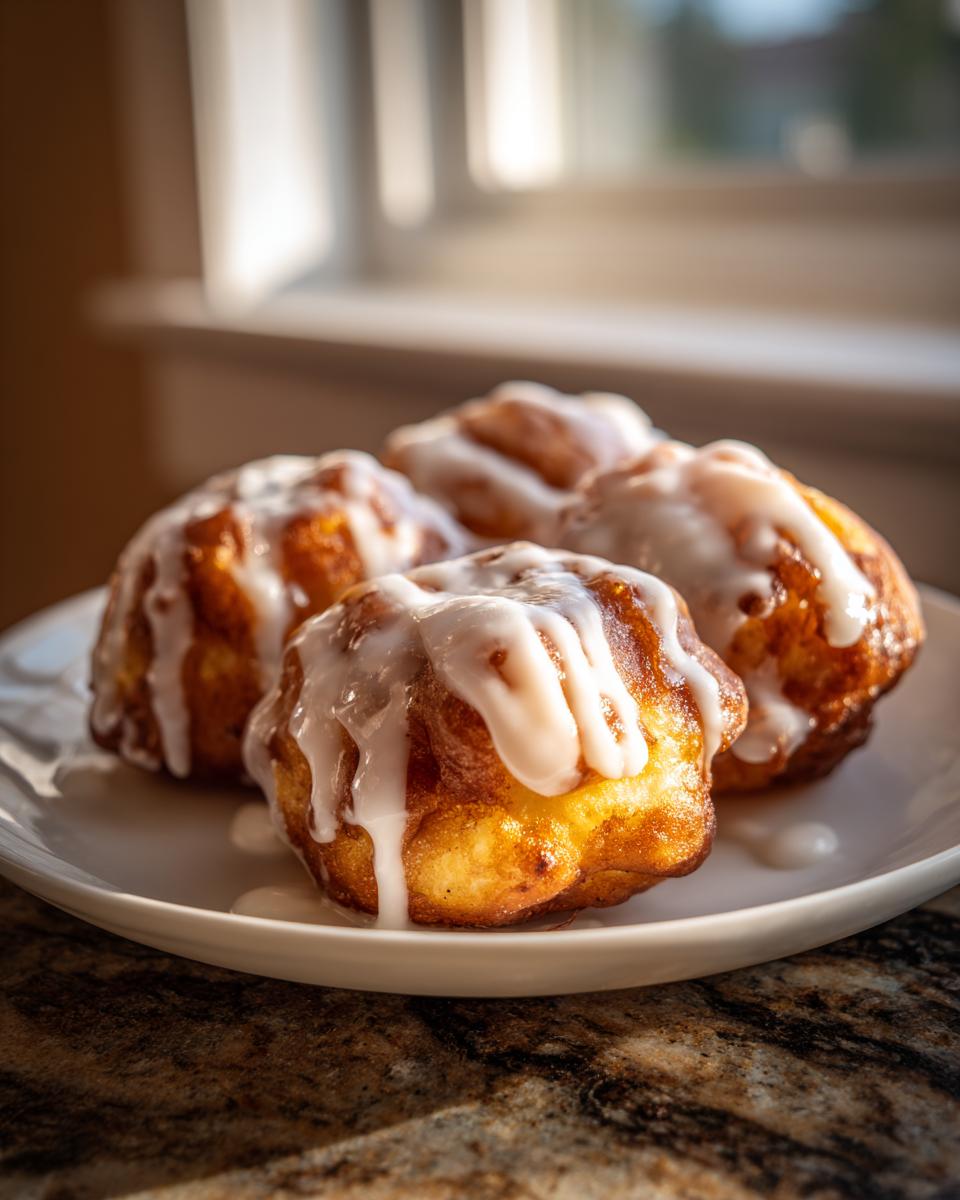
The Simple Vanilla Glaze for your apple fritter with glaze
You can’t have a truly classic, old-fashioned treat without that signature sweet drizzle, right? This vanilla glaze is ridiculously easy—it’s three ingredients and done in about two minutes. It’s the final layer that locks in that bakery-fresh appeal on your apple fritter with glaze. It sets up nicely but stays soft enough to bite through easily.
In a small bowl, combine the powdered sugar, the vanilla extract, and 3 tablespoons of milk. Whisk it vigorously until it is completely smooth. This should look quite thick at first, almost like frosting. That’s okay! The goal is a thick, slow-moving glaze that coats the fritter nicely, rather than thin syrup that just runs off.
If your glaze looks too stiff, add milk in tiny half-teaspoon increments until you reach the perfect pouring consistency. I like it thick enough that when I lift the whisk, the glaze falls in a ribbon that slowly disappears back into the bowl, rather than immediately vanishing. This is the consistency that gives you those lovely, opaque white streaks when you drizzle it over the warm fritters.
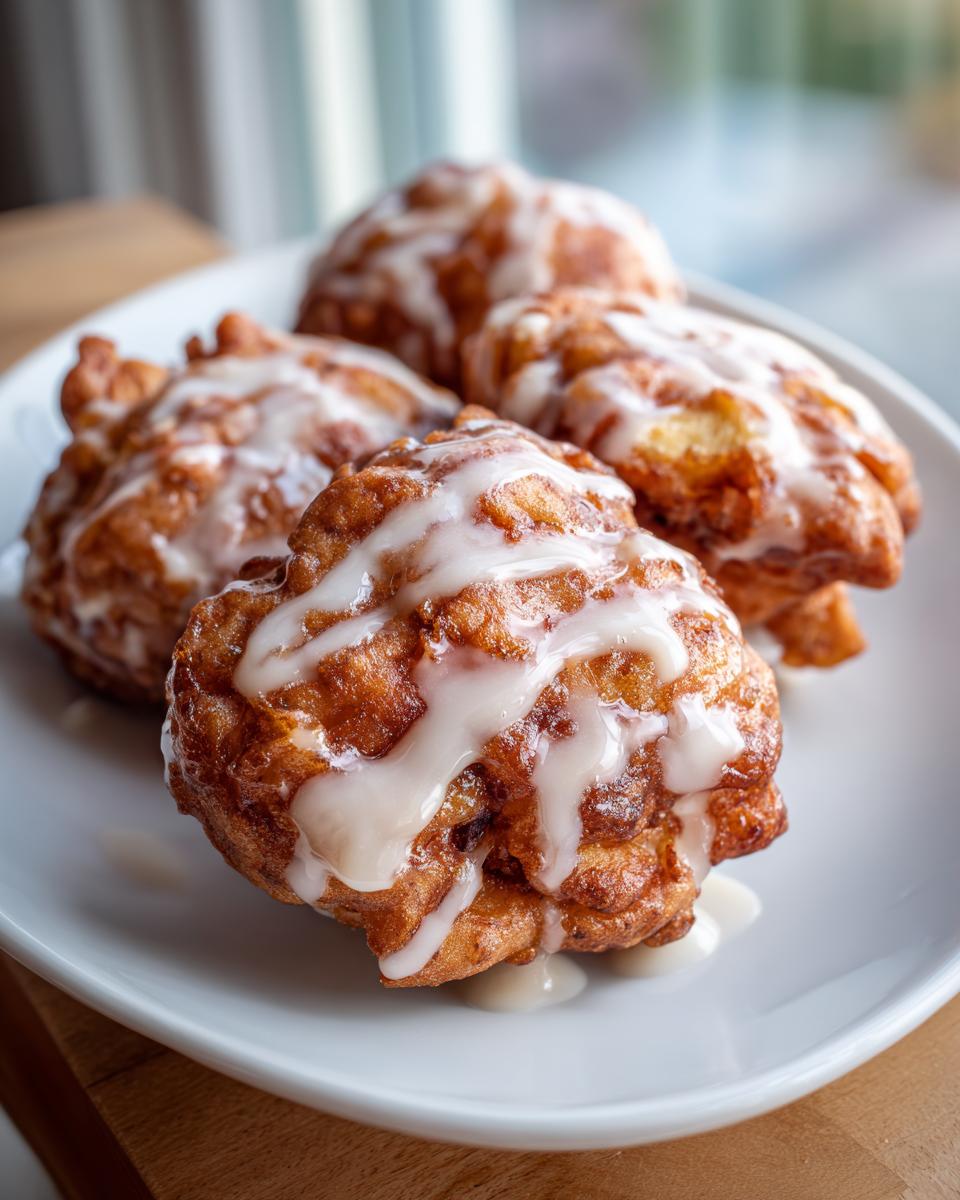
Now for application: you can dip the top half of the warm fritter right into the bowl (that’s my favorite, messy method!), or use a fork and drizzle artfully across the batch sitting on the wire rack. Dipping gives you a full, satisfying glaze layer, while drizzling looks a little more elegant. Either way, they disappear fast! If you’re looking for other ways to use top-tier vanilla, check out my recipe for vanilla buttercream—it uses the same high-quality vanilla for amazing flavor.
Tips for Success Making Soft apple fritters
We’ve mastered the heat and the mixing, but if you really want that melt-in-your-mouth interior—the key to the soft apple fritters everyone dreams about—you need to pay attention to the ingredients before they even hit the bowl. This is where my process ensures reliability and great results. It might seem fussy, but trusting the science I’ve tested means you don’t have to stress later.
First up, ingredient temperature. I know we live busy lives, but setting out your eggs and milk about 30 minutes before you start making the batter makes a huge difference. Room-temperature ingredients emulsify much better when they hit the creamed fats and sugars. This creates a batter that binds beautifully without needing extended mixing time. Remember, less mixing equals a lighter, softer result! It’s the same principle I use when I need that perfect texture in my ultimate soft chewy oatmeal cookies.
Now, let’s talk about the stars of the show: those diced apples. Even though we cut them finely, sometimes those diced bits—especially if using a slightly sweeter apple—want to sink right to the bottom of that bowl while you mix the final batter. If you notice your apples congregating at the bottom, don’t just stir them aggressively! That will activate the gluten we worked so hard to keep sleeping. Instead, gently lift the batter from the bottom of the bowl and fold it *over* the apples three or four times to redistribute them evenly. You want them suspended throughout the batter when you drop it in the oil.
If you want a fantastic deep-dive into other ways to achieve softness in a similar recipe, check out this great resource on soft cinnamon apple fritters. It’s always good to see how others approach flavor combinations!
Alternative Cooking Methods for apple fritters
I totally get it. Deep frying is traditional, and honestly, it gives that undisputed crispy-meets-tender texture we love in these apple fritters. But sometimes, you need to skip the oil, especially on a busy Tuesday morning. Since my goal is always to simplify your access to great food, I’ve tested out the modern routes, too. While the frying method in the main recipe is what delivers that authentic, rustic look, you can absolutely adapt the base batter for baking or air frying.
For baking, you’re going to treat the batter a bit differently. It needs to be thicker, and you definitely won’t get that deep golden hue or the same crunch. If you want the full details on the adjustments needed for baked apple fritters, I’d point you toward a dedicated guide, like the one on Baked Apple Fritters. Generally, you’ll bake them on a lined sheet pan around 375°F until they are golden brown on top.
The air fryer is fantastic for getting a close resemblance to the fried texture without submerging anything in oil. For the air fryer route, you often need slightly less liquid in the batter just so the smaller portions hold their shape better in the basket. I’ve found that spraying the tops generously with oil spray before cooking helps them crisp up nicely. It’s a great way to make easy apple fritters for a lighter dessert.
Making Quick & Easy apple fritters for Breakfast Pastries
Here’s the beauty of the deep-fried version we just made: the total time is only about 35 minutes! That’s faster than picking them up from the drive-thru, honestly. Because the process is so streamlined—we mix dries, mix wets, combine, drop—it makes this recipe a legitimately easy way to elevate your weekend brunch or even a special weekday morning. These taste incredible fresh, making them some of the best breakfast pastries you can whip up quickly.
If you need help sticking to quick timelines, I’ve written guides on streamlining proteins that might help you manage your week, like my method for juicy baked chicken breast. It’s all about efficiency in the kitchen!
Storage and Reheating Homemade apple fritters
So, you made too many glorious, golden homemade apple fritters? Congrats! But they are definitely at their peak right after the glaze sets, when they have that perfect crunch. Fried dough really suffers when it sits overnight, so my advice is always: if you can eat them all today, do it!
However, we understand life happens. If you have leftovers, you need a strategy that preserves that beautiful texture. Do NOT store them in the refrigerator. Humidity is the enemy of crispness, and the fridge will just turn them soft and chewy in the worst way—we want the *good* kind of chewy, which is inside the fresh ones only!
Store them loosely covered in an airtight container on the counter at room temperature for up to two days, separated by layers of paper towels if you have many. The paper towels help control any lingering moisture.
Now, for reheating, we are going to execute a tiny culinary revival project to bring back that golden exterior. The microwave is a hard pass; it just steams the fritter and turns it into dense cake. Instead, you have two much better options.
Restoring Crispness in the Oven or Air Fryer
The oven or air fryer acts like a little crispness sauna. For the best results, use the air fryer if you have one. Set your air fryer to about 350°F and pop the fritters in for just 3 to 4 minutes. Seriously, watch them—they heat up fast! This simple process evaporates the surface moisture and firms up the crust again, making them feel almost freshly fried.
If you’re using a conventional oven, preheat it slightly lower, around 325°F. Place the fritters directly on the oven rack (not on a baking sheet, as that traps steam). Let them sit for about 5 to 7 minutes. You are just warming them through and bringing that crunch back. They will taste surprisingly close to the original batch!
This revival technique works great even if you are cooling down leftovers from making a big batch of homemade bread! It’s all about reversing the moisture effects. Let me know if you try it—it saves so much waste!
Frequently Asked Questions about apple fritters
It happens every time I post one of these deeply satisfying recipes—the DMs and comments light up with great questions! I love hearing what you all are up to in your kitchens. Addressing these key points ensures that when you tackle this recipe for cinnamon apple fritters, you eliminate any guesswork. Here are the things I get asked most often.
What apples are best for apple fritters?
This question is huge! You absolutely must prioritize texture over sweetness here. I constantly preach using firm, tart apples that can stand up to that intense 350-degree oil without disintegrating into applesauce. My favorites remain Granny Smith, as that tartness cuts through the sweetness of the dough and glaze perfectly. Honeycrisp is a close second because it’s very firm. If you use a softer apple, like McIntosh, they kind of disappear into the batter, and you lose that wonderful textural contrast that makes the apple fritter so iconic.
Can I use different spices than cinnamon in my apple fritter?
While I standardized this recipe around cinnamon because it’s the champion of warm spices, feel free to experiment! If you want a deeper, more complex fall flavor profile, try swapping out about half a teaspoon of the cinnamon for a quarter teaspoon of allspice or a healthy pinch of freshly grated nutmeg. A little ground ginger plays really nicely with the apples too. These spices really amplify that cozy feeling, turning your breakfast treat into a proper warm apple dessert.
If you’re looking for more simple meal ideas that use those same warm flavor profiles without frying, you should check out my recipe for the easy creamy chicken tortilla soup—sometimes you need that warmth in a savory dish!
And since you asked about skipping the glaze in other comments I’ve seen: yes, you can skip the glaze! If you do, I suggest tossing the warm fritters in a mix of cinnamon and granulated sugar instead, which gives you a nice subtle coating without the full commitment of the icing.
PrintThe Ultimate Classic Deep-Fried Apple Fritters with Perfect Vanilla Glaze

Make these old-fashioned apple fritters that achieve a crispy outside and a soft, tender inside. This recipe uses simple pantry ingredients and features a sweet vanilla glaze for a classic fall dessert or breakfast treat.
- Prep Time: 15 min
- Cook Time: 20 min
- Total Time: 35 min
- Yield: 12 large fritters 1x
- Category: Dessert
- Method: Deep Frying
- Cuisine: American
- Diet: Vegetarian
Ingredients
- 2 cups all-purpose flour
- 1/4 cup granulated sugar
- 2 teaspoons baking powder
- 1 teaspoon ground cinnamon
- 1/2 teaspoon salt
- 2 large eggs
- 1 cup milk
- 1 teaspoon vanilla extract
- 2 cups peeled, cored, and finely diced apples (about 2 medium apples)
- Vegetable oil, for deep frying
- For the Glaze: 1 1/2 cups powdered sugar
- For the Glaze: 3 tablespoons milk
- For the Glaze: 1/2 teaspoon vanilla extract
Instructions
- In a large bowl, whisk together the flour, granulated sugar, baking powder, cinnamon, and salt. This is your dry base.
- In a separate medium bowl, whisk the eggs, milk, and vanilla extract until combined.
- Pour the wet ingredients into the dry ingredients. Mix gently until just combined. Do not overmix; a few lumps are fine.
- Fold in the diced apples until they are evenly distributed throughout the batter.
- Prepare your frying station. Pour vegetable oil into a deep, heavy-bottomed pot or Dutch oven to a depth of about 2 inches. Heat the oil over medium-high heat until it reaches 350 degrees Fahrenheit (175 degrees Celsius). Use a thermometer to monitor the temperature.
- Carefully drop heaping tablespoons of batter into the hot oil, ensuring you do not overcrowd the pot. Fry about 3 to 4 fritters at a time.
- Fry for 2 to 3 minutes per side, turning once, until the fritters are deep golden brown and cooked through.
- Use a slotted spoon or spider to remove the fritters from the oil. Place them on a wire rack set over a baking sheet lined with paper towels to drain excess oil.
- While the fritters cool slightly, prepare the glaze. In a small bowl, whisk together the powdered sugar, milk, and vanilla extract until smooth. Adjust milk for desired consistency.
- Dip or drizzle the warm apple fritters generously with the vanilla glaze. Let the glaze set before serving.
Notes
- For the best texture, ensure your oil temperature stays near 350 degrees Fahrenheit. If the oil is too cool, the fritters absorb too much oil and become greasy.
- Use crisp apples like Granny Smith or Honeycrisp for the best flavor contrast against the sweet dough.
- If you prefer a lighter glaze, reduce the milk in the glaze mixture slightly.
Nutrition
- Serving Size: 1 fritter
- Calories: 320
- Sugar: 25g
- Sodium: 250mg
- Fat: 18g
- Saturated Fat: 4g
- Unsaturated Fat: 14g
- Trans Fat: 0g
- Carbohydrates: 38g
- Fiber: 1g
- Protein: 4g
- Cholesterol: 55mg