
We’ve all stood in line, staring at that glass case, knowing exactly which brightly colored, perfectly round treat we want. That famous starbucks cake pop might seem like a mystery—a perfectly sealed little orb of joy—but I promise you, it’s not some secret culinary magic. As the founder of Dishicious, I approach recipes like a project manager: we need efficiency, clarity, and maximum flavor payoff for the least amount of stress. That means we’re ditching the complex bakery techniques and getting straight to making the ultimate copycat Birthday Cake Pop right here in your kitchen. If you want other streamlined favorites, check out my easy sugar cookie bars recipe!
This guide cuts through the noise. We’re focusing only on the steps that count to give you a moist, dense base covered in that shatteringly smooth vanilla shell. If you’re ready to streamline your dessert production and achieve bakery perfection without leaving home, you’re in the absolute right place. No guesswork, just delicious results.
- Why This Copycat starbucks cake pop Recipe Works (The Dishicious Method)
- Gathering Your starbucks cake pop Ingredients
- How to Prepare the Cake Base for Your starbucks cake pop
- Mastering the Best Cake Pop Coating Technique
- Decorating Your starbucks cake pop and Finalizing Presentation
- Storage and Serving Suggestions for Your starbucks style dessert copycat
- Troubleshooting Common starbucks cake pop Issues
- Frequently Asked Questions About Making starbucks cake pop
- Nutritional Snapshot for Your Homemade starbucks cake pop
Why This Copycat starbucks cake pop Recipe Works (The Dishicious Method)
When you map out a project, you look for the non-negotiable steps that guarantee success. For these copycat starbucks cake pop treats, it all comes down to structure and coating. We’re not dealing with complicated baking here; we’re streamlining an easy cake ball recipe into a foolproof method. You’ll get exactly the texture you love—moist cake mixed with creamy binder—without any hassle.
- This method guarantees you get those moist cake pop ingredients every single time.
- It’s designed to be efficient, minimizing cooling and setting times wherever possible.
- The coating technique is optimized for a smooth, crack-free finish, just like the pros use.
If you enjoyed streamlining processes here, you should definitely check out my guide for easy no-bake peanut butter bars!
Achieving the Perfect Moist Cake Pop Ingredients
Here’s the first critical efficiency hack. When you mix up that yellow cake, don’t just dump in the required water or milk listed on the box. We slightly reduce the liquid component. Trust me on this engineering trick; using just a little bit less liquid creates a dramatically denser cake structure when baked. That density is what prevents your starbucks cake pop base from crumbling when you roll it or cracking when you dip it later. It’s a small change that solves a major baking headache!
Simple Cake Pop Tutorial for Beginners
Look, if you’ve never made homemade chocolate coated treats before, don’t sweat it. I designed this whole process to be a simple cake pop tutorial. We use readily available ingredients, and the steps are broken down so clearly you can follow them even while watching TV. We’re focusing on the two major points where things usually go wrong—the base consistency and the coating temperature—and we nail those first. You’ve got this, I promise!
Gathering Your starbucks cake pop Ingredients
Before we start optimizing the process, we need to stage our supplies. Approach this like setting up your project workspace—get everything measured and in bowls ready to go. This speeds up the whole assembly line later on, which is key when you’re aiming for that starbucks cake pop perfection everyone craves. We’re keeping this ingredient list tight and effective, using accessible items so you don’t have to hunt down specialist grocery items!
Here is exactly what you need on hand for about two dozen delicious pops. If you’re looking for something lighter to serve alongside these rich treats, you should definitely check out my guide to making fruit dip!
- One box (15.25 oz) yellow cake mix.
- The eggs, oil, and whatever liquid your cake mix box calls for—but remember our trick: use slightly less liquid than recommended!
- About a half cup of vanilla frosting. Seriously, grab the store-bought tub; it’s perfect for binding these crumbs.
- One full bag (around 12 oz) of white candy melts. These give us that classic bright vanilla coating.
- One little teaspoon of vegetable shortening. This is optional, but trust me, it’s the secret weapon for getting that super glossy finish.
- A good handful of rainbow sprinkles—gotta have them for that iconic look!
- Your cake pop sticks, of course.
That’s the core list! Simple, right? Everything is ready to go for the next phase of production.
How to Prepare the Cake Base for Your starbucks cake pop
Okay, we’ve got our slightly dense yellow cake batter ready to go into the oven. Remember that trick where we used less liquid? That’s already setting us up for success in this foundational step of our easy cake ball recipe. Bake that cake according to the box instructions, but once it’s done, the temptation to rush is huge. You must resist! The cake has to be completely, totally cool. I mean room temperature, maybe even slightly chilled from the fridge—otherwise, you end up with a hot, sticky mess when you try to crumble it.
Once cool, get that cake out of the pan and into a big mixing bowl. We need fine crumbs, so really break it down. Any dried-out edges? Toss them. We only want the soft, interior part. If you’re looking for another simple baked treat utilizing cake mix, you have to try my strawberry cake mix cookies recipe next!
Mixing Cake Crumbs and Frosting
This is the binding stage, and it’s best done using your hands—don’t rely on a mixer! Add that half cup of vanilla frosting directly into your crumbs. Now, mix it. Really get in there and work it together. You’re not just tossing it; you’re kneading it until there are no dry spots left. The goal is to achieve the consistency of a proper, moldable dough, almost like Play-Doh. When you press a handful together, it needs to hold its shape perfectly without crumbling apart. That’s your magic texture right there.
Chilling: Essential for Perfect starbucks cake pop Balls
Now that we have our perfect dough, we roll! Keep the balls uniform, maybe 1 to 1.5 inches, and line them up on parchment paper. Before you even think about dipping these into chocolate later, they need a mandatory rest. Pop the tray into the refrigerator for at least 30 minutes. This chilling isn’t just a suggestion; it’s the engineering step that prevents catastrophic failures! If the cake ball is warm or room temperature when it hits the hot melted coating, the center heats up too fast, causing steam bubbles or, worse, the ball cracks wide open in the coating. Chilling locks in that density so these starbucks cake pop spheres stay solid and stable. Don’t skip this part!
Mastering the Best Cake Pop Coating Technique
This is where we transform our simple cake balls into stunning Starbucks style dessert copycat treats! The coating is the star here, right? If the coating is lumpy or cracks later, the whole project feels a bit deflated. My goal is always that incredibly smooth, flawless shell you see in the stores, which requires a little patience with the microwave and the right use of stabilizers. We are delivering the absolute best tips for achieving perfectly smooth candy melts for cake pops right now.
If you need a fantastic vanilla base for other projects, check out my recipe for fluffy vanilla buttercream—it pairs well with so many other ideas!
Melting Candy Wafers for Homemade chocolate coated treats
You cannot rush this melting phase! Put your white candy melts into a microwave-safe bowl. We are going to use short bursts: 30 seconds on medium power. After 30 seconds, pull it out and stir it vigorously, even if it looks like nothing has happened. Do this repeatedly. Why? Because candy melts burn shockingly fast if you overheat them, turning thick and useless for creating beautiful homemade chocolate coated treats. If, after several stirs, it still seems too stiff—and only then—stir in that optional teaspoon of vegetable shortening. That little bit of fat ensures the melts flow like absolute silk around your chilled balls.
Securing the Cake Pop Sticks
You need the stick to be *anchored* firmly before dipping the whole ball, or the pop will just slide right off the stick into your bowl of melted coating—and nobody wants that disaster! Take your chilled cake ball and dip just the very tip of the cake pop stick about a quarter of an inch into the melted coating. Think of this as edible glue. Once the stick is anchored, place that entire pop back onto the parchment-lined tray and return it to the refrigerator for a quick 10 minutes. This minute of chilling solidifies that anchor point, ensuring rock-solid construction for the final dip!
Decorating Your starbucks cake pop and Finalizing Presentation
The grand finale! Once those cake balls come out of their second chill session, they are perfectly firm and ready for their beautiful vanilla coating. Hold the stick firmly—this is where you need confidence, especially aiming for that signature starbucks cake pop look. Submerge the entire ball into that perfectly melted, smooth coating. You want to work quickly but smoothly here.
As soon as the ball is fully coated, you need to let the excess drip off. Gently lift the pop out and hold it slightly above the bowl. Now, tap the stick against the edge of the bowl—not too hard, just a few gentle taps. You should see excess coating drip away, leaving you with a thin, even layer. This prevents thick, bumpy bottoms!
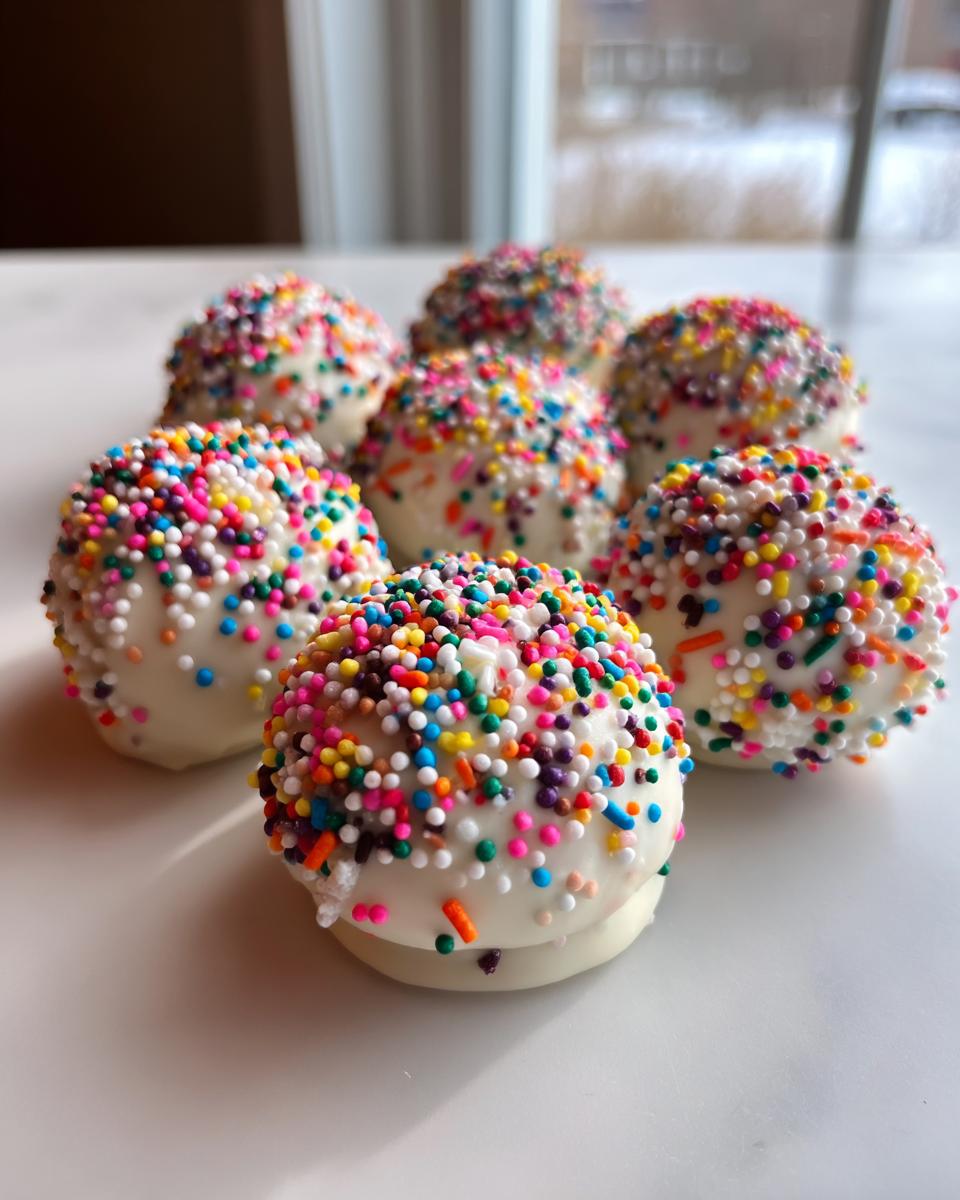
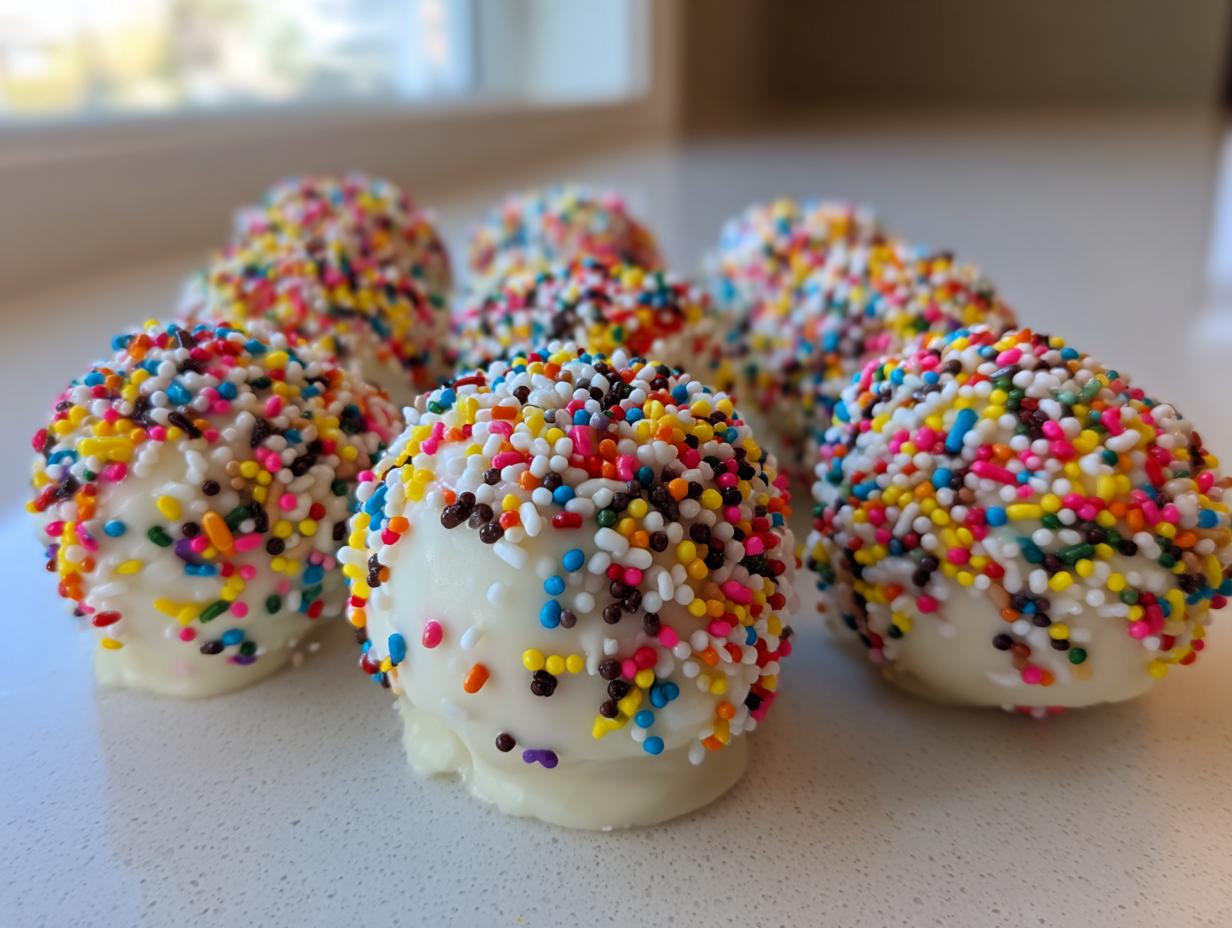
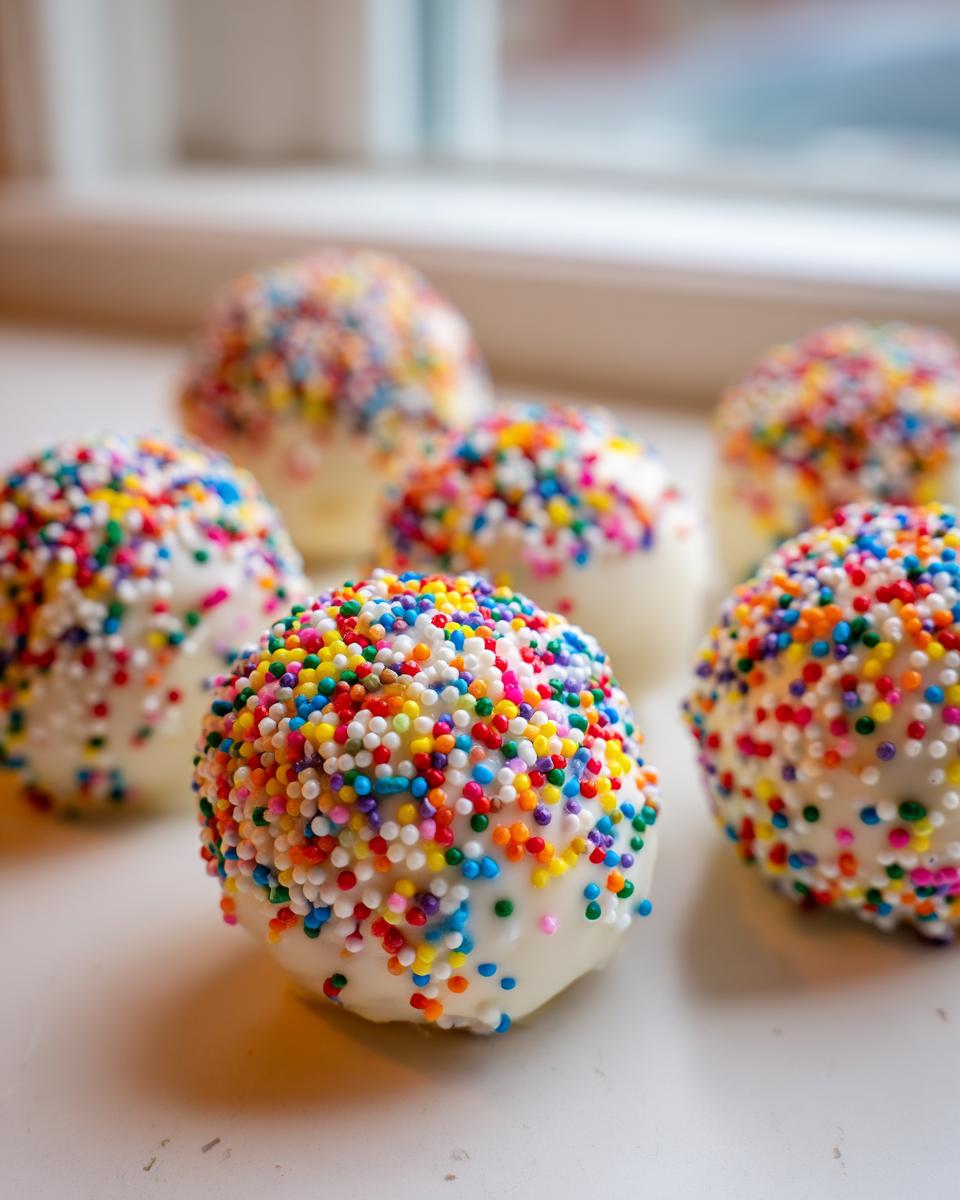
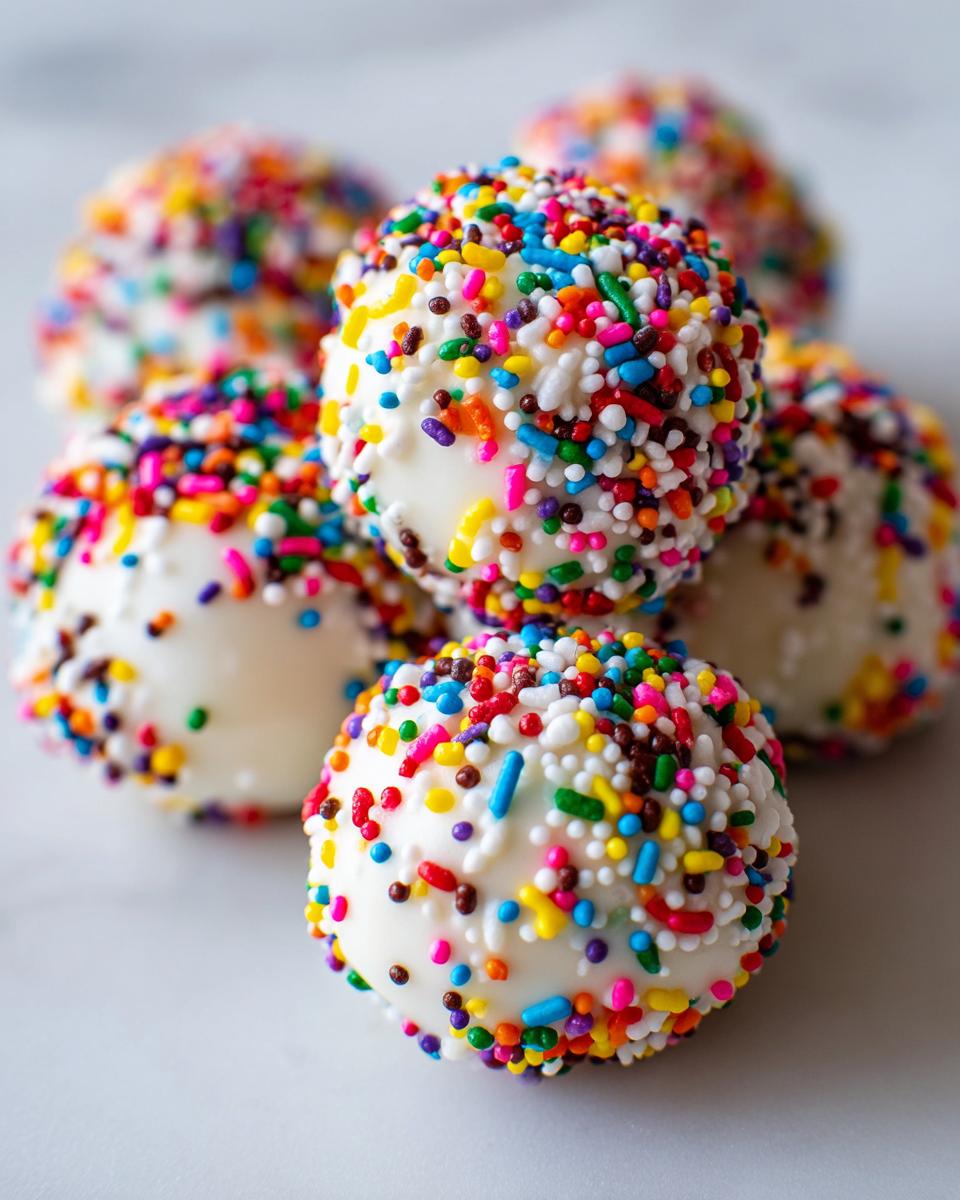
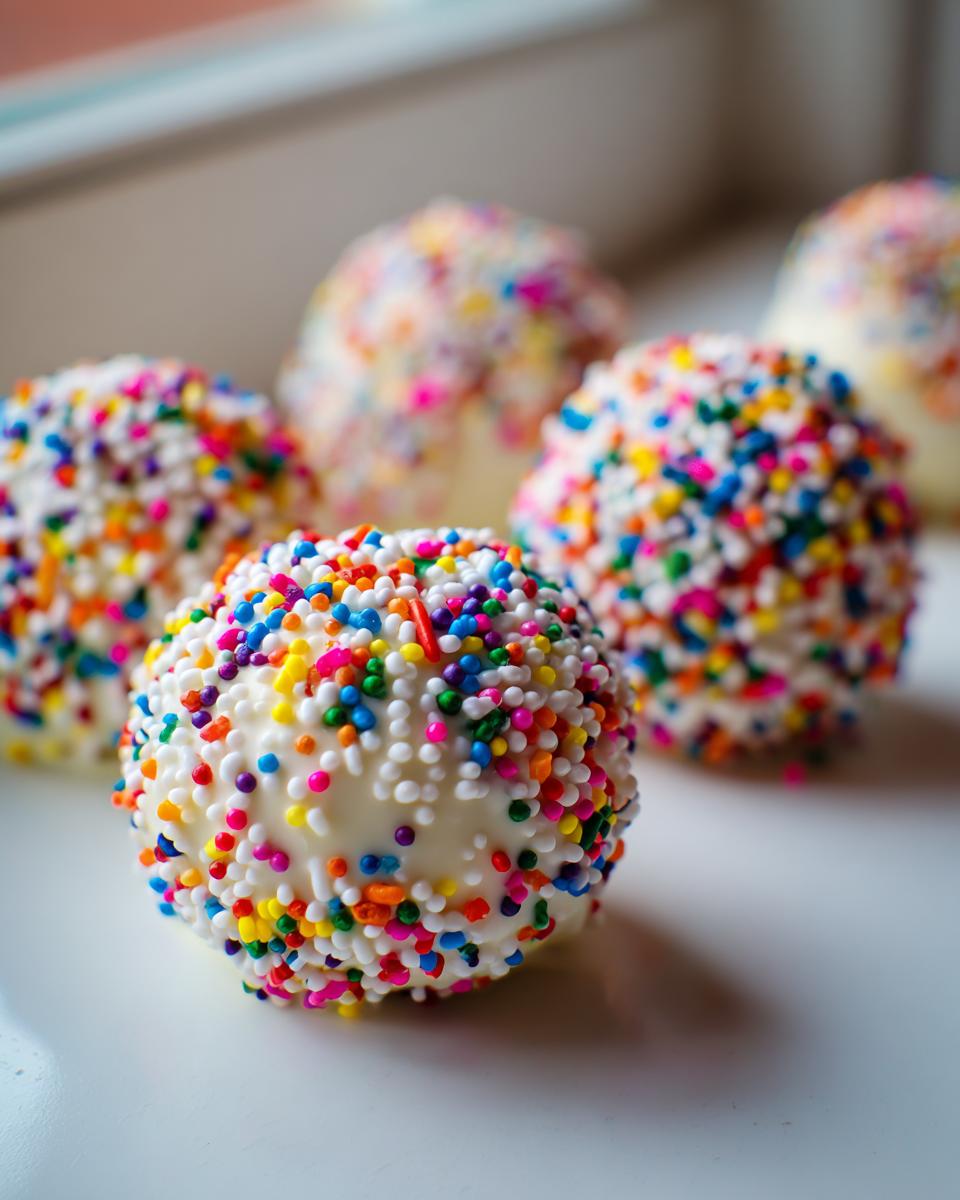
This next part is time-sensitive, so have your sprinkles ready! Because we want that iconic look, you must apply the rainbow sprinkles immediately while the coating is still wet. If you wait even 30 seconds, the coating will start to set up, and the sprinkles won’t stick properly. Don’t worry about fancy designs on the cake pop sticks decorating; for this copycat, we just want that fun, colorful explosion on the top half.
Once sprinkled, you need a safe spot for them to dry completely. Grab a block of styrofoam, or if you don’t have one, even a large piece of cardboard poked with holes works fine! Insert the sticks carefully and leave them standing upright. They need to dry undisturbed at room temperature until the shell is totally hard. If you’re looking for other fun, small treats for a party platter, check out my Christmas sprinkle cookies recipe. Getting all these visual details right is what elevates your homemade chocolate coated treats from amateur to award-winning!
Storage and Serving Suggestions for Your starbucks style dessert copycat
Once you’ve finished that satisfying dipping marathon and your pops are totally dry, the last project management step is handling inventory and presentation! Since these starbucks style dessert copycat treats are essentially dense cake mixed with frosting and coated in candy melts, they are pretty stable, but we still need a plan. I like to treat them like my other easy dessert recipes—keep them neat and tidy!
For short storage, meaning one or two days, leaving them out at cool room temperature in an airtight container is usually fine. If your kitchen is warm, or if you made them several days ahead of a party, I definitely recommend the fridge. Just make sure the container is sealed tight! If condensation forms when you take them out, that moisture can make the candy coating get sweaty and sticky, which ruins that perfect smooth finish we worked so hard for.
When serving, presentation really matters. Since these are individual servings, they make fantastic, fuss-free fun party dessert ideas. Use a nice, heavy styrofoam block covered in decorative foil, or even a tiered cupcake stand, to display them standing up. They look colorful and inviting that way. Because they’re so rich, people usually only eat one, making portion control simple! If you ever need some backup ideas for a larger dessert spread, check out my general guide for easy dessert recipes.
Honestly, the best serving suggestion is simply setting them out and watching people grab them immediately. They are quick, familiar, and perfectly portioned!
Troubleshooting Common starbucks cake pop Issues
Even with the best planning, sometimes a project hits a snag. That’s okay! As a project manager, I know that addressing failure points proactively is key to quality control. Don’t panic if your beautiful starbucks cake pop doesn’t look perfect immediately. Most issues boil down to temperature or mixture consistency, and they all have straightforward, optimized fixes. If you need a reliable icing recipe for another project, check out my guide on easy cookie icing that hardens!
Here are the three biggest curveballs and how we solve them efficiently.
Problem 1: The Coating Cracks After Setting
This is the most irritating failure, and it almost always means one thing: the cake ball wasn’t cold enough when it hit the melted coating. When a room-temperature cake ball hits warm candy melts, the rapid temperature change causes micro-fractures in the shell as the cake expands slightly during dipping. My solution is strict adherence to that second chill time. If you notice cracking even after chilling, your coating might also be cooling down too much while you work; keep your melted candy smooth by microwaving it in 10-second bursts periodically.
Problem 2: The Pop Slides Off the Stick
If your cake ball detaches from the stick while dipping or drying, it means the anchor (that initial dip we discussed) didn’t set properly. This happens if you neglect to chill the stick-inserted pop for those mandatory 10 minutes before the final dip. We created that little bit of solidified candy glue specifically to hold that weight! If this happens, gently remove the pop, re-dip the stick tip in melted coating, re-insert it firmly into the ball, and *immediately* return it to the fridge. Don’t rush it this time!
Problem 3: The Coating Is Gloppy or Too Thick
A dense coating makes dipping nearly impossible and leaves you with a lumpy, thick shell rather than that signature smooth Starbucks finish. If your melted candy is too thick, you need to thin it out slightly for optimal flow. Stir in just a tiny bit—say, a quarter teaspoon—of vegetable shortening or coconut oil. This breaks down the structure of the melts just enough to make them runnier without affecting the final set. Stir it in slowly, reheat for 15 seconds, and test the consistency. You want it thin enough to glide easily but thick enough that the first layer adheres nicely to the chilled cake.
Remember, every time something goes wrong, ask: Was temperature managed correctly? Was the chilling time sufficient? Solving these small mechanical issues is what keeps your dessert production running smoothly!
Frequently Asked Questions About Making starbucks cake pop
I know when you’re trying a new recipe, especially a tricky one like the starbucks cake pop, you end up with a million little questions popping into your head. That’s totally normal! I’ve streamlined this process as much as possible, but sometimes you just need confirmation on a detail. Think of this as the final review phase of our project—making sure every component is perfectly understood before we wrap up the production line. If you need more ideas for quick meals later this week, check out my guide for quick and easy dinners!
Can I use homemade frosting instead of store-bought for the cake ball recipe?
Absolutely, you can! Since we are aiming for a sweet, dense binder for our easy cake ball recipe, the consistency is way more important than where the frosting comes from. If you are using homemade frosting, just make sure it’s on the thicker side—almost like a very stiff buttercream. If your homemade frosting is too soft or runny, it will make your cake crumbs too wet, and you won’t get that perfect moldable dough we need. If it is a little soft, maybe chill the frosting for 15 minutes before mixing it with the crumbs!
What is the best way to store these easy individual desserts?
These are best when they are fresh, but they keep well, which is great for making ahead! For the best quality—that sharp snap on the coating and the soft interior—I recommend storing these easy individual desserts in an airtight container at cool room temperature for up to two days. If you need to keep them longer, the fridge works, but always let them sit out on the counter for about 15 to 20 minutes before serving. Pulling them straight from the fridge can make the coating dull and stiff. Honestly, they taste best within 72 hours of making them.
Can I make these without baking the cake first (no bake cake treats)?
This is a common query about these no bake cake treats, and the answer is a little nuanced. While the *final assembly*—mixing crumbs with frosting and dipping them in chocolate—is no-bake, the structure of a real starbucks cake pop relies on a baked cake base. You need the cake to bake, cool, and then crumble properly to form that dense, non-gooey ball that holds up to dipping. Trying to use something like crushed cookies or brownies usually results in a texture that absorbs the frosting too much or crumbles apart immediately. So, yes, the final steps are no-bake, but you must bake that cake first to get the right foundation!
Nutritional Snapshot for Your Homemade starbucks cake pop
Okay, so we’ve conquered the assembly and the coating, and now we look at the final project metrics. When you’re making these incredible starbucks cake pop treats at home, you actually have more control over what goes in than you do buying them pre-made! That’s a huge win for smarter eating, even with a sweet indulgence like this. Since we used a standard cake mix and candy melts, these numbers are highly reliable estimates for one single, perfectly round pop.
Just remember that these figures are based on the specific ingredients I used in this batch and the yield of about 24 pops. If you roll your balls bigger or use extra frosting, those numbers shift slightly. For more reliable information on fueling your day, check out my resources for easy breakfast and brunch ideas!
Here’s the breakdown for one single, glorious, homemade copycat starbucks cake pop:
- Serving Size: 1 pop
- Calories: Approximately 180
- Total Fat: Around 10 grams
- Carbohydrates: Roughly 22 grams
- Protein: About 2 grams
It’s important stuff to know, but honestly, when they taste this good, I look at them as a necessary part of a balanced dessert strategy! You know exactly what’s in them, and that control is the most valuable metric of all when you’re cooking smart.
PrintCopycat Starbucks Birthday Cake Pops: The Ultimate Homemade Recipe

Make the popular Starbucks Birthday Cake Pop at home using this straightforward recipe. You will create moist cake balls coated in smooth vanilla candy melts.
- Prep Time: 30 min
- Cook Time: 35 min
- Total Time: 95 min
- Yield: 24 pops 1x
- Category: Dessert
- Method: No Bake (after initial cake baking)
- Cuisine: American
- Diet: Vegetarian
Ingredients
- 1 box (15.25 oz) yellow cake mix
- Ingredients required by cake mix box (usually eggs, oil, water)
- 1/2 cup vanilla frosting (store-bought is fine)
- 1 bag (12 oz) white candy melts or vanilla flavored coating
- 1 teaspoon vegetable shortening (optional, for smoother coating)
- Rainbow sprinkles
- Cake pop sticks
Instructions
- Prepare the cake according to the package directions, but use slightly less water or milk than the box suggests to ensure a denser cake. Bake the cake in a 9×13 inch pan. Let the cake cool completely.
- Crumble the cooled cake into a large bowl, removing any browned edges. You want fine crumbs.
- Add the 1/2 cup of vanilla frosting to the cake crumbs. Mix thoroughly with your hands until the mixture holds together when pressed. This should resemble thick dough.
- Roll the mixture into uniform balls, about 1 to 1.5 inches in diameter. Place the balls on a parchment-lined baking sheet.
- Chill the cake balls in the refrigerator for at least 30 minutes. This step prevents them from falling apart when dipped.
- Prepare the coating: Place the white candy melts in a microwave-safe bowl. Microwave in 30-second intervals, stirring well after each interval, until completely smooth. Stir in the shortening if using.
- Dip the tip of a cake pop stick into the melted coating, then insert the stick about halfway into a chilled cake ball. Return the pops to the refrigerator for 10 minutes to set the stick in place.
- Hold the stick and dip the entire cake ball into the melted coating, turning to cover completely. Tap the stick gently against the side of the bowl to remove excess coating.
- Immediately sprinkle with rainbow sprinkles before the coating sets.
- Insert the finished cake pops into a block of styrofoam or a cake pop stand to dry completely.
Notes
- For the smoothest coating, use high-quality vanilla candy melts. If the coating is too thick, add a small amount of vegetable shortening or coconut oil to thin it slightly.
- If you want a chocolate coating, use white chocolate chips mixed with milk chocolate chips, or use dark candy melts.
- Do not skip chilling the cake balls; this is key to preventing cracks during dipping.
Nutrition
- Serving Size: 1 pop
- Calories: 180
- Sugar: 20
- Sodium: 120
- Fat: 10
- Saturated Fat: 6
- Unsaturated Fat: 4
- Trans Fat: 0
- Carbohydrates: 22
- Fiber: 0
- Protein: 2
- Cholesterol: 15