
Look, making real, authentic Italian bread at home can feel intimidating, right? Especially when you see those pictures of ciabatta—all those huge, irregular air pockets and that unbelievably crisp crust. It looks like something only a professional baker in Rome can pull off. Well, I’m here to tell you that’s simply not true. As someone who approaches cooking like a project manager, I’ve streamlined this entire process.
This guide cuts through the noise and delivers exactly what you need: a reliable, authentic recipe for classic homemade ciabatta bread that uses a high-hydration dough designed to work beautifully in your standard home oven. We’re focusing on the essential steps—especially how to handle that very wet dough—so you skip the confusion and guarantee success on your first real attempt. Get ready for amazing bread!
- Why This Classic Homemade Ciabatta Bread Recipe Works for Home Bakers
- Gathering Your Ingredients for Classic Homemade Ciabatta Bread
- Step-by-Step Instructions for Classic Homemade Ciabatta Bread
- Achieving the Perfect Crust Bread with Steam
- Crumb Structure Secrets: Getting That Big Hole Bread Recipe Look
- Storage and Reheating Instructions for Rustic European Breads
- Troubleshooting Common Ciabatta Issues
- Serving Suggestions for Your Homemade Italian Bread
- Estimated Nutritional Data
- Share Your Bake and Get More Artisan Bread Recipes
Why This Classic Homemade Ciabatta Bread Recipe Works for Home Bakers
The magic of this recipe, making it perfect for your kitchen, comes down to respecting physics—not endless kneading. We embrace the wetness because that high hydration dough is exactly what gives you those beautiful, irregular holes. This isn’t about brute force; it’s about smart technique. For those interested in diving deeper into pre-ferments, check out my guide on how to make a sourdough starter from scratch for beginners, as the mindset is similar!
- The final result is that classic, airy texture you expect from Artisan Bread Recipes.
- The process is simplified through slow fermentation, meaning flavor develops while you sleep.
- We prioritize building structure gently, making it manageable even for beginners tackling European breads.
Mastering High Hydration Dough Handling Tips
When I first saw how wet this dough was, I nearly dumped in more flour! Don’t do it. That goopy texture is your friend. It’s what lets the gases move around and form those huge air pockets when baking. Since you’re not kneading, you need tools to manage the mess. I strongly recommend starting with a good dough whisk or even a stiff rubber spatula until the gluten starts to organize itself after the first rest period. Your hands will thank you later!
The Importance of Long Fermentation Bread
If you want that deep, savory flavor that screams Authentic Ciabatta Tutorial, you need time. We use a poolish (pre-ferment) overnight, and then we let the dough bulk ferment slowly at room temperature. This long fermentation breaks down the starches beautifully, generating complex flavors that a quick dough just can’t match. It’s patient baking, but the payoff is huge.
Gathering Your Ingredients for Classic Homemade Ciabatta Bread
Okay, gathering the ingredients for this loaf is part of the strategy. Since we’re aiming for that top-tier Homemade Italian Bread texture, what you use matters—though you won’t need anything exotic! The most important thing here is planning ahead for our poolish. You’ll mix a small portion of the flour, water, and yeast the night before you actually mix the final dough. Think of it like prepping your tools before starting the main project. If you want a deeper dive into making bowls out of your finished loaves later, check out how I anchor my easy homemade bread bowls recipe!
Here’s the shopping list rundown:
- 200g Poolish (This is the pre-ferment we make first!)
- 400g Bread Flour (This is the heavy lifter—needs high protein)
- 100g Whole Wheat Flour (Just a touch for flavor complexity)
- 375g Water (Must be lukewarm, aiming right around 90°F/32°C)
- 10g Fine Sea Salt (Don’t skimp on the salt; it builds flavor!)
- 3g Instant Dry Yeast (Just a dash for the final mix)
Ingredient Notes and Flour Types for Ciabatta
The flour choice is non-negotiable for that airy structure we want. You absolutely need a high-protein bread flour for the majority of the mix, around 12-14% protein is ideal. This extra protein builds the strong gluten network that traps all the fermentation gas. We mix in 100g of whole wheat flour just for a little earthy depth, but it’s mostly bread flour doing the heavy lifting here.
Remember the poolish! That fermentation starter needs about 12 to 16 hours to mature at room temperature. You mix those first ingredients (100g flour, 100g water, pinch of yeast) the night before. When you wake up, it should look like the top of a bubbly lake, ready to boost the flavor and structure of your final dough. Planning ahead is Leo’s trick for always having success!
Step-by-Step Instructions for Classic Homemade Ciabatta Bread
This is where the real project management comes in handy. We are not kneading this dough the way you would for a standard loaf. Kneading develops gluten quickly, but for ciabatta, we want that gluten structure to develop slowly while trapping as much water as possible. This reliance on time over effort is what makes this recipe part of my easy yeast bread beginner recipe philosophy.
Creating and Using the Poolish (Pre-Ferment)
Since you mixed the poolish last night, today you just need to evaluate your work! A ready poolish looks incredibly active—it should be full of bubbles, almost like looking at a shaken soda, and it should look slightly domed or puffy on top. If it has collapsed significantly, it’s a little past its peak, but honestly, trust me, it’s still usable. Just gently scrape the entire thing into your mixing bowl with the rest of your main ingredients. Don’t worry if it seems a little soupy; that’s exactly what we want for this style of bread!
Mixing the Wet Dough and Bulk Fermentation
Now we bring everything together—the poolish, the rest of the water, flours, salt, and the tiny bit of remaining yeast. Mix this by hand or with your dough whisk just until there are no dry spots of flour left. It will look like a sloppy, sticky mess. Do not panic! This is the sign you’re succeeding at High Hydration Dough Baking. Cover it tightly and let it sit for 30 minutes.
After that first rest, we perform the crucial move: stretch and folds. Don’t punch it down; we are literally lifting one edge of the dough up high and folding it gently over the middle. Rotate the bowl 90 degrees and repeat three more times. You are building strength internally without degassing all the air you worked so hard to create in the poolish. Repeat that set of folds 30 minutes later. The dough should look visibly smoother and stronger after the second set. Let it rest for another hour or two until it looks puffy and alive.
Easy Ciabatta Shaping Guide for Beginners
Time to move the dough. This is where we need a light touch, which is why I recommend this as the final stage for shaping. Generously flour your counter space—you need this barrier! Gently scrape the bubbly mass onto the flour. Sprinkle a little more flour on top of the dough. Using your bench scraper, divide the dough into two or three uneven rectangles. Try not to press down; you are cutting it, not compressing it.
For the actual shaping, if you want that perfect, rustic look, the goal is to gently stretch the dough into a rough rectangle shape, about 10 inches long, using your fingertips. You are aiming to elongate it, not deflate it. Seriously, this is the key to our Easy Ciabatta Shaping Guide—gentle stretching preserves those crucial air pockets. Place the shaped dough pieces onto parchment paper that you’ve dusted heavily with flour or semolina. Cover loosely and let them proof for about 45 minutes to an hour.
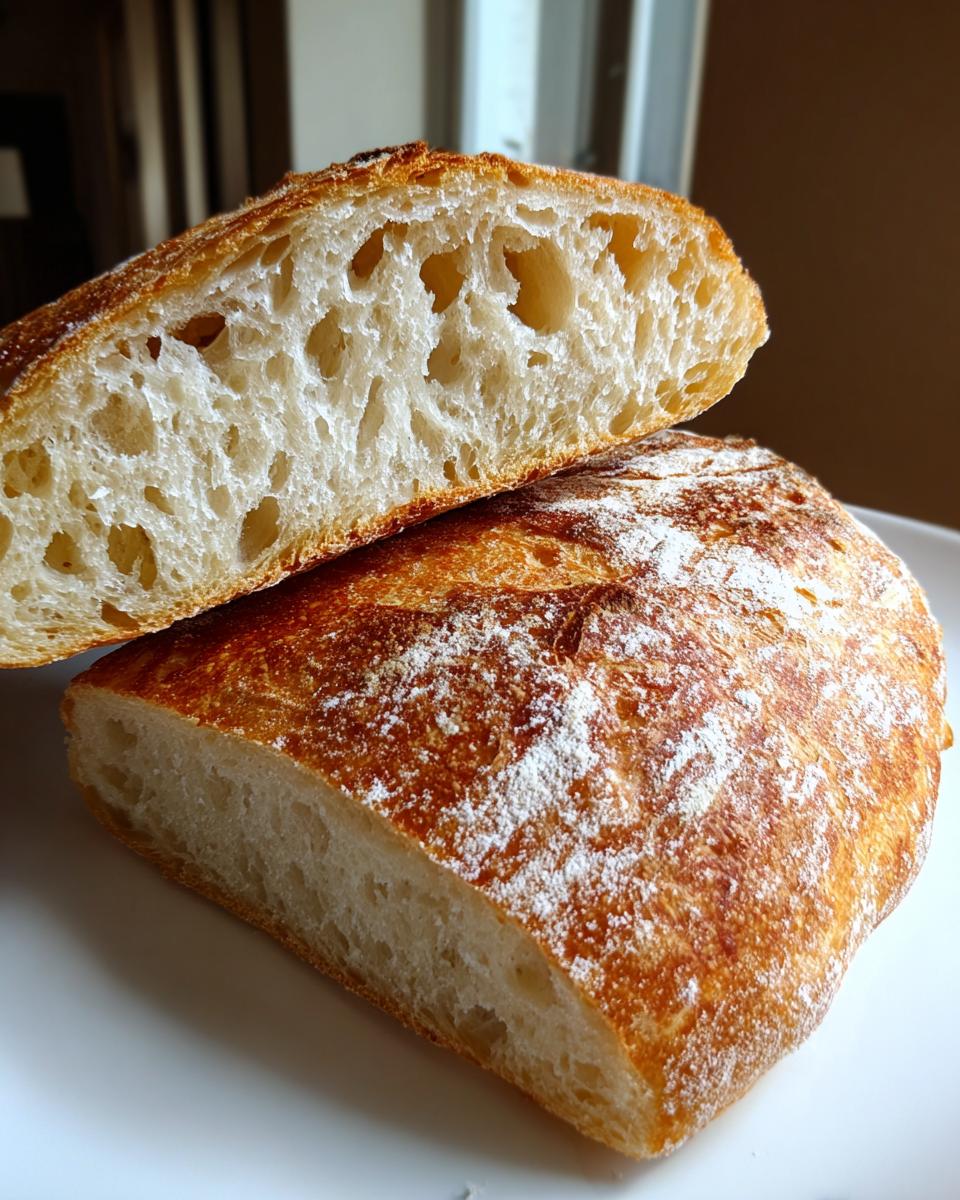
Achieving the Perfect Crust Bread with Steam
I’m going to tell you right now: if you skip the steam, you’re not going to get true ciabatta. The high heat helps the dough spring up fast, but that initial burst of steam keeps the outer layer of the dough flexible. This flexibility is what lets the bread expand to its maximum volume—that incredible oven spring—and it’s how we get that thin, crackly, Perfect Crust Bread we are aiming for. Think of it like this: steam equals maximum puffiness!
This is the trickiest part of the project, but if you’ve followed the previous steps well, your dough is ready to shine. If you want to see how this concept of extreme heat works for other recipes, my guide on a Yorkshire pudding guaranteed perfect rise uses the exact same principle of trapped heat and moisture!
Baking Instructions: Steam Setup and Temperature Control
This step requires preparation and speed, so get everything set up before you even move the loaves. First, pop your baking stone or steel onto the middle rack and make sure it preheats for at least 45 minutes at a blistering 475°F (245°C). Next, place an empty, sturdy cast iron pan or metal tray on the rack directly below that baking stone.
When your loaves are proofed and ready, carefully slide the parchment paper holding the ciabatta onto that hot stone. The very second the door closes, you need to pour about a cup of boiling water directly into that hot tray on the bottom rack. Close the door fast! This creates that essential cloud of steam we need for Baking with Steam at Home. Let it steam bake at 475°F for 15 minutes.
After those 15 minutes, carefully open the oven door—watch out for the steam rushing out! Now, remove the water pan entirely. Drop your oven temperature down to 425°F (220°C) and continue baking for another 15 to 20 minutes until that crust turns a beautiful, deep golden brown. That’s your cue that the inside is cooked through and the crust is flawless.
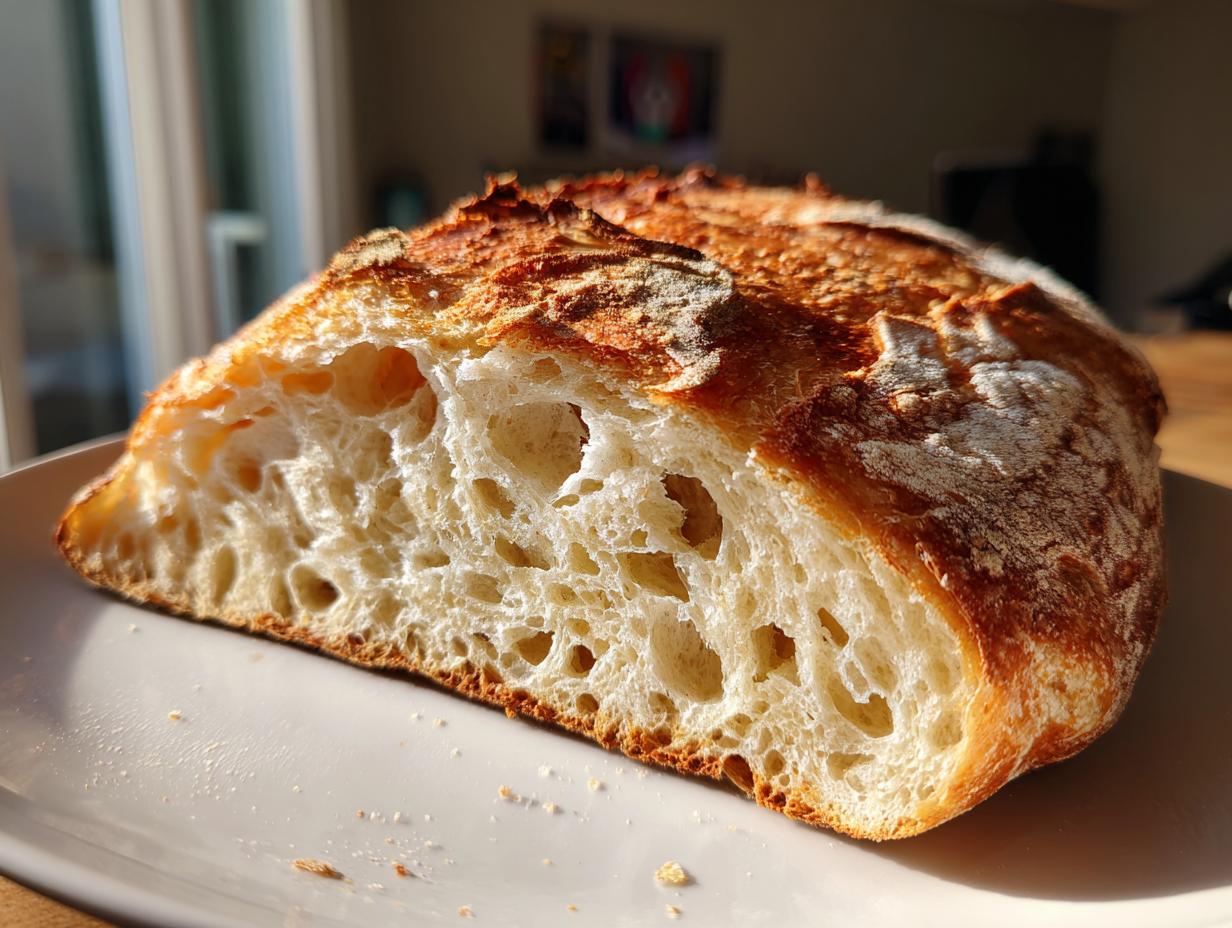
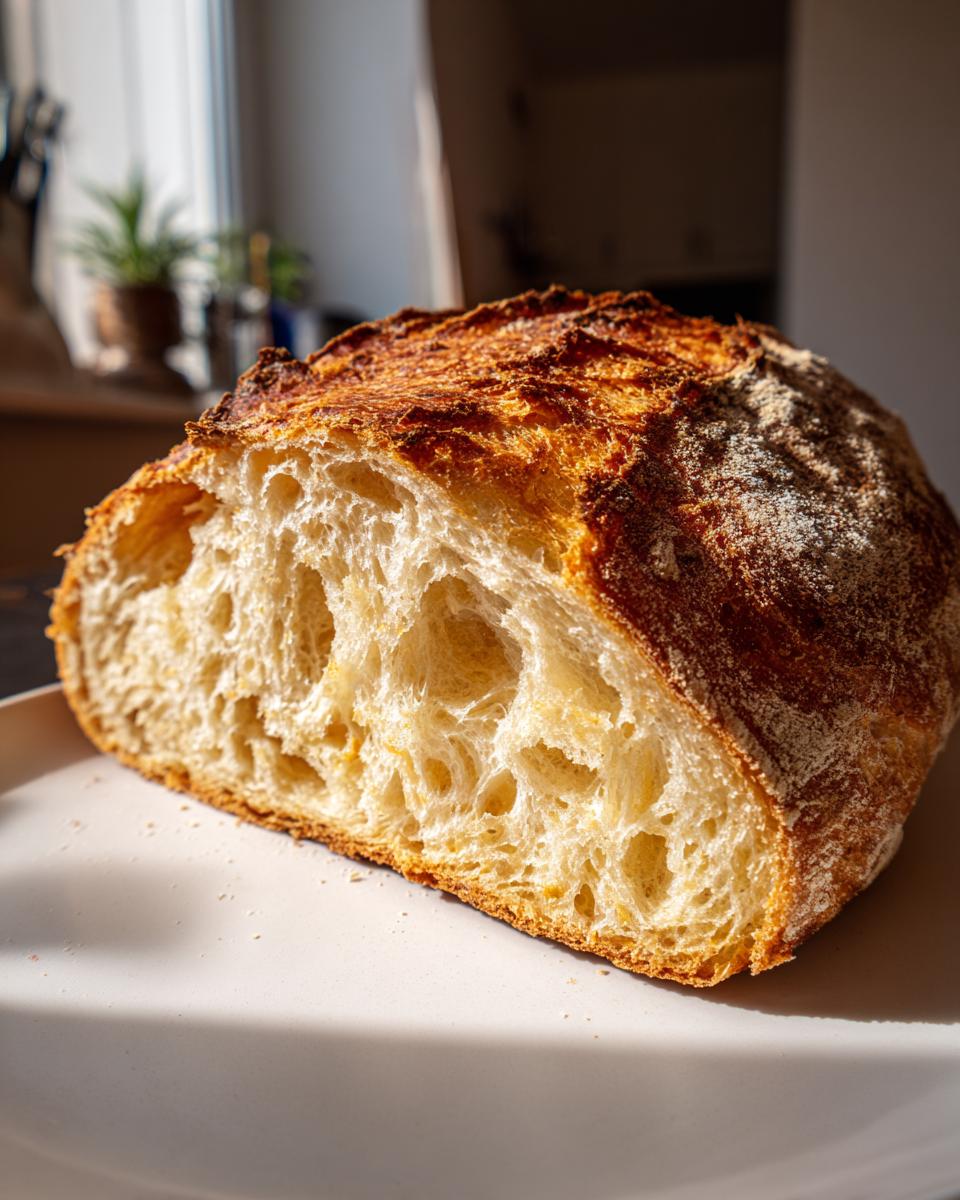
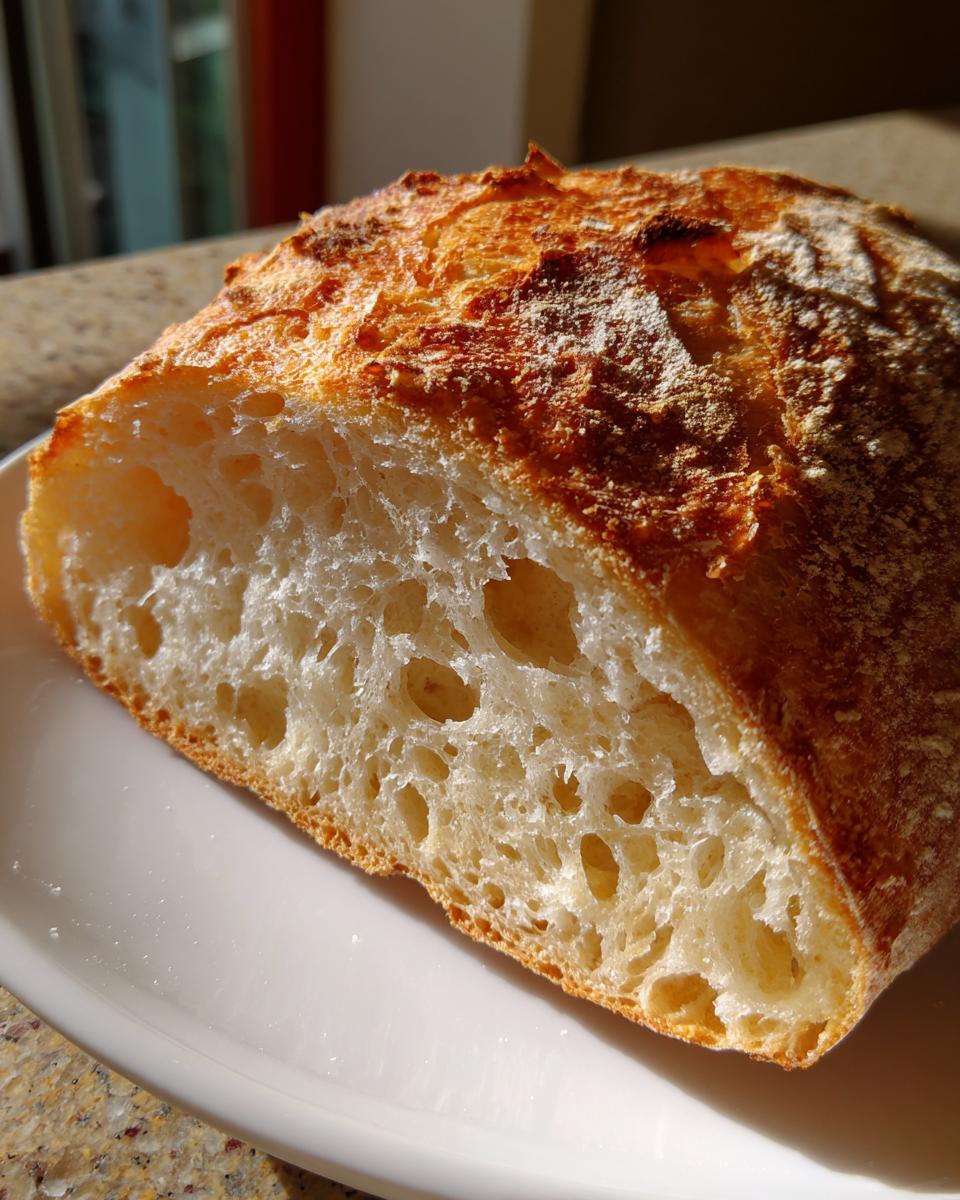
Crumb Structure Secrets: Getting That Big Hole Bread Recipe Look
This is the moment we’ve all been waiting for, isn’t it? That reveal when you finally slice into the loaf and see those gigantic, irregular holes. Getting that true Big Hole Bread Recipe look isn’t luck; it’s a direct result of what we did earlier, so just trust the process we set up.
I remember the first time I got it right. I had been treating the dough too roughly, expecting it to behave like a sandwich loaf. When I finally backed off, just let the poolish do its thing, and respected the gentle stretch-and-folds instead of mixing aggressively, I nearly cried. The crumb was so open, it looked like Swiss cheese! These are the fundamental Crumb Structure Secrets working together.

Three things dictate your internal structure above everything else:
- The Water Level: Remember that ultra-wet, high-hydration dough? That’s non-negotiable. More water means more movement for the gas to travel before the crust sets.
- Gentle Handling: If you beat the air out of it during shaping, you end up with a dense loaf. We stretch gently, we never press hard.
- Proofing Time: If it’s under-proofed, the yeast hasn’t made enough gas yet. If it’s significantly over-proofed, the gluten structure collapses. Getting that sweet spot during bulk fermentation is everything.
Honestly, if you follow the slow fermentation we discussed and use that super hot oven with steam, the structure will take care of itself. This isn’t complex; it’s just methodical!
Storage and Reheating Instructions for Rustic European Breads
Here’s the tough love part of this project, and it applies to almost all Rustic European Breads: Ciabatta? It’s at its absolute peak eaten the day it was baked. Those big holes and that delicate, crisp crust start to fade pretty quickly as the moisture equalizes. But don’t worry, we have a couple of ways to salvage your hard work if you can’t finish it all in one sitting.
For short-term storage—say, if you plan to eat the second loaf tomorrow—use a paper bag, not plastic. Plastic traps moisture, and that defeats the whole purpose of that beautiful, crisp crust we fought for! The paper bag keeps the air flowing just enough. If you’re going beyond 24 hours, I’d just slice it and freeze it. Then, you can revisit this recipe anytime you want something delicious—maybe try making some easy homemade naan bread recipe skillet style next time!
Now, for the reheating magic. This is the only way to bring yesterday’s loaf back to life! If you have a slice or half a loaf that’s gone a little soft, get a spray bottle, give it a quick, light spritz of water—literally just three or four sprays, don’t soak it!—and pop it back into a 350°F (175°C) oven for about 5 to 7 minutes. That steam you hated dealing with during the bake becomes your best friend for revival. The crust will crisp right back up, and you’ll be tasting fresh bread again in under ten minutes. See? Project management for leftovers!
Troubleshooting Common Ciabatta Issues
Even the most methodical baker hits a snag now and then. Ciabatta is so sensitive because of that high water content; a small error in timing or handling can throw the whole thing off. Don’t sweat it! When I see these issues, it’s usually a simple fix on the next batch. We just need to diagnose the result and adjust the process next time. Here are the most common call-outs I see when people tackle this process for the first time.
- Dough Fell Flat or Spread Out Too Much: If your loaves look like sad, thin pancakes instead of proud, puffy rectangles, odds are you let the bulk fermentation go too long. The gluten network got tired, couldn’t hold the gas anymore, and collapsed under its own weight. Next time, watch the clock and pull the dough out closer to when it looks doubled and very, very airy, not when it looks like it might collapse any second.
- The Crumb is Dense with Small Holes: This is the opposite problem! Usually, this means the dough was under-proofed—the yeast just hadn’t made enough gas yet to create those big pockets. It can also happen if you accidentally added too much flour during the shaping phase, inadvertently tightening up the structure when you meant to keep it loose. Be stingy with the bench flour!
- The Crust is Soft and Pale, Not Crispy: We fought hard to get that perfect oven spring, but if the crust doesn’t get that beautiful deep color and thin snap, it’s almost always a steam issue. You either didn’t get enough steam in there quickly enough after loading the loaves, or you let the steam escape too early. Remember that step where we drop the temp? Make sure you only vent the steam right before you pull the water pan out, not before.
Treating these results like data points helps you refine your technique. Every bake teaches you something about your oven or your environment, even when following a perfect plan!
Serving Suggestions for Your Homemade Italian Bread
Okay, so you’ve pulled those beautiful, rustic loaves out of the oven. They are steaming, they smell incredible, and the crust is singing. Now what? We get to the best part of any great bake: eating it! This Homemade Italian Bread isn’t just for show; it’s built to be an amazing vehicle for flavor. Honestly, you could just sit there and tear off chunks while it’s still warm, but I’ve got a few foolproof ways I like to serve it up properly.
The real key here is honoring that texture—the airy interior and the crackly exterior. You need something that can soak up flavor but doesn’t aggressively compress against that beautiful air structure you worked so hard to create.
- The Simplest Way: Dipping Oil. Forget fancy appetizers. Take a great quality olive oil—the slightly peppery kind—sprinkle in some coarse salt, maybe a tiny pinch of red pepper flakes if you like a kick, and just dip. The holes in the ciabatta are practically designed to hold little pools of that flavorful oil.
- Lunch Hero: The Ultimate Panini. Ciabatta holds up to serious fillings better than almost any other bread. Slice it open, brush the inside with a little olive oil or pesto, load it up with mozzarella, fresh basil, some sun-dried tomatoes, and maybe some thin slices of prosciutto. Press it in a panini press or a heavy skillet until the cheese melts and the outside gets crispy again. It’s heaven.
- Dinner Companion: Hearty Soups. This bread demands a proper dinner partner. It’s not designed for delicate salads! I love serving it alongside a big bowl of soup. It’s perfect for scooping up broth. If you are looking for a recipe that this bread was absolutely made to accompany, you have to try my vegetable beef soup easy old-fashioned recipe. That hearty broth needs a serious piece of bread to soak it all up.
Just make sure whatever you serve it with lets the bread shine through. This is the star of the show, not just a side plate item!
Estimated Nutritional Data
Okay, so we’ve baked two amazing, massive loaves of classic homemade ciabatta bread, and you’re probably wondering how this hearty stuff stacks up. Since this recipe focuses on simple flour, water, and yeast—with almost zero added fat or sugar—the numbers are actually pretty reasonable for such a satisfying bread!
Please remember this is just an estimation based on standard calculations for the entire yield of two large loaves. Nutritional data can swing wildly based on the exact flour percentage you use, but this gives you a great baseline for tracking your amazing baking success. We’re looking at the data per serving slice, which I estimate at about 1/8th of a large loaf.
| Nutrient | Amount (Per Serving Estimate) |
|---|---|
| Calories | 210 |
| Fat | 0.8g |
| Saturated Fat | 0.1g |
| Carbohydrates | 43g |
| Protein | 7g |
| Sodium | 350mg |
| Sugar | 0.5g |
See? High in complex carbohydrates for energy, decent protein from the bread flour, and super low in sugar and fat because we kept it authentic and simple. This is the beauty of making your own Artisan Bread Recipes—you control exactly what goes into the final product. Enjoy that slice; you earned it!
Share Your Bake and Get More Artisan Bread Recipes
Alright, now that you’ve conquered high hydration and you’ve got that beautiful, crusty loaf sitting on your cooling rack, I want to see it! This is Leo, and when I execute a tricky project like classic homemade ciabatta bread, I get such a kick out of seeing how everyone else’s turned out. Did you get those huge holes you were aiming for? Did your steam setup work perfectly?
Please, take a picture of your finished bake and share it! Knowing that this methodical approach worked for you in your kitchen is exactly why I put this entire process together. You can always tag us on social media, or better yet, hop back here and leave a rating and a comment letting me know how long your bulk fermentation took—that’s always interesting data!
If you’re feeling energized by defeating this challenging loaf, don’t stop now! You’ve officially moved past the beginner stage and into true artisan baking territory. If you want to keep that momentum going and try another recipe that requires similar patience and structure building, you absolutely must try my cranberry walnut bread recipe easy artisan loaf next. It uses a slightly different approach but delivers that same high-quality, homemade result that makes you proud to say you baked it yourself. Happy baking!
PrintClassic Homemade Ciabatta Bread: Authentic High Hydration Dough

Follow this detailed tutorial to make authentic, airy ciabatta bread at home. This method focuses on proper fermentation and handling the wet dough to achieve the characteristic large, open crumb structure and crisp crust.
- Prep Time: 20 min
- Cook Time: 35 min
- Total Time: 4 hours 50 min (includes overnight poolish)
- Yield: 2 large loaves 1x
- Category: Bread
- Method: Baking
- Cuisine: Italian
- Diet: Vegetarian
Ingredients
- 200g Poolish (made ahead)
- 400g Bread Flour (high protein recommended)
- 100g Whole Wheat Flour
- 375g Water (lukewarm, about 90F)
- 10g Fine Sea Salt
- 3g Instant Dry Yeast
Instructions
- Prepare the Poolish: Mix 100g flour, 100g water, and a pinch of yeast the night before. Cover and let it ferment at room temperature for 12-16 hours until very bubbly.
- Mix the Dough: In a large bowl, combine the remaining 300g flour, 275g water, salt, and remaining yeast. Add the entire poolish. Mix by hand or with a dough whisk until just combined. The dough will be very wet and shaggy. Do not knead.
- Bulk Fermentation (First Rise): Cover the bowl tightly. Let the dough rest for 30 minutes. Perform a set of stretch and folds: gently stretch one side of the dough up and fold it over the center. Rotate the bowl 90 degrees and repeat three more times (four folds total).
- Continue Bulk Fermentation: Cover the dough and let it rest for another 30 minutes. Repeat the stretch and fold process. Cover and let the dough complete its bulk fermentation at room temperature for 2 to 3 hours, or until it has increased significantly in volume and appears aerated.
- Divide and Shape: Lightly flour a work surface. Gently scrape the wet dough onto the flour. Dust the top lightly with flour. Using a bench scraper, gently divide the dough into two or three rectangles. Do not press out the air. Gently stretch each piece into a rough rectangle shape, about 10 inches long.
- Final Proof: Place the shaped dough pieces onto parchment paper dusted heavily with flour or semolina. Cover loosely with plastic wrap or a damp towel. Proof at room temperature for 45 to 60 minutes. The dough should look puffy but still hold its shape.
- Preheat Oven and Steam Setup: Place a baking stone or steel on the middle rack. Place a cast iron pan or sturdy metal tray on the bottom rack. Preheat the oven to 475F (245C) for at least 45 minutes.
- Bake: Carefully slide the parchment paper with the dough onto the preheated stone. Pour 1 cup of boiling water into the hot pan on the bottom rack immediately and quickly close the oven door to trap the steam.
- Bake for 15 minutes with steam. Carefully remove the water pan (or open the door briefly to vent steam). Reduce the temperature to 425F (220C). Continue baking for another 15 to 20 minutes until the crust is deep golden brown.
- Cool: Transfer the loaves to a wire rack and cool completely before slicing to set the crumb structure.
Notes
- Achieving the open crumb requires high hydration (the wet dough). Do not add extra flour during mixing or shaping unless absolutely necessary.
- Use a high-protein bread flour for the best structure development.
- Steam is critical for maximum oven spring and a thin, crisp crust.
- If you prefer a longer, slower fermentation for deeper flavor, you can retard the bulk fermentation in the refrigerator for up to 18 hours after the first set of folds.
Nutrition
- Serving Size: 1 slice (approx 1/8 loaf)
- Calories: 210
- Sugar: 0.5
- Sodium: 350
- Fat: 0.8
- Saturated Fat: 0.1
- Unsaturated Fat: 0.7
- Trans Fat: 0.0
- Carbohydrates: 43
- Fiber: 2
- Protein: 7
- Cholesterol: 0