
There is absolutely nothing that signals “home” quite like that incredible, sweet aroma of fresh bread baking in the oven. Forget spending hours kneading; I’m here to give you the simplest path to the softest, most flavorful No Knead Cinnamon Raisin Bread you’ve ever had. That’s the Dishicious philosophy, right? We take a complex idea—like perfect homemade raisin bread—and streamline the project until it’s both reliable and incredibly delicious. Seriously, if you’re looking for the easiest sweet loaf that delivers on flavor every single time, you’ve found your new blueprint. Before we dive in, if you’re exploring other simple dough projects, you should definitely check out my guide for easy homemade bread bowls recipe. Grab your bowl; we’re making magic with minimum effort.
- Why This No Knead Cinnamon Raisin Bread is Your New Go-To Recipe
- Gathering Ingredients for the Best Cinnamon Raisin Bread
- Step-by-Step Instructions for No Knead Raisin Bread
- Tips for Success Making Delicious Homemade Baked Goods
- Variations on Classic Raisin Bread
- Serving Suggestions for Homemade Bread for Breakfast
- Storage and Make-Ahead Tips for Your Raisin Loaf
- Frequently Asked Questions About Cinnamon Raisin Bread
- Estimated Nutritional Data for This Raisin Bread
Why This No Knead Cinnamon Raisin Bread is Your New Go-To Recipe
I know what you’re thinking: bread takes commitment, right? Not this loaf! From my project management background, I focus on efficiency, and this method cuts out the hardest part—the kneading—while boosting the results. That means you get bakery-quality results without ending up with sore arms. We are aiming for reliability here, which is why this technique is perfect for anyone new to yeast or just looking for a simple weekend activity. If you want more simple dough inspiration, check out my easy yeast bread beginner recipe!
Achieving Soft and Fluffy Bread Texture
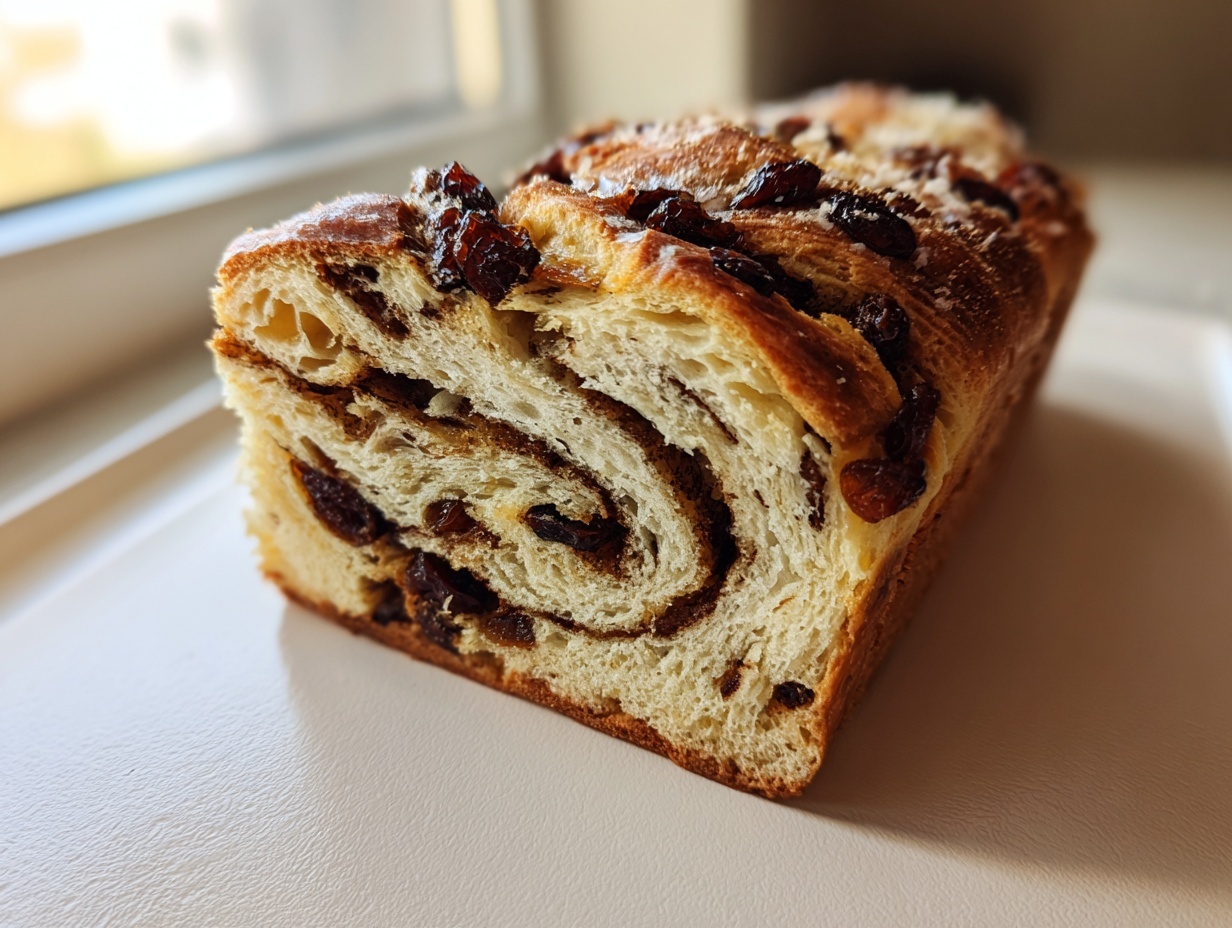
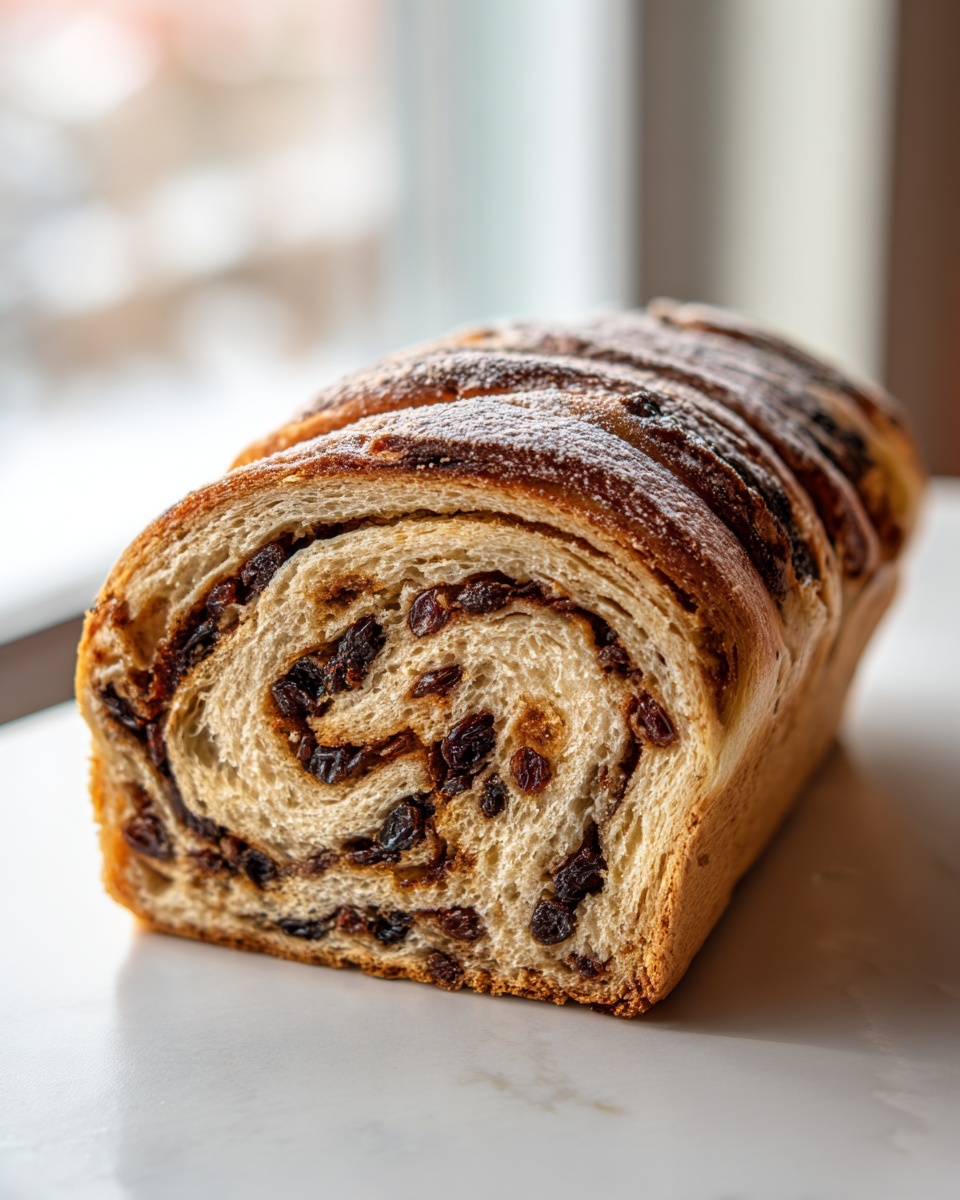
The magic truly happens during that long, slow initial rise. When you skip the aggressive kneading, you let time and a proper ratio of water and flour do the work. This develops just enough gluten structure without making the bread tough. The result is an incredibly soft and fluffy interior, making every slice of this raisin bread tender. It’s dense enough to hold its shape perfectly, but light enough to melt in your mouth.
The Simplicity of No Knead Sweet Bread
This is where we eliminate stress. I build flavor into this No knead sweet bread through patience, not sweat. You simply mix the ingredients until they look shaggy, cover it up, and walk away. There’s no guesswork on how long to knead or whether you’ve developed enough structure. If you’re a beginner, this step builds confidence instantly. You’re delivering maximum flavor with minimal physical input—it’s simple, efficient baking.
Gathering Ingredients for the Best Cinnamon Raisin Bread
Before we can enjoy that warm, sliceable loaf, we need to organize our components. When you’re aiming for the best Cinnamon Raisin Bread, sticking exactly to the measurements is key—especially since this is a no-knead dough that relies on precise hydration percentages. Trust me, having everything ready makes the assembly process fly by. If you’re looking for other simple baking treats while you wait for the dough to rise, check out my easy sugar cookie bars recipe!
Ingredient Breakdown for Homemade Raisin Bread Recipe
This list is straightforward, focusing on core pantry staples that deliver maximum impact. Pay real close attention to the cinnamon and brown sugar blend; that ratio is what provides the deep, delicious flavor throughout the Homemade raisin bread recipe.
- 1 1/2 cups warm water (aim for 105-115°F—just warm to the touch, not hot!)
- 1 tablespoon active dry yeast
- 1/4 cup granulated sugar
- 1 teaspoon salt
- 3 1/2 cups all-purpose flour
- 1/2 cup golden raisins (make sure they are plump!)
- 1/4 cup unsalted butter, melted, plus more for brushing
- 1/2 cup packed light brown sugar
- 2 tablespoons ground cinnamon
Step-by-Step Instructions for No Knead Raisin Bread
This is the project management payoff! Once the dough is ready, assembly is fast, but precision when rolling dictates how beautiful your cinnamon swirl will look. If you’re working on other quick baking projects, remember you can check out my easy homemade naan bread recipe skillet for a different kind of dough fun. Let’s walk through the rise, the filling, and the bake.
Activating Yeast and Mixing the Shaggy Dough
First things first: wake up that yeast! Mix the yeast and a teaspoon of your sugar into the warm water—make sure that temperature is right, or the yeast won’t activate. Wait about five minutes until it gets foamy. That foam is your signal that the yeast is alive and ready to work its magic. Then, stir in the rest of the sugar and the salt. Now, add the flour slowly until you get a rough, shaggy dough. I cannot stress this enough: Do not knead! Cover the bowl tightly and find a warm spot for 1 to 1.5 hours. That time is your commitment; the dough will double, guaranteed.
Creating the Cinnamon Swirl Filling for Your Raisin Bread
While the dough is rising, whisk together your brown sugar and cinnamon. This is where all the cozy flavor lives! Once the dough has risen, gently punch it down and turn it onto a lightly floured area. Roll it gently into that big rectangle shape—about 12×18 inches. Next, brush the entire surface with that melted butter. This butter layer is crucial because it helps the sugar stick. Sprinkle that cinnamon-sugar mix evenly across the butter, and then scatter your golden raisins over the top. Pro tip: toss the raisins in a teaspoon of flour before sprinkling; it keeps them from sinking to the bottom.
Shaping, Proofing, and Baking the Artisan Raisin Loaf
Starting from the long edge, you need to roll this up super tight, like a jelly roll. You want those beautiful, tight layers for that perfect Artisan raisin loaf look! Pinch the seam shut really well, then place it seam-side down right into your greased 9×5 inch loaf pan. Cover it loosely again, and let it proof for another 30 to 45 minutes. Here’s my process optimization: about 15 minutes before that second rise is done, start heating your oven to 375°F. When you pop it in, bake it for 30 to 35 minutes. We are aiming for an internal temperature of 200°F—that’s my metric for a perfectly baked loaf!
Tips for Success Making Delicious Homemade Baked Goods
Once you master the basic assembly of this recipe, the next level is ensuring you get maximum quality from your final product. As a home cook who values repeatable results, I’ve dialed in a couple of critical checks that move your loaf from ‘good’ to truly fantastic. These small procedural tweaks are what turn simple ingredients into truly Delicious homemade baked goods. If you’re interested in applying this methodical approach to quick baking, make sure you look at my sourdough cornbread recipe moist and easy guide next.
Why Cooling Completely Matters for Sliceable Raisin Bread
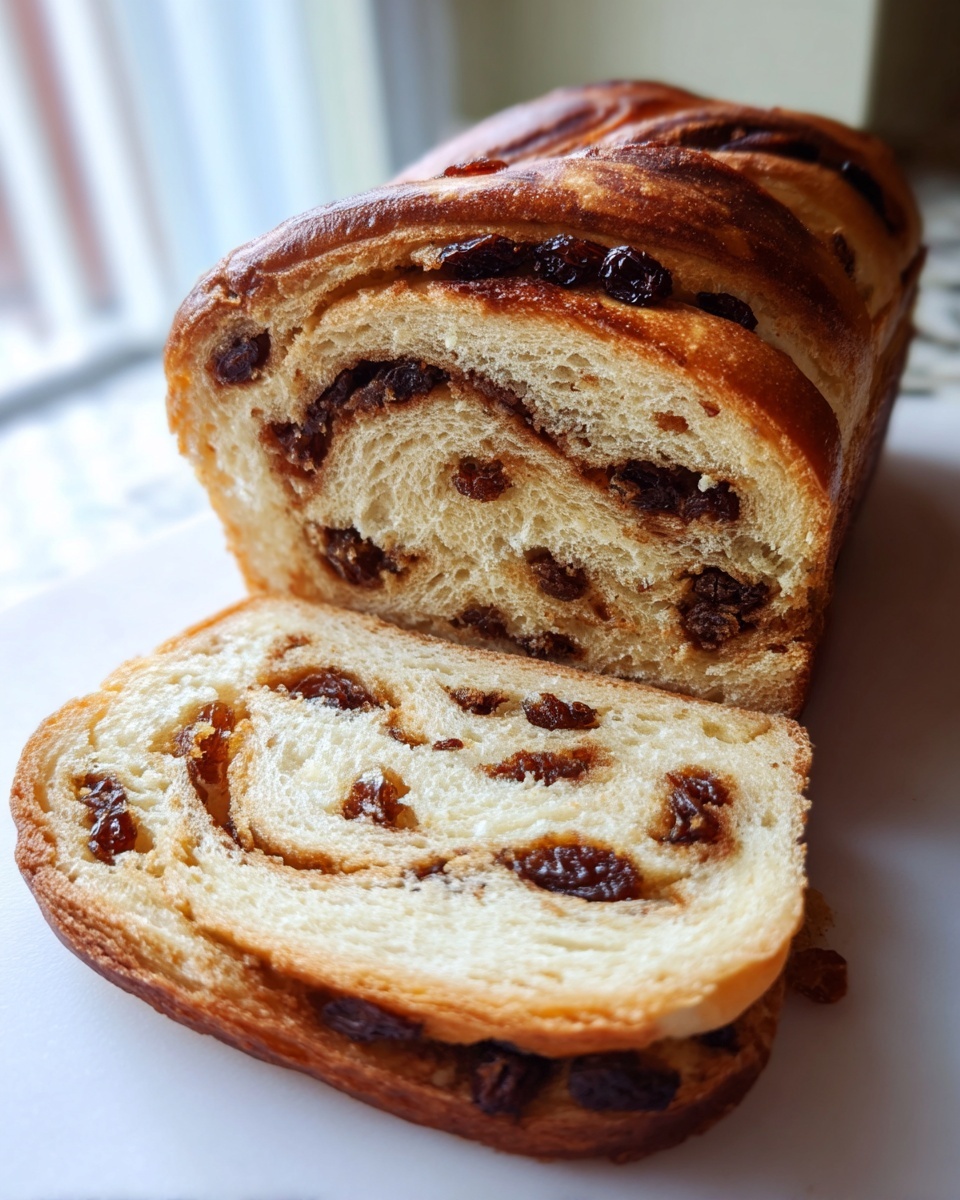
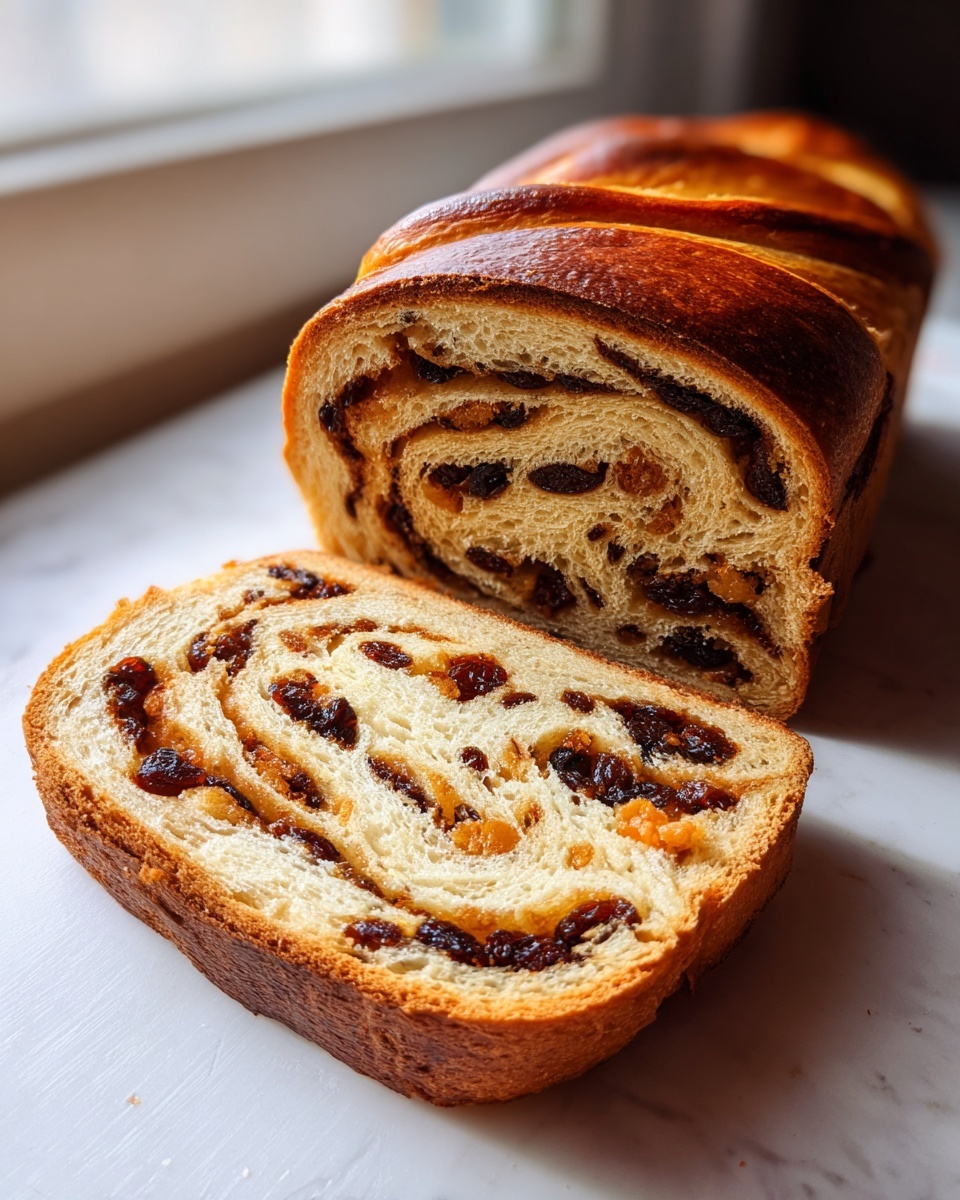
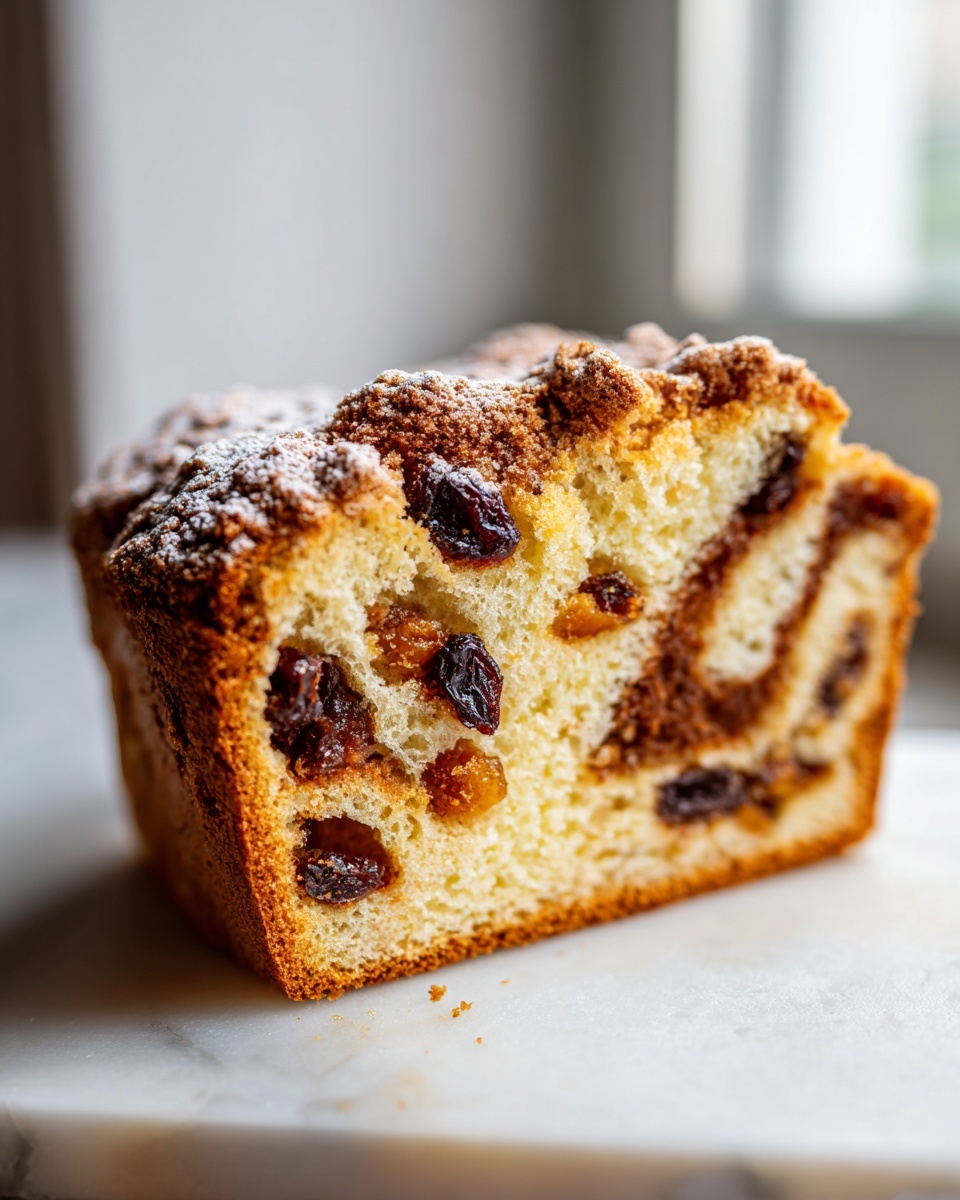
This is perhaps the toughest step to follow, but it’s non-negotiable for that perfect sliceable crumb. I know the smell is incredible right out of the oven, and you want to cut a thick piece immediately. Don’t do it! When the bread is hot, the internal structure is still setting up, and a lot of steam is trapped inside. If you slice it early, all that steam rushes out, and you’re left with a dense, gummy texture where the knife went through. Let it cool completely on a wire rack—at least an hour—so that steam can escape slowly, leaving you with that incredibly soft, fluffy texture we worked so hard to create.
Ensuring Even Distribution of Raisins
We want raisins in every single bite, not a giant cluster at one end of the loaf! I touched on this briefly earlier, but I want to emphasize it here because it’s a quick fix. Before you scatter your cinnamon-sugar mixture over the buttered dough rectangle, take your measured raisins and toss them gently with about one teaspoon of all-purpose flour. That tiny bit of flour coats them just enough so when you sprinkle them over the butter, they don’t immediately clump together or slide off to one end when you start rolling up the dough. It keeps the distribution even across the entire length of your finished sliceable raisin bread.
Variations on Classic Raisin Bread
While this No Knead Cinnamon Raisin Bread is fantastic straight out of the oven, I always encourage a little smart experimentation once you’ve proven the core recipe works for you. Remember, optimizing the process means you have freedom to adjust for taste later! If you love that cozy, fruit-and-spice profile, there are a couple of tweaks that really elevate the experience without adding any extra kneading time. If you’re feeling bold after mastering this sweet loaf, you might want to check out my cranberry orange cake moist zesty bundt recipe for a different type of sweet bake.
The beauty of this foundational raisin bread dough is its flexibility. Because we developed a really reliable, high-hydration dough base, it happily accepts mix-ins without complaint.
- The Nutty Upgrade: Cinnamon Raisin Walnut Bread. This is my favorite little adjustment for crunch. When you scatter your raisins and cinnamon-sugar filling over the buttered dough (Step 6 of the instructions), simply add an additional 1/2 cup of toasted, roughly chopped walnuts. Toasting them lightly first really boosts their natural oils and flavor, so they aren’t soft when baked inside the bread. This gives you that satisfying contrast between the soft crumb and the crunchy nut.
- Switching the Fruit: Mixed Dried Fruit Loaf. If you aren’t strictly a raisin person, or just like variety, swap out half the raisins for other dried fruits. Dried cranberries or finely diced dried apricots work wonderfully. Make sure whatever fruit you choose is relatively small, though. If the pieces are too big, they can sometimes tear the dough when you roll it up tightly. This variation still captures that warming spice flavor profile we love, just with a slightly different burst of fruitiness in every slice.
Serving Suggestions for Homemade Bread for Breakfast
Okay, we’ve successfully avoided the temptation to slice into the loaf too soon, and now the structural integrity is set! The best part of making this perfect loaf is what happens next—the tasting. I find that this bread is so flavorful on its own, it barely needs anything, but we all deserve a little extra decadence in the morning, right? When it comes to enjoying this Homemade bread for breakfast, I have a few tried-and-true methods that I use regularly here in Chicago.
For ultimate comfort, you absolutely must try toasting a thick slice. The heat brings those cinnamon swirls back to life, making them fragrant and slightly gooey again. If you’re having it warm, the spread melts perfectly into all those nooks and crannies left by the rolling process. If you’re looking for a great accompanying beverage, you might want to try making my apple cider moscow mule recipe, though maybe stick to coffee for the actual breakfast!
The Simple Spread: Butter and Cream Cheese Power
The classic choice is always the best place to start. A generous layer of good quality, salted butter melting over a hot slice is pure nostalgia. But if you want to elevate that breakfast experience, try mixing softened cream cheese with a dash of vanilla extract and just a tiny pinch of cinnamon. Whip it for about 30 seconds until it’s light and fluffy. This slightly tangy, sweet spread pairs beautifully with the spiced dough.
Glazing for Dessert-Style Morning Slices
If you feel like you’re making something truly special for a weekend brunch, a very light glaze transforms this from breakfast bread to a dessert loaf. You don’t need a thick frosting; just mix about 1/2 cup of powdered sugar with just enough milk (maybe 1-2 tablespoons total) and a tiny splash of vanilla until it’s thick but still drizzly. Drizzle this lightly over the cooled loaf. It looks beautiful and adds just that little extra touch of sweetness for a weekend treat.
Savory Counterpoint (Hear Me Out!)
I know, I know, it’s sweet bread. But sometimes, the best way to highlight cinnamon and raisins is with a little salt. Try toasting a slice and topping it with very thin slices of sharp cheddar cheese. Let the cheese melt under the broiler for just a minute. The saltiness and sharp tang cut right through the sweetness of the sugar and fruit, creating a wonderfully complex bite that is totally addictive. It’s a project manager move: using contrast for maximum impact!
Storage and Make-Ahead Tips for Your Raisin Loaf
One of the huge advantages of mastering How to make raisin loaf at home is that you always have delicious bread on hand. This loaf is honestly wonderful the day it is baked, but like many sweet yeast breads, its texture holds up really well if you plan ahead. We put in all that effort with the mixing and the rolling; let’s make sure we preserve that soft crumb! If you are planning your weekly meal prep, you might want to look at my guide for easy no-bake peanut butter bars for a quick dessert option.
Room Temperature Storage for Everyday Slices
For the first couple of days, I recommend keeping the loaf stored at room temperature. This keeps the crust soft. You need an airtight container or a heavy-duty plastic bag, but here’s the key: make sure the bread is completely cool before you seal it up. If you wrap it while it’s even slightly warm, that trapped steam turns into condensation, and you’ll end up with a soggy crust, which ruins the texture we worked hard to achieve in the final bake. A tightly wrapped loaf should stay perfect for about two to three days.
Refrigeration: Use Only If You Must
I generally advise against refrigeration for this bread, just like any homemade yeast bread. Cold temperatures tend to stale bread much faster because the starches crystallize. If you live somewhere extremely hot or humid where two days at room temperature isn’t feasible, then the fridge is better than letting it get moldy, but expect the texture to firm up considerably. The good news is that refrigeration is easily fixed!
Freezing for Long-Term Make-Ahead Baking
This bread freezes beautifully, which is my preferred method for making it ahead of time. This allows you to bake a double batch on a Sunday and have fresh-tasting bread ready for weeks. The secret to convenience here is slicing it before you freeze it. Once the loaf is completely cool, wrap it tightly in plastic wrap first, and then wrap it again in foil or place it in a freezer-safe bag. When you want a slice, just pull out exactly what you need, pop it right into the toaster, and it tastes almost perfectly fresh. It thaws completely in the toaster slot, giving you the best of both worlds!
Frequently Asked Questions About Cinnamon Raisin Bread
I know that when you’re approaching a recipe for the first time, especially a yeast-based one, a few little snags can pop up. That’s normal! My goal is to make sure your baking projects run smoothly, so here are the common hurdles I see people jump over when making this delicious loaf. If you’re curious about other sweet bakes, make sure you check out my vegan banana bread moist easy plant-based loaf recipe too!
Can I use a Bread Machine for this Cinnamon Raisin Bread Recipe?
That is a great question for efficient baking! While the primary instructions here rely on a standard oven finish, you can absolutely use the bread machine to handle the initial mixing and rising stages, which saves you that initial 90 minutes of waiting around. You’d follow your machine’s guide for the “Dough Cycle.” Once that cycle is done, you just take the mixed dough out, proceed with Step 5 (rolling the filling and shaping), and then bake it in your greased loaf pan in the conventional oven as directed. If you want the full walkthrough for this concept, check out my specific bread machine raisin bread instructions!
What is the best type of yeast for this easy yeast bread tutorial?
For these instructions, I specified active dry yeast because it’s what most home cooks have on hand, and we specifically “bloom” it in warm water first to check for viability. If you only have instant yeast (or rapid rise), you can skip the blooming step entirely! Just mix the instant yeast directly in with the dry ingredients (flour, salt, and the remaining sugar) before mixing it into the wet ingredients. The rise time might be slightly faster, so keep an eye on it, but the results are usually just as good for this easy yeast bread tutorial.
My loaf didn’t rise well. What went wrong with my raisin bread?
This is usually one of two culprits, and they both relate back to temperature control. The most common issue is the water temperature when activating the yeast. If the water was too cold (below 100°F), the yeast didn’t wake up properly. If the water was too hot (over 130°F), you actually killed the yeast. Next, check your proofing area; yeast likes warmth! If your kitchen was chilly, the dough will take significantly longer than the 1 to 1.5 hours I listed. A slightly warmer spot, like inside an oven that is *off* but has the light on, helps keep those yeasties happy and booming for a beautiful final raisin bread.
Estimated Nutritional Data for This Raisin Bread
When you’re optimizing a recipe, understanding the basic metrics is just as important as nailing the technique. Since we’re focused on making delicious homemade baked goods that fit into a balanced life, here is the estimated nutritional breakdown for a single slice of this No Knead Cinnamon Raisin Bread. Remember, this data is based on standard ingredient calculations and serving sizes, so your actual numbers might swing a touch based on the exact brands and measurements you use. If you’re looking at other balanced meal plans, you can check out my easy chicken enchiladas recipe for a savory option!
- Serving Size: 1 slice
- Calories: 220
- Sugar: 12g
- Sodium: 250mg
- Fat: 4g
- Saturated Fat: 2g
- Unsaturated Fat: 2g
- Trans Fat: 0g
- Carbohydrates: 43g
- Fiber: 2g
- Protein: 6g
- Cholesterol: 5mg
That’s a really solid profile for a comfort bread—a bit of protein, manageable fat, and enough carbs to provide energy for your morning!
PrintNo Knead Cinnamon Raisin Bread: The Easiest Soft Homemade Loaf

Bake a soft, sliceable homemade cinnamon raisin bread using a simple no-knead method. This recipe delivers maximum flavor and a comforting aroma, perfect for beginners making bread for breakfast or a snack.
- Prep Time: 20 min
- Cook Time: 35 min
- Total Time: 2 hours 50 min
- Yield: 1 loaf (about 12 slices) 1x
- Category: Breakfast
- Method: Baking
- Cuisine: American
- Diet: Vegetarian
Ingredients
- 1 1/2 cups warm water (about 105-115°F)
- 1 tablespoon active dry yeast
- 1/4 cup granulated sugar
- 1 teaspoon salt
- 3 1/2 cups all-purpose flour
- 1/2 cup golden raisins
- 1/4 cup unsalted butter, melted, plus more for brushing
- 1/2 cup packed light brown sugar
- 2 tablespoons ground cinnamon
Instructions
- In a large bowl, dissolve the yeast and 1 teaspoon of the granulated sugar in the warm water. Let stand for 5 minutes until foamy.
- Add the remaining granulated sugar and salt to the yeast mixture. Gradually mix in the flour until a shaggy dough forms. Do not knead.
- Cover the bowl with plastic wrap and let the dough rise in a warm place for 1 to 1.5 hours, or until doubled in size.
- Gently punch down the dough. Turn it out onto a lightly floured surface.
- In a small bowl, mix the brown sugar and cinnamon for the filling.
- Roll the dough into a rough rectangle, about 12×18 inches. Brush the surface evenly with the 1/4 cup of melted butter. Sprinkle the cinnamon-sugar mixture evenly over the buttered surface. Scatter the raisins over the sugar mixture.
- Starting from the long side, tightly roll the dough into a log. Pinch the seam closed.
- Place the log, seam-side down, into a greased 9×5 inch loaf pan.
- Cover the pan loosely and let the dough proof for 30 to 45 minutes, or until it has nearly doubled again. Preheat your oven to 375°F during the last 15 minutes of proofing.
- Bake for 30 to 35 minutes, or until the top is golden brown and the internal temperature reaches 200°F.
- Remove the bread from the pan immediately after baking. Brush the top crust with a little extra melted butter while it is still warm for a soft finish.
- Cool completely on a wire rack before slicing for the best sliceable results.
Notes
- Toast slices and serve warm with butter for a cozy breakfast.
- This bread freezes well once completely cooled; slice before freezing for easy portions.
- For a bread machine variation, use the dough cycle and then shape and bake in a standard oven.
Nutrition
- Serving Size: 1 slice
- Calories: 220
- Sugar: 12g
- Sodium: 250mg
- Fat: 4g
- Saturated Fat: 2g
- Unsaturated Fat: 2g
- Trans Fat: 0g
- Carbohydrates: 43g
- Fiber: 2g
- Protein: 6g
- Cholesterol: 5mg