

Let’s be honest—the chocolate meringue pie is the Mount Everest of home baking goals. It looks so simple, yet it’s famous for collapsing, weeping sugary puddles, or cracking like dry earth right when you pull it out of the oven. That’s where the Dishicious method comes in. I engineered this project to eliminate the stress. We’re going through the process with the precision of a project manager to guarantee two things: a deeply rich, velvety chocolate custard filling and a towering, beautifully stable meringue that stays put. Forget the frustration; this is the ultimate, reliable version of this classic dessert that just works.
- Why This is the Best Chocolate Meringue Pie Recipe You Will Make
- Gathering Ingredients for Your Chocolate Meringue Pie
- How to Prepare the Rich Chocolate Custard Pie Filling
- Creating the Fluffy Meringue Topping Recipe for Chocolate Meringue Pie
- Assembling and Baking Your Ultimate Chocolate Dessert
- Cooling the Chocolate Meringue Pie Correctly
- Tips for Success with Classic Pie Recipes
- Storage and Make Ahead Pie Instructions
- Frequently Asked Questions About This Decadent Chocolate Dessert
- Estimated Nutritional Data for This Classic Pie
- Share Your Experience Making This Perfect Chocolate Meringue Pie
Why This is the Best Chocolate Meringue Pie Recipe You Will Make
Let’s be honest—the chocolate meringue pie is the Mount Everest of home baking goals. It looks so simple, yet it’s famous for collapsing, weeping sugary puddles, or cracking like dry earth right when you pull it out of the oven. That’s where the Dishicious method comes in. I engineered this project to eliminate the stress. We’re going through the process with the precision of a project manager to guarantee two things: a deeply rich, velvety chocolate custard filling and a towering, beautifully stable meringue that stays put. Forget the frustration; this is the ultimate, reliable version of this classic dessert that just works.
- We use a guaranteed tempering technique to ensure a perfectly smooth, rich chocolate custard pie filling.
- The meringue process is designed specifically for stability, meaning you get that high, gorgeous cloud without any weeping.
- This method produces a showstopper that stands tall, earning you serious compliments, but requires simple, focused actions from you.
Achieving a Foolproof, Fluffy Meringue Topping Recipe
The meringue is where most people panic, but here’s the trick I learned from countless kitchen tests for this chocolate meringue pie. You absolutely must use egg whites that are at room temperature—cold whites just won’t whip up right. Also, we use cream of tartar. This little bit of acid acts as a stabilizer, giving you that strong framework for a true ‘no weep meringue pie’. If you want more inspiration on pie stability, check out my guide on the best classic lemon meringue pie recipe.
The Secret to Velvety Chocolate Filling
Grainy filling is a failure in my book, and it usually happens when the eggs scramble a little. My project management approach means zero guesswork here. We temper the yolks perfectly before they even think about heading back to the heat. This slow introduction of hot liquid protects the proteins so you end up with that luxurious, thick, velvety chocolate filling you expect in the best chocolate meringue pie. It’s pure silk.
Gathering Ingredients for Your Chocolate Meringue Pie
Okay, let’s get the components organized. In my world, a successful bake starts with having everything measured and ready to go. For this ultimate chocolate meringue pie, you’ll need components for the crust, the filling, and the topping. Keep those egg whites separate—no cross-contamination allowed! Get your ingredients ready, and we can move on to the main event.
- For the Filling: 1 (9-inch) pre-baked buttery pie crust, 1 cup sugar, 1/3 cup cornstarch, 1/4 teaspoon salt, 1 1/2 cups cold water, 1 1/2 cups whole milk, 3 large egg yolks (lightly beaten), 4 ounces unsweetened chocolate (chopped), 2 tablespoons unsalted butter, and 1 teaspoon vanilla extract.
- For the Meringue: 4 large egg whites (they need to be at room temperature!), and 1/4 teaspoon cream of tartar.
Buttery Pie Crust Recipe Note
Look, the filling and the meringue are the stars, but they can only shine if the foundation is solid. Make sure your 9-inch crust is baked until it’s beautifully golden brown, and I mean completely cooled before pouring in the hot custard. If the crust is even slightly warm, you are guaranteeing a soggy bottom, and we’re aiming for superior texture here. A solid, well-baked ‘buttery pie crust recipe’ is the scaffolding for success.
How to Prepare the Rich Chocolate Custard Pie Filling
This is the engineering phase where we build the body of our chocolate meringue pie. We need that deep, dark chocolate flavor combined with a texture that never quits. Don’t step away from the stove for this part; constant motion is key to getting that perfect set.
First, let’s combine the dry goods in your medium saucepan: whisk together 1 cup of the sugar, the cornstarch, and the salt until they look uniform. Slowly start incorporating the 1 1/2 cups of cold water—whisk constantly while you pour to make sure there are absolutely no lumps. You’re creating a slurry here now. Next, stir in the milk, and then put the pan over medium heat.
You have to stir this mixture constantly until it gets really thick and starts bubbling aggressively. Once it hits that rolling boil, keep stirring hard for exactly one more minute, then yank it off the heat immediately. This 60-second boil is non-negotiable; it activates the cornstarch fully, ensuring your rich chocolate custard pie sets up firm.
Mastering the Egg Yolk Tempering Technique
Now comes the part that separates the successful cooks from the scrambled-egg-in-custard cooks: tempering. We have those hot liquids, and we have our three gorgeous, lightly beaten egg yolks waiting separately. If you dump that hot milk mixture right into the yolks, they will seize up! That’s not what we want for our velvety chocolate filling.
So, take about one cup of that super-hot milk and sugar mixture and drizzle it very slowly into your egg yolks while you beat those yolks non-stop. I mean, whisk like your dessert depends on it—because it does! This gently coaxes the yolks up to temperature without cooking them solid. Once they’re tempered, slowly pour that tempered yolk mixture back into the main saucepan mixture. Then, put it back on medium heat just until it boils again for that final minute. Remember to stir! After that, stir in your chopped chocolate, butter, and vanilla until everything melts down into smooth perfection. Pour that glorious hot filling right into your cooled, pre-baked crust.
If you want more specific help on efficient cooking methods, you might find the steps for my easy homemade naan bread recipe useful for understanding low-and-slow heat management!
Creating the Fluffy Meringue Topping Recipe for Chocolate Meringue Pie
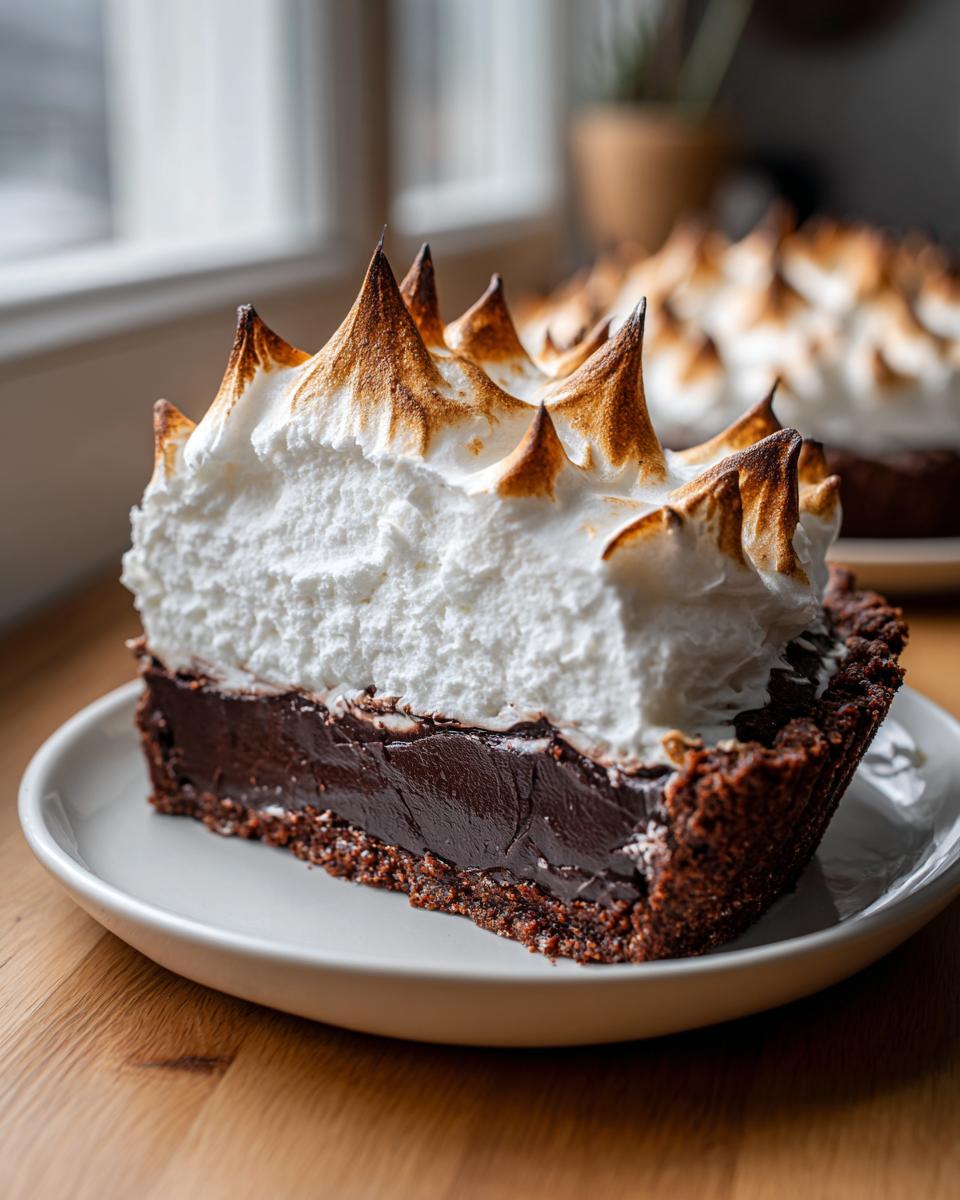
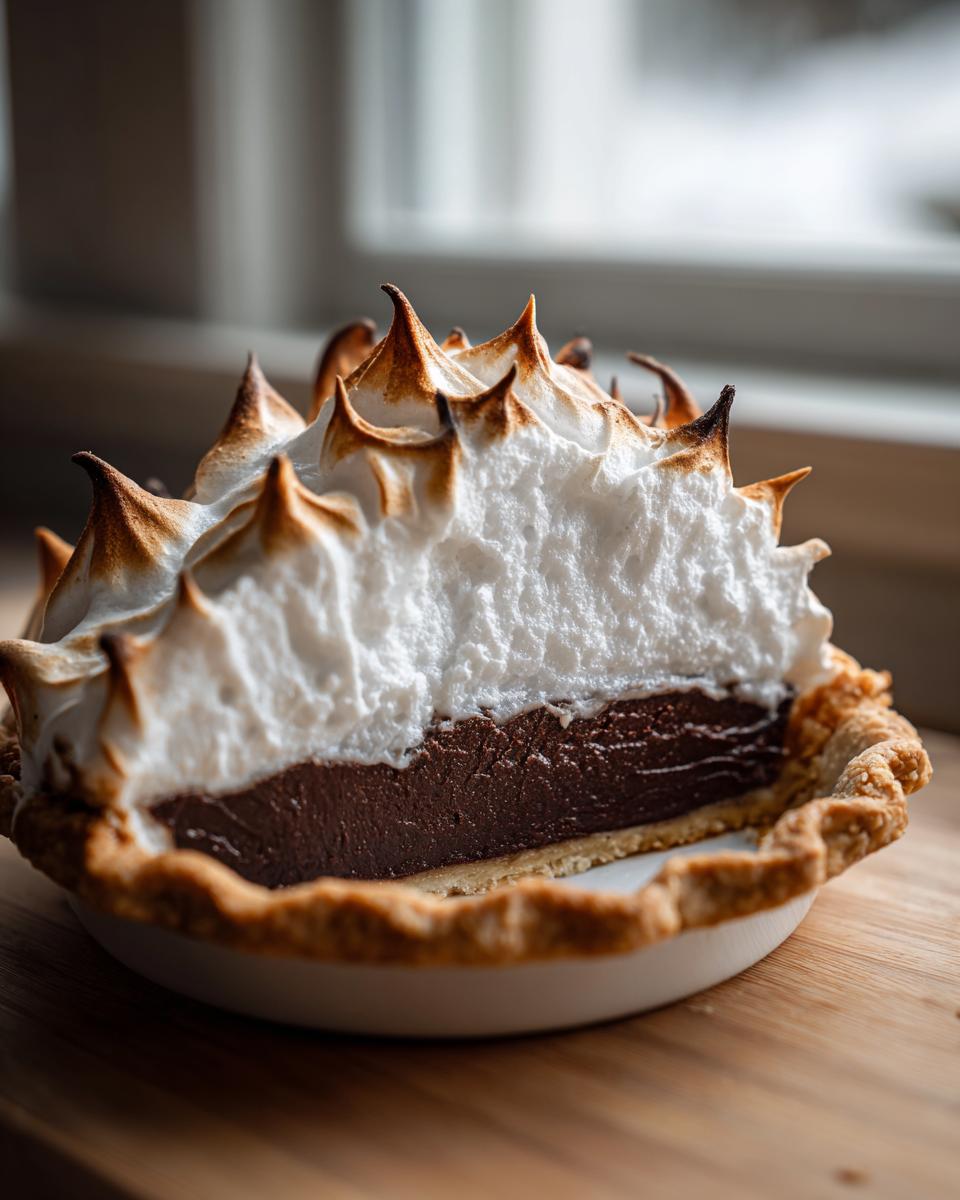
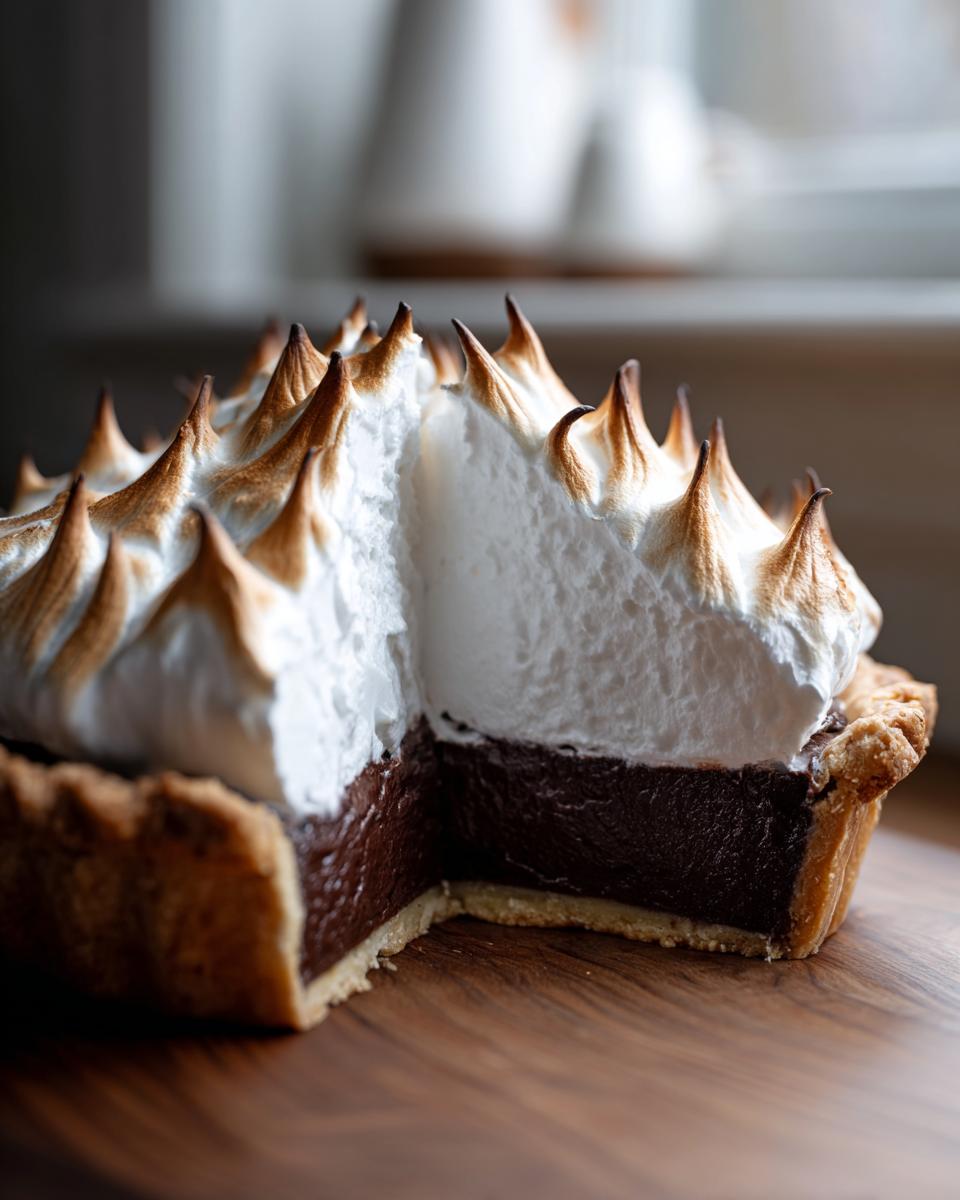
Alright, this is the grand finale for your chocolate meringue pie—the magnificent, fluffy cloud that wobbles just right when you carry it. People think making meringue is tricky, but if you follow these steps for your ‘fluffy meringue topping recipe,’ you’ll get that picture-perfect look without any worries.
First, a non-negotiable rule: Your bowl and your beaters? They must be spotless and completely grease-free. Even a tiny speck of fat or yolk will stop those egg whites from whipping up properly. Grab your 4 room-temperature egg whites and get them into that clean mixing bowl. Start the electric mixer on medium speed until they look foamy—like the head on a beer. That’s when you introduce the cream of tartar. Don’t skip it; it is our insurance policy against collapse!
Now, we slowly introduce the remaining 1/2 cup of sugar. I mean slowly, like a whisper at a time while the mixer is running. If you dump it all in at once, you crash the foam structure we’re trying to build. Keep beating until you achieve stiff, glossy peaks. When you pull the beaters out, the peaks should stand up straight and hold their shape firmly—that’s the sign of a stable meringue ready for its chocolate bed. If you want more tips on getting buttercreams that stand tall, I break down aeration similarly in my guide on vanilla buttercream fluffy stable recipe. Your meringue is now ready to seal that custard!
Assembling and Baking Your Ultimate Chocolate Dessert
It’s time for the grand assembly of your chocolate meringue pie. We’ve got the cool, silky chocolate base ready in the crust, and we have that light, stiff meringue just waiting to be piled on top. Before you start dolloping, remember this crucial engineering step: you must seal the meringue to the edges of the crust.
Take your spatula and spread that meringue over the hot chocolate filling, but make sure the meringue actually touches the crust all the way around the perimeter. Seriously, seal it down tight! If there is even a tiny gap between the meringue and the crust, the filling beneath will shrink as it cools, creating that dreaded gap, and your meringue topping will start weeping sugary tears. We are avoiding weepage at all costs!
Once you’ve sealed the deal around the edges, go ahead and create some drama with the peaks. Use the back of a spoon or a spatula to create swirls and tall points—these high points are what toast up so nicely in the oven. We are baking this pie at 350°F (175°C) for a relatively short time, maybe 12 to 15 minutes. You’re not trying to cook the meringue through; you’re just looking to kiss those peaks with golden color. Watch it like a hawk, because it goes from perfect gold to burnt charcoal surprisingly fast! If you often run into issues with toppings, you might find the process I use for my fudgy cosmic brownies recipe helpful for understanding how temperature affects toppings.
Cooling the Chocolate Meringue Pie Correctly
Look, getting the filling right and building that spectacular meringue is only half the battle. The cooling process for your chocolate meringue pie is the final checkpoint where many people (me included, back in the day!) lose the meringue war to humidity and temperature shock.
The rule here is slow and steady wins the race. Step 11 is simple but absolutely crucial: Do not—I repeat, do not—rush this pie into the refrigerator the second it comes out of the oven. The thermal shock is what causes the meringue to panic. When a hot pie hits cold air or cold glass, the water trapped between the filling and the meringue rapidly expands and then condenses.
This temperature crash is the number one reason why your beautiful, stiff meringue starts sweating, leaking sugary syrup, or “weeping.” We worked too hard for that fluffy meringue topping recipe to fail now! Instead, you need to leave the entire chocolate meringue pie sitting right on the counter, on a wire rack, for a minimum of four hours. This gentle, room-temperature cool-down allows those internal pressures to equalize without forcing that moisture out.

Once the pie is completely cooled down to room temperature—and I mean cool all the way through—then, and only then, can you cover it loosely and transfer it to the fridge. This slow approach ensures that your finished homemade chocolate pie remains structurally sound and perfectly delicious when you finally cut into it.
Tips for Success with Classic Pie Recipes
When you’re tackling classic pie recipes, especially one as visually impressive as the chocolate meringue pie, it’s about knowing the little secrets that make the difference between good and great. Since I apply a project-oriented approach to baking, I’ve captured the key checkpoints that guarantee you walk away with success. These aren’t complicated moves; they are just non-negotiable execution points for reliability.
If you want to dive deeper into how to make other fruit classics foolproof, my approach to a foolproof comforting apple crisp recipe focuses on similar structural integrity points!
Here are the three primary meringue pie secrets that ensure your final product is professional grade:
- Total Grease Elimination for Whites: Before you even think about whipping those egg whites, scrub your mixing bowl and attachments with hot, soapy water, then wipe them down with a splash of white vinegar or lemon juice. Any residual fat—even from your own fingertips—will inhibit the volume and create a weak foam structure. For our powerful fluffy meringue topping recipe, we need maximum strength right from the start.
- Seal the Deal: Remember during assembly when we talked about spreading the meringue all the way to the edge of the crust? This is an absolute must. When the meringue hits the crust edge, it seals the hot chocolate filling inside. If you leave a gap, steam builds up under the meringue, condenses, and causes the weep, which nobody wants on their decadent chocolate dessert.
- Patience During the Cooldown: The final rule is about patience—something I definitely had to work on when I started cooking efficiently! The transition from a 350°F oven to immediate refrigeration is too fast for this pie. Let the chocolate meringue pie rest on the counter, uncovered, for at least four hours. This slow decompression prevents the structural collapse and frustrating sugar beads that ruin an otherwise beautiful pie.
Storage and Make Ahead Pie Instructions
One of the best parts about perfecting a classic pie recipe like this chocolate meringue pie is knowing you can manage your timeline. This is where the Dishicious efficiency shines—we don’t have to bake the whole thing the moment company arrives!
You can absolutely prepare your components ahead of time, making this a fantastic ‘make ahead pie’ option for holidays or big dinners. The buttery pie crust needs to be fully baked and cooled, and that’s easy to tackle the day before. Even better, the rich chocolate custard filling can be made first and stored in the crust—covered tightly with plastic wrap pressed right onto the surface to prevent a skin from forming—in the refrigerator for up to three days.
Now, here is the critical timing detail: The meringue must always be made as close to serving time as possible. Aerated toppings, like meringue, just don’t hold up well to extended refrigeration. We want that fresh, fluffy structure.
If you want to get ahead, complete the filling and crust the day before. Then, on the day you plan to serve your decadent chocolate dessert, whip your meringue, top the cool filling, and bake immediately according to the directions. Once baked, follow the slow cooling process we discussed earlier!
If you’re looking for more scheduling help for your baking projects, I walk through some general timeline strategies in my guide on make ahead pie planning. It’s all about streamlining the workflow!
Frequently Asked Questions About This Decadent Chocolate Dessert
So, you’ve got your pie built, but maybe a few details from the process are nagging at you. That’s totally normal! When you’re aiming for a showstopper like the chocolate meringue pie, you want certainty. I’ve collected the common questions I get about ensuring this dessert delivers on its promise of a rich custard and perfect topping. Let’s clear up any lingering doubts so you can slice with confidence.
Can I use pre-made whipped topping instead of homemade meringue?
Technically, you can, but if you’ve gone to all the effort to get that rich chocolate custard pie filling perfect, why stop short on the topping? Pre-made toppings just don’t have the structure, volume, or distinct flavor that our homemade fluffy meringue topping recipe achieves. The lightness of a true baked meringue provides a textural contrast that the canned stuff just can’t match. For the ultimate experience of this chocolate meringue pie, stick to the fresh egg whites!
What causes the meringue on a chocolate meringue pie to weep?
Weeping is the mortal enemy, and it almost always comes down to two things we covered in detail: temperature shock or poor sealing. If the hot pie hits the fridge too fast, the trapped moisture underneath the meringue leaks out—that’s the weep. If the meringue doesn’t touch the crust edge all the way around, the steam builds up under the meringue, condenses, and causes the weep, which nobody wants on their chocolate meringue pie.
Can I substitute the unsweetened chocolate?
For the absolute best, deepest flavor in our velvety chocolate filling, I strongly recommend sticking to the 4 ounces of unsweetened chocolate called for. It provides that deep cocoa punch that balances the sweetness of the custard. If you absolutely can’t find it, you can substitute semi-sweet chocolate, but you’ll need to cut back on the 1 cup of sugar in the filling by about 2 tablespoons. This keeps the intensity right where it should be for the best chocolate meringue pie experience. For more help on structuring delicious chocolate bakes, take a look at my guide on easy fudge pie recipe!
Estimated Nutritional Data for This Classic Pie
When you’re aiming for an ultimate chocolate dessert that delivers this kind of richness, you know it’s going to be a treat! Because let’s be honest, this is not a low-calorie snack; it’s a celebration piece. I’ve broken down the estimated nutritional information below so you know exactly what you’re serving up.
Remember, I approach recipes like projects, and data is part of that analysis. These numbers are calculated based on the ingredients listed in the recipe above for a standard eight-serving slice. Since we all use different brands of cocoa, eggs, and butter, these figures should be treated as a solid estimate for your chocolate meringue pie, not exact figures.
- Serving Size: 1 slice
- Calories: 380
- Sugar: 45g
- Sodium: 150mg
- Fat: 18g
- Saturated Fat: 10g
- Unsaturated Fat: 8g
- Trans Fat: 0g
- Carbohydrates: 52g
- Fiber: 2g
- Protein: 7g
- Cholesterol: 110mg
It’s a decadent bake, so enjoy it mindfully! Knowing the structure of a great classic pie recipe means appreciating both the flavor and the substance.
Share Your Experience Making This Perfect Chocolate Meringue Pie
I’ve given you the blueprints, the tested material lists, and the precise steps to achieve what I know is the ultimate chocolate meringue pie. Now the project is in your hands! Baking is truly satisfying when you follow a reliable system, and I really want to know how this Dishicious method has worked for you.
Did you conquer the weaving issue? Was your chocolate custard filling every bit as rich and velvety as you hoped? I need the feedback! Head down to the comments section below and tell me everything. Rate the recipe, especially noting the stability of that fluffy meringue topping.
Connecting with you helps me refine the playbook for future bakes. If you ran into a snag, let’s troubleshoot together—that’s the beauty of this shared kitchen approach. You can always reach out directly if you have something specific you want to discuss privately via my contact page. Go on, slice that beautiful pie, and tell me how perfect it is!
PrintThe Ultimate Chocolate Meringue Pie Recipe: Rich Custard and Fluffy, No-Weep Topping
This recipe delivers a classic chocolate meringue pie with a deeply rich chocolate custard filling and a towering, stable meringue topping. We focus on simple steps to achieve a velvety filling and prevent common meringue failures like weeping or cracking. This is your go-to for a truly decadent homemade chocolate dessert.
- Prep Time: 25 min
- Cook Time: 30 min
- Total Time: 4 hours 55 min
- Yield: 8 servings 1x
- Category: Dessert
- Method: Baking
- Cuisine: American
- Diet: Vegetarian
Ingredients
- 1 (9-inch) pre-baked buttery pie crust
- 1 1/2 cups granulated sugar, divided
- 1/3 cup cornstarch
- 1/4 teaspoon salt
- 1 1/2 cups cold water
- 3 large egg yolks, lightly beaten
- 1 1/2 cups whole milk
- 4 ounces unsweetened chocolate, chopped
- 2 tablespoons unsalted butter
- 1 teaspoon vanilla extract
- 4 large egg whites, at room temperature
- 1/4 teaspoon cream of tartar
Instructions
- Prepare the pie crust: Bake your 9-inch pie crust according to your preferred recipe until golden brown. Set aside to cool completely.
- Make the chocolate custard filling: In a medium saucepan, whisk together 1 cup of the sugar, cornstarch, and salt. Gradually whisk in the cold water until smooth.
- Stir in the milk and place the saucepan over medium heat. Cook, stirring constantly, until the mixture thickens significantly and begins to bubble. Cook for 1 minute more, stirring constantly. Remove from heat.
- Temper the egg yolks: In a separate bowl, whisk the egg yolks. Slowly pour about 1 cup of the hot milk mixture into the yolks while whisking constantly to temper them.
- Return the tempered yolk mixture to the saucepan with the remaining hot mixture. Cook over medium heat, stirring constantly, until the filling comes to a boil and thickens again. Boil for 1 minute. Remove from heat.
- Stir in the chopped chocolate, butter, and vanilla extract until smooth. Pour the hot chocolate custard immediately into the cooled, pre-baked pie crust.
- Make the meringue: In a clean, grease-free bowl, beat the egg whites with an electric mixer on medium speed until foamy. Add the cream of tartar.
- Gradually add the remaining 1/2 cup of sugar, beating until stiff, glossy peaks form. This is the secret to a stable, fluffy meringue topping.
- Spread the meringue over the hot chocolate filling, making sure the meringue touches the edges of the crust all the way around to seal it. This prevents shrinking.
- Bake the pie at 350°F (175°C) for 12 to 15 minutes, or until the meringue peaks are lightly golden brown.
- Cool the pie completely on a wire rack at room temperature for at least 4 hours before slicing. Do not refrigerate immediately, as rapid cooling can cause the meringue to weep.
Notes
- For a crack-free meringue, ensure your egg whites are at room temperature and your mixing bowl is completely free of any grease or yolk residue.
- To prevent weeping, spread the meringue so it seals completely against the crust edge. Also, cool the pie slowly at room temperature before chilling.
- Use high-quality unsweetened chocolate for the richest flavor in your velvety chocolate filling.
Nutrition
- Serving Size: 1 slice
- Calories: 380
- Sugar: 45g
- Sodium: 150mg
- Fat: 18g
- Saturated Fat: 10g
- Unsaturated Fat: 8g
- Trans Fat: 0g
- Carbohydrates: 52g
- Fiber: 2g
- Protein: 7g
- Cholesterol: 110mg