
Okay, let’s ditch the stress. When it comes to the centerpiece of any special holiday meal—especially Christmas—nothing beats a giant, gorgeous, perfectly cooked rib roast. For years, I thought making a show-stopping Prime Rib was reserved for professional chefs, but that’s just not true. As a home cook who approaches food like a project manager, I engineered this Foolproof Oven Roasted Prime Rib method to be completely reliable. We aren’t messing around with complicated setups here; we are focusing purely on efficiency and flavor delivery so you get that incredibly tender, juicy result every single time. Trust me, you’re going to nail this impression-making meal.
This whole streamlined process—from the easy seasoning to the perfect resting time—is detailed in my favorite guide, which you can check out if you want the full rundown: our go-to Prime Rib instructions. It’s all about removing the variables.
- Why This Foolproof Oven Roasted rib roast Recipe Works (The Dishicious Method)
- Ingredients for Your Herb Crusted rib roast
- Standing Rib Roast Instructions: How to Cook rib roast Perfectly
- Resting and Making the Au Jus for Your rib roast
- Carving Tips for rib roast Presentation
- Serving Suggestions for Your Special Occasion Beef Roast
- Storage and Reheating Instructions for Leftover rib roast
- Frequently Asked Questions About Cooking Prime Rib Roast
- Share Your rib roast Success
Why This Foolproof Oven Roasted rib roast Recipe Works (The Dishicious Method)
When you invest in a beautiful standing rib roast, you want zero guesswork. That’s why this simple oven method is my absolute favorite. I stripped away all the old, fussy techniques and kept only the essential steps that guarantee success. It’s smart cooking applied to a classic centerpiece. If you’re looking for a truly reliable Prime Rib Roast Recipe, this is it.
Here is the methodology in a nutshell:
- Always let the roast come to room temperature first—no exceptions!
- Use the powerful high-heat sear to lock in flavor right at the start.
- Trust the thermometer over the clock every single time.
- Resting isn’t optional; it’s the final, crucial cooking step.
The Importance of Temperature for a Juicy Roast Beef Recipe
Ditch the “guess and check” method; that’s how we end up with dry edges and blue centers. For any juicy roast beef recipe, relying on a high-quality meat thermometer is non-negotiable. Cooking times are suggestions, but the internal temperature tells the absolute truth about your meat. We pull this beautiful roast out when the thickest part hits 125°F for a perfect medium-rare finish. But listen, the thermometer isn’t done working! Resting for at least 20 minutes after it leaves the oven is the key to that edge-to-edge tenderness. If you skip resting, all those delicious juices you worked so hard to retain will run right out onto your cutting board.
Ingredients for Your Herb Crusted rib roast
When I put together a list for a big centerpiece like this, I keep it lean. We need quality ingredients, but we don’t need 30 small bowls cluttering up the counter. This recipe focuses on what truly matters for a sensational herb crusted rib roast. Make sure you grab a roast between 5 and 7 pounds—that’s usually a two or three-rib cut, which is usually the sweet spot for the oven method.
Here’s what you need for the meat and the simple au jus:
- One 5–7 pound standing rib roast (Prime Rib)
- 3 tablespoons kosher salt (I swear by kosher for rubs!)
- 1 tablespoon black pepper
- 1 tablespoon dried thyme
- 1 tablespoon dried rosemary
- 6 cloves garlic, minced finely
- 1/2 cup unsalted butter, making sure it’s totally softened—not melted!
- 1 tablespoon olive oil
- 1 cup beef broth (for the delicious au jus later)
- 1/4 cup dry red wine (totally optional, use it if you want extra depth)
Ingredient Notes and Substitutions
Let’s talk quality control, because this cut deserves it. Salt choice is important here; use kosher salt, not table salt. It adheres better and seasons more evenly without making the crust too aggressively salty. If you only have fresh herbs, use about double the amount—maybe 2 tablespoons of each fresh thyme and rosemary—and chop them finely so they mix into the butter nicely.
The olive oil helps the herb butter spread easily over that big piece of meat, so don’t skip it. And seriously, for the au jus, if you aren’t cooking with wine, just use an extra 1/4 cup of high-quality beef broth. No big deal, the flavor will still be fantastic.
Standing Rib Roast Instructions: How to Cook rib roast Perfectly
Now for the main event—the execution. My project management brain loves this because it’s broken down into easy, sequential phases. We start by pulling that gorgeous rib roast out of the fridge. You need it to nap on the counter for about two to three hours. If you cook a cold roast, you’ll end up with that disappointing grey ring around the outside because the center is still fighting the cold. Seriously, make the time for that temperature equalization!
Once it’s ready, grab a stack of paper towels and pat the whole thing bone-dry. A dry surface is essential for getting that nice crust, just like you want when you’re aiming for a tender roast beef recipe.
Preparing the Garlic Herb Butter Roast
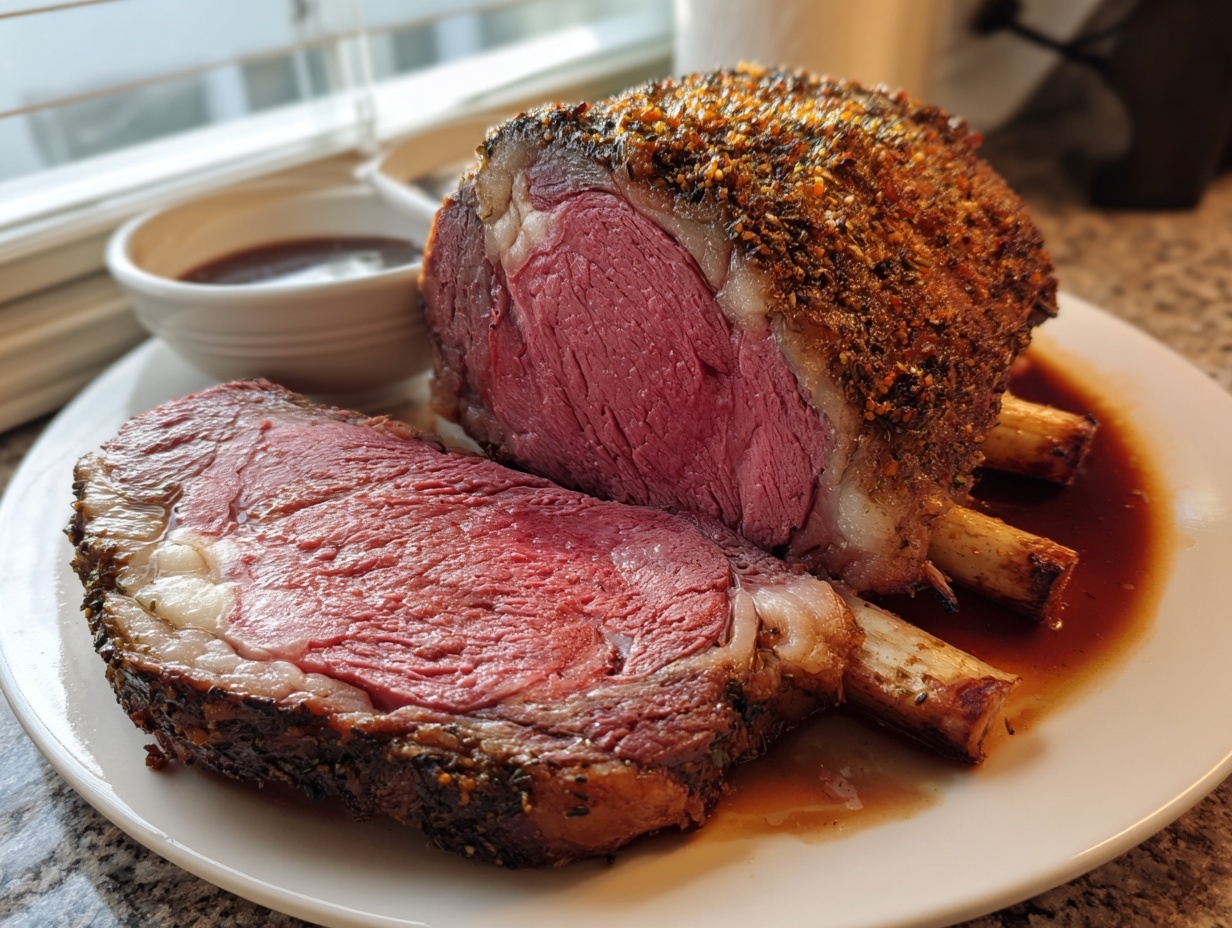
This herb butter is everything. Take your softened butter—and I mean soft, not oily or melted—and mix it aggressively with the minced garlic, the thyme, the rosemary, salt, and pepper. I like to use a fork to really smash everything together until it looks like a perfectly blended, aromatic paste. Don’t be shy! You need to get this garlic herb butter rub all over the roast. Use your hands and press it firmly onto every exposed surface. I mean every nook and cranny. This isn’t just seasoning; it’s forming the protective shell.
Two-Stage Oven Roasting for the Perfect rib roast
This is where the magic—and the engineering—comes in. We use two heat zones. First, crank that oven up to 450°F. Place your roast fat-side up on the rack in the pan and sear it hard for exactly 15 minutes. This sets the crust beautifully. After that blast of heat, don’t touch the dial; just drop the temperature down to 325°F. Now, this is where we integrate the Best Rib Roast Temperature Guide concept: you must use a reliable instant-read thermometer. Insert it into the thickest part of the meat, avoiding the bone completely. We are aiming for 125°F for that perfect medium-rare. Forget what the standard chart says about time; the thermometer is your only boss here. If you need more background on nailing the internal heat, remember that perfect sides also rely on good recipe timing!
Resting and Making the Au Jus for Your rib roast
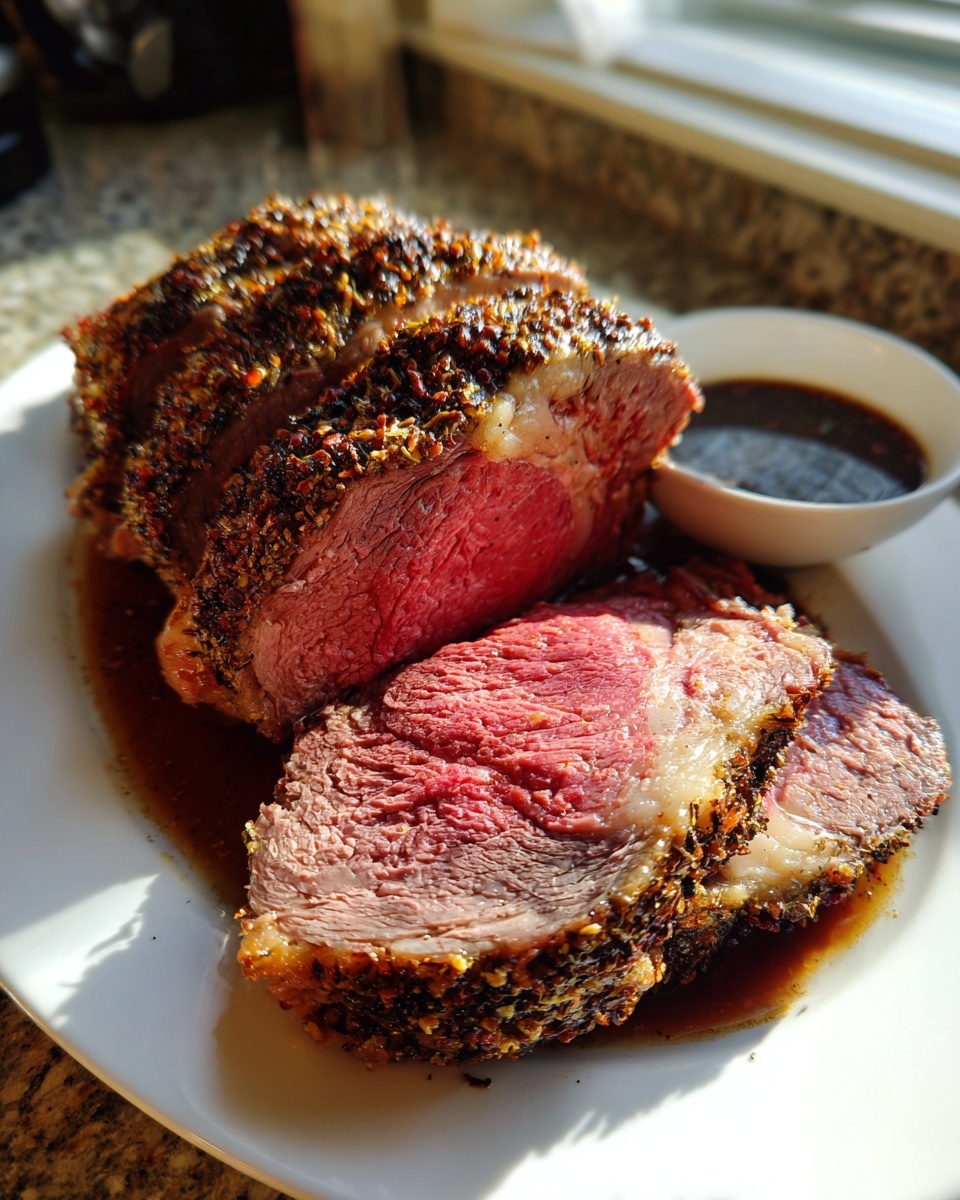
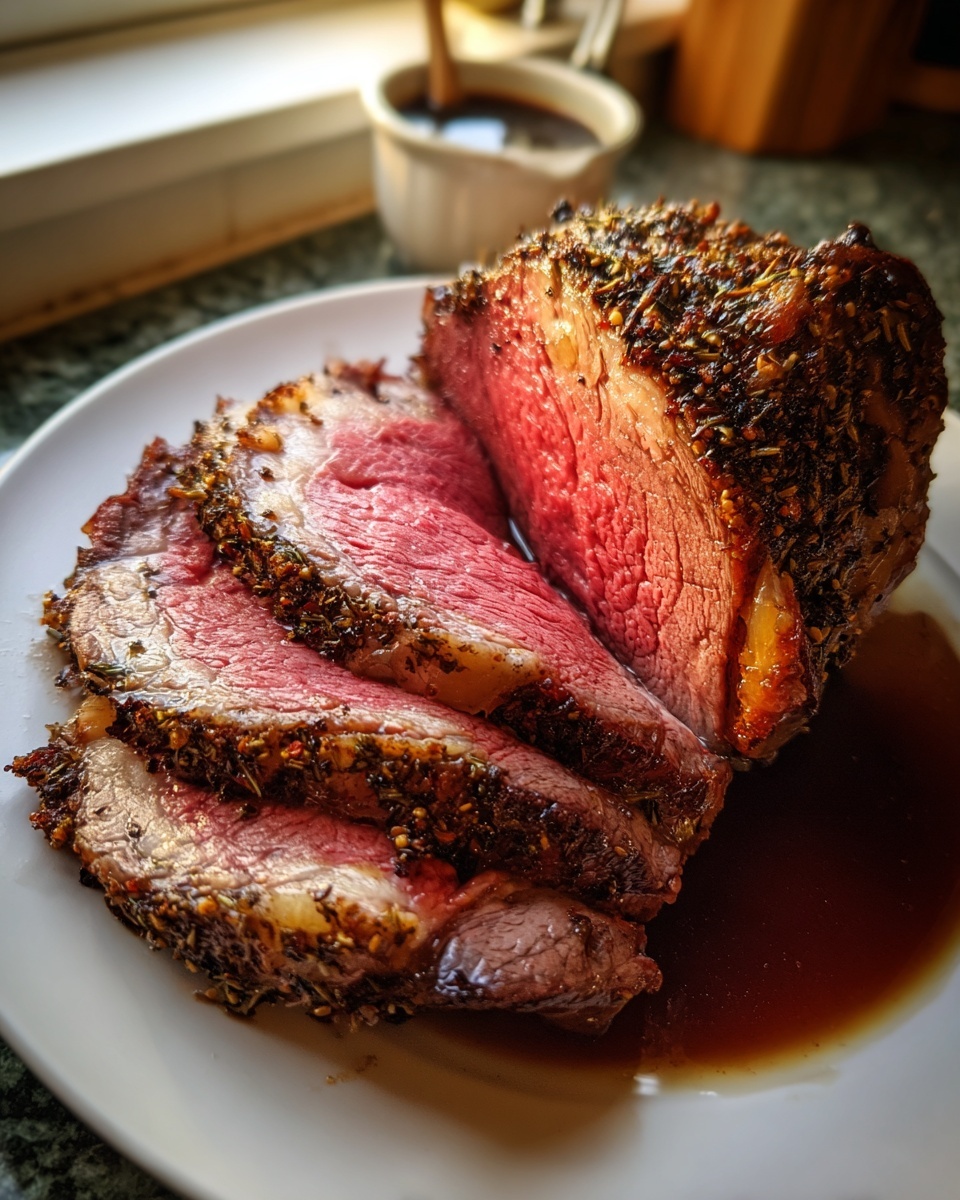
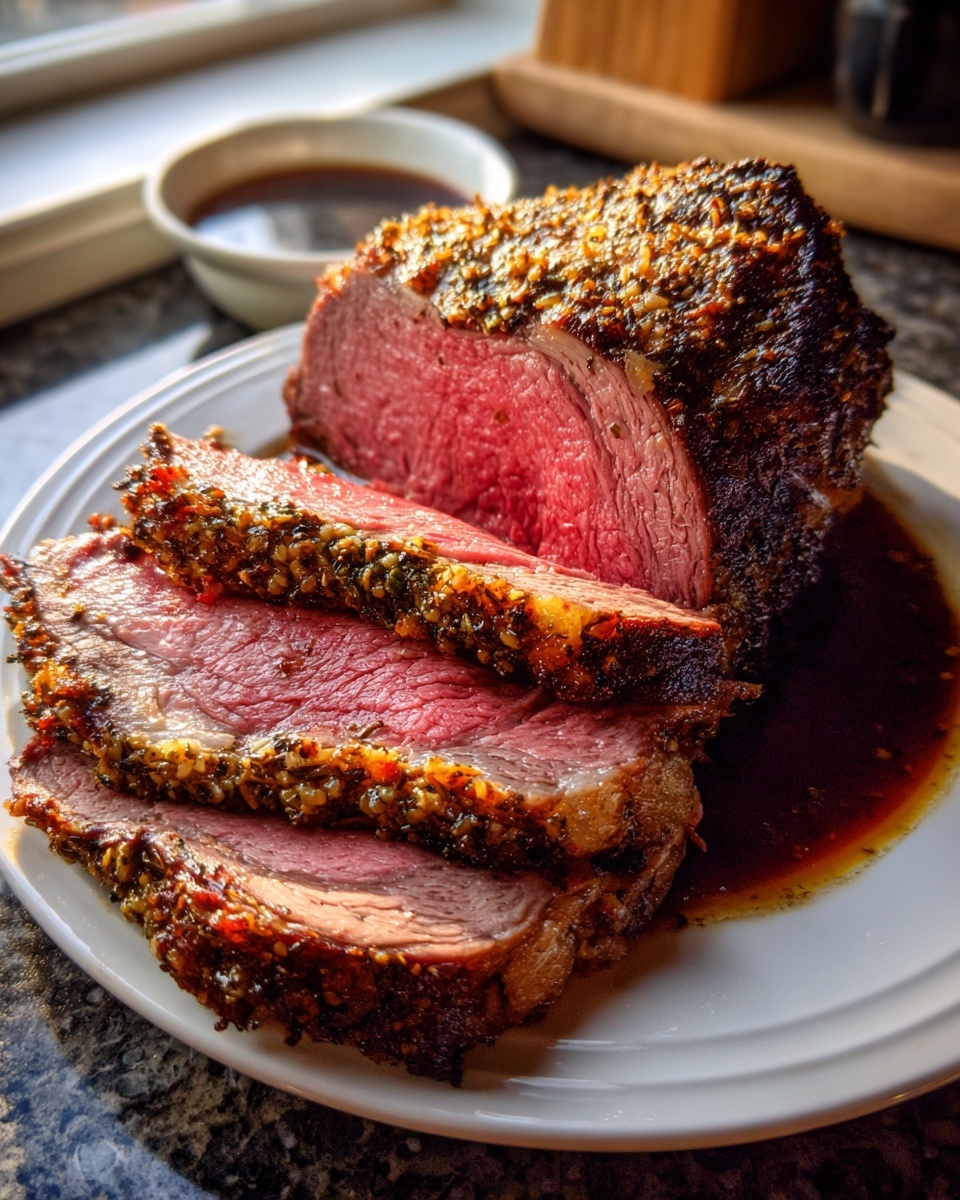
I know, I know! You pulled that glorious, perfectly pink, herb-crusted rib roast out of the oven at 125°F, and your first instinct is to slice into it immediately. We usually want instant gratification, right? But hold the carving knife! That 20-minute rest is absolutely critical. I actually plan my entire dinner timeline around this resting period. Why? Because when the meat is roasting that hard, all those delicious juices get super excited and rush toward the center. If you cut it right away, those juices spill out onto your platter, and you end up with a slightly drier roast than you deserve.
Tent that beauty loosely with foil—don’t wrap it tight, or you’ll steam that gorgeous crust we worked so hard on. During those 20 minutes, the temperature continues to coast upward, finishing precisely where we want it (maybe 130°F after resting), and more importantly, the muscle fibers relax and reabsorb all that moisture. That’s how you guarantee a truly tender roast beef recipe.
While your meat is relaxing, it is prime time to whip up some fantastic pan drippings—that incredible foundation for your Roast Beef with Au Jus. Pull that roasting pan out, but leave all those browned bits stuck to the bottom; that’s pure flavor gold.
Here is my super-efficient method: Move the pan right onto a stovetop burner over medium heat. Pour in your cup of beef broth and that optional splash of red wine. Grab a wooden spoon and scrape, scrape, scrape! You need to release every speck of caramelized fond from the bottom. Let that mixture bubble and reduce just a bit—maybe about five minutes is plenty to concentrate the flavor. Strain the liquid through a fine-mesh sieve into a little gravy boat to remove any charred bits or herb debris. If you’re planning on serving my favorite creamy sides, don’t forget to check out my recipe for creamy horseradish sauce—it’s the perfect sharp counterpoint to this rich beef!
That’s it! The roast rests, the sauce simmers, and you’ve just managed a gourmet centerpiece with textbook efficiency.
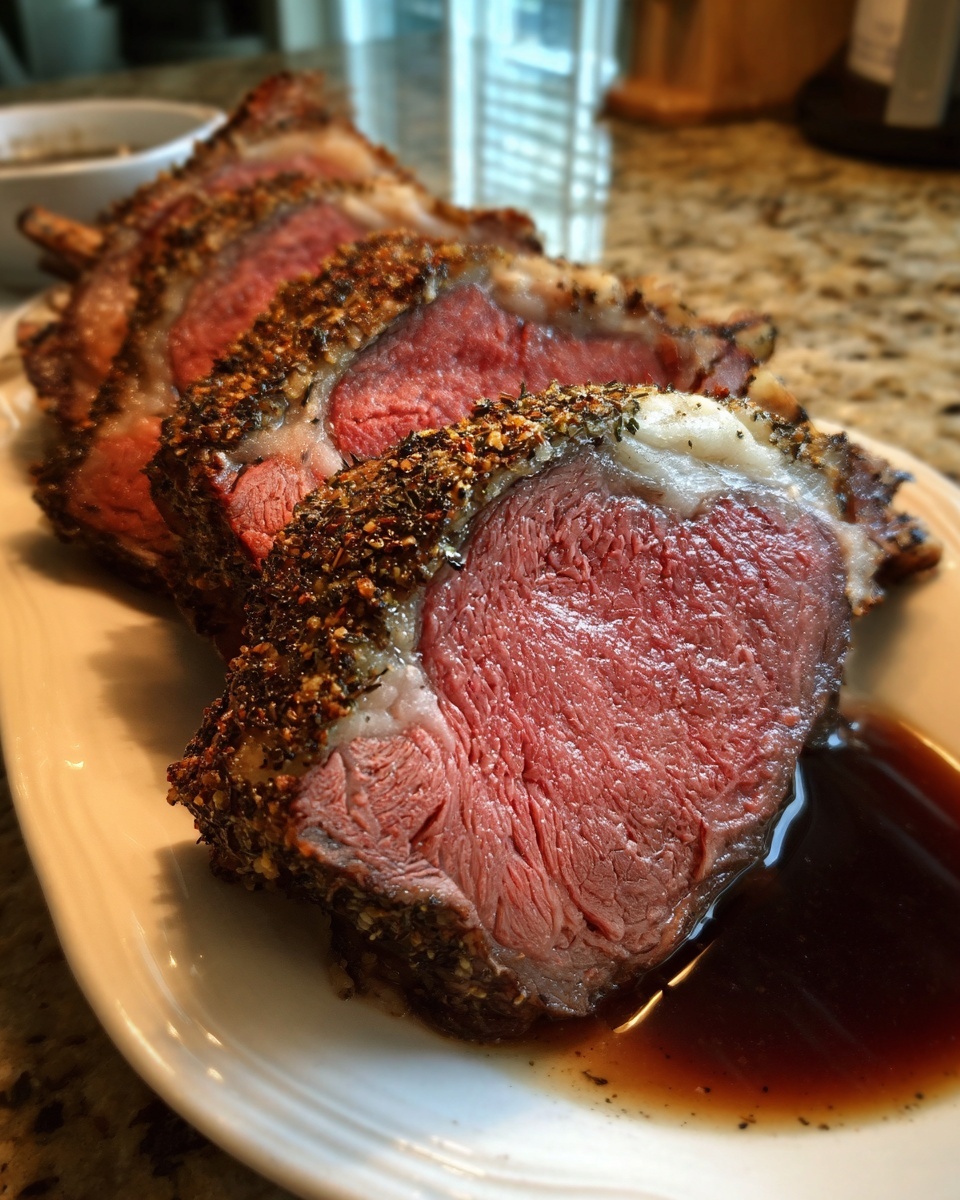
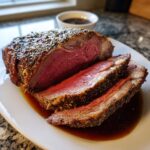
Carving Tips for rib roast Presentation
You’ve successfully roasted the perfect rib roast, you’ve let it rest—the smell in your kitchen is incredible! Now comes the moment of truth: the final presentation. You want those slices to look as perfect as they taste, right? We are aiming for an impressive beef dinner presentation here, and how you cut it truly matters. My strategy is all about maximizing convenience for your guests while keeping every slice beautiful.
The number one secret here, especially if you have bones attached, is to carve *between* the bones. Do not try to saw through them while the roast is on the platter; that just gets messy and tears up the meat.
Here are the direct steps for getting those picturesque slices:
- First, lay the roast on a sturdy cutting board, fat-side up. You need a long, sharp carving knife for this job. If you haven’t sharpened your knives in a while, now is the time!
- Locate where the bones connect to the meat. You want to slide your knife gently between the meat and the main rib bones. Angle the knife slightly toward the bone as you run the blade down the length.
- Once you’ve loosened the meat from the bones, you can lift the entire section of meat off the rib cage. Those bones can go straight onto the serving platter for that classic holiday look—they look so festive!
- Now, slice the de-boned roast against the grain. Remember, the grain runs parallel to the ribs. Cutting against it ensures that every single slice is fork-tender. Aim for slices about 1/4 to 1/2 inch thick, depending on how hungry your crowd is.
This method of carving between the bones ensures you have perfectly intact, beautiful slices ready to serve, giving you that “restaurant-quality” centerpiece look without any fuss.
Serving Suggestions for Your Special Occasion Beef Roast
A show-stopping rib roast demands equally impressive partners on the plate. You’ve handled the main event with precision; now we need sides that absorb those amazing juices and complement that rich, beefy flavor without fighting it. When I plan for a big meal—you know, the kind that screams “Holiday Main Course Centerpiece”—I focus on balancing richness with something bright or creamy. We’re aiming for that classic, heartwarming feel you expect from the best Christmas Roast Dinner Ideas.
The beauty of a perfectly cooked prime rib is that it basically goes with everything, but here are the pairings I always default to because they’re simple to execute, and they definitely work.
First up, you absolutely cannot go wrong with potatoes. I’m talking creamy, fluffy, delicious potatoes. If you want to skip the tedious peeling and mashing for a regular weeknight, I get it, but for this important roast, you need to treat yourself. You must try my recipe for Garlic Parmesan Mashed Potatoes. The garlic and Parmesan add just enough sharpness to cut through the richness of the roast, making every bite balanced. Plus, they are sturdy enough to hold a nice puddle of that homemade au jus!
Next, we have to get some green on the plate, something roasted to bring out its natural sweetness. Forget boiling sad little veggies. We need texture and caramelization. My favorite go-to are simple roasted root vegetables, but I have a great guide over on Garlic Herb Roasted Veggies that works perfectly here. Toss carrots, parsnips, and maybe some Brussels sprouts with olive oil, salt, and pepper, and let them roast alongside your roast (adjusting time as needed, of course). The slight char and the roast’s drippings make them unbelievably good.
Finally, think about texture. You want one starchy, creamy component (the potatoes) and one slightly crisp, caramelized element (the roasted vegetables). If you feel like you need one more easy win, just make sure you have a sharply pickled item on the side, like a simple mignonette or some sharp Dijon mustard, just to cleanse the palate between those big, wonderful savory bites. It keeps the whole meal feeling intentional and elegant!
Storage and Reheating Instructions for Leftover rib roast
If you managed to have leftovers of this incredible rib roast—which, honestly, is a victory in itself—we need a plan to handle them responsibly. A perfectly cooked, juicy roast can easily turn into tough, dry leftovers if you just toss it in the microwave like yesterday’s pizza slice. We are applying the same planning and efficiency here to preserve that beautiful quality.
First things first: storage. You need to get that leftover roast beef tucked away correctly and fast. Once it’s completely cool, slice it, remove it from the bones, and place it in the shallowest airtight container you own. I always try to use glass containers because they don’t stain or hold onto odors the way plastic can. Keep it refrigerated, and honestly, try to eat it within three to four days maximum. This isn’t stew; it’s an exceptional cut of beef, so we want to enjoy it while it’s still premium.
Now, reheating is the tricky part. If you need warm slices for a sandwich or a quick dinner, you must go low and slow. Never try to reheat a large piece all at once in the oven; it will seize up instantly. Instead, place your thin slices into a baking dish. You need moisture assistance! Add just a tablespoon or two of water, beef broth, or even some of that leftover au jus right into the bottom of the dish—just enough to cover the bottom, not enough to swim in. Tent that dish tightly with foil. Pop it into a very low oven, around 275°F (135°C), and let it warm through gently for about 10 to 15 minutes. The foil traps the steam, effectively bathing the meat in moisture, keeping those precious juices locked in. That method is a lifesaver for maximizing the meal.
And what about those massive bones you carved the meat away from? Do *not* throw them out! Bones are the cornerstone of deep flavor. If you have a free afternoon later in the week, toss those bones into a pot, cover them with water, add some roughly chopped carrots, onions, and celery scraps, and let it simmer for eight hours. You’ll end up with incredible homemade beef stock. You can use that stock base for amazing soups, or hey, you could even use it to mix up a batch of my delicious homemade bread bowls to serve it in later! It’s efficient food management, you know?
Frequently Asked Questions About Cooking Prime Rib Roast
I love getting questions about this recipe because it shows people are planning something truly special! Cooking a huge, expensive piece of meat like this can feel intimidating, but once you understand the checkpoints, you’ll realize it’s actually one of the more straightforward roasts out there. These are the common hang-ups I hear most often when someone is trying to achieve that perfect medium rare roast.
What is the difference between a rib roast and prime rib?
This is a classic confusion point! Most people use the terms interchangeably, and honestly, in the butcher shop, they usually mean the same thing: a large cut taken from the primal rib section of the steer, ribs in or out. The technical difference comes down to grading. “Prime” is the highest quality grade the USDA gives for beef—it means the meat has incredible marbling, which equals tenderness and flavor. So, a Prime Rib Roast is technically a rib roast that has achieved the Prime grade. If you buy a “Select” grade rib roast, it’s still fantastic, but “Prime Rib” technically means it got the best score possible. For this recipe, you can use either—just know that the better the marble, the better the result!
Can I cook my rib roast from frozen?
Absolutely not! Please, please do not attempt this. This is where my project management side kicks in—we cannot properly manage the temperature variables if the meat starts frozen. If you try to slow-roast a frozen hunk of beef, the outside will be gray and overcooked by the time the center even thaws, let alone reaches 125°F. For safety and for that juicy roast beef recipe result we are aiming for, you need to thaw it completely in the refrigerator for about 3 to 4 days before you plan to season and cook it. Remember that vital rule: room temperature before cooking!
If you are looking for even more detailed advice from other experts on techniques, sometimes it helps to see how others approach high-end cuts. You might find some interesting techniques over at this resource on herb-crusted roasts.
If you end up with a smaller cut but still need an amazing side, don’t forget you can make a fantastic soup base out of the leftovers, or use the carcass bones for stock—we talked about that above. And if you are planning a full feast, be sure you check out my instructions for homemade bread bowls. They make serving dinner feel extra special!
Share Your rib roast Success
Okay, that’s my entire blueprint for turning a costly cut of meat into the most perfectly cooked, stress-free centerpiece you’ve ever made. We broke down the project, optimized the steps, and now you’ve got a beautiful, juicy rib roast cooling on the counter. I’m honestly so excited for you to try this!
When you finish carving and everyone is raving about how tender it is—and believe me, they will be raving—I want to hear all about it. Seriously! This is where the Dishicious community shines, and your feedback helps me refine these processes even more for the next person tackling a big holiday meal.
Did the high-heat sear work amazingly well for setting your herb crust? Did you manage to hold steady on that 125°F target temperature? Let me know! Drop a rating right here on the recipe card—five stars if you feel like I saved your holiday dinner, or even if you just liked the efficiency of the method. If you snap a picture of that stunning platter right before you carve into it, please share it with me! You can always reach out directly through my contact page if you have specific follow-up questions about the process.
Go ahead, take a bow. You just managed a show-stopping classic with smart, efficient planning. Happy cooking, everyone!
PrintFoolproof Oven Roasted Prime Rib with Herb Crust and Au Jus
Follow this straightforward method to prepare a tender, juicy standing rib roast with a flavorful garlic herb crust. This recipe is designed for reliable results, making it the perfect centerpiece for your next special occasion.
- Prep Time: 20 min
- Cook Time: 1 hr 45 min
- Total Time: 2 hr 45 min
- Yield: 6 servings 1x
- Category: Main Course
- Method: Oven Roasting
- Cuisine: American
- Diet: Low Fat
Ingredients
- 1 (5-7 pound) standing rib roast (prime rib), 2-3 ribs
- 3 tablespoons kosher salt
- 1 tablespoon black pepper
- 1 tablespoon dried thyme
- 1 tablespoon dried rosemary
- 6 cloves garlic, minced
- 1/2 cup unsalted butter, softened
- 1 tablespoon olive oil
- 1 cup beef broth (for au jus)
- 1/4 cup dry red wine (optional, for au jus)
Instructions
- Remove the roast from the refrigerator 2-3 hours before cooking to allow it to come to room temperature. Pat the entire surface dry with paper towels.
- Prepare the herb butter: In a small bowl, combine the softened butter, minced garlic, thyme, rosemary, salt, and pepper. Mix until fully incorporated.
- Rub the herb butter evenly over the entire surface of the rib roast.
- Preheat your oven to 450°F (232°C). Place the roast, fat side up, in a roasting pan fitted with a rack.
- Sear the roast: Cook at 450°F for 15 minutes. This sets the crust.
- Reduce the oven temperature to 325°F (163°C). Continue roasting until the internal temperature reaches your desired doneness (see temperature guide below). Use a meat thermometer inserted into the thickest part of the meat, avoiding bone.
- For medium-rare (recommended): Remove the roast when the internal temperature reads 125°F (52°C).
- Remove the roast from the oven. Tent it loosely with foil and let it rest for at least 20 minutes before carving. The temperature will rise during resting.
- Prepare the au jus: Place the roasting pan over medium heat on the stovetop. Scrape up any browned bits from the bottom of the pan. Add the beef broth and red wine (if using). Simmer for 5 minutes, stirring, until slightly reduced. Strain the liquid before serving.
- Carve the roast between the bones and serve immediately with the au jus.
Notes
- For a perfect medium-rare, aim for a final temperature of 130°F to 135°F after resting.
- If your roast is tied, remove the kitchen twine before serving.
- Use a meat thermometer; this is the most critical step for achieving a juicy roast beef recipe result.
Nutrition
- Serving Size: 6 oz cooked meat
- Calories: 450
- Sugar: 0
- Sodium: 450
- Fat: 30
- Saturated Fat: 14
- Unsaturated Fat: 16
- Trans Fat: 0
- Carbohydrates: 0
- Fiber: 0
- Protein: 42
- Cholesterol: 140